


Hosted by Rowan Baylis
How dirty should a cockpit be from WW2
troikken

Joined: December 20, 2010
KitMaker: 20 posts
AeroScale: 11 posts
Posted: Monday, December 20, 2010 - 01:23 AM UTC
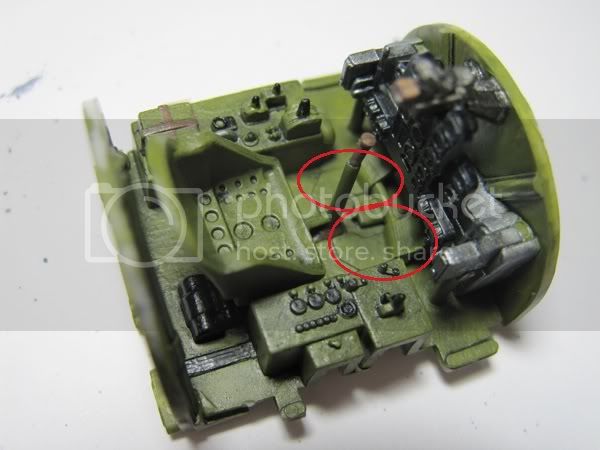
It's been a long time since I have taken on the task of building a model...last time was when I was a kid. I watched a few tutorials on youtube and read quite a few other tutorials on modeling techniques. So I purchased my first model which is a 1/48 Kawanishi N1K1 Kyofu WW2 aircraft. I'm interested in the Japanese Military in the WW2 era and it's a theme I decided to start with. So far I have put together the cockpit. So my first question is how dirty should a cockpit be from the WW2 era. I had a go at the oil washing technique but I am not sure if I should remove more or leave it as is. Any help is much appreciated.
NickZour

Joined: May 01, 2008
KitMaker: 1,437 posts
AeroScale: 1,241 posts
Posted: Monday, December 20, 2010 - 01:38 AM UTC
A drybrysh with alluminium on the ruder pedals & a general light drybrush with white oil paint will be FINE 
Cheers Nick
Cheers Nick

bdanie6

Joined: November 09, 2008
KitMaker: 615 posts
AeroScale: 459 posts

Posted: Monday, December 20, 2010 - 02:01 AM UTC
Troy, it looks really good as is, BUT, if you want to show it later in it's service life then you need to show much more wear on the floor and rudder peddles. So some dry brushing with aluminium and a wash of dark brown (dust and dirt) and some chipping on the panels and you are good.  OR just leave it as is and it looks factory fresh Less to weather on the outside that way also.
OR just leave it as is and it looks factory fresh Less to weather on the outside that way also. troikken
Joined: December 20, 2010
KitMaker: 20 posts
AeroScale: 11 posts
Posted: Monday, December 20, 2010 - 02:03 AM UTC
Quoted Text
A drybrysh with alluminium on the ruder pedals & a general light drybrush with white oil paint will be FINE
Cheers Nick
Thanks Nick. The dry brush on the rudder pedals....is that just on the little ridges...to give the effect of worn paint?
troikken
Joined: December 20, 2010
KitMaker: 20 posts
AeroScale: 11 posts
Posted: Monday, December 20, 2010 - 02:08 AM UTC
Quoted Text
Troy, it looks really good as is, BUT, if you want to show it later in it's service life then you need to show much more wear on the floor and rudder peddles. So some dry brushing with aluminium and a wash of dark brown (dust and dirt) and some chipping on the panels and you are good.
thats the effect i'm after Bruce! I have already used a wash of dark gray to highlight some of the lines. Can I use a wash over a wash? can I still give a dark brown wash in various areas?
NebLWeffah

Joined: October 13, 2004
KitMaker: 1,683 posts
AeroScale: 58 posts

Posted: Monday, December 20, 2010 - 05:46 AM UTC
Good looking cockpit! Cockpits are generally clean and not dirty but do show signs of wear over their service life, as anything does. Washes over top of washes are usually fine as long as the previous one has dried thoroughly. If your next wash is really 'wet' then it may try and lift and mix with the previous one a bit if you're using acrylic paint, especially if you don't work quickly. With oils you should be fine as long as the previous layer is absolutely dry.

Bob
Bob

NickZour
Joined: May 01, 2008
KitMaker: 1,437 posts
AeroScale: 1,241 posts
Posted: Monday, December 20, 2010 - 07:15 AM UTC
Drybrush with alluminium here
Cheers Nick
Cheers Nick

AussieReg

#007
Joined: June 09, 2009
KitMaker: 8,156 posts
AeroScale: 3,756 posts
Posted: Monday, December 20, 2010 - 08:13 AM UTC
Hi Troy, and welcome to Aeroscale. Great to see another Aussie join the fun !!
Here's a pic of a P-47 cockpit I did recently using flat aluminium for the drybrushing and a wash of burnt umber artists watercolour to put some dirt on the floor.
The trick is to start off light and add effect until you get what you want. It's easy to add a bit more, but really hard to take it off again in the cockpit !!
Cheers, Damian


warreni
Joined: August 14, 2007
KitMaker: 5,926 posts
AeroScale: 2,201 posts

Posted: Monday, December 20, 2010 - 08:34 AM UTC
Well, having working on and with military aircraft for 21 years I think I can shed some light on the subject. Basically, an aircraft can look like brand new even after being in service for 30 years, IF it has just come out of a major service.. Or an aircraft can look 100 years old if it is in the middle of an exercise operating off dusty or dirt airstrips. ANytime an aircraft goes on exercise they normally start to look pretty second-hand with dust build up in corners etc, but the instruments and panels will normally be clean as they are one of the things included in pre-flight servicings.
Cleaning aircraft is also a good way of keeping bored aircraft maintenance workers from thinking about things that might take their minds off the job at hand, so in lulls in operations aircraft tend to get cleaned more often.
Another factor is how long the aircraft tended to survive their operations in wartime. Many brand new aircraft never came back from missions so their cockpits never got a chance to get worn looking.
So as you can see you could argue that a cockpit can look spanking new, down to very second-hand depending on many factors. And of course in a wartime situation everything changes again so there is really no definitive answer as to how dirty your kits cockpit should be, or how worn looking.
Basically, however YOU want the cockpit to look is all that matters..
troikken
Joined: December 20, 2010
KitMaker: 20 posts
AeroScale: 11 posts
Posted: Monday, December 20, 2010 - 11:54 AM UTC
Quoted Text
Good looking cockpit! Cockpits are generally clean and not dirty but do show signs of wear over their service life, as anything does. Washes over top of washes are usually fine as long as the previous one has dried thoroughly. If your next wash is really 'wet' then it may try and lift and mix with the previous one a bit if you're using acrylic paint, especially if you don't work quickly. With oils you should be fine as long as the previous layer is absolutely dry.
Bob
Thanks Bob. The colours are acrylic and the wash is oil...so I'll wait for it to dry and give it another hit with raw umber.
troikken
Joined: December 20, 2010
KitMaker: 20 posts
AeroScale: 11 posts
Posted: Monday, December 20, 2010 - 11:57 AM UTC
Quoted Text
Hi Troy, and welcome to Aeroscale. Great to see another Aussie join the fun !!
The trick is to start off light and add effect until you get what you want. It's easy to add a bit more, but really hard to take it off again in the cockpit !!
Cheers, Damian
Thanks for the welcome Damian. Your cockpit looks great!! I think the general feel about my post is to get the aluminium out and start dry brushing

troikken
Joined: December 20, 2010
KitMaker: 20 posts
AeroScale: 11 posts
Posted: Monday, December 20, 2010 - 11:59 AM UTC
Quoted Text
Drybrush with alluminium here
Cheers Nick
Thanks Nick....thats where im going to start...thanks for the heads up.
troikken
Joined: December 20, 2010
KitMaker: 20 posts
AeroScale: 11 posts
Posted: Monday, December 20, 2010 - 12:12 PM UTC
Quoted Text
Well, having working on and with military aircraft for 21 years I think I can shed some light on the subject. Basically, an aircraft can look like brand new even after being in service for 30 years, IF it has just come out of a major service.. Or an aircraft can look 100 years old if it is in the middle of an exercise operating off dusty or dirt airstrips. ANytime an aircraft goes on exercise they normally start to look pretty second-hand with dust build up in corners etc, but the instruments and panels will normally be clean as they are one of the things included in pre-flight servicings.
Cleaning aircraft is also a good way of keeping bored aircraft maintenance workers from thinking about things that might take their minds off the job at hand, so in lulls in operations aircraft tend to get cleaned more often.
Another factor is how long the aircraft tended to survive their operations in wartime. Many brand new aircraft never came back from missions so their cockpits never got a chance to get worn looking.
So as you can see you could argue that a cockpit can look spanking new, down to very second-hand depending on many factors. And of course in a wartime situation everything changes again so there is really no definitive answer as to how dirty your kits cockpit should be, or how worn looking.
Basically, however YOU want the cockpit to look is all that matters..
Cheers Warren...I am looking for that in service look with the models I am going to build. I was wondering if people could shed some light on how dirty did actual WW2 planes get in the cockpits. Its a good point you make though that a plane will be worn if it survives many missions in WW2.
troikken
Joined: December 20, 2010
KitMaker: 20 posts
AeroScale: 11 posts
Posted: Monday, December 20, 2010 - 05:12 PM UTC
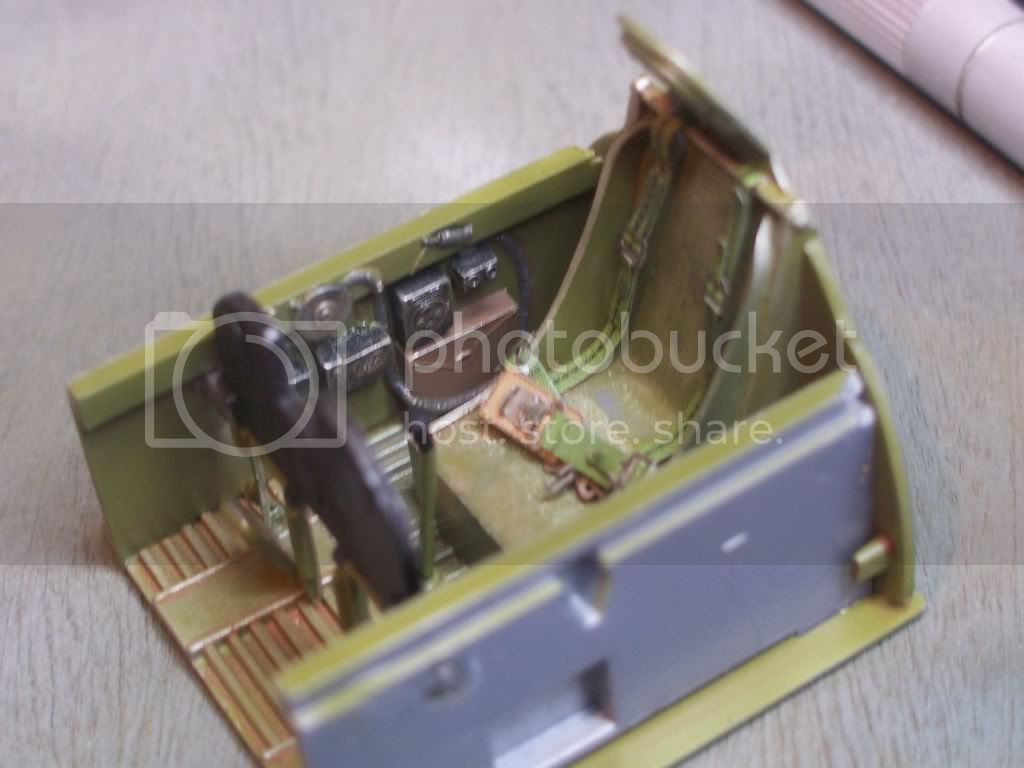
Ok...did some dry brushing to give a more worn look in the cockpit. Hopefully I didnt over do it. Does look better I reckon with the changes as suggested.

AussieReg
#007
Joined: June 09, 2009
KitMaker: 8,156 posts
AeroScale: 3,756 posts
Posted: Monday, December 20, 2010 - 05:29 PM UTC
Very nice Troy, looks great. The only thing you could do now is a light wash of brown or black to enhance the lines and put a bit of "grime" along any corners and edges.
Cheers, D
Cheers, D
warreni
Joined: August 14, 2007
KitMaker: 5,926 posts
AeroScale: 2,201 posts
Posted: Monday, December 20, 2010 - 07:03 PM UTC
Agree with Damien, Troy, but be aware of where the aircraft was operating. The colour wash you use will be determined by where it operated. A wash is a great idea as it builds up in the corners just like real dust.
Keep up the good work mate!
Keep up the good work mate!
troikken
Joined: December 20, 2010
KitMaker: 20 posts
AeroScale: 11 posts
Posted: Monday, December 20, 2010 - 07:48 PM UTC
Quoted Text
Agree with Damien, Troy, but be aware of where the aircraft was operating. The colour wash you use will be determined by where it operated. A wash is a great idea as it builds up in the corners just like real dust.
Keep up the good work mate!
Thanks Warren and Damien. The cockpit has already had a wash of dark gray and you can notice along some of the structural areas and seat pan of the cockpit the residual wash. I actually removed quite a bit of the wash as it looked just to over done to me. What do you guys think? Perhaps its not so visible from the photo I have posted.
The Kyofu being a forward operating float plane...I imagine it wouldnt have had any dusty airstrip contact. Perhaps just some light corrosion in certain areas and some general dirt from perhaps the odd dropped sushi roll and spilled green tea

ShawnM
Joined: November 24, 2008
KitMaker: 564 posts
AeroScale: 510 posts
Posted: Wednesday, December 22, 2010 - 02:57 AM UTC
another factor is what surface were they flying from?
Crushed coral is abrasive, its gonna eat paint.
Mud will cake and create dust.
Sand will dust and build in corners and abrade the paint like sand paper.
Grass wont scuff the paint but you'll get some grass staining and loose blades.
Crushed coral is abrasive, its gonna eat paint.
Mud will cake and create dust.
Sand will dust and build in corners and abrade the paint like sand paper.
Grass wont scuff the paint but you'll get some grass staining and loose blades.
troikken
Joined: December 20, 2010
KitMaker: 20 posts
AeroScale: 11 posts
Posted: Wednesday, December 22, 2010 - 06:51 PM UTC
The Kyofu was a seaplane fighter so I imagine the following wear in the cockpit:
1. Sand in general
2. Scratching from buckles on the aircrew and seat harnesses
3. Scratching from maintenance tools and hardware
4. Light corrosion
any other ideas?
1. Sand in general
2. Scratching from buckles on the aircrew and seat harnesses
3. Scratching from maintenance tools and hardware
4. Light corrosion
any other ideas?
NickZour
Joined: May 01, 2008
KitMaker: 1,437 posts
AeroScale: 1,241 posts
Posted: Wednesday, December 22, 2010 - 11:08 PM UTC
Quoted Text
The Kyofu was a seaplane fighter so I imagine the following wear in the cockpit:
1. Sand in general
2. Scratching from buckles on the aircrew and seat harnesses
3. Scratching from maintenance tools and hardware
4. Light corrosion
any other ideas?
These are just FINE Mr. Troy
Cheers Nick
 |

WEB HOSTING BY


Copyright ©2021 AeroScale and Kitmaker Network, a subsidiary of Silver Star Enterprises
All Rights Reserved. Please read our Conditions of Use and Privacy Policy.
All Rights Reserved. Please read our Conditions of Use and Privacy Policy.