

Pre-Flight Check
Constructive critique of your finished or in-progress photos.
Constructive critique of your finished or in-progress photos.
Hosted by Jim Starkweather
Trumpeter MI-24 1/35 Build

Lucky13

Joined: June 01, 2006
KitMaker: 1,707 posts
AeroScale: 1,119 posts

Posted: Monday, March 28, 2011 - 12:47 AM UTC
Outstanding work mate! Amazing!
Gundam-Mecha

Joined: August 05, 2009
KitMaker: 1,019 posts
AeroScale: 66 posts

Posted: Monday, March 28, 2011 - 12:58 AM UTC
Thanks Jan! It took a whole lot of work but I actually found it quite relaxing and therapeutic in a messed up way. There are a few small accuracy issues as folks on Russian Forums have pointed out (tough tough crowd), however I tried to match things as closely as possible from the photos and drawings I had.
One guy on the Russian site even told me there wasn't ENOUGH detail for 1/35 scale...
The fuel(?) containers at the front of the engines are slightly wrong in shape, but I can live with that. They should be smaller and more curved, mine are a too rectangular. But hey the alternative was an empty gap and big vacant hole if I left it to Trumpeter!
Gundam-Mecha
Joined: August 05, 2009
KitMaker: 1,019 posts
AeroScale: 66 posts
Posted: Monday, March 28, 2011 - 01:08 AM UTC
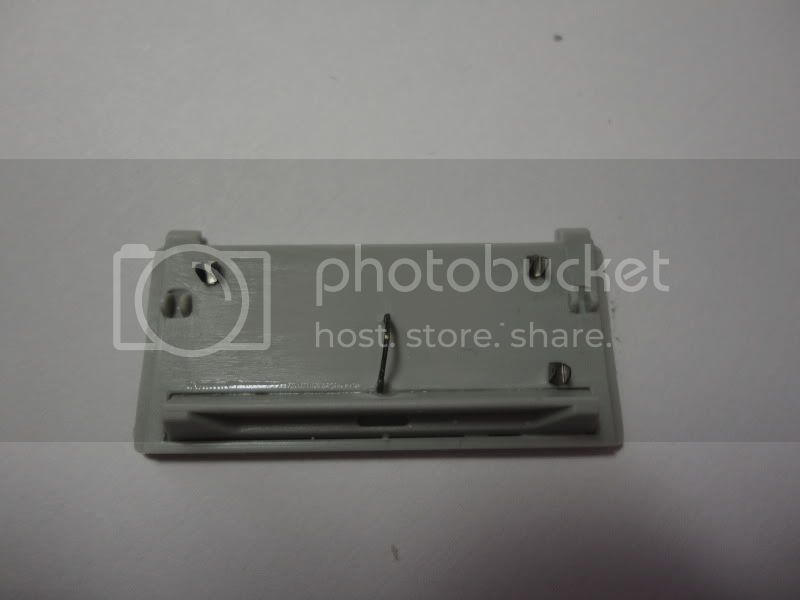
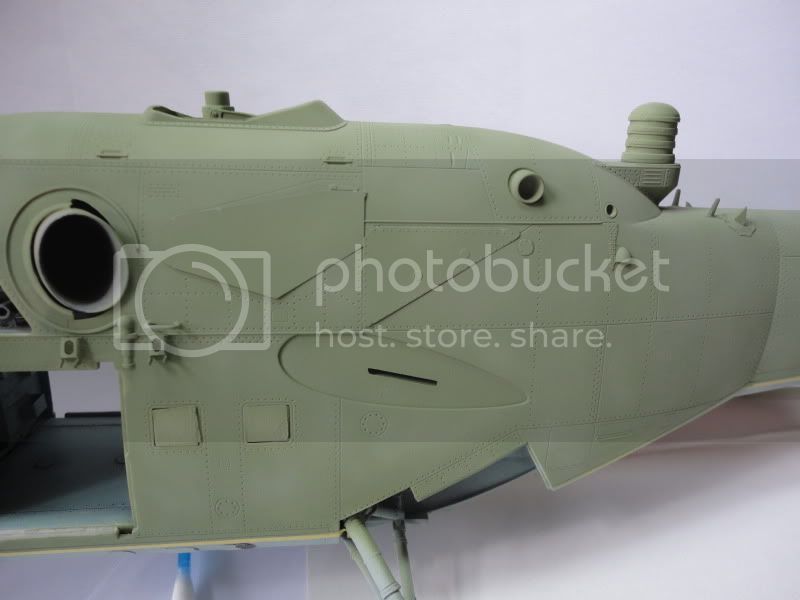
After this was done I moved onto building up the sub assemblies as per Trumpys instructions.
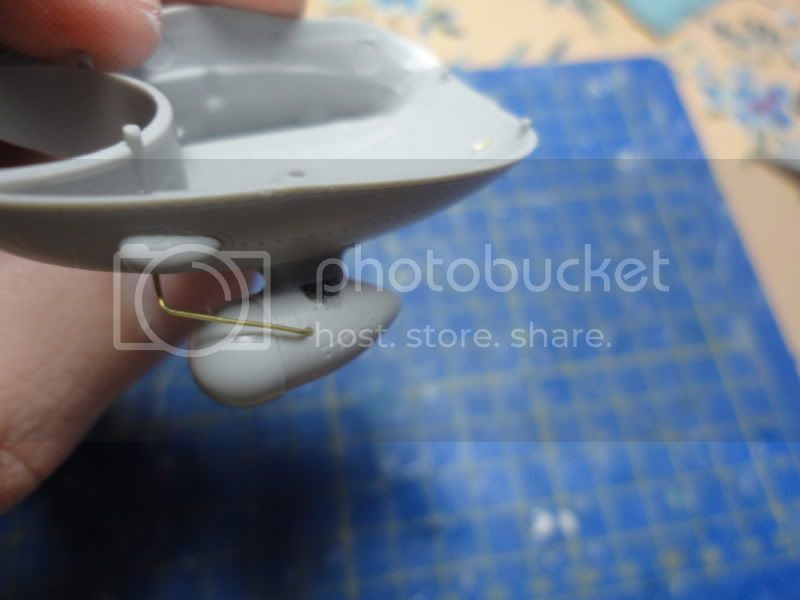
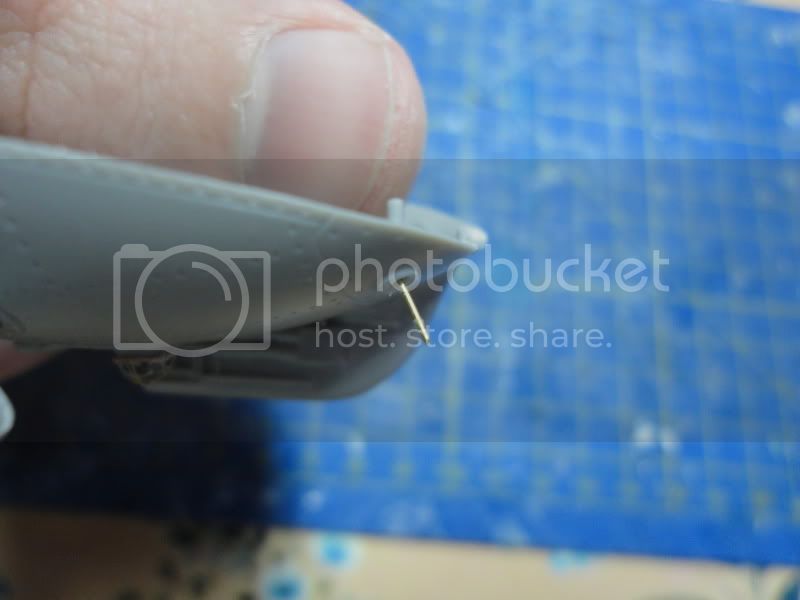
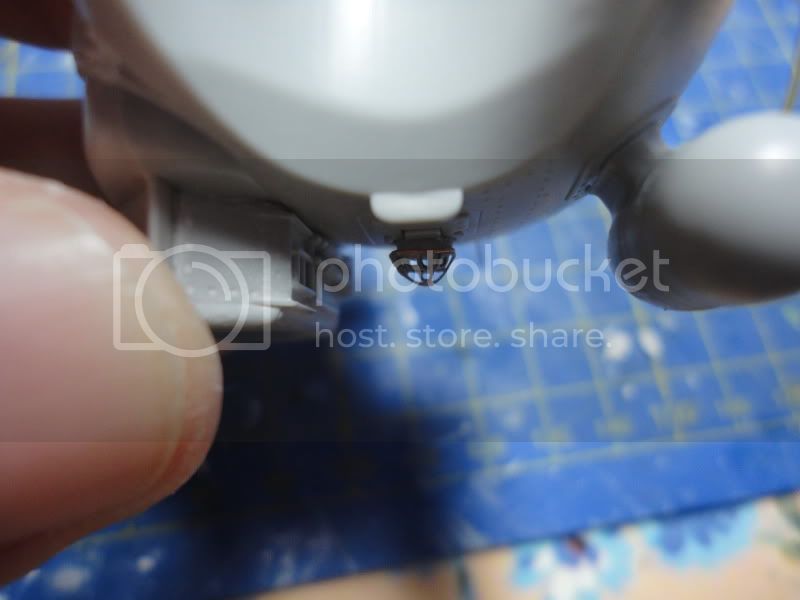
I did the nose section without any problems (a few minor fit issues aside), and detailed it up. I added some left over engine mesh from an old Tamiya T-72 to make the no slip step, added some wire, made the small sensor on the back of the compartment with a ring of plastic rod and brass wire, and also scratch built the wire cage that covers the light on the underside. That wire cage was real tricky as the part is actually very small. I'm really surprised that Eduard left this part off their exterior PE set, its a very noticeable feature on real Hind's. Maybe making a PE dome shape is too difficult or something?

The stub wings have taken a lot of time and given me no end of grief. The general fit of the wing halves themselves was okay, just a little sanding and filler required. However the pylons for the weapons load are a terrible fit, even after sanding the parts down before mating them. Numerous large gaps are left.

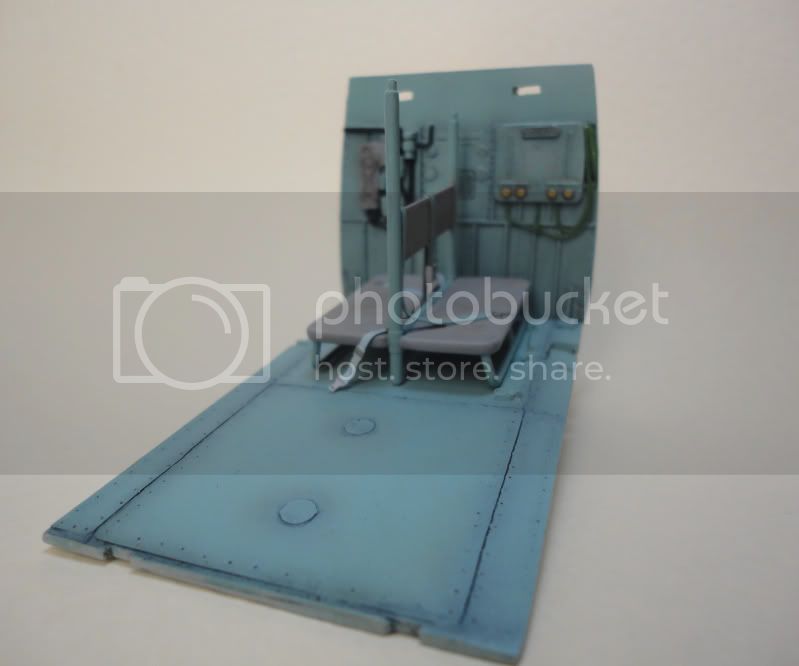
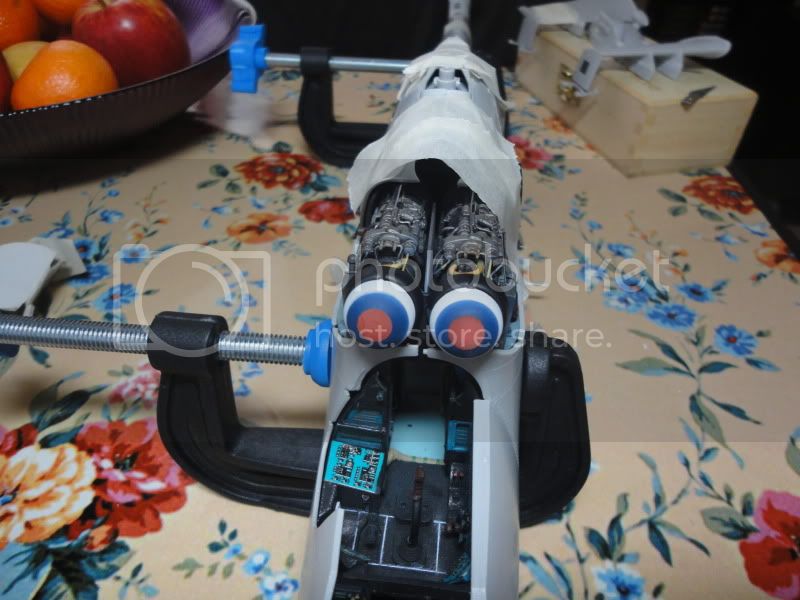
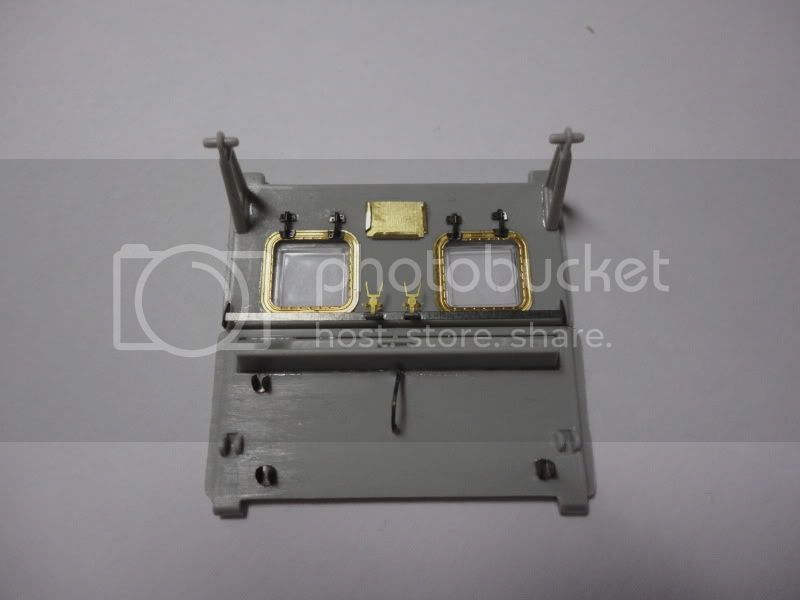
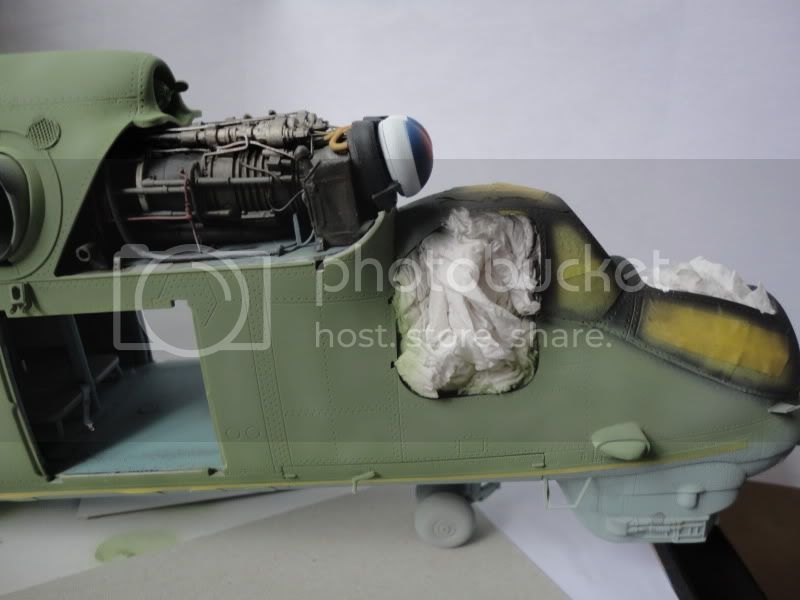
The interior of the Hind is now finished, crew cabin and cockpit! So I could finally move onto sealing up the fuselage halves and moving forward with the actual "build" part of the project.
I tried using Vallejo's varnishes on this area for the first time. The gloss then the matt. I found that they gave great results and airbrushed very nicely. Gloss, decals, oil washes, matt. It's the first time I've used both varnish coats on a project (never used gloss on tanks much).
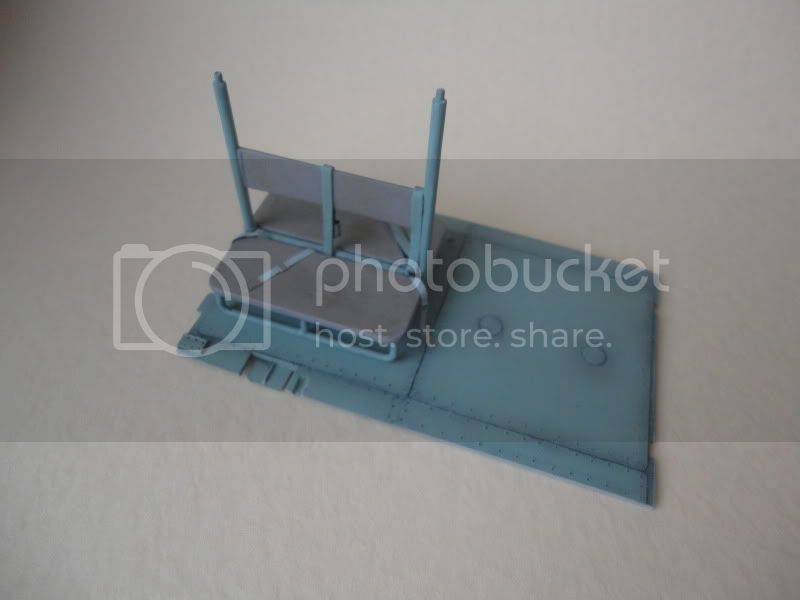
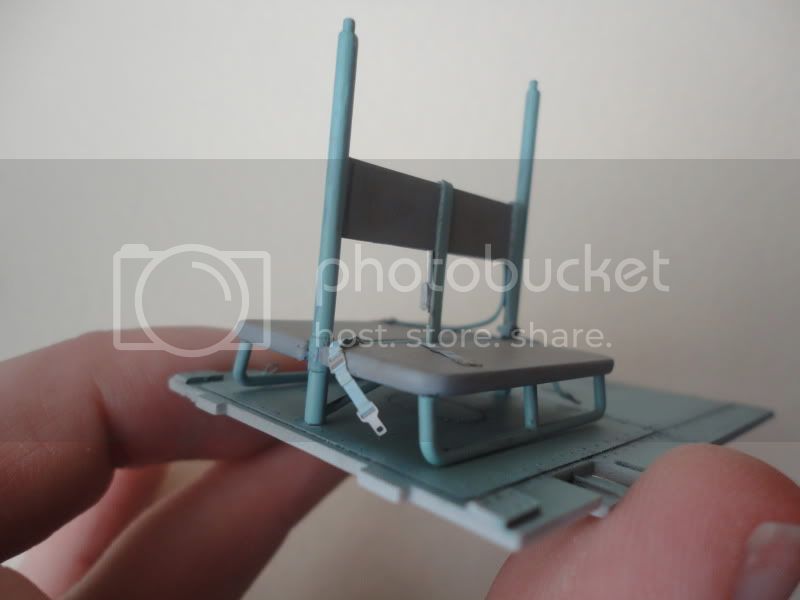
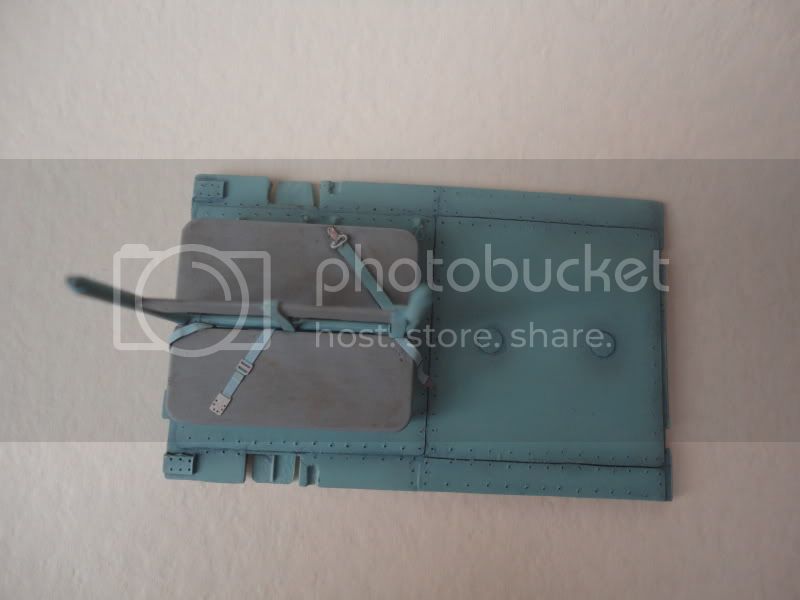
Heres the finished Crew cabin floor and crew chair/bench. In addition to the scratch built straps and belts I also added some PE belts that were left over from the Eduard Cockpit set. Weathering this area was also good fun, and the stencil decals for the rear wall were pretty tricky to apply. The added detail really brings a lot to the area though.


I did the nose section without any problems (a few minor fit issues aside), and detailed it up. I added some left over engine mesh from an old Tamiya T-72 to make the no slip step, added some wire, made the small sensor on the back of the compartment with a ring of plastic rod and brass wire, and also scratch built the wire cage that covers the light on the underside. That wire cage was real tricky as the part is actually very small. I'm really surprised that Eduard left this part off their exterior PE set, its a very noticeable feature on real Hind's. Maybe making a PE dome shape is too difficult or something?
The stub wings have taken a lot of time and given me no end of grief. The general fit of the wing halves themselves was okay, just a little sanding and filler required. However the pylons for the weapons load are a terrible fit, even after sanding the parts down before mating them. Numerous large gaps are left.
The interior of the Hind is now finished, crew cabin and cockpit! So I could finally move onto sealing up the fuselage halves and moving forward with the actual "build" part of the project.
I tried using Vallejo's varnishes on this area for the first time. The gloss then the matt. I found that they gave great results and airbrushed very nicely. Gloss, decals, oil washes, matt. It's the first time I've used both varnish coats on a project (never used gloss on tanks much).
Heres the finished Crew cabin floor and crew chair/bench. In addition to the scratch built straps and belts I also added some PE belts that were left over from the Eduard Cockpit set. Weathering this area was also good fun, and the stencil decals for the rear wall were pretty tricky to apply. The added detail really brings a lot to the area though.

DutchBird

#068

Joined: April 09, 2003
KitMaker: 1,144 posts
AeroScale: 123 posts

Posted: Wednesday, April 06, 2011 - 08:44 AM UTC
Looks very good....
I am just wondering: how did you get rid off Eduard's nickel(?) coating over the PE and get to the brass stuff?
Cheers,
Harm
I am just wondering: how did you get rid off Eduard's nickel(?) coating over the PE and get to the brass stuff?
Cheers,
Harm
Gundam-Mecha
Joined: August 05, 2009
KitMaker: 1,019 posts
AeroScale: 66 posts
Posted: Wednesday, April 06, 2011 - 11:15 AM UTC
Thanks Harm, do you mean in the unpainted crew cabin interior sections?
The Photo Etch here is Part Etching's components and they naturally have this brass colour. Eduard parts are in the dark silver colour. I mixed both PE sets and the Cobra Company Resin in the interiors.
The Photo Etch here is Part Etching's components and they naturally have this brass colour. Eduard parts are in the dark silver colour. I mixed both PE sets and the Cobra Company Resin in the interiors.
DutchBird
#068
Joined: April 09, 2003
KitMaker: 1,144 posts
AeroScale: 123 posts
Posted: Wednesday, April 06, 2011 - 11:58 AM UTC
Thanks for the reply - hadn't realized you use the Part set as well...
Cheers,
Harm
Cheers,
Harm
Gundam-Mecha
Joined: August 05, 2009
KitMaker: 1,019 posts
AeroScale: 66 posts
Posted: Wednesday, April 06, 2011 - 11:51 PM UTC
The Part set is excellent actually, much better than the crew cabin interior provided by Eduard. It takes a lot more work though.
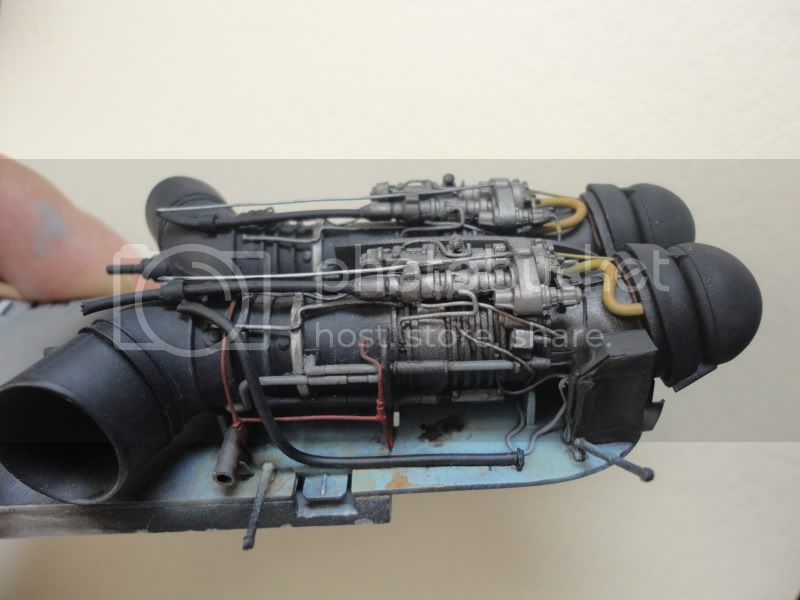
I moved onto painting the engines quite quickly.
I used Citadel's Metallic range of paint for the metal areas. Boltgun metal/ chaos black mix for the dark silver areas, and mithril silver for the lighter areas. This was airbrushed. The shades are quite subtle on the dark silvers but they shine nicely in the light when you move them around.
I thinned the Citadel Colour with Tamiya thinner, I found that they sprayed weel and gave good coverage. I know everyone raves about Alclad, but I found these metalics to do a great job. Not only can they be airbrushed, they also brush paint very well, and are water based acryllic.
The underside of the Engine bay is the crew cabin roof, so I had to paint this at the same time. This was weathered with oils.
The engines in addition to metallics were painted with oils and pigments. The stains by the engines were painted with oils, varnish, and Mig's oil and grease mixture.


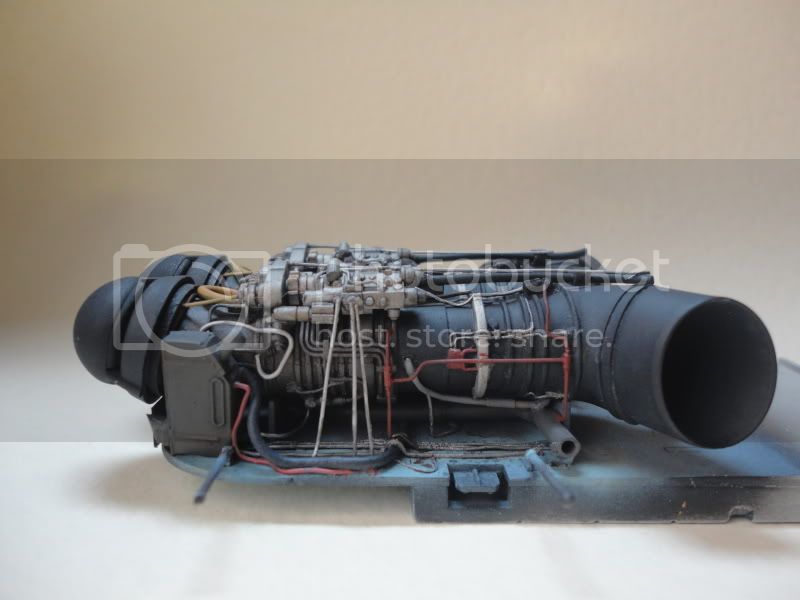

I then moved onto masking the front of the engines as the Berkut Hind's have distinctive circle patterns on this area. First up is white, next blue then the red. Happy times!


I finally finished painting the interiors totally and the engines, added all the exterior detail to the outside before putting the fuselage halves together, and finally got the damn thing together! This was no mean feat, and took a great deal of time, patience, and more dry fits than I care to remember.
First up heres the finished wall of the Troop cabin. Interestingly Linden Hill didn't include any decals for the distinctive markings in this area, so I drew them on with a fine graphic marker.


Wheel bays, these are a little bare on detail and actually while Trumpy got it mostly right they really arent all that accurate. However replicating the mountings and accurate suspension and hydraulics for the landing gears would be impossible as it really is a very complex area. Also most of this is hidden under the large bay doors. So I decided to just detail it up a bit from the noticeable areas, a few lines and some plumbing and extra detail to the floors and walls with fine plastic strip was enough for me. I also added Scale Aircraft Conversions replacement metal legs. These look great and also add important strength as the Hind really is quite heavy.
Considering the issues with the wheel bays I'm suprised the aftermarket boys havent made some resin replacement sets.


I also used the Eduard PE details for the nose wheel bay, it looks nice when in but I realised after I had glued it all that Eduards instruction sheet is wrong. They have you attach them the wrong way round. After looking at some close ups of this area I noticed that they should be the other way round with the sloping pointed areas by the landing gear strut. Too late to change it now though that it was glued and cured! I had planned to detail this area up a lot, however this error made most of that pointless, so I just added a little extra plumbing after this photo. It added a little more detail and this area will hardly be seen. In hindsight I should have checked the closeup photos first, and always assume Eduard are testing me!

Next problem... The rear wheel bays... After glueing them into place I realised that they made fitting the resin crew cabin parts VERY difficult. Lot's and lot's of sanding and swearing followed. Till eventually I could fit them in. The Euphoria of dry fit crew cabin above was short lived.
Fitting the damn thing together... I can say that this was a very nerve wracking, time consuming, and very stressful. Ironic for a hobby thats supposed to be enjoyable and relaxing. The amount of complex parts and sub assemblies that had to all go together so that the fuselage halves can join together were immense. There was a lot of creaking, flexing of plastic, PE, and Resin, and many nasty snapping sounds. These turned out to be good snapping sounds of things clicking together. I seriously thought though that the whole thing was going to just snap apart in a million pieces!
I also had to finish the Engine area totally before putting it in, and that meant painting an area I had been putting off. The large circular dome covers over the front of the engines. The Berkuts Team had the kindness of painting these with two circular masks to make a target like paint job (see below):

Quite how I was going to replicate this well I really wasnt sure... I couldnt make a simple mask in tamiya tape as the area was curved, so I had to make perfect circle masks somehow that could go around the curved parts and still give a perfect circle.
I moved onto painting the engines quite quickly.
I used Citadel's Metallic range of paint for the metal areas. Boltgun metal/ chaos black mix for the dark silver areas, and mithril silver for the lighter areas. This was airbrushed. The shades are quite subtle on the dark silvers but they shine nicely in the light when you move them around.
I thinned the Citadel Colour with Tamiya thinner, I found that they sprayed weel and gave good coverage. I know everyone raves about Alclad, but I found these metalics to do a great job. Not only can they be airbrushed, they also brush paint very well, and are water based acryllic.
The underside of the Engine bay is the crew cabin roof, so I had to paint this at the same time. This was weathered with oils.
The engines in addition to metallics were painted with oils and pigments. The stains by the engines were painted with oils, varnish, and Mig's oil and grease mixture.
I then moved onto masking the front of the engines as the Berkut Hind's have distinctive circle patterns on this area. First up is white, next blue then the red. Happy times!
I finally finished painting the interiors totally and the engines, added all the exterior detail to the outside before putting the fuselage halves together, and finally got the damn thing together! This was no mean feat, and took a great deal of time, patience, and more dry fits than I care to remember.
First up heres the finished wall of the Troop cabin. Interestingly Linden Hill didn't include any decals for the distinctive markings in this area, so I drew them on with a fine graphic marker.
Wheel bays, these are a little bare on detail and actually while Trumpy got it mostly right they really arent all that accurate. However replicating the mountings and accurate suspension and hydraulics for the landing gears would be impossible as it really is a very complex area. Also most of this is hidden under the large bay doors. So I decided to just detail it up a bit from the noticeable areas, a few lines and some plumbing and extra detail to the floors and walls with fine plastic strip was enough for me. I also added Scale Aircraft Conversions replacement metal legs. These look great and also add important strength as the Hind really is quite heavy.
Considering the issues with the wheel bays I'm suprised the aftermarket boys havent made some resin replacement sets.
I also used the Eduard PE details for the nose wheel bay, it looks nice when in but I realised after I had glued it all that Eduards instruction sheet is wrong. They have you attach them the wrong way round. After looking at some close ups of this area I noticed that they should be the other way round with the sloping pointed areas by the landing gear strut. Too late to change it now though that it was glued and cured! I had planned to detail this area up a lot, however this error made most of that pointless, so I just added a little extra plumbing after this photo. It added a little more detail and this area will hardly be seen. In hindsight I should have checked the closeup photos first, and always assume Eduard are testing me!
Next problem... The rear wheel bays... After glueing them into place I realised that they made fitting the resin crew cabin parts VERY difficult. Lot's and lot's of sanding and swearing followed. Till eventually I could fit them in. The Euphoria of dry fit crew cabin above was short lived.
Fitting the damn thing together... I can say that this was a very nerve wracking, time consuming, and very stressful. Ironic for a hobby thats supposed to be enjoyable and relaxing. The amount of complex parts and sub assemblies that had to all go together so that the fuselage halves can join together were immense. There was a lot of creaking, flexing of plastic, PE, and Resin, and many nasty snapping sounds. These turned out to be good snapping sounds of things clicking together. I seriously thought though that the whole thing was going to just snap apart in a million pieces!
I also had to finish the Engine area totally before putting it in, and that meant painting an area I had been putting off. The large circular dome covers over the front of the engines. The Berkuts Team had the kindness of painting these with two circular masks to make a target like paint job (see below):
Quite how I was going to replicate this well I really wasnt sure... I couldnt make a simple mask in tamiya tape as the area was curved, so I had to make perfect circle masks somehow that could go around the curved parts and still give a perfect circle.
Gundam-Mecha
Joined: August 05, 2009
KitMaker: 1,019 posts
AeroScale: 66 posts
Posted: Wednesday, April 06, 2011 - 11:56 PM UTC
I thought on this long and hard. In the end I used a bit of plastic tube for the blue circle, and a small circle stamped out of a bit of plastic for the small red circle.
Here's the end result:

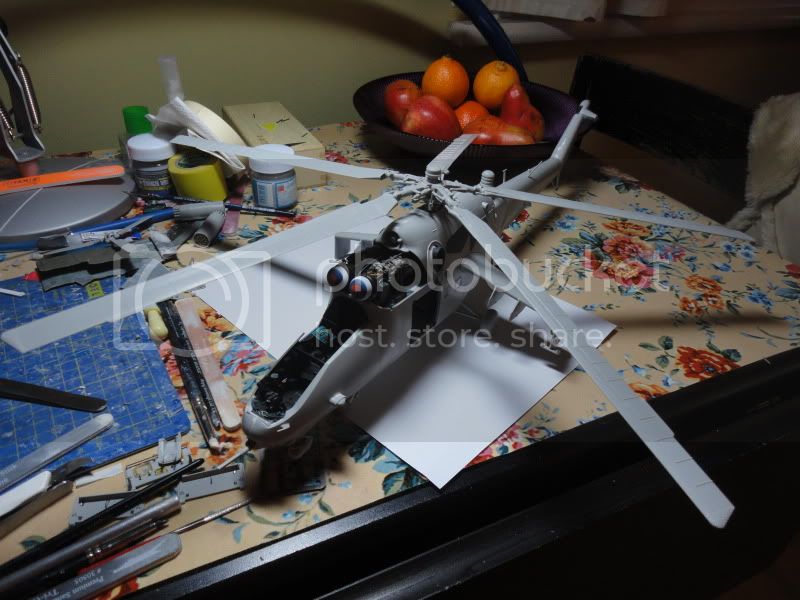
After many hours I was finally there! My Hind starts to look like an actual Helicopter:

Left overnight I unwrapped the Hind the next day like an archeologist unwrapping a mummy!
And I found... GAPS! Plenty of them!


A lot of filling and sanding followed!


Here's the end result:
After many hours I was finally there! My Hind starts to look like an actual Helicopter:
Left overnight I unwrapped the Hind the next day like an archeologist unwrapping a mummy!
And I found... GAPS! Plenty of them!
A lot of filling and sanding followed!
FlyboyShane

Joined: April 15, 2011
KitMaker: 13 posts
AeroScale: 8 posts
Posted: Friday, April 29, 2011 - 01:36 AM UTC
Very nice build! I am very impressed with the detailing! How about some updated pix please??  Would love to see the finished product!
Would love to see the finished product!
russamotto

Joined: December 14, 2007
KitMaker: 3,389 posts
AeroScale: 375 posts

Posted: Friday, April 29, 2011 - 03:32 AM UTC
Really nice work. Your scratch work is outstanding.
Lucky13
Joined: June 01, 2006
KitMaker: 1,707 posts
AeroScale: 1,119 posts
Posted: Friday, April 29, 2011 - 12:21 PM UTC
Absolutely amazing work mate! How about an update??
Gundam-Mecha
Joined: August 05, 2009
KitMaker: 1,019 posts
AeroScale: 66 posts
Posted: Saturday, April 30, 2011 - 10:55 AM UTC
Thanks guys! I'm glad your enjoying the build. It's been great fun!
Sorry for the delay in posting, here's a monster update!
The weapons also needed a lot of filling, the rocket pods after sanding and milliput:

I didn't use much of Eduards Weapon upgrade set, but the PE screen for the rear of the rocket pods was nice:
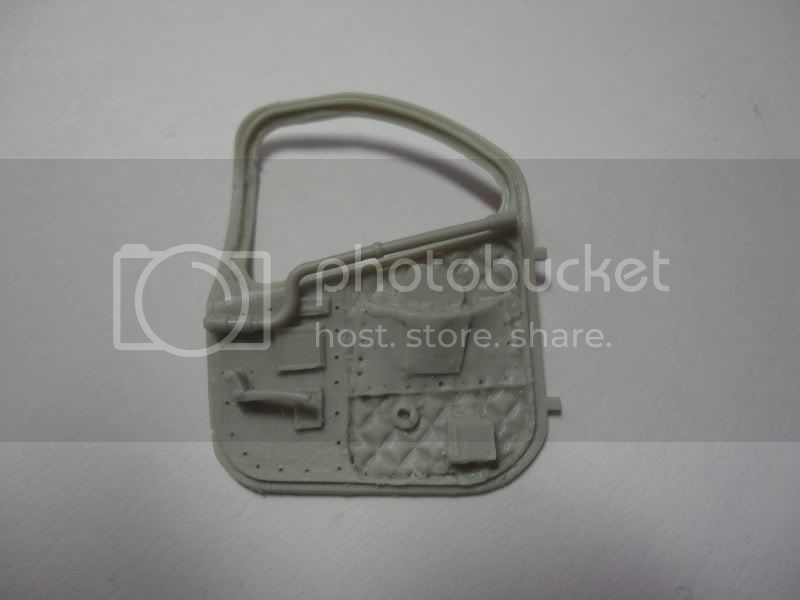
The sub assemblies after sub assemblies takes the most time I find. Here for example are the doors to the crew cabin. I detailed these up with a mixture of parts from both the Part Etchings and Eduard Sets. Without the PE these large open areas really are quite bare.
Top hatch:

Bottom Hatch:
Closed doors (they will never be seen like this sadly as both side will be positioned open)
Once blasted with Linden Hills Stencil Decals these should look quite nice!
Continuing the door theme here is Cobra Companies replacement resin door to the Pilot's cockpit:
With the general exterior construction finished I added the wheels and made the bottoms flat to show the sag when the Hind is on the Ground:


The stub wings will be left off to help painting, but heres a dry fit.


Sorry for the delay in posting, here's a monster update!
The weapons also needed a lot of filling, the rocket pods after sanding and milliput:
I didn't use much of Eduards Weapon upgrade set, but the PE screen for the rear of the rocket pods was nice:
The sub assemblies after sub assemblies takes the most time I find. Here for example are the doors to the crew cabin. I detailed these up with a mixture of parts from both the Part Etchings and Eduard Sets. Without the PE these large open areas really are quite bare.
Top hatch:
Bottom Hatch:
Closed doors (they will never be seen like this sadly as both side will be positioned open)
Once blasted with Linden Hills Stencil Decals these should look quite nice!
Continuing the door theme here is Cobra Companies replacement resin door to the Pilot's cockpit:
With the general exterior construction finished I added the wheels and made the bottoms flat to show the sag when the Hind is on the Ground:
The stub wings will be left off to help painting, but heres a dry fit.
Gundam-Mecha
Joined: August 05, 2009
KitMaker: 1,019 posts
AeroScale: 66 posts
Posted: Saturday, April 30, 2011 - 10:58 AM UTC
Here are the finished rotor blades, after extra detailing. Interestingly Trumpeter ignore the prominent and very visible cable detail on the main rotor assembly. I added this myself following reference images in my Kageroo and Verlinden books. You can also see here the Eduard detail parts at the root of the rotors:


I also detailed up the rear rotor with the extra cables:

I also detailed up the rear rotor with the extra cables:
Gundam-Mecha
Joined: August 05, 2009
KitMaker: 1,019 posts
AeroScale: 66 posts
Posted: Saturday, April 30, 2011 - 11:06 AM UTC
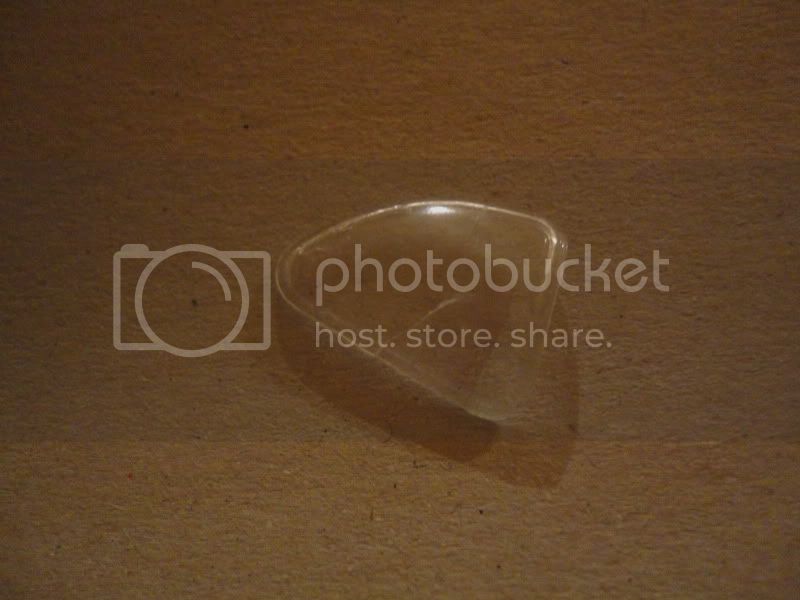
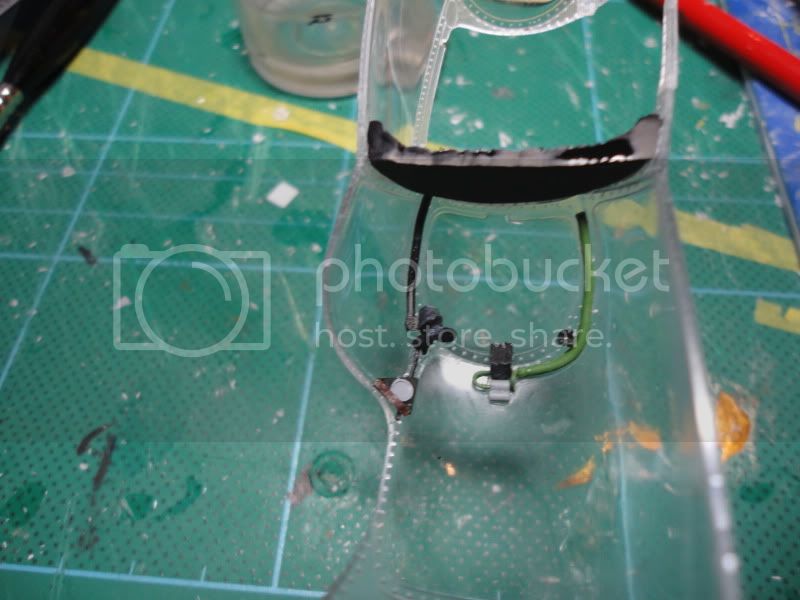
I had a bit of a problem, while polishing one of the canopy windows with micromesh the clear plastic part cracked and I now have a fine crack clean through running down the window!
Here's the offending part:
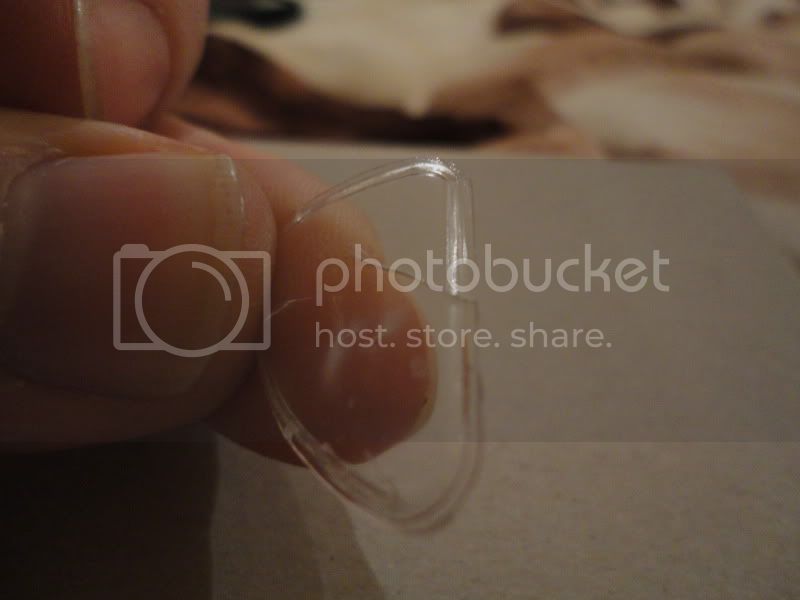
Heres the solution, made from an old Evian plastic water bottle. Clear durable plastic with a natural curvature:


The trumpy part was actually a pretty nasty fit for the resin Cobra door. So this was a case of disaster actually giving better results!
I've tended to do bits very slowly in little steps. I've also tried a lot of new techniques that I don't usually use with AFV's. Pre Shading... argh (how do people keep nice straight lines across all the panel lines? I found it extremely difficult), I've also tried my hand at high lighting, and mottling with the airbrush. Using translucent coats to get different surface effects and tones isn't something I usually do. I've always tended to use flat coats with my airbrush and do my shading, highlighting, and fading with oils or enamel washes.
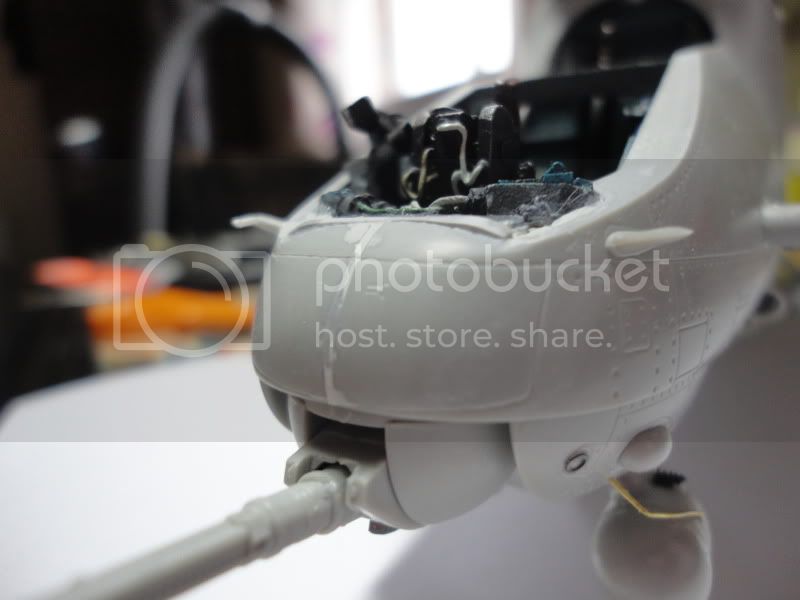
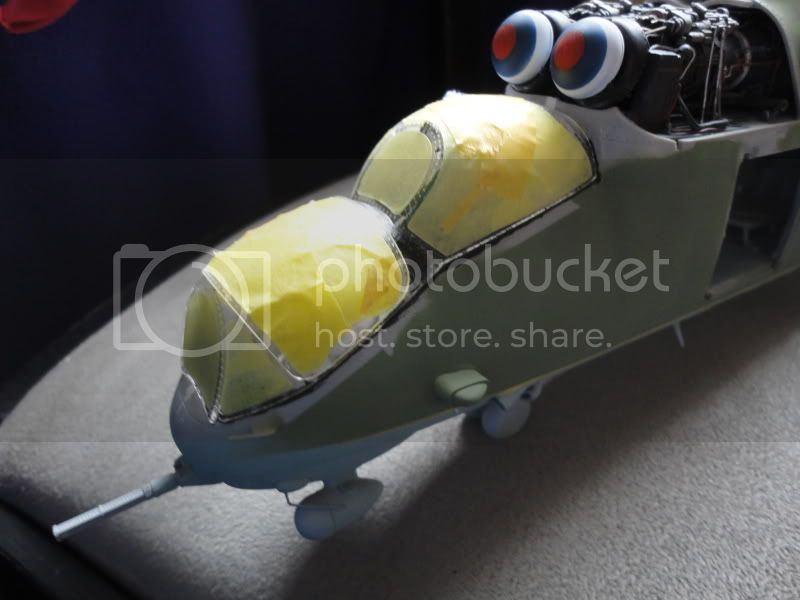
My first block was wanting to get the canopy on so I could seal everything off and start the paint work on the exterior proper. However that meant totally finishing the cockpit interior, as well as detailing up the canopy interior. Well first up here are some photos of the detail on the canopy interior (not the best as they were taken quickly so the focus is a little out). I used a mix of Eduard, Cobra, and scratch built parts to give this area some more detail.


I found the Eduard mask set for the canopy very good, however it still needed extra tamiya tape to cover the large gaps that Eduard leave. Also the WSO window is not included in the Eduard set strangely, so I had to make it myself with Tamiya tape.
Formula 560 Canopy glue is fantastic, but takes 24 hours to fully cure. Hence the delays in fast progress.

Here's the offending part:
Heres the solution, made from an old Evian plastic water bottle. Clear durable plastic with a natural curvature:
The trumpy part was actually a pretty nasty fit for the resin Cobra door. So this was a case of disaster actually giving better results!
I've tended to do bits very slowly in little steps. I've also tried a lot of new techniques that I don't usually use with AFV's. Pre Shading... argh (how do people keep nice straight lines across all the panel lines? I found it extremely difficult), I've also tried my hand at high lighting, and mottling with the airbrush. Using translucent coats to get different surface effects and tones isn't something I usually do. I've always tended to use flat coats with my airbrush and do my shading, highlighting, and fading with oils or enamel washes.
My first block was wanting to get the canopy on so I could seal everything off and start the paint work on the exterior proper. However that meant totally finishing the cockpit interior, as well as detailing up the canopy interior. Well first up here are some photos of the detail on the canopy interior (not the best as they were taken quickly so the focus is a little out). I used a mix of Eduard, Cobra, and scratch built parts to give this area some more detail.
I found the Eduard mask set for the canopy very good, however it still needed extra tamiya tape to cover the large gaps that Eduard leave. Also the WSO window is not included in the Eduard set strangely, so I had to make it myself with Tamiya tape.
Formula 560 Canopy glue is fantastic, but takes 24 hours to fully cure. Hence the delays in fast progress.
Gundam-Mecha
Joined: August 05, 2009
KitMaker: 1,019 posts
AeroScale: 66 posts
Posted: Saturday, April 30, 2011 - 11:14 AM UTC
With the Canopy was on safely and masked I could work on covering all the areas that my earlier coats missed (I was a bit uber cautious with the original masking as I was paranoid I would get paint somewhere I shouldnt).
First up I masked the underside and covered the pre shading with a light grey, I then moved onto the upper surfaces and gave it a coat of Tamiya cockpit green IJN. Which I found looks NOTHING like the colour on the jar lid:
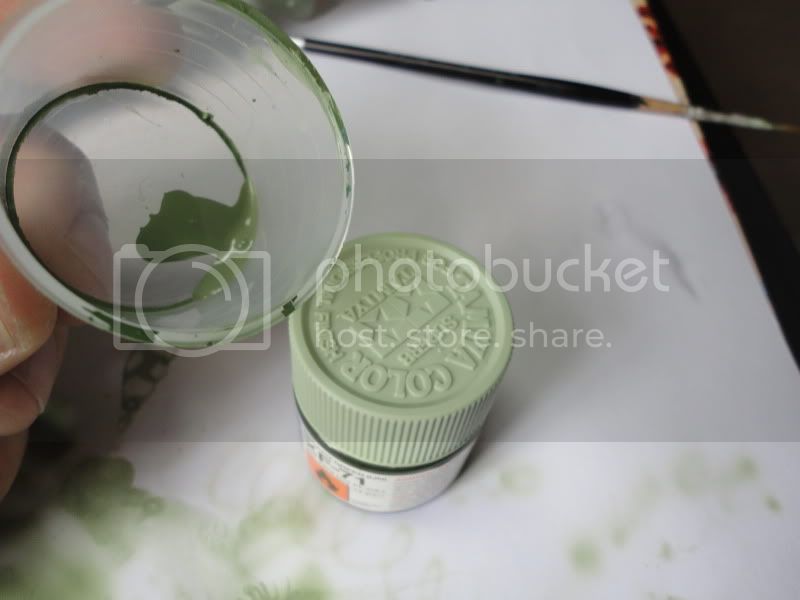
After the base coat I mixed some white into the Green and tried highlighting and mottling the surface:


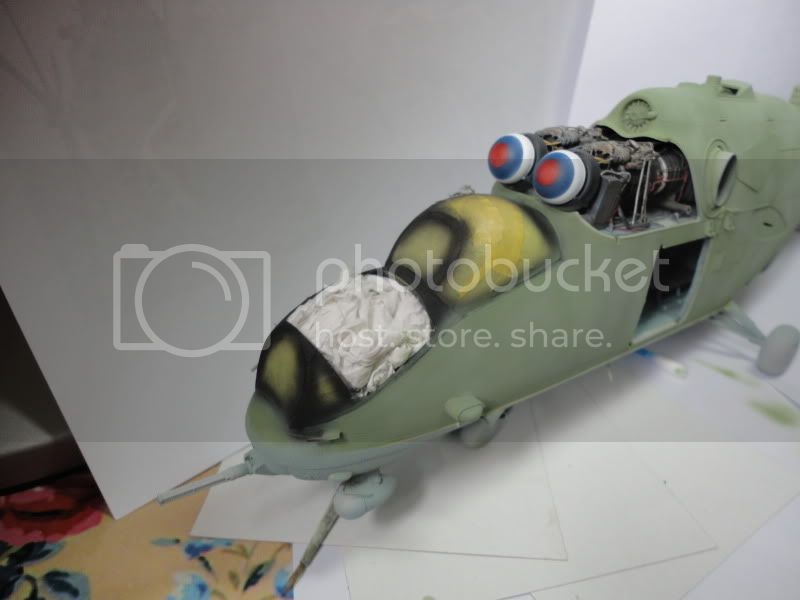
I found though that the white came out a little too harshly for my liking. So after it had dried I decided to tone it down with some more cockpit green.


First up I masked the underside and covered the pre shading with a light grey, I then moved onto the upper surfaces and gave it a coat of Tamiya cockpit green IJN. Which I found looks NOTHING like the colour on the jar lid:
After the base coat I mixed some white into the Green and tried highlighting and mottling the surface:
I found though that the white came out a little too harshly for my liking. So after it had dried I decided to tone it down with some more cockpit green.

SHarjacek

Joined: January 29, 2011
KitMaker: 977 posts
AeroScale: 263 posts

Posted: Thursday, May 26, 2011 - 04:23 AM UTC
This is awsome!
NickZour

Joined: May 01, 2008
KitMaker: 1,437 posts
AeroScale: 1,241 posts
Posted: Friday, May 27, 2011 - 06:21 AM UTC
I really enjoying watching the whole thread. Really great work Mr. Jon 
Good luck with the continue

Cheers Nick
Good luck with the continue
Cheers Nick

shopkin4
Joined: March 29, 2009
KitMaker: 1,135 posts
AeroScale: 16 posts
Posted: Wednesday, July 13, 2011 - 03:54 PM UTC
Give us some updates. I just got this kit and will be using it in a dio with a BMP-3

Macbain

Joined: January 13, 2011
KitMaker: 2 posts
AeroScale: 1 posts
Posted: Sunday, August 07, 2011 - 09:39 PM UTC
Book marked for future reference, this is an awesome build.
Keep it up!
Keep it up!

Buckeye198
Joined: May 02, 2010
KitMaker: 596 posts
AeroScale: 197 posts

Posted: Sunday, September 11, 2011 - 03:35 PM UTC
Damn, dude...just...damn...

liberator

Joined: May 15, 2004
KitMaker: 1,086 posts
AeroScale: 38 posts
Posted: Sunday, October 02, 2011 - 10:35 PM UTC
awesome step by step build..and (off topic) lovely still photos of the "fruits in the Platter"..! 


Middle_Franconian

Joined: January 02, 2011
KitMaker: 279 posts
AeroScale: 239 posts

Posted: Tuesday, December 27, 2011 - 09:26 AM UTC
Quoted Text
Book marked for future reference, this is an awesome build.
Ditto! But please give us an update!!

valholm

Joined: January 14, 2012
KitMaker: 19 posts
AeroScale: 4 posts
Posted: Friday, March 09, 2012 - 01:25 AM UTC
Yes, would like to see an update here. Building the same one and am finding your thread very helpfull
Ed
Ed


Alaska
Joined: January 22, 2015
KitMaker: 158 posts
AeroScale: 1 posts
Posted: Friday, June 12, 2015 - 07:59 PM UTC
Hello Gundam-Mecha!
Just discovered this build, Nice work, This kit is something I'm interested in building and your thread will be of great value to me and others!
That being said, I realize that this posted build ended April 30th 2011 and was wondering why you stopped showing us your great build?
Do you have pics of the final steps and completed model you could share with us??
It sure would be much appreciated Jon!!
Thanks!
Craig
SGTJKJ
#041

Joined: July 20, 2006
KitMaker: 10,069 posts
AeroScale: 3,788 posts

Posted: Wednesday, June 17, 2015 - 04:54 PM UTC
This looks awesome! The interior and engines are really benefitting from the extra details.
Jon, please do not tell us this never got finished?
Or did you just never post the finished result?
Jon, please do not tell us this never got finished?
Or did you just never post the finished result?

 |

WEB HOSTING BY


Copyright ©2021 AeroScale and Kitmaker Network, a subsidiary of Silver Star Enterprises
All Rights Reserved. Please read our Conditions of Use and Privacy Policy.
All Rights Reserved. Please read our Conditions of Use and Privacy Policy.