_GOTOBOTTOM
World War II
Discuss WWII and the era directly before and after the war from 1935-1949.
Hosted by Rowan Baylis
Howd I do That? Weathering in 1/32
ShawnM
_VISITCOMMUNITY
Missouri, United States
Joined: November 24, 2008
KitMaker: 564 posts
AeroScale: 510 posts
Posted: Tuesday, January 04, 2011 - 02:32 AM UTC
Hi everyone!
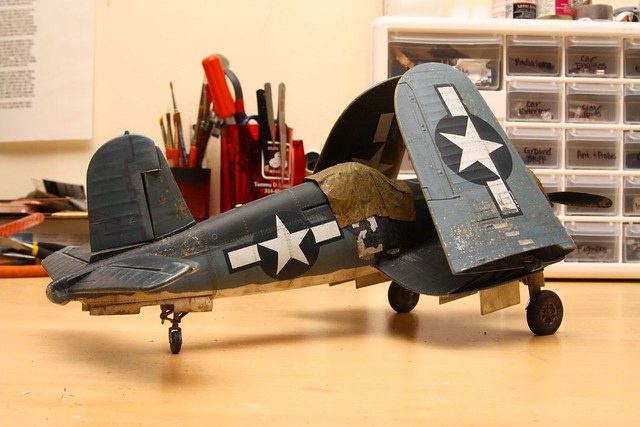
I was asked to write up a quick "how'd I do that" in regards to the finish I obtained on this build.


Use reference materials, find out where the bird was worn most, how it wore down and what colors AND materials were used.

First, I dont own or use an airbrush. This is all done with rattle cans and brushes.

The answer, is salt, scotchbrite pad and post shading using thinned tempra paint.

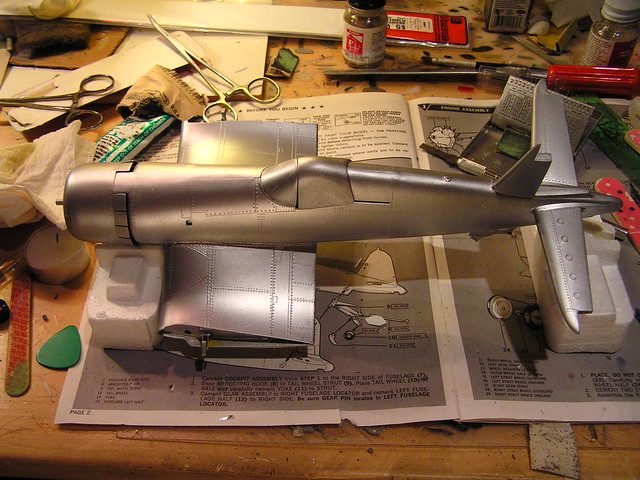
To start, build the kit assemblies:


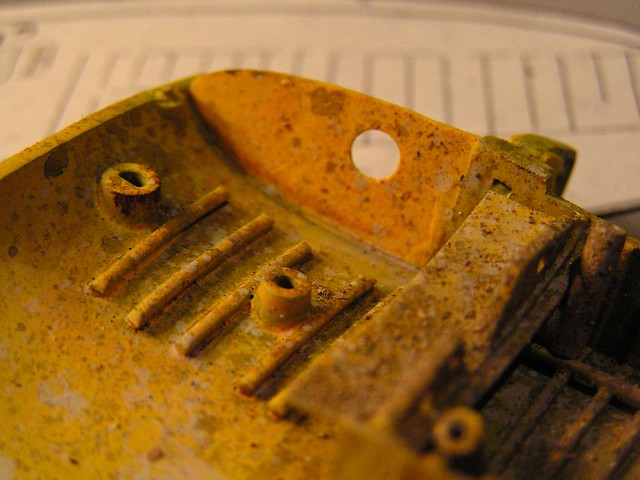
Paint your base color, by base I mean the raw material color. In this case, its aluminum.


When dry, clear coat. I use Matte coat from testors rattle cans.

Now, when thats dry we apply salt. I use water with a touch of windex to break the surface tension. Now slop some water on and sprinkle salt onto the model where you want the chipping to be.
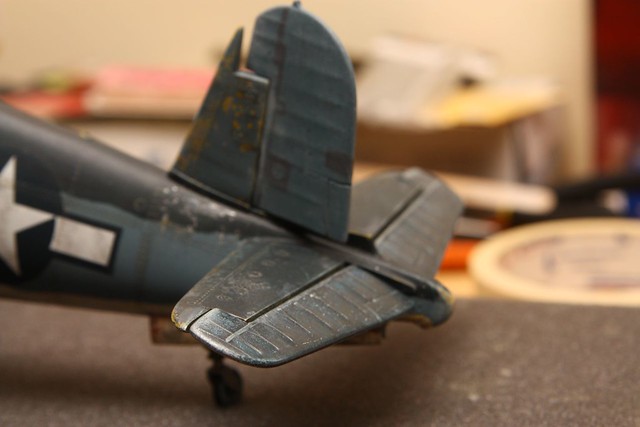
Be aware that Fabric surfaces DONT CHIP! keep it on the metal.

When the salt is dry, apply your next coat of paint; Primer. In this example it is Yellow Chrome from Tamiya (rattle can) as there is no rattle can Yellow Chromate available.


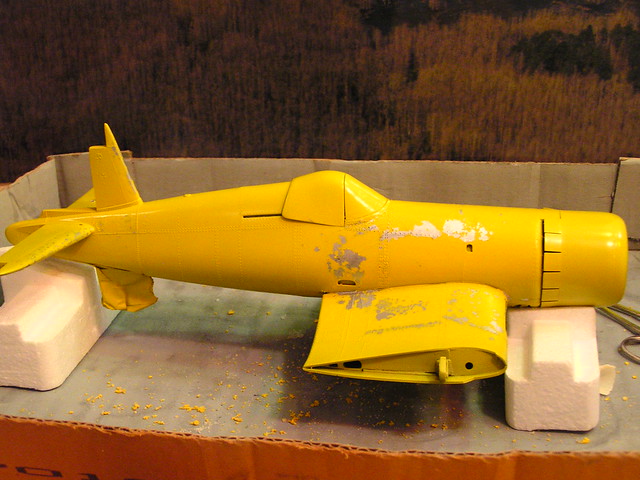
When the paint is dry, knock the salt off using an old terry cloth towel, your fingers, etc.

Now, clear coat again (you'll soon notice a theme)

Apply water and salt in desired locations, let dry.

Apply next coat of paint, when dry remove salt


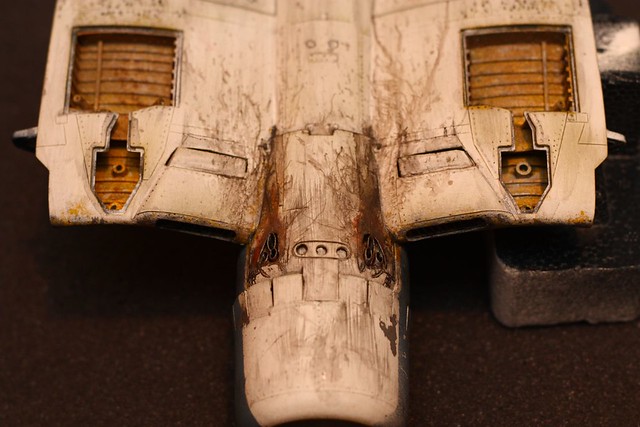
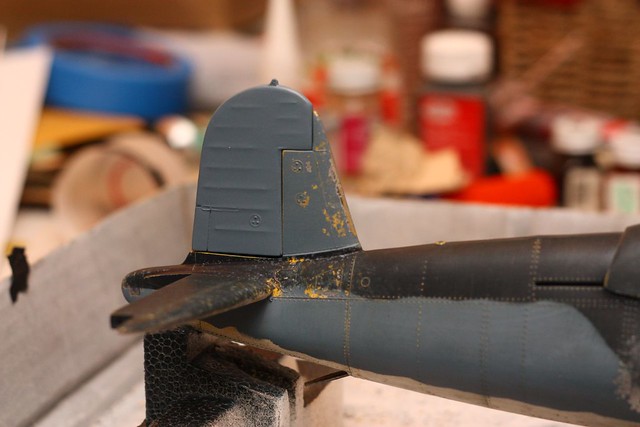
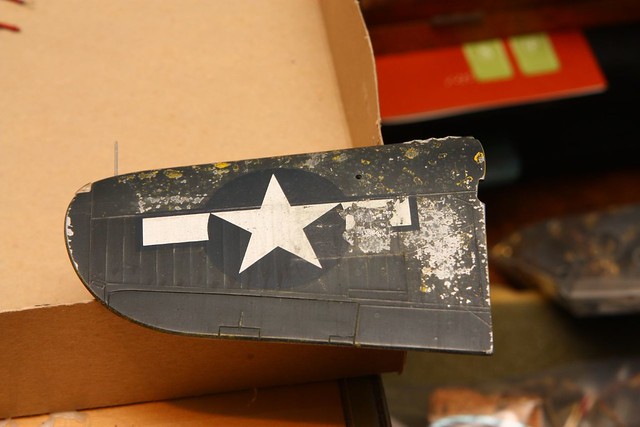
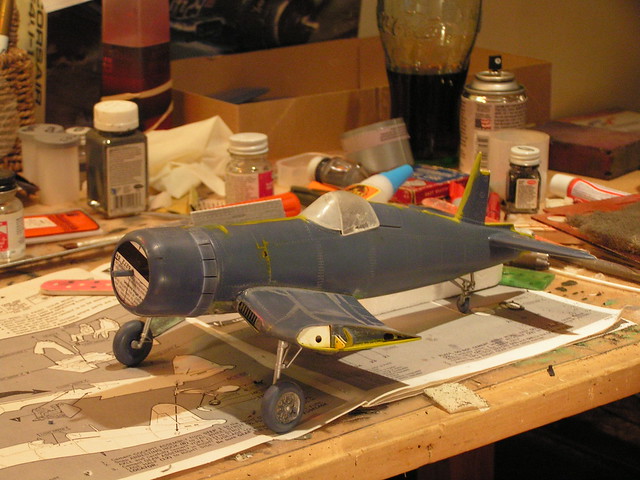
Now as you can see we have 3 colors visible. Now, go clear coat it.

AAAAAnnd one last time, apply water and salt, let dry add final color.


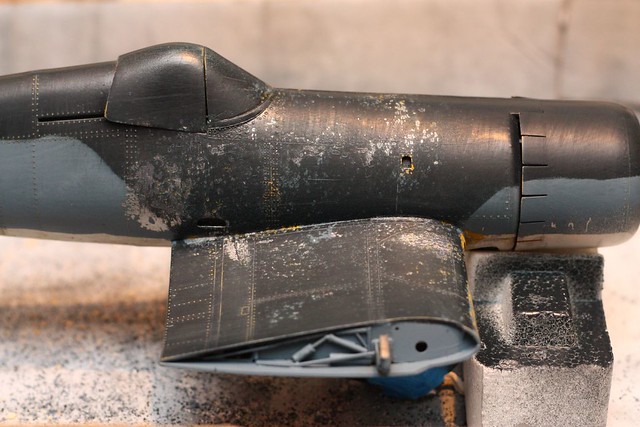
Now here is where I throw a curve ball at you.
ShawnM
_VISITCOMMUNITY
Missouri, United States
Joined: November 24, 2008
KitMaker: 564 posts
AeroScale: 510 posts
Posted: Tuesday, January 04, 2011 - 02:41 AM UTC
Next step.

Take a fine scotch brite pad, and start "sanding" the paint down. Go in the direction of airflow, from top down, swirls where crew stand, turn etc.
Make sure to hit the leading edges of the wings, tails etc.
This will blend the layers of paint and smooth the masking lines. It will also help "knock down" the pock marks made by the salt. If your kit has raised detail like this one, it will also wear the paint on the panel lines, rivets etc...this is good!

At first I freaked out over the pock marks, then I realized that paint chips in 3 dimensions, they have depth, so I learned to embrace them. Plus they hold a little wash and add depth.

I also use masking tape to help pull and chip some paint off, be careful though! It can rip up BIG patches. (see under canopy)


When you've got it about right, clear coat it!

Now, we need to dirty it up. I used thinned Black Tempra paint and painted on a wash along all the rivet lines, panel lines, etc. Also used it to streak along the fuse, cowl etc.

WARNING: Tempra (when dry) is permanent, it will stain everything. But your brushes will clean up with water if you dont let them dry.


NOTE: The fuel/oil stain on the front top of the fuse is NOT tempra. Its a thinned oil wash of testors Jet Exhaust, Matte Black and Brown.

Next up, exhaust.

Any questions so far?

ShawnM
_VISITCOMMUNITY
Missouri, United States
Joined: November 24, 2008
KitMaker: 564 posts
AeroScale: 510 posts
Posted: Tuesday, January 04, 2011 - 03:12 AM UTC
mmmm, durty


After salt chipping and painting the undersides in testors classic white (gloss) I scotchbrited the whole underside. Clear coat again.

Found some ref. pics and went to town.

Using testors rust I dry brushed some exhaust staining around the pipes and back a bit.
Then I used a #2 pencil and lined some of the more oil filled panels to bring them out.
I then made a wash of testors jet exhaust, black and brown, plus some dirty thinner and dolloped it on. Using a cocktail straw I "blew" it back in the direction of airflow. Repeat until happy.
When that was dry, i dry brushed on a little grey for some lighter staining.


The exhaust pipes were made from styrene tube stock, cut to shape, thinned out and glued in place.


I started adding depth with washes. Then painted them steel, dry brushed rust, black and a touch of aluminum.
Then filled them with matte black paint.

Next up, gear bays.
ShawnM
_VISITCOMMUNITY
Missouri, United States
Joined: November 24, 2008
KitMaker: 564 posts
AeroScale: 510 posts
Posted: Tuesday, January 04, 2011 - 03:40 AM UTC
To do the gear bays is WAY easier. Now mind you this was done to reflect an aircaft that flew from crushed, abrasive coral that ended up everywhere.

Paint the gear bays the correct color, wheather its primer, zinc chromate or whatever.


Now, I used charcoal grill ash to replicate the coral debris.

Spray on a clear coat, and while still wet sprinkle on the ash in the areas where you know it would collect. Its not going to pile up
in the front of the bay, think about airflow here.
I packed it on heavier on the rear portion of the bay, but scattered it about all over.
Clear coat when done.


To replicate oil splatter, leaks etc I just used a thinned black loaded up on a short bristle brush and "flicked" the bristles towards the gear bay, random is good here. I also did this with Floquil Railroaders Grime.


I added a wash of thinned brown to define detail and made some more splatter with it, maybe some subtle chipping with aluminum paint.


Next up, fabric surfaces
bill_c
Staff MemberCampaigns Administrator
MODEL SHIPWRIGHTS
_VISITCOMMUNITY
New Jersey, United States
Joined: January 09, 2008
KitMaker: 10,553 posts
AeroScale: 1,198 posts
Posted: Tuesday, January 04, 2011 - 05:07 AM UTC
Superb work, and very generous of you to show your technique.
ShawnM
_VISITCOMMUNITY
Missouri, United States
Joined: November 24, 2008
KitMaker: 564 posts
AeroScale: 510 posts
Posted: Tuesday, January 04, 2011 - 05:13 AM UTC
Thanks Bill, always happy to help when asked!
ShawnM
_VISITCOMMUNITY
Missouri, United States
Joined: November 24, 2008
KitMaker: 564 posts
AeroScale: 510 posts
Posted: Tuesday, January 04, 2011 - 05:33 AM UTC
ahh Fabric surfaces...you cant chip em, the color fades at a different rate then metal and they get repaired in totally different ways.

Once you've identified whats fabric you need to check your refs to see how it faded, was it lighter, darker, did the ribs stand out, etc.

I started by painting them overall white, turns out I didn't need to.

I painted my base color.


Then I went through and used white and light blue colored pencil (Berol Prismacolor since you can smear/blend them) (your colors will vary) to highlight the ribs.

After that I used my thinned tempra paint to post shade between the ribs.

Followed by a light downward dry brushing of grey and railroaders grime.

I found a great pic online that showed darker field repairs, so I hand painted them on with grey as well. That detail alone made them POP!


On the wings, I scuffed the paint up with scotchbrite to wear the paint on the ribs, then I washed between them to post shade with tempra.


NOTE: there is NO salt weathering done on the fabric here.

Same on the bottom:


There is some wash splatter I added though.

Same sort of work done on the elevators, with more scotchbrite action and grey drybrushing:


What else would you all like to see?
ShawnM
_VISITCOMMUNITY
Missouri, United States
Joined: November 24, 2008
KitMaker: 564 posts
AeroScale: 510 posts
Posted: Tuesday, January 04, 2011 - 05:39 AM UTC
One thing I did, which I dont know if it helped or not, on the elevators (only) was to make a salt solution and spray it on with a mister bottle. It dried into neat little salt clumps that I used to abrade the finish with using my finger tip.
ShawnM
_VISITCOMMUNITY
Missouri, United States
Joined: November 24, 2008
KitMaker: 564 posts
AeroScale: 510 posts
Posted: Wednesday, January 05, 2011 - 07:28 AM UTC
Lots of hits, no questions?
McIvan
_VISITCOMMUNITY
New Zealand
Joined: November 18, 2009
KitMaker: 64 posts
AeroScale: 34 posts
Posted: Wednesday, January 05, 2011 - 11:08 AM UTC
Nope, no real questions. You explained it too well!
ShawnM
_VISITCOMMUNITY
Missouri, United States
Joined: November 24, 2008
KitMaker: 564 posts
AeroScale: 510 posts
Posted: Thursday, January 06, 2011 - 01:09 AM UTC
lol, well Im glad it explains things.

Is there anything I didn't cover that anyone wants to know how I did it?
McIvan
_VISITCOMMUNITY
New Zealand
Joined: November 18, 2009
KitMaker: 64 posts
AeroScale: 34 posts
Posted: Thursday, January 06, 2011 - 01:11 PM UTC
Could you go over the tarpaulin? Looks very well done.
ShawnM
_VISITCOMMUNITY
Missouri, United States
Joined: November 24, 2008
KitMaker: 564 posts
AeroScale: 510 posts
Posted: Friday, January 07, 2011 - 01:59 AM UTC
McIvan, gladly!

After getting the model all painted up I had to tackle the tarps.

I started out by taking kitchen foil and "moulding" it to the airframe where I wanted to tarp. I made the piece of foil WAY bigger then the tarp to protect the model.
Use the foil to "sculpt" the folds and the way you want the tarp to drape.
Now mix up a jar of elmers white glue and water at a 50:50 ratio. It wont stir so you have to shake it up to mix it.

Select a piece of gift wrapping tissue, DO NOT use the recycled stuff!!! It melts in the glue water solution.

Now cut your "tarp" to the size it needs to be, I guessed and made a few to make sure it was big enough. I guess you could make them to scale if you wanted.

Immerse the tissue in the water/glue solution (i hold it with forceps) and make sure its soaked.

Then drape it over the foiled model and carefully tweak it into the shape, folds, etc you want. Careful is key here, the stuff will tear in no time.

Once happy with its drape, use an old brush and paint on more glue/water solution to unsure its all stuck down to itself.

Now walk away from it for a night.

When dry, remove the foil with the tarp on it, and GENTLY pop the tissue tarp off of the foil. Go slowly and flex the foil a bit as you go, it should literally pop of as you go.

Now you should have a pre molded to fit tarp!

I spray painted them olive drab, weathered with wash splatter to make oil stains etc.

To glue them to the finished model I used RC56 Canopy glue in small dots on the tarp itself to adhere them to the model.

Sorry I have no pics of this, my hands had glue all over them and I wont touch me SLRs with glue hands.
afern401
_VISITCOMMUNITY
Alabama, United States
Joined: October 06, 2009
KitMaker: 34 posts
AeroScale: 22 posts
Posted: Sunday, January 09, 2011 - 06:24 AM UTC
magnificent
Kornbeef
_VISITCOMMUNITY
England - South East, United Kingdom
Joined: November 06, 2005
KitMaker: 1,667 posts
AeroScale: 1,551 posts
Posted: Sunday, January 09, 2011 - 07:40 AM UTC
Very Very VERY informative, thanks

Keith.
FalkeEins
_VISITCOMMUNITY
England - South East, United Kingdom
Joined: March 07, 2005
KitMaker: 868 posts
AeroScale: 690 posts
Posted: Sunday, January 09, 2011 - 10:54 PM UTC

..must try the tarp! thanks
ShawnM
_VISITCOMMUNITY
Missouri, United States
Joined: November 24, 2008
KitMaker: 564 posts
AeroScale: 510 posts
Posted: Monday, January 10, 2011 - 01:11 AM UTC
Sure thing everyone!
I know with the tarps everyone always told me "use tissue" but no one ever said how!
 _GOTOTOP