

Hi all.
This is going to be a build log of my 48scale Revell F-15E.
I'm going to use Afterburner's mindnumbingly awesome (I mean it) Gunfighters decals sheet. No AM stuff other than that.
The specialty is going to be that I will do this step by step as closely as possible.
Some of the guys over at armorama started building wings and I like to point out some aircraft modeling tecs.
I am by no means a master modeller and I'm too you to be really seasoned.
I'm just anxious to share my way of building a plane with a finish I can live with.
So for the aircraft modeling vet this will be boring maybe.
For everyone else please tell me if this is any help at all.
Thanks for watching.
Modern (1975-today)
Discuss the modern aircraft age from 1975 thru today.
Discuss the modern aircraft age from 1975 thru today.
Hosted by Jim Starkweather
Gunfighter Galore

Rebilda

#057

Joined: May 11, 2010
KitMaker: 248 posts
AeroScale: 123 posts

Posted: Monday, January 17, 2011 - 02:52 AM UTC

Rebilda
#057
Joined: May 11, 2010
KitMaker: 248 posts
AeroScale: 123 posts
Posted: Monday, January 17, 2011 - 03:42 AM UTC
Ok. This is one evening worth of modeling:
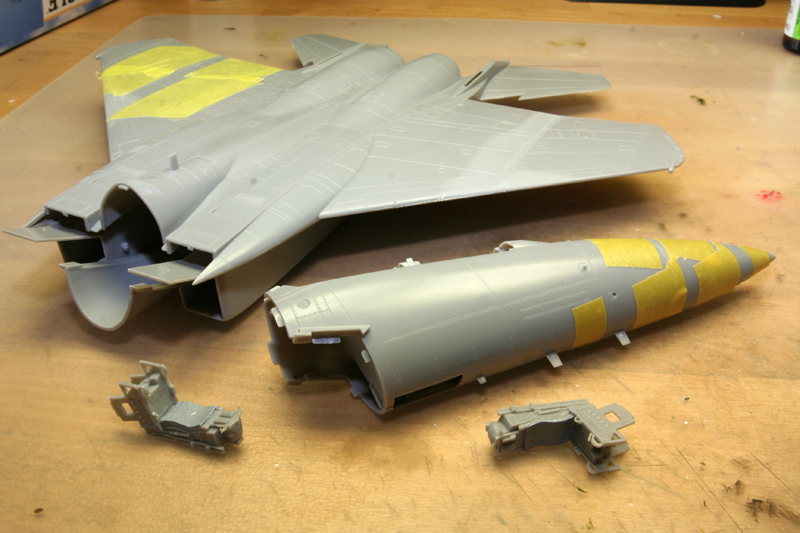
Yes, I assembled the pit and glued it into the body without painting and no it's not a problem.
Let me explain.
I like to build FAST and CLEAN.
And I tried (and still struggle to) develop a building stile to accomodate both speed and cleanliness.
With most builds I'm looking for the perfect paint job and finish (without ever achieving it I'm afraid) instead of going for every detail.
This means I'll invest hours of time in polishing a paint coat to babybottom smoothness (let alone airbrushing) but only minutes in internal structure (no wheel well workouts for me).
So for me a rudimentary cockpit as comes with the kit is sufficient and I found out that most pits are easy to paint from the outside without looking really bad.
This gives me extra drying time for the seams at least one day earlier (we'll come to why this is important).
I'll get you a close up of the pit in the end and show how this fits into my concept of doing less chores and more things I like faster.
As you see in the pic I left the main body and cockpit assembly appart. This is for easier handling while cleaning up the main seams and for a better fit of both when glued together(we'll come to THAT soon, too, I hope).
Before that there's CLEANING UP means: FILLING and SANDING. So of to the first chapter of Modeling Tecs In A Nutshell (meaning: what floats around in my mind spelled out on this here thread).

mother

Joined: January 29, 2004
KitMaker: 3,836 posts
AeroScale: 1,036 posts
Posted: Monday, January 17, 2011 - 08:07 AM UTC
So far your off to a great start and your method sounds like it works. I also like to build fast. Here's someting I do very often, while watching a movie with the wife I'll bring out a kit and cut &clean parts. For the smaller ones I'll clean what I can but leave on the sprue.
I do this from kit after kit all the while saving much time, many off the kits I've cut &cleaned were watching NASCAR races. I have a ton of kits just waiting to be finished.
Also you get bonus points with the wife by sitting with her especially if you let her pick the movie.
Happy Modeling,
Joe
I do this from kit after kit all the while saving much time, many off the kits I've cut &cleaned were watching NASCAR races. I have a ton of kits just waiting to be finished.
Also you get bonus points with the wife by sitting with her especially if you let her pick the movie.
Happy Modeling,
Joe

Rebilda
#057
Joined: May 11, 2010
KitMaker: 248 posts
AeroScale: 123 posts
Posted: Monday, January 17, 2011 - 08:11 AM UTC
Before I start down this path one word or two on a system called MHPD:
My-Highly-Prejudised-Doctrine.
All of this what I show you here works every time, guaranteed.
But just for me.
I tried most of the different ways of filling and sanding and tried everything twice.
This is what made it into my favoureds and only MAYBE it works for you, too.
If one can't get one certain technique to work it may be the simple reason that you just don't like the feel of say a certain tool required.
So, try my way and please, blame ME if it doesn't work for you.
OK.
Sanding and stuff.
This is what I need:

I'll explain later. Got to shower. Long day

My-Highly-Prejudised-Doctrine.
All of this what I show you here works every time, guaranteed.
But just for me.
I tried most of the different ways of filling and sanding and tried everything twice.
This is what made it into my favoureds and only MAYBE it works for you, too.
If one can't get one certain technique to work it may be the simple reason that you just don't like the feel of say a certain tool required.
So, try my way and please, blame ME if it doesn't work for you.
OK.
Sanding and stuff.
This is what I need:
I'll explain later. Got to shower. Long day
Rebilda
#057
Joined: May 11, 2010
KitMaker: 248 posts
AeroScale: 123 posts
Posted: Monday, January 17, 2011 - 08:16 AM UTC
''Hey Joe, what are you doing with that gun in your hand...?''
Really sorry, couldn't help my self, I just love Jimmy. Get that a lot? No, right? It's a stupid joke to make...
Thanks for watching, man. And really nice seeing you again.
By cleaning I meant the dreaded filling and sanding of the assembled kit.
But you know, I'd like to try your precleaning to. Lets you get a first feel for the kit I think?
I have my workshop and the TV-Room with recliner for my wife as one. We watch TV every evening while I'm building. One of my goals in marriage
As for bonus get this: I watched the whole sex and the city glob that way. Shame we don't get NASCAR here...
Well, now of to the tub...

Keeperofsouls2099
Joined: January 14, 2009
KitMaker: 2,798 posts
AeroScale: 2,443 posts
Posted: Monday, January 17, 2011 - 12:40 PM UTC
I will be watching how it turns out for you


vonHengest
Joined: June 29, 2010
KitMaker: 5,854 posts
AeroScale: 372 posts

Posted: Monday, January 17, 2011 - 02:40 PM UTC
Very cool Leo, I'm hoping this will help me learn how to finish builds quickly so I actually have a chance with the bajillion campaigns I've signed up for here and over on Armorama 

ppawlak1

Joined: March 14, 2006
KitMaker: 1,973 posts
AeroScale: 59 posts

Posted: Monday, January 17, 2011 - 08:01 PM UTC
Cool Leo - subscribed 
Now how about something in NMF ?
Cheers
Paul
Now how about something in NMF ?
Cheers
Paul
Rebilda
#057
Joined: May 11, 2010
KitMaker: 248 posts
AeroScale: 123 posts
Posted: Monday, January 17, 2011 - 09:31 PM UTC
Hey, guys!! How cool of you to stop by! Just tell me if it helps!
Ok. Filling and Sanding. I hated it with all my heart. Until I found the superglue technique and combined it with a few others. So, on to a grand day for MHPD.
Again the pic so you don't have to scrol:
My combat load for a cleanup mission (hehe..):
ZapAGap Superglue with kicker
Microballons
extra high quality wet and dry 600, 1000 and 1500 grit
some hard sanding sticks coarse medium and fine
some Superglue applicator
a receptacle for Superglue
toothbrush with a speck of detergent applied
airbrush loaded with a thin mix of some dark colour
kitchen towel
As to why and when and how see you in a minute. Got to go to the OR...
Rebilda
#057
Joined: May 11, 2010
KitMaker: 248 posts
AeroScale: 123 posts
Posted: Monday, January 17, 2011 - 10:03 PM UTC
OK, that was a quick one.
Now. A few words concerning my tools.
Superglue: any brand will do, as long as you find a kicker that works withit. I personally just love Zap, as it sticks like ther's no tomorrow and the corresponding kicker works magic. Just try it but careful: it's addictive. Always got some backup in stash so I never run out.
NEVER aply too thick a lyer of superglue (half a mil max!!) as when you apply kicker the reaction heat causes the glue bead to bubble in the core and you get pores when sanding it down. Really, trust me on that!!!
Microballons: this is some extremely lightweight powder (it's microscopic hollow globes as the name says). RC pilots use it to create a lightweight filler. I found mine on ebay six bucks got me a lifetime worth of powder. I prefer that mix to baking soda (which works like a kicker) as you can move it around for some time on the surface you applied it to. Use it sparingly and only for bigger holes in the depth of the cavity as it can create tiny pores on the surface which are a pest to fill. So:
Upper layers always have to be pure Superglue.
Rebilda
#057
Joined: May 11, 2010
KitMaker: 248 posts
AeroScale: 123 posts
Posted: Monday, January 17, 2011 - 10:51 PM UTC
Ok, next. I really do hope Gary's not gonna kill me for the mass of posts. But I gotta write in shifts...
Well.
Sanding paper: get a good quality and use lotzs of water. Always clean the surface dry when changing to the next higher grit - hence the kitchen towel. If you don't the finer sandpaper pics up a crumb or two of the lower grit and you'll get scratches. Plus the finer one is ruined.
I precut all my sanding paper to handy squares of 30 by 30 mil. Roughly, i mean!
Hard sanding sticks: I use a german brand that comes as really rigid files with changeable self sticking coatings. Simpler still just cut your desired shape from 3 mil plasticard or any rigid plate and stick on wet n dry with twoway tape.
Don't use sanding sponges, their too soft and will not sand edges and glue beads flush.
Superglue applicator: Simplest is steel wire (0.4 mil or other) streightened by pulling on it with two pliers and cut to the desired length. I use dental root canal instruments but they're kind of hard to come by and tricky to clean. Some people use pins.
Rebilda
#057
Joined: May 11, 2010
KitMaker: 248 posts
AeroScale: 123 posts
Posted: Tuesday, January 18, 2011 - 03:58 AM UTC
Superglue receptacle: just a tiny pot to pour in a few drops of superglue for easy access. Get something that is small and narrow and deep, like for example the cap of a pen or a plastic tube sealed off on one end. Has to be narrow and deep so the drop of superglue has a lot of mass/volume but a small surface connecting to air. keeps it from drying (sometimes almost a few hours) and provides acces to small quantities.
toothbrush with detergent: any toothbrush will but i found the cheap flat ones (as opposed to the wavy multicolour I-Kill-All-Germs model) work best. Apply a hint of washing detergent and keep it handy. When faced with a panel line thats full to the brim with sanding sludge just dip the toothbrush in water and rub clean. Afterwards just wipe off the sludge and bubbles.
airbrush: well, yeah, I sometimes have it ready when I really have to be shure (backbone seams of Hasegawa F4 say).
I sand, apply a THIN coat of paint, check for flaws, fill again, sand....you get the picture. Prevents the situation when your ready for the beatiful gloss grey basecoat and a nasty seam rears its ugly head.
OK. We're set. Off to the first seam.

You can see I protected the surroundings with painters tape (something like Tamiya tape on steroids). Believe me a lot of times I just crack and leave it off just merrily sanding without protection(now there are no parallels intended and shame on all of you who thought about any ).
I regret it every time. Leaving off the tape I mean. So up to you but as i said...
First I lightly sand over the seam to see where there's some filling needed. For this usually a 1000grit is best. Makes for less deep scratches.
And there it is ........our first ugly spot.......
To be continued. Need to take a few pics.
Thanks for watching.
toothbrush with detergent: any toothbrush will but i found the cheap flat ones (as opposed to the wavy multicolour I-Kill-All-Germs model) work best. Apply a hint of washing detergent and keep it handy. When faced with a panel line thats full to the brim with sanding sludge just dip the toothbrush in water and rub clean. Afterwards just wipe off the sludge and bubbles.
airbrush: well, yeah, I sometimes have it ready when I really have to be shure (backbone seams of Hasegawa F4 say).
I sand, apply a THIN coat of paint, check for flaws, fill again, sand....you get the picture. Prevents the situation when your ready for the beatiful gloss grey basecoat and a nasty seam rears its ugly head.
OK. We're set. Off to the first seam.
You can see I protected the surroundings with painters tape (something like Tamiya tape on steroids). Believe me a lot of times I just crack and leave it off just merrily sanding without protection(now there are no parallels intended and shame on all of you who thought about any
). I regret it every time. Leaving off the tape I mean. So up to you but as i said...
First I lightly sand over the seam to see where there's some filling needed. For this usually a 1000grit is best. Makes for less deep scratches.
And there it is ........our first ugly spot.......
To be continued. Need to take a few pics.
Thanks for watching.
Rebilda
#057
Joined: May 11, 2010
KitMaker: 248 posts
AeroScale: 123 posts
Posted: Friday, January 21, 2011 - 07:01 AM UTC
Hi all.
Now some in action photos so that this is going get interesting finally. Just tell me when it gets too boring...
First ugly spot:

You'll notice this is the spine of the nose cone with the IFF pannels. So the most obvious seam on the whole thing. This is just after sanding a little to see where the halves line up and where to fill.
Next is gouging out the weak spots where the sprues attached:

I do this so that there won't be any nasty surprises when sanding and polishing. Some kits have channels from shrinking at the attachment points, some don't. You'll know when to fill them and when not.
Next a little superglue in the depth of the cavity:

It's hard to see but that's the point: fill holes up layer by thin layer so there won't be any bubbles after kicker application. Set eacu layer with kicker before applying the next.
This is the last layer:

There's no kicker applied yet for reasons of presentation.
Okeydokey, there you go, filled and levelled:

Now I'l check on what I did or did not achieve. Airbrush on stage please:

If you look cloesly there's only one tiny blemish but some primer will take care of that in the end.
Now restoring panel lines as this is easier to do with the black:

You'll notice i slipped here and there but with the lightest of pressures so it will probably sand out. In that magnification it looks horrible and too wide but in real life it's OK.
I'm no authority on scribing. I use a customized dental currette with titanium handle (because it's light, all the help you can get, guys...), but belive me, a BareMetal Scriber, Tamiya scriber or the new Trumpeter tool will do!!
Now some will say: whats the fuzz about all this.
Well:
All this -
- including fotographing with a bulky macrolens and tripod, tinkering about how to present this (shooting lots of unusable pics), knocking over all my stuff and sorting it out again, setting up my airbrush and cleaning it, watching The Rock in between and generally taking it easy -
- took me 10 minutes....
Beat that....
Now some in action photos so that this is going get interesting finally. Just tell me when it gets too boring...
First ugly spot:
You'll notice this is the spine of the nose cone with the IFF pannels. So the most obvious seam on the whole thing. This is just after sanding a little to see where the halves line up and where to fill.
Next is gouging out the weak spots where the sprues attached:
I do this so that there won't be any nasty surprises when sanding and polishing. Some kits have channels from shrinking at the attachment points, some don't. You'll know when to fill them and when not.
Next a little superglue in the depth of the cavity:
It's hard to see but that's the point: fill holes up layer by thin layer so there won't be any bubbles after kicker application. Set eacu layer with kicker before applying the next.
This is the last layer:
There's no kicker applied yet for reasons of presentation.
Okeydokey, there you go, filled and levelled:
Now I'l check on what I did or did not achieve. Airbrush on stage please:
If you look cloesly there's only one tiny blemish but some primer will take care of that in the end.
Now restoring panel lines as this is easier to do with the black:
You'll notice i slipped here and there but with the lightest of pressures so it will probably sand out. In that magnification it looks horrible and too wide but in real life it's OK.
I'm no authority on scribing. I use a customized dental currette with titanium handle (because it's light, all the help you can get, guys...), but belive me, a BareMetal Scriber, Tamiya scriber or the new Trumpeter tool will do!!
Now some will say: whats the fuzz about all this.
Well:
All this -
- including fotographing with a bulky macrolens and tripod, tinkering about how to present this (shooting lots of unusable pics), knocking over all my stuff and sorting it out again, setting up my airbrush and cleaning it, watching The Rock in between and generally taking it easy -
- took me 10 minutes....
Beat that....

Middle_Franconian
Joined: January 02, 2011
KitMaker: 279 posts
AeroScale: 239 posts

Posted: Saturday, January 22, 2011 - 12:00 PM UTC
Very nice. I like the step-by-step approach of this article. Where do you get the Zap-Superglue and the kicker?

VonCuda
Joined: November 28, 2005
KitMaker: 2,216 posts
AeroScale: 1,080 posts
Posted: Saturday, January 22, 2011 - 03:11 PM UTC
Leo, this is a great "how-to" you're blogging. Until I saw the pic's of you using CA and kicker I would never have thought to do it that way. I usually putty, sand, putty, sand and paint.
Very informative stuff. Carry on!
Hermon
Very informative stuff. Carry on!
Hermon

Rebilda
#057
Joined: May 11, 2010
KitMaker: 248 posts
AeroScale: 123 posts
Posted: Monday, January 24, 2011 - 03:04 AM UTC
Quoted Text
Very nice. I like the step-by-step approach of this article. Where do you get the Zap-Superglue and the kicker?
Hey man! Nice to hear of you!
I get this stuff at GROMOTEC (.de, I think?). It's an RC-Guy.
Outside of Germany it's Hannants, Cammets, Spruebrothers etc.
PM on the way btw!!
Rebilda
#057
Joined: May 11, 2010
KitMaker: 248 posts
AeroScale: 123 posts
Posted: Monday, January 24, 2011 - 03:09 AM UTC
Quoted Text
Leo, this is a great "how-to" you're blogging. Until I saw the pic's of you using CA and kicker I would never have thought to do it that way. I usually putty, sand, putty, sand and paint.
Very informative stuff. Carry on!
Hermon
Thanks, man! Really hope somebody learns something from my mistakes. Well I used Squadron green putty and Tamiya and the likes, too. But this is much faster, cleaner, smoother and durable. And lovely for restoring pannel lines.
I found out about this on the IPMS stockholm homepage.
Greetings
Keeperofsouls2099
Joined: January 14, 2009
KitMaker: 2,798 posts
AeroScale: 2,443 posts
Posted: Monday, January 24, 2011 - 12:44 PM UTC
Ive been using CA for quite a while to fill good stuff
vonHengest
Joined: June 29, 2010
KitMaker: 5,854 posts
AeroScale: 372 posts
Posted: Monday, January 24, 2011 - 05:12 PM UTC
This is very helpful to me Leo, keep the updates coming!
Rebilda
#057
Joined: May 11, 2010
KitMaker: 248 posts
AeroScale: 123 posts
Posted: Thursday, February 03, 2011 - 05:34 AM UTC
Hi all.
Long time no see.
Nothing much happened inbetween except cleaning up the airframe.
Forgot to say: i do use an aftermarket set, the Wolfpack OIF-Update package. Quite expensive and few parts but really really nicely done.
So, fuselage is clean enough to start sticking on details. Lesson for today is: get all the cleaning done before you start detailing the plane say with antennae and stabilizers and so on.

GPS antenna stuck on, sanded down a lot (!) and screw heads drilled.
And the panel line in front of it scribed.
On sharp edges instead of putty i use plasticard for filling:

Afterwards sand to sahpe. More rigid and sharper angles possible.
Some stuff you glue on with suzperglue (especcially resin antennae and dangly bits) there's allways the problem of straightneing out before the gklue sets. Some people use thick CA. I personally don't like that kind of CA. So I use a different approach. I drill the bases to be glued and glue in a short length of wire on one end like this:


Then you glue in the wire, straighten out the assembly and run a bead of CA ariound it.
Done.
Long time no see.
Nothing much happened inbetween except cleaning up the airframe.
Forgot to say: i do use an aftermarket set, the Wolfpack OIF-Update package. Quite expensive and few parts but really really nicely done.
So, fuselage is clean enough to start sticking on details. Lesson for today is: get all the cleaning done before you start detailing the plane say with antennae and stabilizers and so on.
GPS antenna stuck on, sanded down a lot (!) and screw heads drilled.
And the panel line in front of it scribed.
On sharp edges instead of putty i use plasticard for filling:
Afterwards sand to sahpe. More rigid and sharper angles possible.
Some stuff you glue on with suzperglue (especcially resin antennae and dangly bits) there's allways the problem of straightneing out before the gklue sets. Some people use thick CA. I personally don't like that kind of CA. So I use a different approach. I drill the bases to be glued and glue in a short length of wire on one end like this:
Then you glue in the wire, straighten out the assembly and run a bead of CA ariound it.
Done.
Rebilda
#057
Joined: May 11, 2010
KitMaker: 248 posts
AeroScale: 123 posts
Posted: Thursday, February 03, 2011 - 09:03 AM UTC
Just noticed my gibberish from before. Better take some time posting new stuff...
What I meant is:
The ECM-knob on the back end of the tail boom needs to be positioned in thre axes: right-left angle, up/down angle and rotation.
To do this while the glue sets is too much for me.
So the antenna gets a wire glued in. On the tailboom end i drilled a whole to receive the wire glued into the antenna.
Then i put just a little glue on the wire of the antenna knob and glue the wire into the tailboom.
Now the antenna knob sits on the tail boom where it should be but can still be ''bent'' in all directions.
This way it can be positioned with all the time in the world (the wire acts as some kind of hinge) and when you are happy with the way it looks you just fill the tiny gap between the antenna and it's tailboom base.
I'll take some pics tomorrow so youll know what it looks llike in the end.
A thing I noticed: I desperately need to dust my macrolens.... sorry for that.
Rebilda
#057
Joined: May 11, 2010
KitMaker: 248 posts
AeroScale: 123 posts
Posted: Monday, February 21, 2011 - 08:19 AM UTC
Hi guys. Long time no see.
Was down with the flu.
And, Paul, this will interest you: couldn't stop myself to slap together a 1:48 Trumpeter F-100C. So lots of Baremetalfinish-instructions soon!!!
Here's what I meant with running a bead of cyano around the perfectly positioned antenna and sanding it flush:

More tomorrow.
Was down with the flu.
And, Paul, this will interest you: couldn't stop myself to slap together a 1:48 Trumpeter F-100C. So lots of Baremetalfinish-instructions soon!!!
Here's what I meant with running a bead of cyano around the perfectly positioned antenna and sanding it flush:
More tomorrow.

litespeed


Joined: October 15, 2009
KitMaker: 1,976 posts
AeroScale: 1,789 posts
Posted: Monday, February 21, 2011 - 08:48 AM UTC
Great stuff Leo. Super glue is certainly a favourite filler with me also. I tend to use talcum powder instead of microballons. But I will give microballons a try. Great job with the filling. Keep up the excellent tutorial Leo.
All the best.
tim
All the best.
tim
Rebilda
#057
Joined: May 11, 2010
KitMaker: 248 posts
AeroScale: 123 posts
Posted: Tuesday, February 22, 2011 - 11:16 PM UTC
Thanks, Tim! Gotta love superglue.
Now, finally, here's a little update.
Managed to glue on and smooth in the CFTs.
To minimize damage, for ease of filling and to replicate the seals i used Tamiya putty.
So this is a classic putty tutorial.
First I mask like a madman:

And as close to the seam as possible:

in the lower right corner you see the gun port, the model's lying on it's back (just for orientation).
Now i aply putty:

Try to smear it a good way into the seam, aplly sparingly and most of all evenly.
For this I use a blunt small knife (one that dental technicians use for wax), but any blunt wide object of apropriate size will do.
Don't do too much at one time because the putty needs to be still a little soft for the next step.
Stay tuned.
Now, finally, here's a little update.
Managed to glue on and smooth in the CFTs.
To minimize damage, for ease of filling and to replicate the seals i used Tamiya putty.
So this is a classic putty tutorial.
First I mask like a madman:
And as close to the seam as possible:
in the lower right corner you see the gun port, the model's lying on it's back (just for orientation).
Now i aply putty:
Try to smear it a good way into the seam, aplly sparingly and most of all evenly.
For this I use a blunt small knife (one that dental technicians use for wax), but any blunt wide object of apropriate size will do.
Don't do too much at one time because the putty needs to be still a little soft for the next step.
Stay tuned.
Rebilda
#057
Joined: May 11, 2010
KitMaker: 248 posts
AeroScale: 123 posts
Posted: Wednesday, February 23, 2011 - 12:19 AM UTC
Now the most important step. Cleaning up.
As you might have gathered I really love adore and need superglue LOL
If and when I use a regular putty it is for their special quality: they are shapeable for quite a long time.
This reduces sanding to alomost nothing which comes in handy when moving in tight places. Just think of fuselage-to-wing-joints on a Hasegawa Phantom!!!
For this magic to work you need the right solvent for your putty and the right timing.
For instance if you were using Miliput (which i doo, too, occasionally) the solvent is water and you have at least a 15min timeframe to shape the putty.
As solvent for Tamiya putty i use pure Acetone cut with a little alkohol to take off the edge (Acetone otherwise can ''burn'' your plastic surface). Some people use Nail polish remover but I get heart rythm disorder thinking some Aloe-Vera-Nail-Feel-Good oils might leave a nice paint repelling residue on my precious model.
Anyway.
Rip off the tape as long as the putty is still a little soft, dip a Q-tip in your solvent and smooth out your seam until you are pleased with the result.
Yes, after all that blathering it's just that simple.
Looks like this then:

Any blemishes left can be smoothed out with Mr. Surfacer and Mr. Hobby blue label thinner.
To finish off just give it a light rubbing with 2000grit wet n' dry.
Nice, eh?
As you might have gathered I really love adore and need superglue LOL
If and when I use a regular putty it is for their special quality: they are shapeable for quite a long time.
This reduces sanding to alomost nothing which comes in handy when moving in tight places. Just think of fuselage-to-wing-joints on a Hasegawa Phantom!!!
For this magic to work you need the right solvent for your putty and the right timing.
For instance if you were using Miliput (which i doo, too, occasionally) the solvent is water and you have at least a 15min timeframe to shape the putty.
As solvent for Tamiya putty i use pure Acetone cut with a little alkohol to take off the edge (Acetone otherwise can ''burn'' your plastic surface). Some people use Nail polish remover but I get heart rythm disorder thinking some Aloe-Vera-Nail-Feel-Good oils might leave a nice paint repelling residue on my precious model.
Anyway.
Rip off the tape as long as the putty is still a little soft, dip a Q-tip in your solvent and smooth out your seam until you are pleased with the result.
Yes, after all that blathering it's just that simple.
Looks like this then:
Any blemishes left can be smoothed out with Mr. Surfacer and Mr. Hobby blue label thinner.
To finish off just give it a light rubbing with 2000grit wet n' dry.
Nice, eh?
 |

WEB HOSTING BY


Copyright ©2021 AeroScale and Kitmaker Network, a subsidiary of Silver Star Enterprises
All Rights Reserved. Please read our Conditions of Use and Privacy Policy.
All Rights Reserved. Please read our Conditions of Use and Privacy Policy.