Modern (1975-today)
Discuss the modern aircraft age from 1975 thru today.
Discuss the modern aircraft age from 1975 thru today.
Hosted by Jim Starkweather
A recycled TP 84 Hercules in 1/72
tmeyer

Joined: February 03, 2008
KitMaker: 101 posts
AeroScale: 79 posts

Posted: Sunday, April 03, 2011 - 11:40 AM UTC
Nice work, Magnus! I'm really enjoying this thread and seeing you really improve a model that initially looked beyond any help or hope.

magnusf

Joined: May 02, 2006
KitMaker: 1,953 posts
AeroScale: 1,902 posts

Posted: Friday, April 08, 2011 - 09:43 AM UTC
Finally, painting is over.
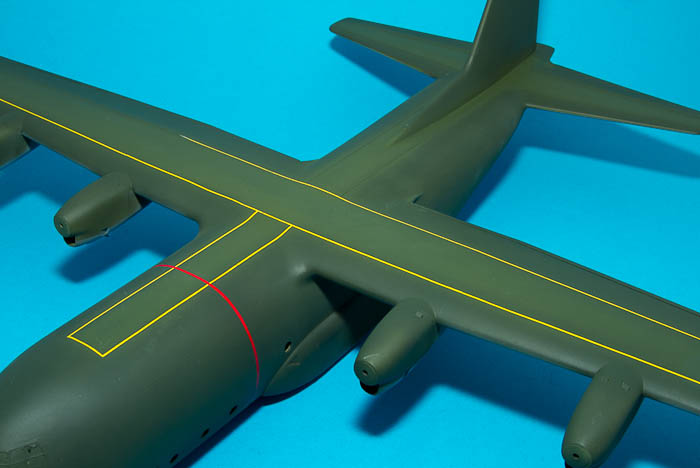
Demasking in progress.

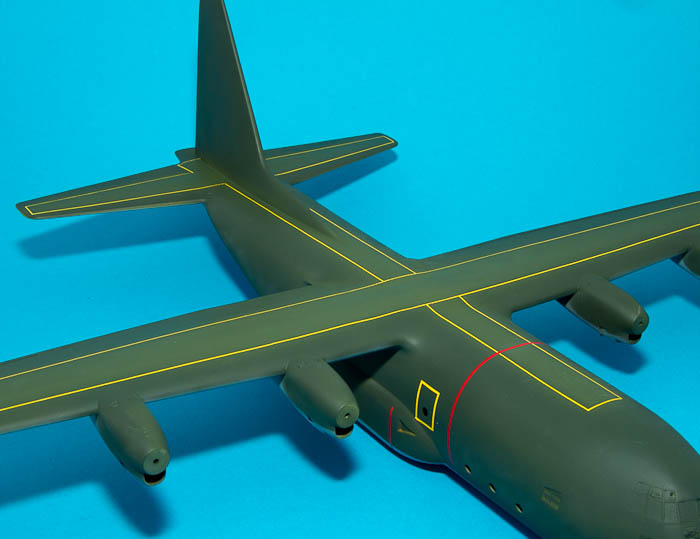
Tape strips worked better than expected!

Magnus

Demasking in progress.


Tape strips worked better than expected!

Magnus
kenner

Joined: October 14, 2007
KitMaker: 122 posts
AeroScale: 119 posts

Posted: Friday, April 08, 2011 - 12:58 PM UTC
Wow, I gotta try that some time. It looks great!
Well done
Well done


Keeperofsouls2099

Joined: January 14, 2009
KitMaker: 2,798 posts
AeroScale: 2,443 posts

Posted: Friday, April 08, 2011 - 01:27 PM UTC
Ive been waiting for you to pull back the tape awesome results cant wait to see finished product 


magnusf

Joined: May 02, 2006
KitMaker: 1,953 posts
AeroScale: 1,902 posts

Posted: Thursday, April 14, 2011 - 09:55 AM UTC
Kenneth and Justin Pulling that tape really was the high point in this build 
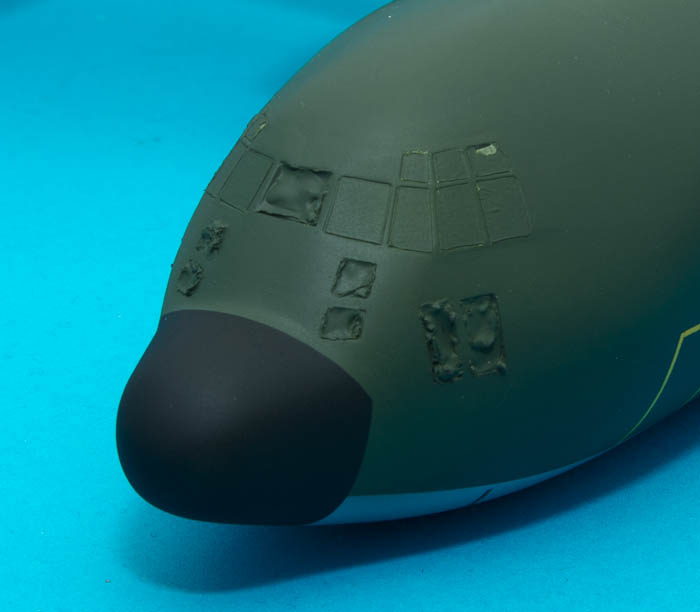
It looks a lot better with a black nose.
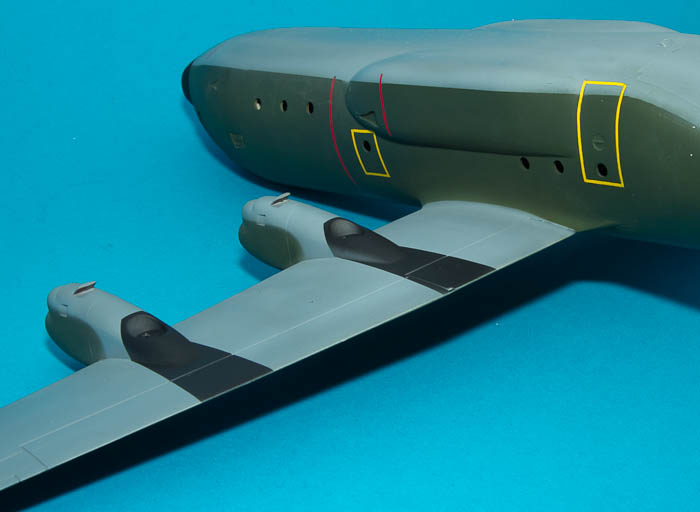
I was a bit worried about symmetry when it came to masking the black portions rear of the engines. I simply solved the problem by just showing you one wing at a time ...
...

I've collected all the major decals that I need, it looks a bit thin though. I'll have to go through the stash for some small texts and other service markings in order to liven things up a bit.

Magnus


It looks a lot better with a black nose.

I was a bit worried about symmetry when it came to masking the black portions rear of the engines. I simply solved the problem by just showing you one wing at a time
 ...
...
I've collected all the major decals that I need, it looks a bit thin though. I'll have to go through the stash for some small texts and other service markings in order to liven things up a bit.

Magnus
Posted: Thursday, April 14, 2011 - 11:47 AM UTC
I'm with Justin, I've been sitting here for weeks holding my breath for the tape-removal ceremony ! Beautiful work Magnus, the extra effort was well worth it.
Cheers, D
Cheers, D

magnusf

Joined: May 02, 2006
KitMaker: 1,953 posts
AeroScale: 1,902 posts

Posted: Friday, April 15, 2011 - 09:44 AM UTC
I have spent tonight decalling. After advice from Sten who supplied a lot of the decals I brushed them with a layer of Liquid Decal Film. It worked great and was dry within 15 minutes, great stuff for saving brittle decals (the large numerals on the fin) and to seal ALPS-decals (Swedish Air Force and a few of the smaller numerals).
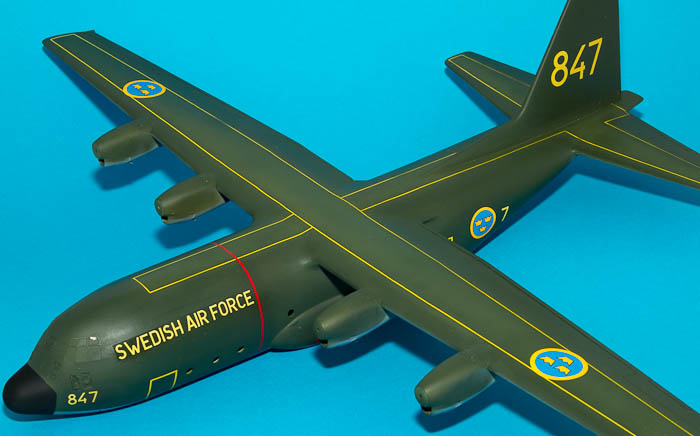
Showing the finished side in the photo, the other is missing the fin numerals!

Magnus

Showing the finished side in the photo, the other is missing the fin numerals!

Magnus
Posted: Friday, April 15, 2011 - 08:26 PM UTC
This one looks really good... though somehow the scheme (including markings) does look odd.
Looking forward to the next in-progress shots.
Cheers,
Harm
Looking forward to the next in-progress shots.
Cheers,
Harm

magnusf

Joined: May 02, 2006
KitMaker: 1,953 posts
AeroScale: 1,902 posts

Posted: Saturday, April 16, 2011 - 09:42 AM UTC
Harm! Nothing strange with that paint scheme, that is what a Hercules looked like when I grew up  !
!
I have had another worry that have refused to solve itself during the project: what to do with the props! I don't want to leave them as they are (even though Björn, the kit's original owner, had painted them already), just cutting off the blades would probably look strange (and can be considered as bad modelling...). Anyway, friend Rickard suggested cutting clear plastic discs and do some "whirly" painting on them.
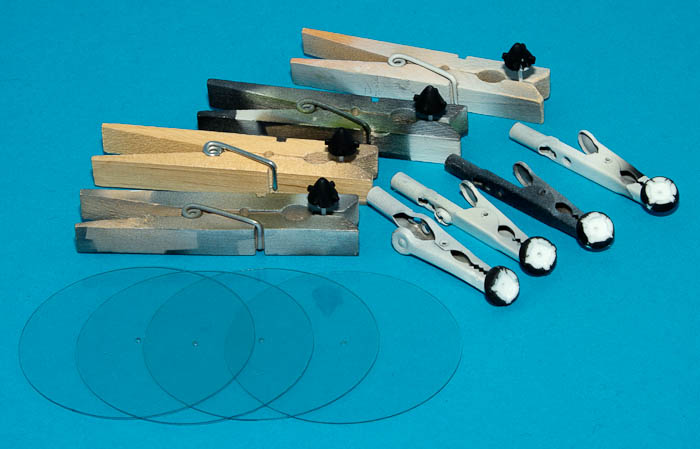
Four discs cut using a compass cutter and hubs prepared for sandwiching the discs. I'll do masks for the blade painting using CAD later, now it's off to bed since tomorrow is promising good weather and the first long distance training for the season with the cycling club!

Magnus
 !
!I have had another worry that have refused to solve itself during the project: what to do with the props! I don't want to leave them as they are (even though Björn, the kit's original owner, had painted them already), just cutting off the blades would probably look strange (and can be considered as bad modelling...). Anyway, friend Rickard suggested cutting clear plastic discs and do some "whirly" painting on them.

Four discs cut using a compass cutter and hubs prepared for sandwiching the discs. I'll do masks for the blade painting using CAD later, now it's off to bed since tomorrow is promising good weather and the first long distance training for the season with the cycling club!

Magnus

magnusf

Joined: May 02, 2006
KitMaker: 1,953 posts
AeroScale: 1,902 posts

Posted: Monday, April 18, 2011 - 09:46 AM UTC
Decals got a coat of semi-gloss Tamiya clear and the rest of the airframe got a quick airbrush-weathering roughly following the remains of the raised surface detail. Not bad if I may say so myself and certainly a LOT easier than re-scribing...

There is a definitely displaced stroke with the airbrush on the centre section... Either overpaint it or polish it away but that is tomorrow's trouble! Some touch-up to do around the cockpit windows before filling them with Clearfix.
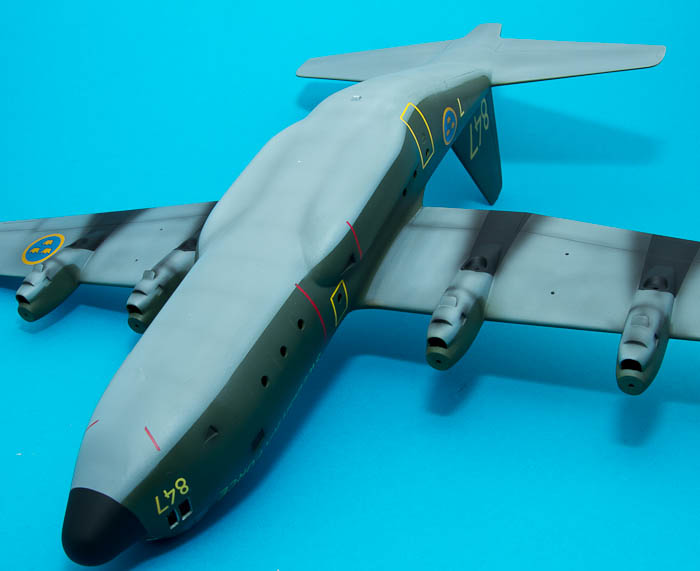
Liberal amounts of exhaust stains...

Magnus

There is a definitely displaced stroke with the airbrush on the centre section... Either overpaint it or polish it away but that is tomorrow's trouble! Some touch-up to do around the cockpit windows before filling them with Clearfix.

Liberal amounts of exhaust stains...

Magnus

Lucky13

Joined: June 01, 2006
KitMaker: 1,707 posts
AeroScale: 1,119 posts

Posted: Tuesday, April 19, 2011 - 07:43 AM UTC
Fantastiskt jobb Magnus, sketa snyggt!
Fantastic job Magnus, d*mn nice!
Fantastic job Magnus, d*mn nice!
Posted: Tuesday, April 19, 2011 - 03:03 PM UTC
Magnus,
nowhere did I intend to imply that you just made the scheme up. It is that sometimes there are 'official' schemes that just look odd/'off'.
Shame of the errant streak.
Honest question (although perhaps superfluous if there is still some weathering to be done): Did the wings stain that quickly with the exhaust fumes that such a contrast could be seen as is especially visible on the under side?
Cheers,
Harm
P.S. Looking forward to see the results of your window-fix.

magnusf

Joined: May 02, 2006
KitMaker: 1,953 posts
AeroScale: 1,902 posts

Posted: Tuesday, April 19, 2011 - 07:21 PM UTC
Jan! Thanks!
Harm!
I realised what you meant when I read it so there is certainly no need for excuses! As a Swede I have finally come to realise that what was perfectly normal around here (Draken, Viggen, Lansen, the camo schemes) is quite exotic abroad!
Looking at it now: your'e probably right, weathering went a bit over the top . I'll tone it down with the base colour after easter. Thanks for pointing it out.
I hope the Clearfix will work on the cockpit windows. The holes look a bit on the large side when I look at them now...

No more updates before easter, I'll be going with my family to "the South", hopefully doing some gliding this weekend.
Magnus
Harm!
Quoted Text
nowhere did I intend to imply that you just made the scheme up. It is that sometimes there are 'official' schemes that just look odd/'off'.
Shame of the errant streak.
I realised what you meant when I read it so there is certainly no need for excuses! As a Swede I have finally come to realise that what was perfectly normal around here (Draken, Viggen, Lansen, the camo schemes) is quite exotic abroad!
Quoted Text
Honest question (although perhaps superfluous if there is still some weathering to be done): Did the wings stain that quickly with the exhaust fumes that such a contrast could be seen as is especially visible on the under side?
Looking at it now: your'e probably right, weathering went a bit over the top
 . I'll tone it down with the base colour after easter. Thanks for pointing it out.
Quoted Text
P.S. Looking forward to see the results of your window-fix.
I hope the Clearfix will work on the cockpit windows. The holes look a bit on the large side when I look at them now...

No more updates before easter, I'll be going with my family to "the South", hopefully doing some gliding this weekend.
Magnus

magnusf

Joined: May 02, 2006
KitMaker: 1,953 posts
AeroScale: 1,902 posts

Posted: Friday, April 29, 2011 - 07:49 AM UTC
Back from Easter holiday with a new project bagged while visiting Helsingborg!
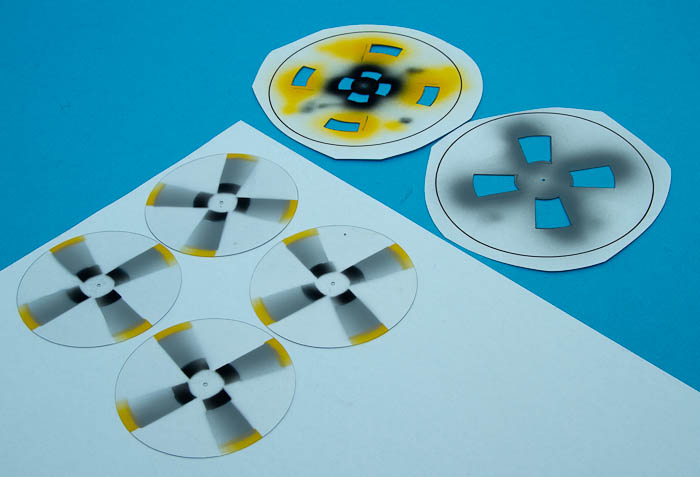
Props are now finished. I did masks using Pro/E that I then printed and cut out using a scalpel and a straight-edge. Using a toothpick as a centering device and spraying with low pressure this was the result!

It is not super-even but it looks good enough! They have since been sealed using Tamiya rattle-can clear. Before that they were rather scratch-prone!
I also toned down the weathering below the wings and the engine nacelles, it looks a lot better now. Thanks Harm!

Magnus

Props are now finished. I did masks using Pro/E that I then printed and cut out using a scalpel and a straight-edge. Using a toothpick as a centering device and spraying with low pressure this was the result!

It is not super-even but it looks good enough! They have since been sealed using Tamiya rattle-can clear. Before that they were rather scratch-prone!
I also toned down the weathering below the wings and the engine nacelles, it looks a lot better now. Thanks Harm!

Magnus

magnusf

Joined: May 02, 2006
KitMaker: 1,953 posts
AeroScale: 1,902 posts

Posted: Monday, May 09, 2011 - 09:25 AM UTC
Time to close the book for this one!
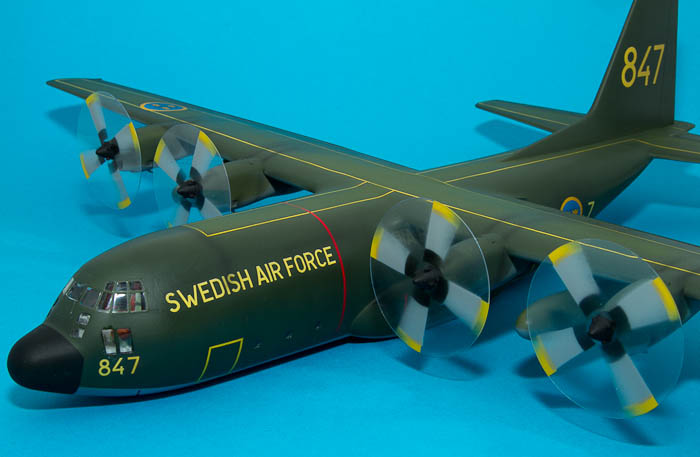
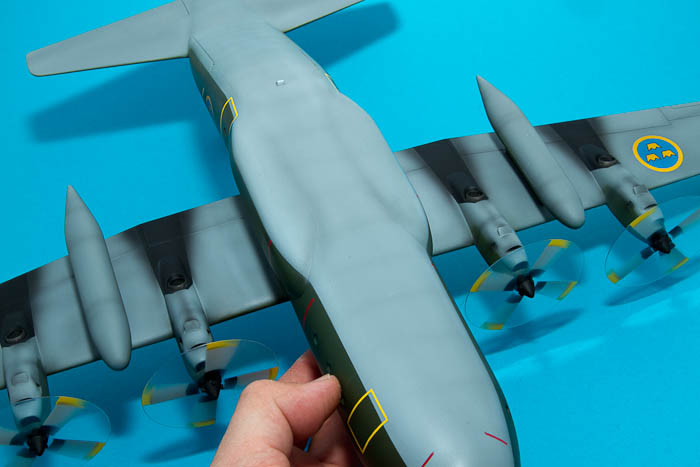
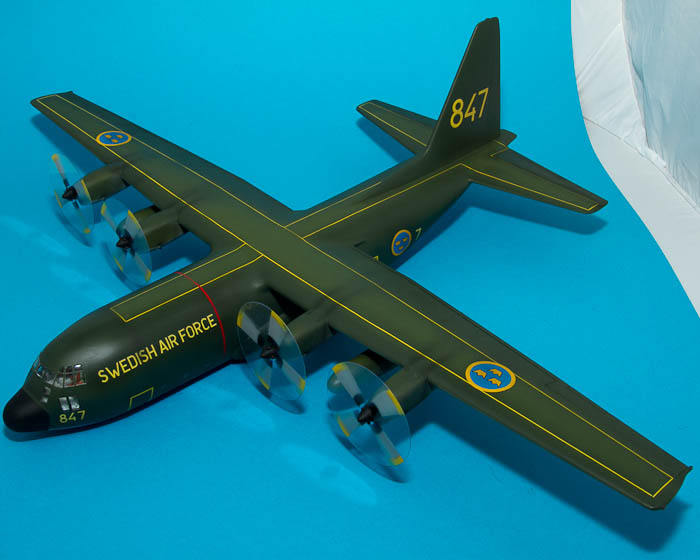
As usual, there are things that could have been done better (cockpit glazing among others), on the other hand it is a "flyer" so an overall good impression and general dirty Hercules-look is more than enough in this case !
!
One thing I appreciate with this one is that it looks good without being rescribed, if doing another one I will not bother doing it on that one either.

It has now been added to the collection even though it will soon move on to it's new home!

Magnus


As usual, there are things that could have been done better (cockpit glazing among others), on the other hand it is a "flyer" so an overall good impression and general dirty Hercules-look is more than enough in this case
 !
!One thing I appreciate with this one is that it looks good without being rescribed, if doing another one I will not bother doing it on that one either.
It has now been added to the collection even though it will soon move on to it's new home!

Magnus

Keeperofsouls2099

Joined: January 14, 2009
KitMaker: 2,798 posts
AeroScale: 2,443 posts

Posted: Monday, May 09, 2011 - 12:57 PM UTC
Good job Mag it looks good the props are very cool 


magnusf

Joined: May 02, 2006
KitMaker: 1,953 posts
AeroScale: 1,902 posts

Posted: Monday, May 09, 2011 - 06:21 PM UTC
Quoted Text
Good job Mag it looks good the props are very cool
Thanks Justin!
Always a good idea to have clever friends - props are the brainchild of modelling colleague Rickard
 !
!
Magnus
Aussie747

Joined: April 26, 2004
KitMaker: 16 posts
AeroScale: 11 posts

Posted: Monday, April 09, 2012 - 07:02 PM UTC
What a great resurrection build. Your masking and painting skills are excellent. The models has turned out great, I have a few C-130s to build and I hope they turn out as well as this one!

magnusf

Joined: May 02, 2006
KitMaker: 1,953 posts
AeroScale: 1,902 posts

Posted: Monday, April 09, 2012 - 07:43 PM UTC
Ray! Thanks a lot for your kind words and it is always nice when someone finds my old build threads. Good luck with your future Hercules projects!

Magnus

Magnus
 |


