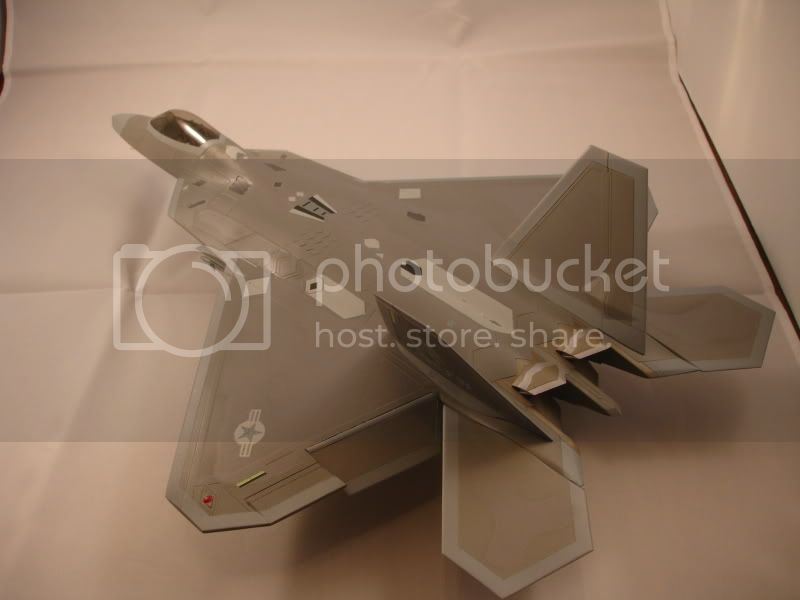
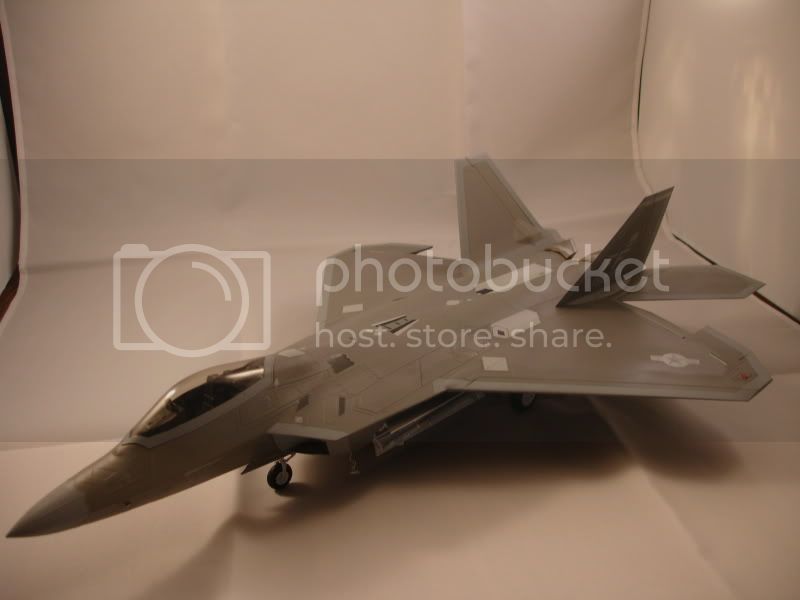
I have not done a lot of aircraft lateley,but I took an armor break and plunged into this one.What a well engineered kit with lots of parts but great fit.I was pretty happy with the result.The pictures don't show the camo pattern but it is there.I also used Hawkeye Hobbies Raptor Sheen which mixes with enamel paints and imparts a nice metallic sheen,I would recommend it.thanks to the fantastic Blog by "Keeper of Souls" Justin who provided inspiration and a great guide to follow.Thanks for looking:
Hosted by Jim Starkweather
Hasegawa 1/48 F-22-Done
Tojo72
North Carolina, United States
Joined: June 06, 2006
KitMaker: 4,691 posts
AeroScale: 238 posts
Joined: June 06, 2006
KitMaker: 4,691 posts
AeroScale: 238 posts
Posted: Monday, March 07, 2011 - 08:47 AM UTC
ViperEnforcer
Alabama, United States
Joined: December 05, 2007
KitMaker: 204 posts
AeroScale: 202 posts
Joined: December 05, 2007
KitMaker: 204 posts
AeroScale: 202 posts
Posted: Monday, March 07, 2011 - 11:30 AM UTC
Looking good. This kit fits together beautifully, doesn't it?
Yes, the camo gray seem to be too close in tone, though that may be due to the subdued lighting. It may show up better in better lighting, but so far I'm not sold on the Hawkeye Raptor Sheen. I'll be able to get a good look at another finished Raptor model this weekend.
For future reference, the Raptor’s diamond wingtip light lenses should be clear and not colored clear blue or red.
Mike V
FullAfterburner
Oklahoma, United States
Joined: February 26, 2008
KitMaker: 3 posts
AeroScale: 2 posts
Joined: February 26, 2008
KitMaker: 3 posts
AeroScale: 2 posts
Posted: Monday, March 07, 2011 - 11:58 AM UTC
Nice work Anthony... One of these days I'll have me one of those...
Keeperofsouls2099
Florida, United States
Joined: January 14, 2009
KitMaker: 2,798 posts
AeroScale: 2,443 posts
Joined: January 14, 2009
KitMaker: 2,798 posts
AeroScale: 2,443 posts
Posted: Monday, March 07, 2011 - 01:14 PM UTC
Good finish you did a great job! Just for future reference the collision lights?the bulbs on the inside are colored the lenses are clear.yours are fine no biggy.
Keeperofsouls2099
Florida, United States
Joined: January 14, 2009
KitMaker: 2,798 posts
AeroScale: 2,443 posts
Joined: January 14, 2009
KitMaker: 2,798 posts
AeroScale: 2,443 posts
Posted: Monday, March 07, 2011 - 01:30 PM UTC
I felt the same way about the tone but those colors are actual references from Lockhead.
ViperEnforcer
Alabama, United States
Joined: December 05, 2007
KitMaker: 204 posts
AeroScale: 202 posts
Joined: December 05, 2007
KitMaker: 204 posts
AeroScale: 202 posts
Posted: Monday, March 07, 2011 - 03:25 PM UTC
Quoted Text
Just for future reference the collision lights?the bulbs on the inside are colored the lenses are clear.yours are fine no biggy.
Maybe I should explain it a little more clearly:
The wingtip internal bulbs are LED clusters of both clear (anticollison) and tinted LEDs for the formation lights. In scale, the colored LED clusters are hardly visiable and the lens itself is clear with a small foil cap laminated to the inner lens crest.
Mike V
Tojo72
North Carolina, United States
Joined: June 06, 2006
KitMaker: 4,691 posts
AeroScale: 238 posts
Joined: June 06, 2006
KitMaker: 4,691 posts
AeroScale: 238 posts
Posted: Tuesday, March 08, 2011 - 12:01 AM UTC
Everybody,thanks for the nice words and suggestions.Justin,thanks again fora great log.
Keeperofsouls2099
Florida, United States
Joined: January 14, 2009
KitMaker: 2,798 posts
AeroScale: 2,443 posts
Joined: January 14, 2009
KitMaker: 2,798 posts
AeroScale: 2,443 posts
Posted: Tuesday, March 08, 2011 - 01:54 PM UTC
Welcome glad it helped
plasticwarfare
Halland, Sweden
Joined: October 11, 2010
KitMaker: 12 posts
AeroScale: 6 posts
Joined: October 11, 2010
KitMaker: 12 posts
AeroScale: 6 posts
Posted: Wednesday, March 09, 2011 - 01:20 AM UTC
So the best way of doing the lights is to paint silver behind the clear part, or?
Working on a raptor of my own, and I too was inspired by Justins blog. :-)
/E
Working on a raptor of my own, and I too was inspired by Justins blog. :-)
/E
Keeperofsouls2099
Florida, United States
Joined: January 14, 2009
KitMaker: 2,798 posts
AeroScale: 2,443 posts
Joined: January 14, 2009
KitMaker: 2,798 posts
AeroScale: 2,443 posts
Posted: Wednesday, March 09, 2011 - 12:59 PM UTC
I left the lenses clear and put a dot of tamiya clear in each.I painted the sockets chrome silver
plasticwarfare
Halland, Sweden
Joined: October 11, 2010
KitMaker: 12 posts
AeroScale: 6 posts
Joined: October 11, 2010
KitMaker: 12 posts
AeroScale: 6 posts
Posted: Thursday, March 10, 2011 - 10:12 PM UTC
Thanks, I'll do that too.
I realized I probably should have painted the intakes before gluing them together. Masking the border between the white and the grey area will be a bit difficult, I believe.
How did you guys do?
I realized I probably should have painted the intakes before gluing them together. Masking the border between the white and the grey area will be a bit difficult, I believe.
How did you guys do?
ViperEnforcer
Alabama, United States
Joined: December 05, 2007
KitMaker: 204 posts
AeroScale: 202 posts
Joined: December 05, 2007
KitMaker: 204 posts
AeroScale: 202 posts
Posted: Sunday, March 13, 2011 - 09:43 AM UTC
Here's a close up shot of the starboard lower wingtip formation/anticollison light, I took in 2006. Hopefully you can see what I was trying to explain.
Mike V
Mike V
Keeperofsouls2099
Florida, United States
Joined: January 14, 2009
KitMaker: 2,798 posts
AeroScale: 2,443 posts
Joined: January 14, 2009
KitMaker: 2,798 posts
AeroScale: 2,443 posts
Posted: Saturday, March 19, 2011 - 10:10 AM UTC
spot on thank you