KotS GB 2011 Albatros D.Va warreni
South Australia, Australia
Joined: August 14, 2007
KitMaker: 5,926 posts
AeroScale: 2,201 posts
Posted: Monday, June 20, 2011 - 11:03 AM UTC
As a famous English Comedy team once sang, "Here comes another one.."
Yes, number 6 in my series of KotS builds has commenced..
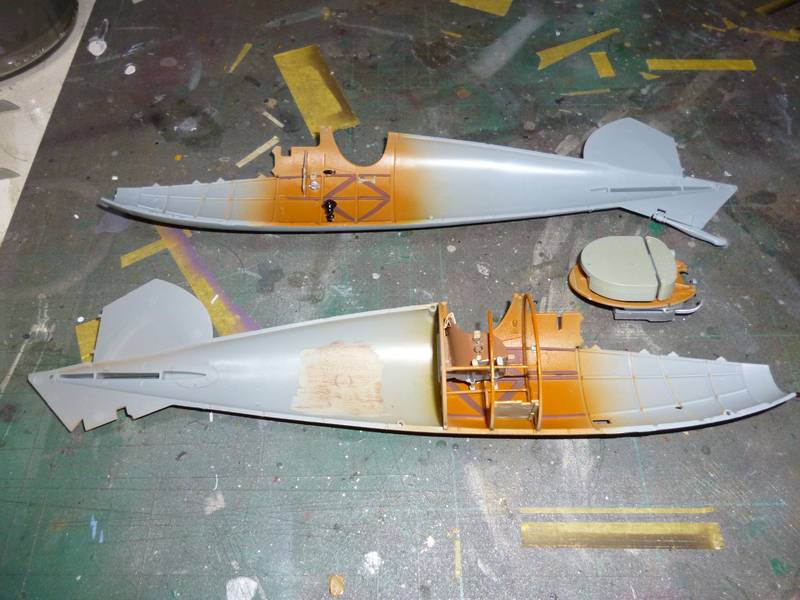
That is as far as I have gotten so far. Fit etc great so far. One mistake I glued the cockpit frames in the wrong half of the fuselage.. oh well...

You may be right, I may be crazy.
Alberta, Canada
Joined: January 19, 2008
KitMaker: 6,743 posts
AeroScale: 6,151 posts
Posted: Monday, June 20, 2011 - 12:13 PM UTC
My God ! Don't you ever stop !
Looking forward to the build Warren

Alberta, Canada
Joined: July 26, 2010
KitMaker: 1,032 posts
AeroScale: 1,025 posts
Posted: Monday, June 20, 2011 - 02:09 PM UTC
Warren,
Let me re-word Terri's question if I may; My Gawd, do you ever sleep?! Such great work and productivity beyond all logic. Go for it and keep us updated!!
Cheers,
Lance
Officially Retired as of 20 August 2013 and looking forward to some un-interrupted bench time. Currently starting Roden's Nieuport 28 and hoping to follow that with another WNW Fokker DVII.
South Australia, Australia
Joined: August 14, 2007
KitMaker: 5,926 posts
AeroScale: 2,201 posts
Posted: Monday, June 20, 2011 - 10:46 PM UTC
Update time...
Fuselage is buttoned up.. For some reason I couldn't get the bottom of the fuselage to close properly so I had a little filling to do. Just a little CA glue and some sanding and all was fixed.
Base coat for wood-grain is on and coats of Future. Is looking lovely at the moment. I have come up with a way to do woodgrain on the acrylic paint using acrylic artists paint rather than the oils. will be interesting to see how they come out.
Pictures tomorrow.
You may be right, I may be crazy.
New Jersey, United States
Joined: June 02, 2006
KitMaker: 1,212 posts
AeroScale: 468 posts
Posted: Tuesday, June 21, 2011 - 07:38 AM UTC
My god man... you're an animal. A string bag buildin' animal

South Australia, Australia
Joined: August 14, 2007
KitMaker: 5,926 posts
AeroScale: 2,201 posts
Posted: Tuesday, June 21, 2011 - 08:53 AM UTC
Quoted Text
My god man... you're an animal. A string bag buildin' animal
As a famous actor in a mask once said.. "Somebody stop meh!"...
You may be right, I may be crazy.
New Jersey, United States
Joined: June 02, 2006
KitMaker: 1,212 posts
AeroScale: 468 posts
Posted: Tuesday, June 21, 2011 - 02:10 PM UTC
Quoted Text
Quoted Text
My god man... you're an animal. A string bag buildin' animal
As a famous actor in a mask once said.. "Somebody stop meh!"...
Ah yes, there in lies the rub. It can't be stopped

South Australia, Australia
Joined: August 14, 2007
KitMaker: 5,926 posts
AeroScale: 2,201 posts
Posted: Tuesday, June 21, 2011 - 03:08 PM UTC
Very correct Marc..
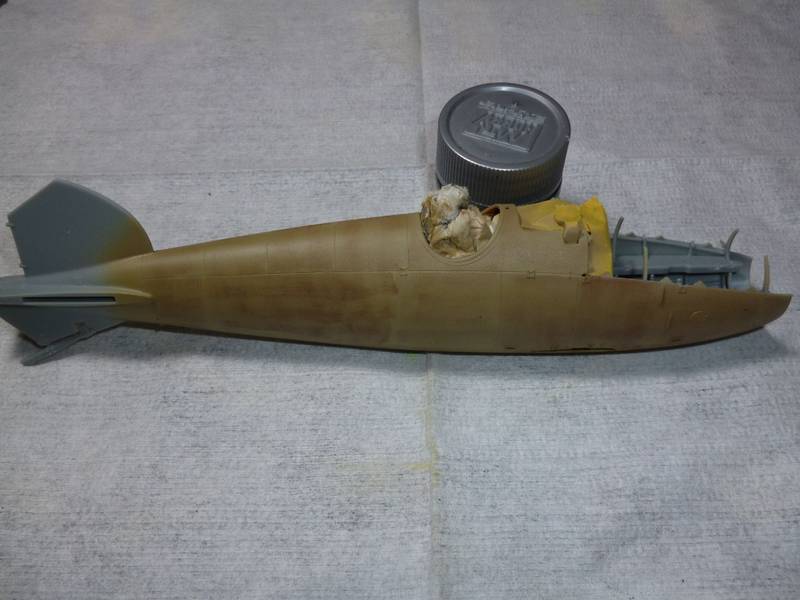
Albie fuselage after my pretty lame attempt at wood grain...
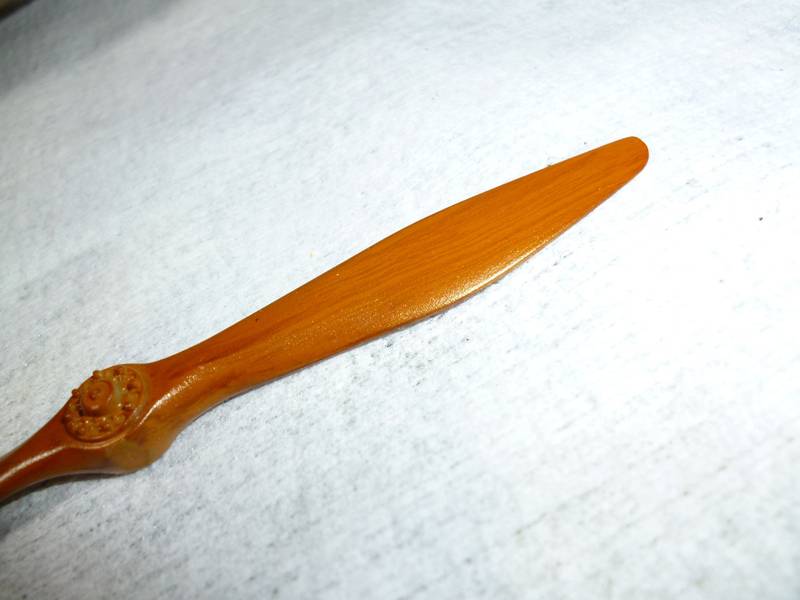
I used a new technique on the prop and it seemed to come out great! Will use it from now on. But I leave the fuselage the way it is to remind me that I am progressing when I look at the prop..
You may be right, I may be crazy.
New Jersey, United States
Joined: June 02, 2006
KitMaker: 1,212 posts
AeroScale: 468 posts
Posted: Wednesday, June 22, 2011 - 01:20 AM UTC
it dos look great. what did you do?
Alberta, Canada
Joined: January 19, 2008
KitMaker: 6,743 posts
AeroScale: 6,151 posts
Posted: Wednesday, June 22, 2011 - 01:30 AM UTC
Honestly Warren , your wood grain on the fuselage looks alright to me . In 32 scale you really won't see the grainning .
Once you get a clear coat on it will tie in the different shades better and giving it some depth .
Not sure what you have for clear coats , but Tamiya clear yellow with a little smoke mixed in will give it that nice warm honey shade ....
Arizona, United States
Joined: December 12, 2008
KitMaker: 1,423 posts
AeroScale: 1,319 posts
Posted: Wednesday, June 22, 2011 - 02:02 AM UTC
Hi Warren:
I think your wood grain looks good. As Terri noted, in 1/32nd you actually wouldn't see the grain, as no two grains are the same, no two models are going to be the same, so it is more in the eye of the beholder. It also comes with experience and experimentation. Looking forward to more.
Best
Mark
We few, we happy few........
South Australia, Australia
Joined: August 14, 2007
KitMaker: 5,926 posts
AeroScale: 2,201 posts
Posted: Wednesday, June 22, 2011 - 07:47 AM UTC
Thanks guys and gal..
@ Marc, basically I painted the prop Tamiya XF-59, then got my el-cheapo acrylic Burnt Umber paint, thinned it a bit and lightly ran down the prop with a stiff brush. When it dried I just sprayed it with Tamiya Clear Orange.
@ Terri, I used Tamiya Clear Yellow and just applied a light coat as I wanted light wood effect for a change. After a little time out in the weather it would have got darker anyway methinks.
@ Mark, yes, you are right re the wood grain in 1/32.
Thanks again. Have finished painting the fuselage now and will post some piccies later.
Cheers
Warren
You may be right, I may be crazy.
South Australia, Australia
Joined: August 14, 2007
KitMaker: 5,926 posts
AeroScale: 2,201 posts
Posted: Wednesday, June 22, 2011 - 01:43 PM UTC
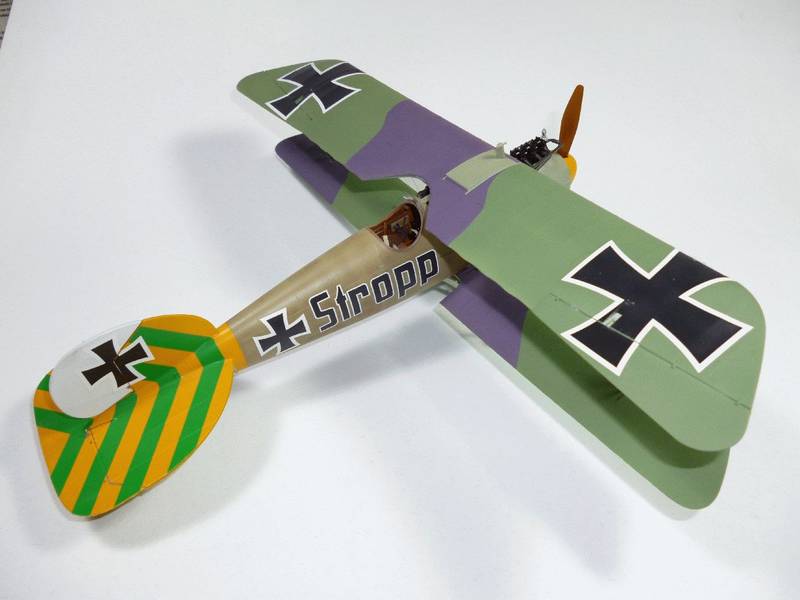
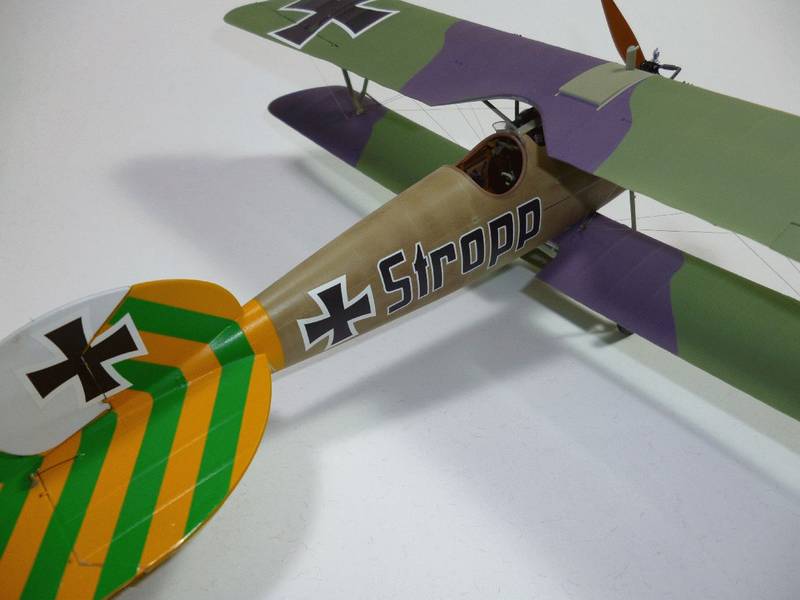
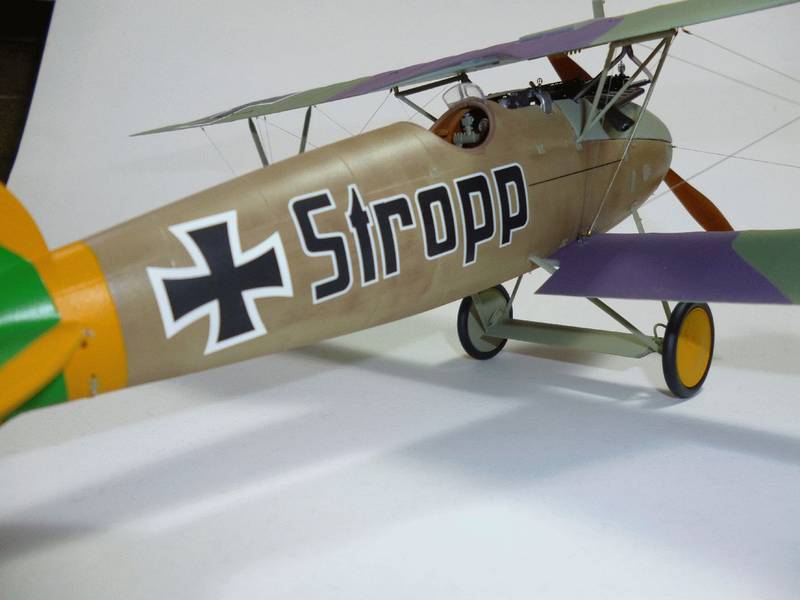
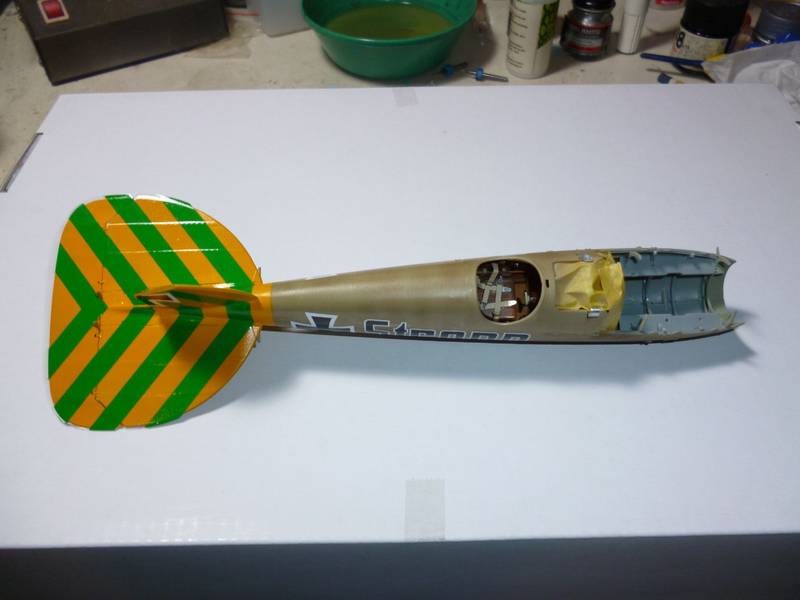
As promised...
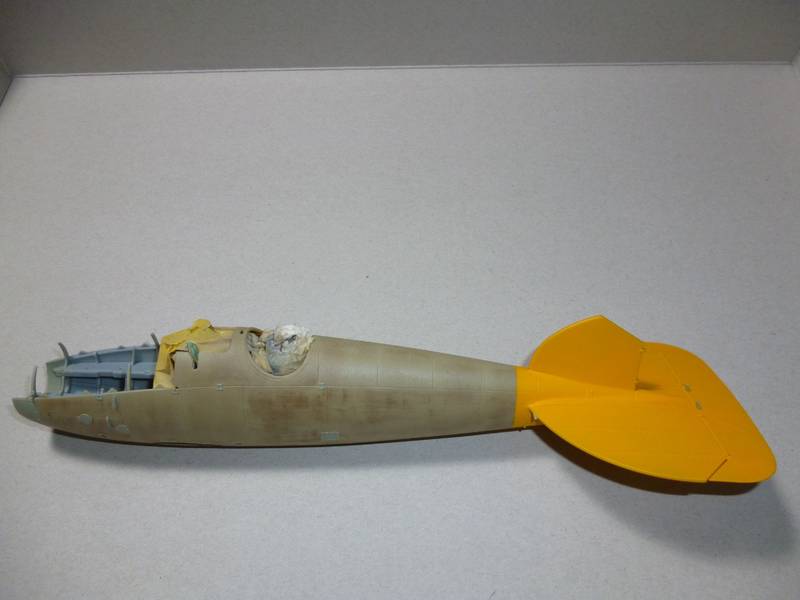
I mixed up a batch of that yellow yesterday, sprayed everything I thought needed to be that colour, and promtly forgot the wheel covers..

This actually turned out to be fortuitous as when I mixed up another batch I realised that I had put a little too much orange in and it was not quite right. So after a quick masking job I sprayed the empennage and prop spinner again, and did the wheel covers then time.
My wife decided on the 'Stropp' scheme as the empennage is in Australian national colours, green and gold. And, remarkably, Stropp is the name of a character in the Paul Hogan Show, a comedy series produced here in the 1970s. He is so Aussie he wore a Surflifesavers cap everywhere..
You may be right, I may be crazy.
South Australia, Australia
Joined: August 14, 2007
KitMaker: 5,926 posts
AeroScale: 2,201 posts
Posted: Wednesday, June 22, 2011 - 07:57 PM UTC
Hey Trendsetters!
Hope you are all well.
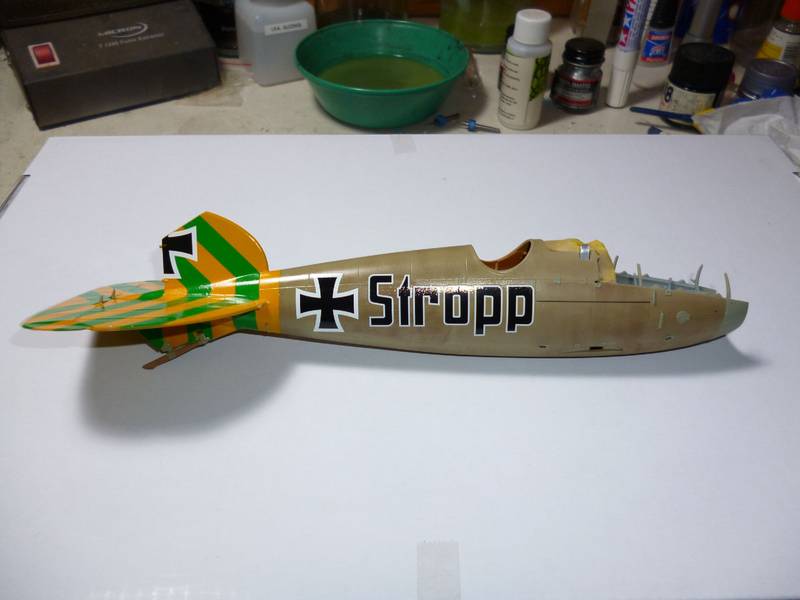
As you can see I made a good bit of progress this morning. The WNW Cartograf decals are a pleasure to work with. Only problem is I want all five of the markings in this kit which would mean building 5 D.Vas.. not really too much of a chore but unless I get them cheap a bit on the expensive side. At least you don't need any aftermarket stuff with these kits. I have even worked out how to do the PE seatbelts now, and the PE bits to detail the Machine guns are as easy as falling off a log, as long as you anneal the PE first. Roll the outer cover around a 2.5mm drill, chuck it on the plastic body, and slide the sight into place with a dab of CA glue to hold it altogether.
More news tomorrow.
You may be right, I may be crazy.
Indiana, United States
Joined: May 14, 2007
KitMaker: 3,117 posts
AeroScale: 2,270 posts
Posted: Thursday, June 23, 2011 - 10:32 AM UTC
"Treat 'em Rough", Current Builds--Wingnut Rumpler
I am frequently seen with blood shot eyes from staying up past my nap time to get the right colour scheme on my latest WWI model?
South Australia, Australia
Joined: August 14, 2007
KitMaker: 5,926 posts
AeroScale: 2,201 posts
Posted: Thursday, June 23, 2011 - 10:44 AM UTC
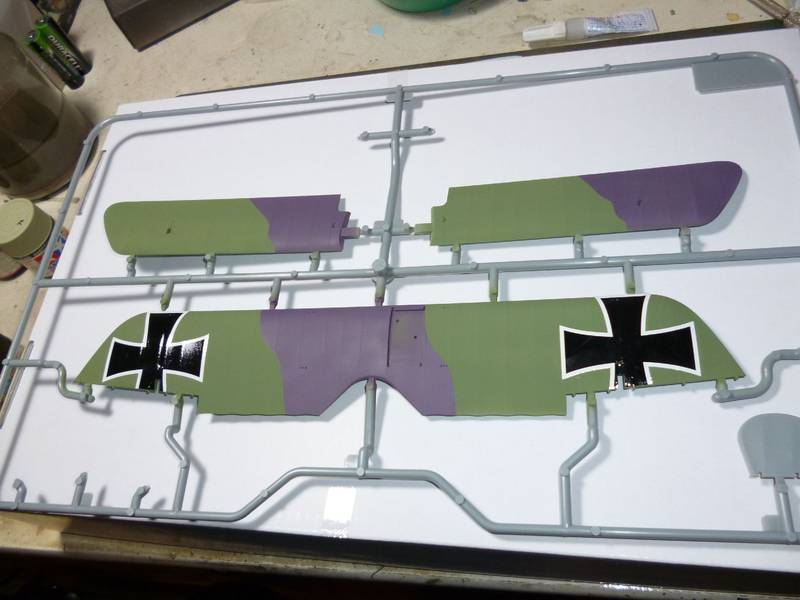
Thanks for that Carl. The yellow, green and mauve markings make for a truly colourful machine. I seem to be wanting to do the more difficult schemes all the time now rather than the simple ones I normally went for a few years ago. AMS setting in??
You may be right, I may be crazy.
New Jersey, United States
Joined: June 02, 2006
KitMaker: 1,212 posts
AeroScale: 468 posts
Posted: Friday, June 24, 2011 - 12:50 AM UTC
Above, you called you attempt at wood grain on the fuselage lame.
I have to say there is something about the look you achieved that I found very fetching. Can't put mu finger on it but it's like a very worn out looking surface. The decal are in sharp contrast but if you can really tone then down or blend the "look" into the sides that is going to be slicker 'en snot on a door knob.
South Australia, Australia
Joined: August 14, 2007
KitMaker: 5,926 posts
AeroScale: 2,201 posts
Posted: Sunday, June 26, 2011 - 09:20 PM UTC
@ Marc, thanks for the kind words Sir, and don't worry, all will be toned down when it gets its final coats of clear as it will have Tamiya smoke mixed with it that should do the job marvellously.
But that is a ways off yet..
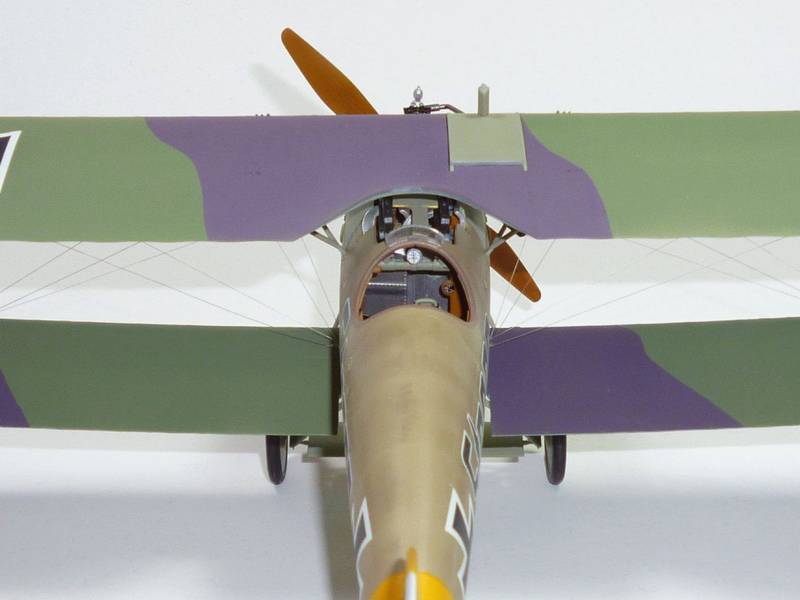
Sitting at the back of my hobby room the D.a is straining under the weight of two wash jars while the glue on the struts dries. For some unknown reason these ones have not been at all cooperative and have needed a little ... persuasion to assume their correct positions.
All the rigging wires are in place except the four from the nose to the wings and the two undercarriage ones. I will put the undercarriage ones on when the undercarriage is installed as one of the eyelets has already come adrift due to picking up the model in just the wrong way..

Oh well. Should be close to finished tomorrow.
Cheers everyone and thanks for looking.
You may be right, I may be crazy.
Kentucky, United States
Joined: July 02, 2010
KitMaker: 175 posts
AeroScale: 174 posts
Posted: Monday, June 27, 2011 - 06:45 AM UTC
Hi Warren
I like that technique to correct the gap between the struts and upper wing. I'll have to try that on my next Albatros.
"I took German in school...but I can't understand the way these foreigners speak it." The Dawn Patrol (1938)
Dennis O'C
South Australia, Australia
Joined: August 14, 2007
KitMaker: 5,926 posts
AeroScale: 2,201 posts
Posted: Monday, June 27, 2011 - 07:36 AM UTC
Nothing an application of force won't fix..
My D.V seemed to work fine so I am thinking it may be the different struts you use for the D.Va maybe??
The fun bit is going to be the Roden D.III (OAW)...

You may be right, I may be crazy.
South Australia, Australia
Joined: August 14, 2007
KitMaker: 5,926 posts
AeroScale: 2,201 posts
Posted: Monday, June 27, 2011 - 08:12 PM UTC
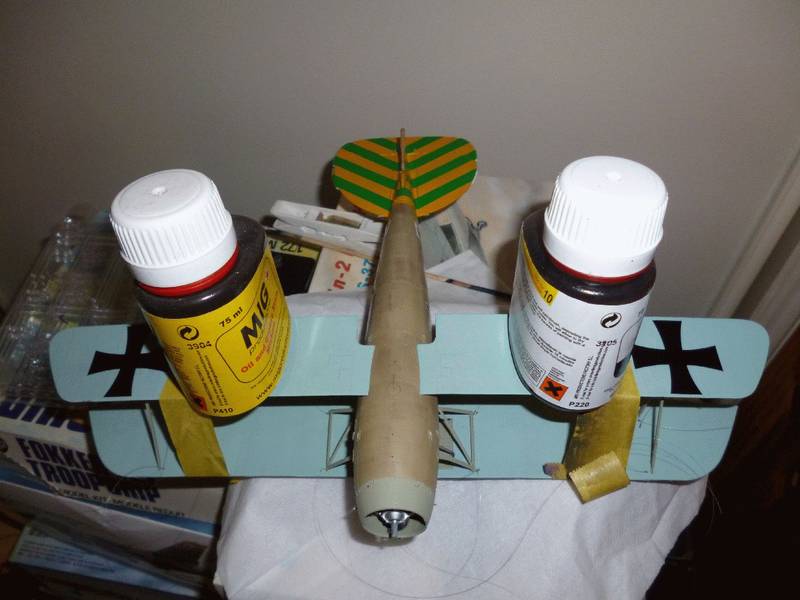
Hi All.
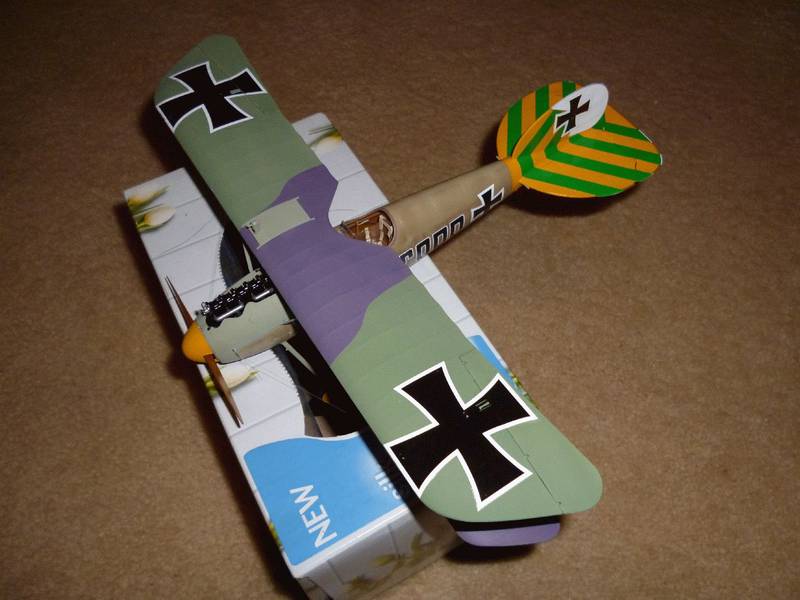
As you can see she is pretty close to finished. It is sitting on Warren's patented model stand specifically designed to make it easy to do anything with a biplane model, especially rigging..
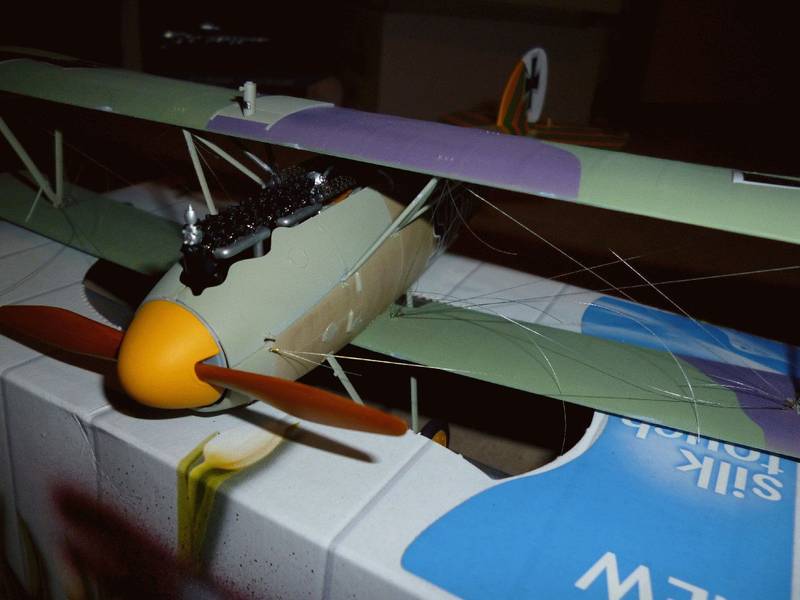
As you can see the wing paintt needs some small touchops and the riggimg needs tidying up after it has dried.
Hopefully finished tomorrow!
You may be right, I may be crazy.
Indiana, United States
Joined: May 14, 2007
KitMaker: 3,117 posts
AeroScale: 2,270 posts
Posted: Tuesday, June 28, 2011 - 08:55 AM UTC
Quoted Text
Thanks for that Carl. The yellow, green and mauve markings make for a truly colourful machine. I seem to be wanting to do the more difficult schemes all the time now rather than the simple ones I normally went for a few years ago. AMS setting in??
The sky is the limit on Albatri. Check out the Pheon Decals. My Bavarian is quite vivid. I am anxious to do the Demon scheme.
I really like the look of your wood finish. As Marc Stated, there Is something about it that just grabs you. Great work.
"Treat 'em Rough", Current Builds--Wingnut Rumpler
I am frequently seen with blood shot eyes from staying up past my nap time to get the right colour scheme on my latest WWI model?
South Australia, Australia
Joined: August 14, 2007
KitMaker: 5,926 posts
AeroScale: 2,201 posts
Posted: Tuesday, June 28, 2011 - 09:16 AM UTC
Thanks Carl. It is the technique I did an article on a few months ago. Very simple to do and no messy oil paints, just messy pigments..
You may be right, I may be crazy.
South Australia, Australia
Joined: August 14, 2007
KitMaker: 5,926 posts
AeroScale: 2,201 posts
Posted: Tuesday, June 28, 2011 - 12:38 PM UTC
You may be right, I may be crazy.
New Jersey, United States
Joined: June 02, 2006
KitMaker: 1,212 posts
AeroScale: 468 posts
Posted: Friday, July 01, 2011 - 12:04 PM UTC
That's looking pretty hot Warren.