_GOTOBOTTOM
Early Aviation
Discuss World War I and the early years of aviation thru 1934.
1:32 Fairey Flycatcher
Merlin
Staff MemberSenior Editor
AEROSCALE
#017
_VISITCOMMUNITY
United Kingdom
Joined: June 11, 2003
KitMaker: 17,582 posts
AeroScale: 12,795 posts
Posted: Monday, October 24, 2011 - 10:15 PM UTC
Hi there

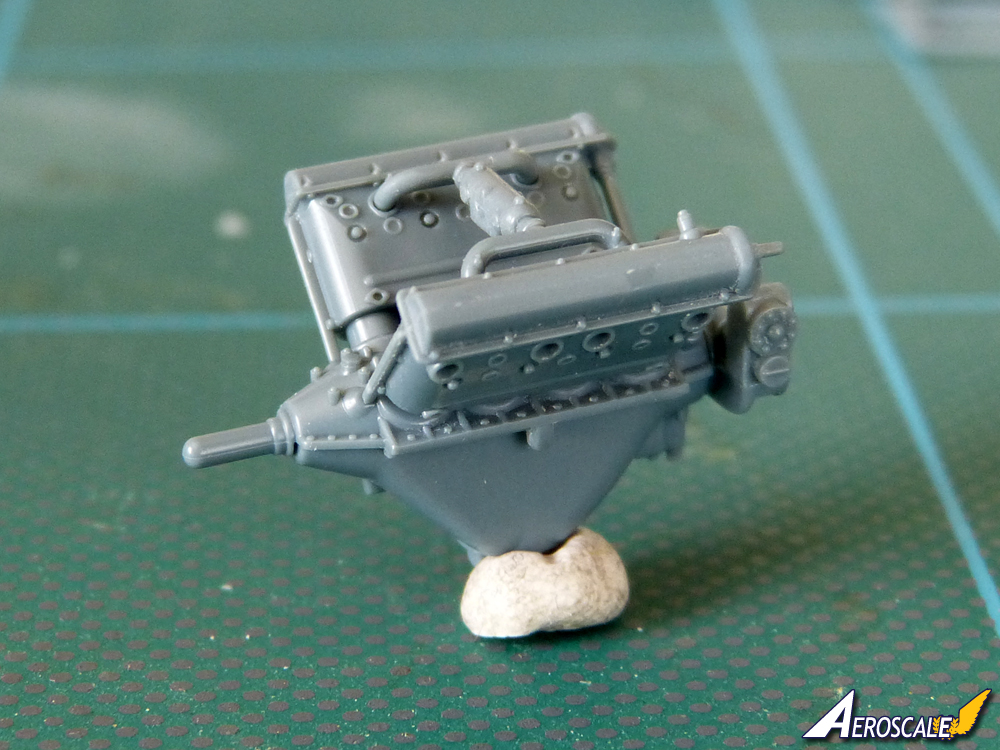
I've started work on Silver Wings' new resin Flycatcher, putting together the basic "cat's cradle" cockpit framework:


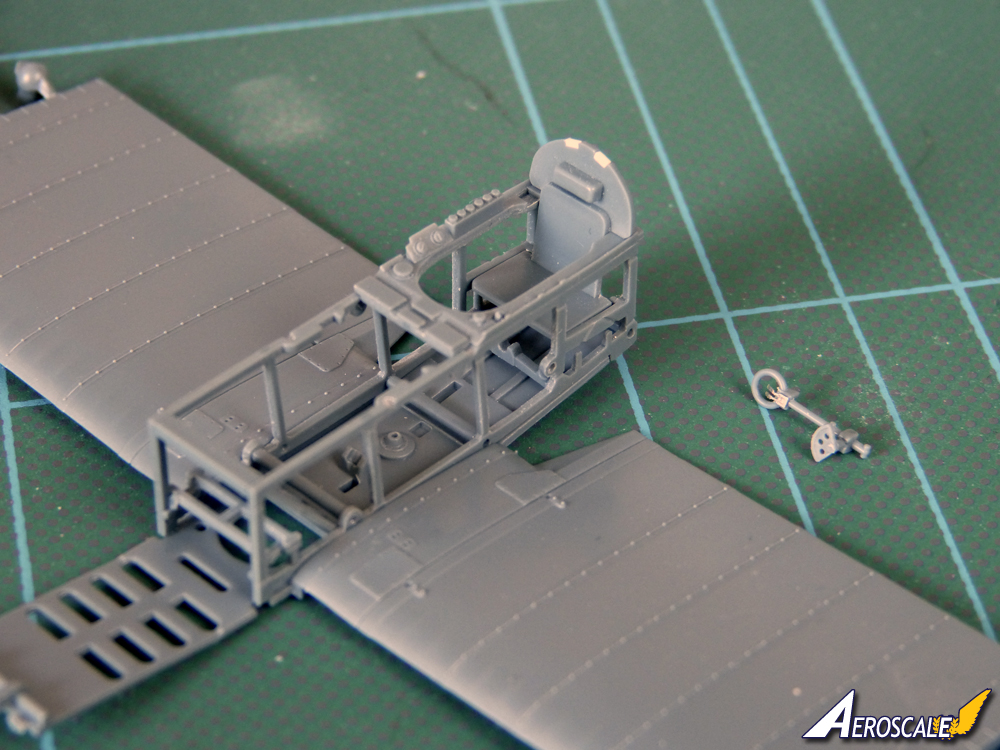
It's one of those assemblies you can't really dry-fit - you have to tack it together lightly to see if it'll all fit inside the fuselage. And the encouraging thing is... it does, perfectly. :


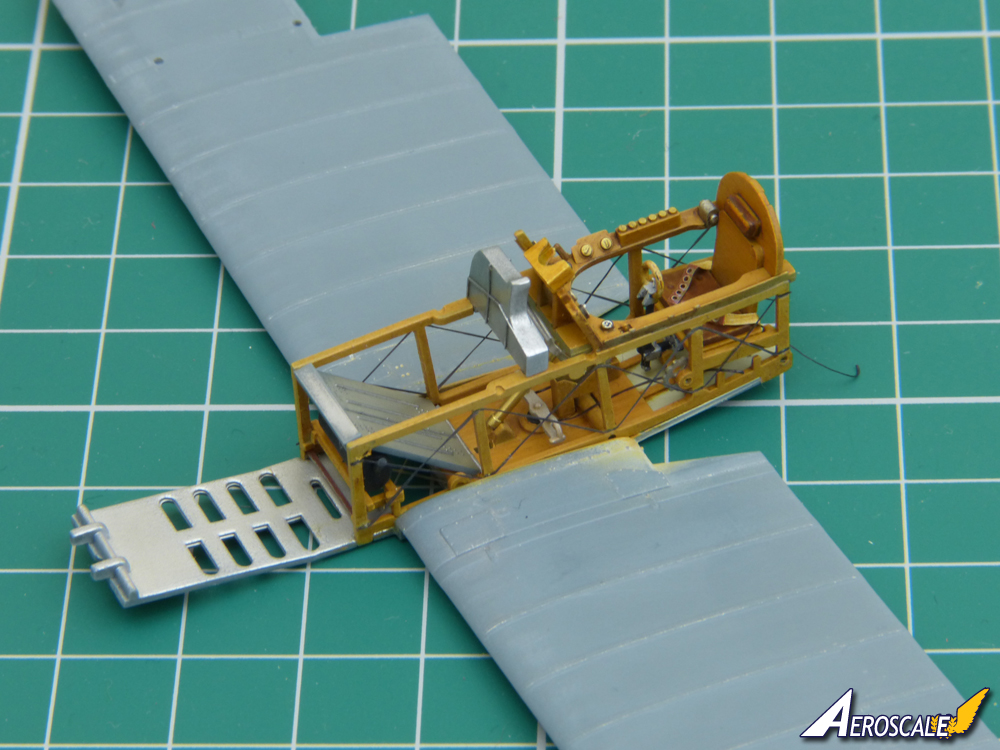
That done safely, you can reinforce the joints

So, with an nice solid foundation to work on, the next jobs are the detail parts and painting.

More soon - all the best

Rowan
lcarroll
_VISITCOMMUNITY
Alberta, Canada
Joined: July 26, 2010
KitMaker: 1,032 posts
AeroScale: 1,025 posts
Posted: Tuesday, October 25, 2011 - 06:01 AM UTC
Rowan,
I have never built a Resin Kit but this thread looks very interesting. Looking forward to following your progress; this could be a bit of a tutorial for one as uninitiated in resin as me!
I'll be following closely........

Cheers,
Lance
Merlin
Staff MemberSenior Editor
AEROSCALE
#017
_VISITCOMMUNITY
United Kingdom
Joined: June 11, 2003
KitMaker: 17,582 posts
AeroScale: 12,795 posts
Posted: Tuesday, October 25, 2011 - 08:43 AM UTC
Cheers Lance

It'll be a bit of an adventure for me too! I've built some resin kits before, but not in this scale or as elaborate as a Silver Wings biplane. Hopefully Doug Nelson will be posting a detailed "no filler and no paint" build guide of the kit that will be a real help in avoiding potential pitfalls.

Anyway, I've added the rest of the basic framework, and all the parts that will end up painted black, and given the lot a coat of dark grey enamel as a primer to check the joints etc. :


I'll let it really "cook" in the paint drier overnight and tomorrow and then crack on.

All the best

Rowan
eseperic
_VISITCOMMUNITY
Croatia Hrvatska
Joined: November 06, 2009
KitMaker: 624 posts
AeroScale: 609 posts
Posted: Tuesday, October 25, 2011 - 08:57 AM UTC
nicely put so far As you can imagine, we all have our jealous side! Will closely follow your build!
Merlin
Staff MemberSenior Editor
AEROSCALE
#017
_VISITCOMMUNITY
United Kingdom
Joined: June 11, 2003
KitMaker: 17,582 posts
AeroScale: 12,795 posts
Posted: Tuesday, October 25, 2011 - 10:12 AM UTC
Cheers Entoni

OK - these are the first of undoubtedly many questions!

The fuselage... the fabric is silver doped, but would it be Red Oxide shrinking dope underneath? I'm just thinking in terms of a little "bleed through" for the interior.

Also, Silver Wings indicate "Slate Grey" for the inside of the forward metal panels. Not that it will really show, but I'd like to try to get it right. Was "Slate Grey" (as used in WW2) an early interior colour, or is an early variation on Interior Grey-Green more likely? - remembering this is the 1920s...

Any help is much appreciated.

All the best

Rowan
Airbag
_VISITCOMMUNITY
Morbihan, France
Joined: January 24, 2009
KitMaker: 18 posts
AeroScale: 17 posts
Posted: Tuesday, October 25, 2011 - 09:33 PM UTC

Quoted Text

Cheers Entoni

OK - these are the first of undoubtedly many questions!

The fuselage... the fabric is silver doped, but would it be Red Oxide shrinking dope underneath? I'm just thinking in terms of a little "bleed through" for the interior.

Also, Silver Wings indicate "Slate Grey" for the inside of the forward metal panels. Not that it will really show, but I'd like to try to get it right. Was "Slate Grey" (as used in WW2) an early interior colour, or is an early variation on Interior Grey-Green more likely? - remembering this is the 1920s...

Any help is much appreciated.

All the best

Rowan


I'm pretty sure that the pinkish red oxide dope bleed-through would be appropriate for this period, it was certainly visible on the Swordfish and RAF aircraft, As to the Slate Grey colour, I suspect that this is to represent anodised aluminium. The external metal panels on Fleet Air Arm aircraft of the period were painted in Cerux Grey but it would make sense for the interior of these panels to be anodised - Aluminium and seawater are notoriously reactive!

Looking great so far, Silver Wings kits are just superb and you look to be doing this one justice!

All the best,

The "other" Rowan
Merlin
Staff MemberSenior Editor
AEROSCALE
#017
_VISITCOMMUNITY
United Kingdom
Joined: June 11, 2003
KitMaker: 17,582 posts
AeroScale: 12,795 posts
Posted: Wednesday, October 26, 2011 - 09:05 AM UTC
Hi Rowan

Many thanks for the pointers - they're a real help.

(You'll be glad to know a certain Albatros-shaped project is also on my work-bench now I've got Eduard's MiG-21 safely out of the way. The arrival of new Staffers to help share the admin load will also hopefully allow me to devote more time to builds like these once everyone's up to speed.)

All the best

Rowan
warreni
_VISITCOMMUNITY
South Australia, Australia
Joined: August 14, 2007
KitMaker: 5,926 posts
AeroScale: 2,201 posts
Posted: Wednesday, October 26, 2011 - 02:01 PM UTC
I have a resin Montex 1/32 Hawker Fury in the stash and I will be watching this thread very closely for any hints and tips for building resin kits. Maybe I should start with a couple of 1/72 Czechmaster kits I have in the stash first..
Merlin
Staff MemberSenior Editor
AEROSCALE
#017
_VISITCOMMUNITY
United Kingdom
Joined: June 11, 2003
KitMaker: 17,582 posts
AeroScale: 12,795 posts
Posted: Thursday, November 03, 2011 - 03:38 AM UTC
Hi again

I've begun tinkering with the engine. I have to say the diagrams in the instructions are a little bit vague, but there are a few nice photos of the Armstrong Siddeley Jaguar on-line that are a big help in getting your head around the "3-D geography" of the beast:


The intake pipes are a good fit (they have enough "spring" to stay in place without glue). Looking at photos, the ignition harness runs back and is strapped to them.

Much more to come as time permits...

All the best

Rowan
DougN1
_VISITCOMMUNITY
Georgia, United States
Joined: August 08, 2011
KitMaker: 410 posts
AeroScale: 409 posts
Posted: Thursday, November 03, 2011 - 09:27 AM UTC
Looks great Rowan! One thing - although it is too late now, you might want to have kept the round stub on the back of the engine plate, as that goes into the fuselage hole, making it easier to mount the engine

Also, when you get to the pushrods, as you've probably sussed from photos, the left goes in front of the right (when looking at the engine from the front).

I also know which markings you are going to do now

Doug
Merlin
Staff MemberSenior Editor
AEROSCALE
#017
_VISITCOMMUNITY
United Kingdom
Joined: June 11, 2003
KitMaker: 17,582 posts
AeroScale: 12,795 posts
Posted: Thursday, November 03, 2011 - 08:02 PM UTC
Cheers Doug

I must have sliced off the mounting stub without realising what it was. I'll add another if needs be.

Don't let the fact I've sprayed a base coat on the long exhausts fools you - I still haven't finally decided which scheme to model. If anything, I keep being drawn to the HMS Courageous scheme.

All the best

Rowan
Littorio
_VISITCOMMUNITY
England - South East, United Kingdom
Joined: September 15, 2004
KitMaker: 4,728 posts
AeroScale: 1,351 posts
Posted: Saturday, November 05, 2011 - 04:31 PM UTC
Looking good Rowan, I'm going to follow this with interest as this and the Hart have me almost converted to 1/32

One thing I have heard is that the cockpit is based on the one at the FAA museum, if so the instrument panel will be wrong as the one at the museum is fitted with modern dials etc, as its a replica. One plus side is that photo's of the real cockpit seam to be almost impossible to find (que the photo's being posted)
Merlin
Staff MemberSenior Editor
AEROSCALE
#017
_VISITCOMMUNITY
United Kingdom
Joined: June 11, 2003
KitMaker: 17,582 posts
AeroScale: 12,795 posts
Posted: Saturday, November 05, 2011 - 09:38 PM UTC

Quoted Text

Looking good Rowan, I'm going to follow this with interest as this and the Hart have me almost converted to 1/32

One thing I have heard is that the cockpit is based on the one at the FAA museum, if so the instrument panel will be wrong as the one at the museum is fitted with modern dials etc, as its a replica. One plus side is that photo's of the real cockpit seam to be almost impossible to find (que the photo's being posted)


Hi Luciano

Yes, I must admit I'm seriously tempted to have a go at the Hart too! (But I'm notorious for getting distracted, so I mustn't even consider it until this beauty is finished!

You're quite right about the instrument panel. Doug has very kindly sent me drawings of the original cockpit which show the correct panel and a few other items missing from the replica, so I'll work on that this coming week (I'm merrily wiring up the engine at the moment).

I haven't any photos though - so if anyone has any they can share, or can give a link to vintage shots, it would be an enormous help.

All the best

Rowan
Merlin
Staff MemberSenior Editor
AEROSCALE
#017
_VISITCOMMUNITY
United Kingdom
Joined: June 11, 2003
KitMaker: 17,582 posts
AeroScale: 12,795 posts
Posted: Saturday, November 05, 2011 - 10:49 PM UTC
Hi again

Having mentioned that I'm wiring the engine, I suppose I'd better show what I'm up to, or this won't be much of a Blog!

Please give a warm welcome to our old friend, the cotton bud. Having served its purpose cleaning the airbrush, it's suffered the ignominy of being stretched over a candle flame:


This produces a really fine tube, into which I've inserted lengths of lead wire:


I haven't got a proper reference for the original colour of the spark plug insulators and cable connector covers, but there seem to be glimpses of reddish brown in some shots of engines of the period so I've gone for an unobtrusive tan. It's work in progress, but you can see what the effect will be:


It's a total mess at the back at the moment:


When all the cables are attached, I'll tie them in pairs and run them down the intake pipes.

As with the cockpit, any extra info will be very welcome.

All the best

Rowan
DougN1
_VISITCOMMUNITY
Georgia, United States
Joined: August 08, 2011
KitMaker: 410 posts
AeroScale: 409 posts
Posted: Sunday, November 06, 2011 - 02:39 AM UTC
Now you're just showing off Rowan

Seriously, those plugs/wires look great! Should be very noticeable on the finished model. I hope someone can come up with some photos of the cockpit, but I don't know that any exist.

I would love to see the Courageous scheme if you can talk yourself into doing it, although I think any of the 3 schemes will look great!

Doug
Merlin
Staff MemberSenior Editor
AEROSCALE
#017
_VISITCOMMUNITY
United Kingdom
Joined: June 11, 2003
KitMaker: 17,582 posts
AeroScale: 12,795 posts
Posted: Monday, November 07, 2011 - 09:54 AM UTC
Hi again Doug

Well - it's definitely a toss up between HMS Courageous and HMS Furious (not HMS Glorious - that's the scheme we "always" see...). They're both great schemes (and I like the extended exhausts for the HMS Glorious) - but the blue top decking for HMS Courageous is pretty stunning!

Not much by way of an update tonight. I finished the wiring while tinkering with other projects and added the first row of push-rods. One more lot to go along with a bit of pipework and I'll put the engine on one side for a while.:


I've e-mailed John Adams at Aeroclub to order some of his etched instrument bezels since I found today that my old stash of beloved Reheat bezels seems to have gone astray. That will put finishing the cockpit back a bit while I wait for a reply, so I'll probably move on to other items in the meantime.

All the best

Rowan
Merlin
Staff MemberSenior Editor
AEROSCALE
#017
_VISITCOMMUNITY
United Kingdom
Joined: June 11, 2003
KitMaker: 17,582 posts
AeroScale: 12,795 posts
Posted: Tuesday, November 15, 2011 - 10:56 PM UTC
Hi again

Time for an update. I've been having a play with the interior, blocking in the basic colours and adding a little detail in the area behind the seat that will be partly visible on the completed model:


It's very much an "educated guess", based on the stringers visible on the exterior but, together with a few bracing wires, it gives a sense of something going on:


The central stringer also hides the seam along the fuselage bottom, although a lot of this will be hidden once the seat is installed.


There's still a fair bit to add to the cockpit, and I'll do a little bit of weathering to bring it to life a bit (nothing too heavy - this was a peacetime aircraft and would be pretty well looked after).

More soon.

Al the best

Rowan
Merlin
Staff MemberSenior Editor
AEROSCALE
#017
_VISITCOMMUNITY
United Kingdom
Joined: June 11, 2003
KitMaker: 17,582 posts
AeroScale: 12,795 posts
Posted: Tuesday, November 15, 2011 - 11:44 PM UTC
Hi again

It's funny how you sometimes spot things in photos that you've missed on the model sitting right in front of you! In this case it's obvious I've fitted the throttle too far forward - I need to move it back a bit ready to clear the ammunition chute.

All the best

Rowan
Merlin
Staff MemberSenior Editor
AEROSCALE
#017
_VISITCOMMUNITY
United Kingdom
Joined: June 11, 2003
KitMaker: 17,582 posts
AeroScale: 12,795 posts
Posted: Wednesday, November 16, 2011 - 03:15 AM UTC
Hi again

That's a bit happier:


I'll have to cheat a little to get the chute to match the outlet precisely, but it's near enough, and the throttle is in the correct position (and tallies with drawings that Doug once again kindly provided). It also means my poor pilot wouldn't the arms of an orangutan to reach it!

I forgot earlier to add a picture of the engine with all the push-rods in place:


There's still a bit of pipework to add, but it's just about complete and ready for a little weathering to bring out the details.

All the best

Rowan
Merlin
Staff MemberSenior Editor
AEROSCALE
#017
_VISITCOMMUNITY
United Kingdom
Joined: June 11, 2003
KitMaker: 17,582 posts
AeroScale: 12,795 posts
Posted: Friday, November 18, 2011 - 11:30 PM UTC
Hi again

I've blocked out the first "sketch" for the replacement instrument panel:


It's a completely different layout to that fitted in the replica Flycatcher - a real jumble, typical of the days before standardised blind-flying panels. It will only be fully attached at the left hand side - the right will be supported by a compass (also missing on the replica):


I've ordered some HGW bezels as seen HERE to use with Airscale WW1 Dial Decals.

I've noticed another little mistake in the photos - the control column is back-to -front! I'll have to turn the triggers 'round.

All the best

Rowan
Murdo
_VISITCOMMUNITY
Scotland, United Kingdom
Joined: May 25, 2005
KitMaker: 2,218 posts
AeroScale: 211 posts
Posted: Saturday, November 19, 2011 - 02:00 AM UTC
Very nice Rowan.

That's a cracking idea for the spark plugs.

I'll borrow it if I may as I have a WW1 Whippet (Tanky thingy) that I'm scratching engines for.
DougN1
_VISITCOMMUNITY
Georgia, United States
Joined: August 08, 2011
KitMaker: 410 posts
AeroScale: 409 posts
Posted: Saturday, November 19, 2011 - 03:03 AM UTC
Looking good Rowan!

Be sure to make up an extra instrument panel while you're at it and send it to me

It seems that you need to sand that rear bulkhead a bit more, as your photo shows the same gap I ended up with in the Build Guide.

I see you went with an interior green colour - did you find some reference to support that colour, or is it "artistic license"? Regardless, this build is definately looking great!

Doug
Merlin
Staff MemberSenior Editor
AEROSCALE
#017
_VISITCOMMUNITY
United Kingdom
Joined: June 11, 2003
KitMaker: 17,582 posts
AeroScale: 12,795 posts
Posted: Saturday, November 19, 2011 - 05:51 AM UTC
Hi Murdo and Doug

Many thanks for the kind words.

I certainly can't claim to have invented using stretched cotton-bud tube for spark plugs etc. - I'm just happy if seeing my effort with it helps spread the word.

@ Doug - I'll certainly do an extra panel for you. I suppose I could do some resin copies too if anyone else needs them.

The fit behind the cockpit isn't really the way the picture makes it look - the fuselage halves are only clipped together without any tape or glue - put a little pressure either side and it closes nicely.

I've gone by the instructions and Rowan Broadbent's suggestion for a "slate grey" anodised finish. I've actually used RLM 02 (don't tell the Admiralty! LOL!) as a fairly nondescript colour.

All the best

Rowan
Littorio
_VISITCOMMUNITY
England - South East, United Kingdom
Joined: September 15, 2004
KitMaker: 4,728 posts
AeroScale: 1,351 posts
Posted: Sunday, November 20, 2011 - 03:49 PM UTC
This is looking good Rowan, that engine is really something. Having just seen the announcement from Silver Wings about 25% off on the Fiat Cr.32 I think that plus a Hart will wing their way to me for Christmas. Followed in the new year by the Flycatcher and yes you can put me down for one of those instrument panels please.

Now just waiting for some one to bring out a 1/48 or 1/32 Fairey IIIF, Blackburn Shark and the rest of the Hawker Hart family
Merlin
Staff MemberSenior Editor
AEROSCALE
#017
_VISITCOMMUNITY
United Kingdom
Joined: June 11, 2003
KitMaker: 17,582 posts
AeroScale: 12,795 posts
Posted: Sunday, November 20, 2011 - 10:04 PM UTC
Cheers Luciano

HGW have just e-mailed to say they've dispatched the bezels, so I should hopefully get underway this week.

I go along with your wish list - and I'll add a Fairey Fox and Gloster Gauntlet.

All the best

Rowan
 _GOTOTOP