Hello all,
I was looking at my stash for a one final aircraft build before 2011 was over, when a friend suggested that I build one of the Tamiya's P-47 kits if I had one. Having a huge stash, of course I did! (even with all the after-market goodies for 4-5 P-47 kits, despite having only one kit in the stash )
Here's what the intended project looked like at first. Of course, when I was buying the after market items, I was assuming I would be building a P-47 D-20 or a later series razorback. The items included are Eduard's zoom set, Master's .50cal gun barrels for P-47, Ultracast resin diamond-pattern uncovered wheels, Ultracast resin pilot's seats, Ultracast's Hamilton Standard propeller and an EagleCal decal sheet to build 56th FG aircraft. Yes I know, the after market probably costs as much as the kit (possibly more)!
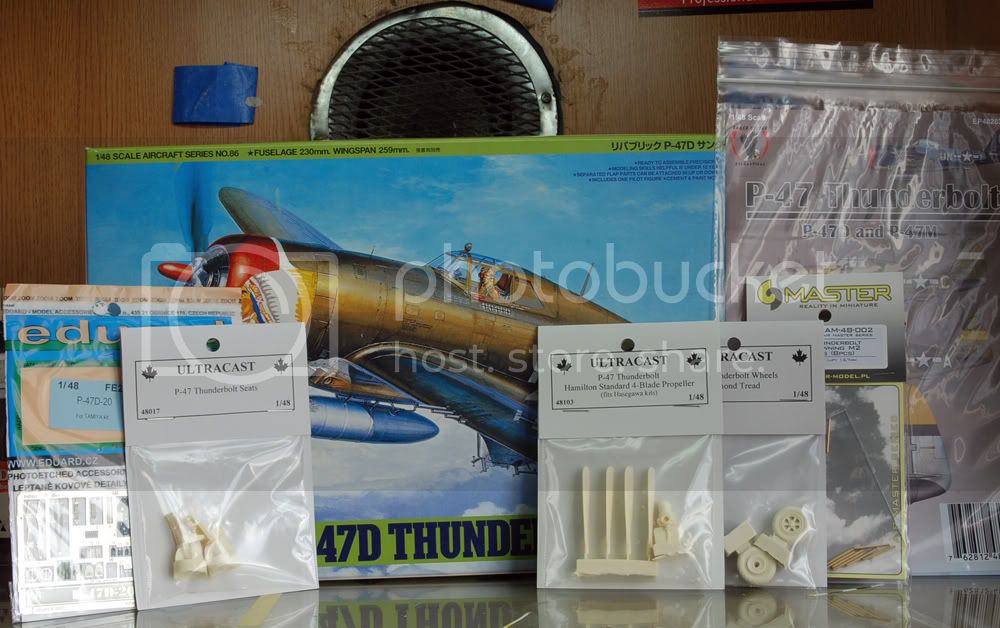
I wanted to build a P-47 with naughty nose-art. I had two sets to choose from... but much to my dismay, one of the sets included P-47s that were D-6 models (which requires some extra resin parts to back-date Tamiya's kit). That left me with the other set, which thankfully has the rather famous "Rozzie Geth / Boche Hunter", the aircraft of the American ace Fred Christensen, who scored 21.5 kills during the war (10.5 with this particular aircraft).
Of course, much to my dismay, Christensen's P-47 is a D-10 model. While you can build it using the Tamiya kit, I had to ditch nearly all of the after-market items except for the pilot's seat and metal gun barrels. The D-10 model has a Curtiss Electric propeller and wheels with covers, so goodbye to Eduard's zoom and Ultracast propeller and wheels!
After deciding which P-47 I was going to build, the construction began, as usual with the cockpit. The Tamiya kit is very detailed and goes together like a dream. I used Gunze's H302 to simulate Republic's cockpit green.
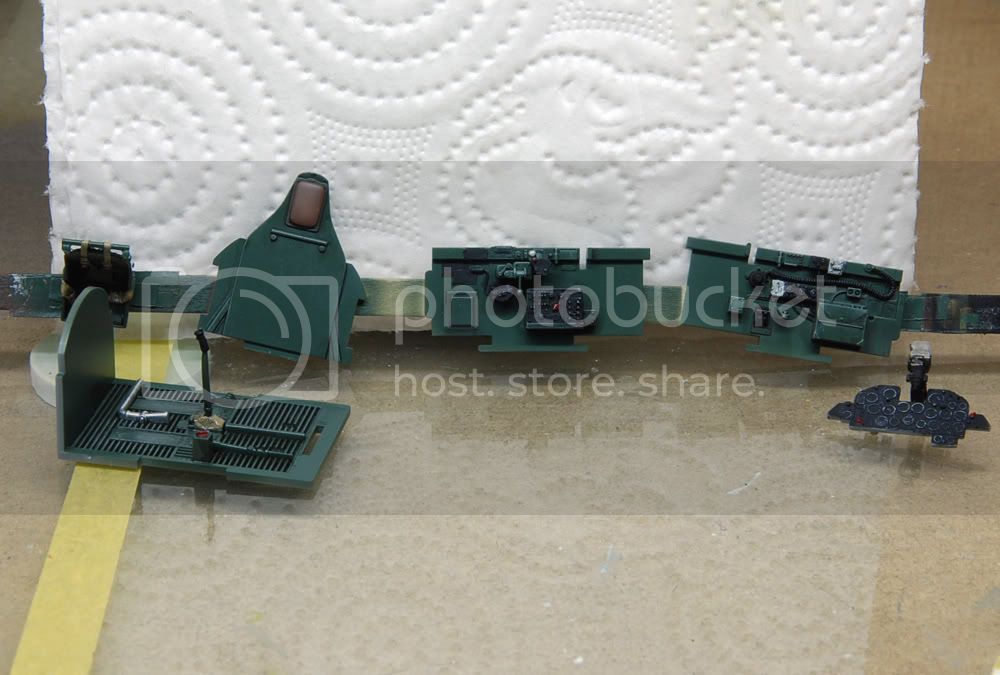
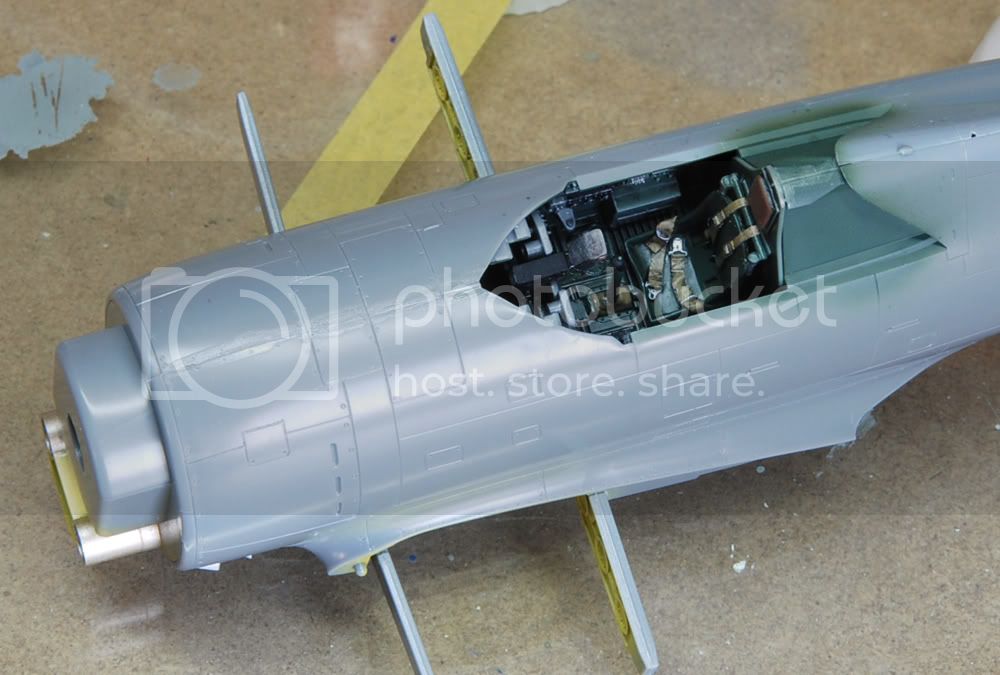
The fuselage was mated without problems and here's what's visible from all that cockpit work that took about a day.
Today I got real early to get some painting done before work. First I sprayed flat black, then Alclad aluminium to required ares over the flat black. The propeller, a combination of these both, also got it's yellow and was complete. The landing gears and the engine are also ready.
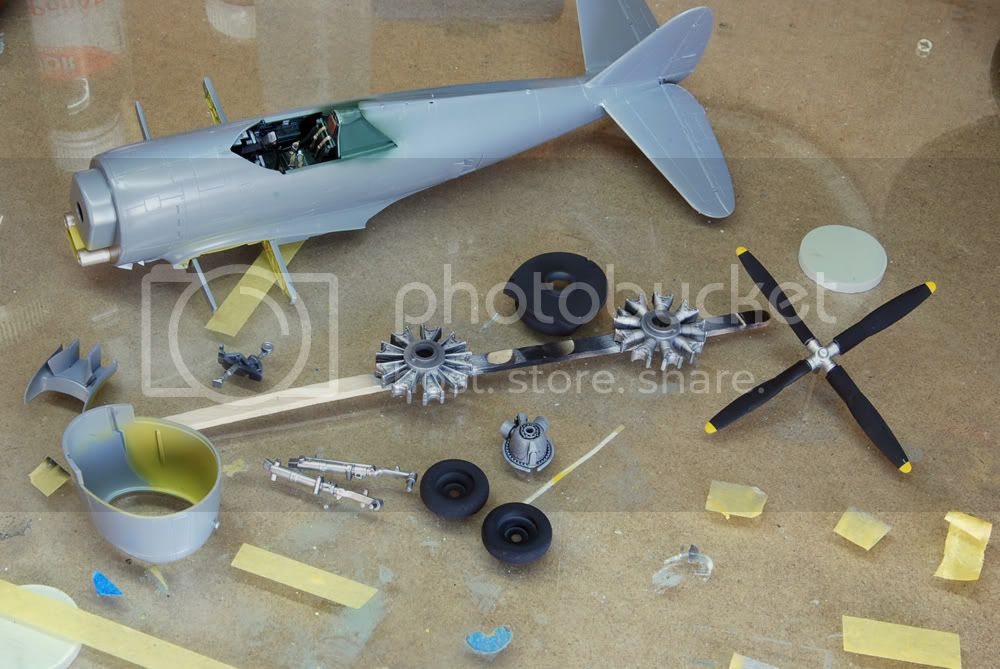
Today, if I have time, I'll assemble the engine and the wings and put the aircraft together.
Hosted by Rowan Baylis
P-47D "Rozzie Geth" (Tamiya, 48th)
emroglan
Istanbul, Turkey / Türkçe
Joined: December 16, 2004
KitMaker: 1,163 posts
AeroScale: 255 posts
Joined: December 16, 2004
KitMaker: 1,163 posts
AeroScale: 255 posts
Posted: Tuesday, November 29, 2011 - 01:19 AM UTC
Naseby
Slovakia
Joined: October 15, 2010
KitMaker: 825 posts
AeroScale: 476 posts
Joined: October 15, 2010
KitMaker: 825 posts
AeroScale: 476 posts
Posted: Tuesday, November 29, 2011 - 08:05 AM UTC
Emre Your Jug is realy cool. Man You are a fast builder, I wish I had Your skills.
eseperic
Croatia Hrvatska
Joined: November 06, 2009
KitMaker: 624 posts
AeroScale: 609 posts
Joined: November 06, 2009
KitMaker: 624 posts
AeroScale: 609 posts
Posted: Tuesday, November 29, 2011 - 11:03 AM UTC
Emre, do you sleep by chance? How many builds do you have per year!? Nevertheless, keep the good work... I am just a teaser!!
emroglan
Istanbul, Turkey / Türkçe
Joined: December 16, 2004
KitMaker: 1,163 posts
AeroScale: 255 posts
Joined: December 16, 2004
KitMaker: 1,163 posts
AeroScale: 255 posts
Posted: Tuesday, November 29, 2011 - 05:14 PM UTC
Thanks Naseby and Entoni. Entoni, I also wrote it in the P-51 topic. My wife goes to work 2 hours before I do, but I get up the same time as she does. That gives me 2 hours of free time each morning, so unless I choose to exercise that day I'm free to build models
This will be my 15th model for this year. I was targeting 12 models in 12 months, but I proudly passed that target (building Tamiya aircraft kits is like cheating!). Who knows, I might attempt a 16th if I have any time left before 2012
Posted: Wednesday, November 30, 2011 - 10:06 PM UTC
You're work is looking great so far Emre, great progress is such a short time. If you are planning to have this finished by new year, why don't you enlist in the Pin-Up Jugs campaign over on P-47 Heaven (shameless self-promotion, I just couldn't help it !) ?
Cheers, D
Cheers, D
emroglan
Istanbul, Turkey / Türkçe
Joined: December 16, 2004
KitMaker: 1,163 posts
AeroScale: 255 posts
Joined: December 16, 2004
KitMaker: 1,163 posts
AeroScale: 255 posts
Posted: Wednesday, November 30, 2011 - 10:20 PM UTC
Oh yes, good thing you made me remember that campaign Mr Shameless Self-Promoter If joining late is no problem I will gladly join. I think I should be able to complete my kit within December.
mpatman
New South Wales, Australia
Joined: March 09, 2006
KitMaker: 248 posts
AeroScale: 160 posts
Joined: March 09, 2006
KitMaker: 248 posts
AeroScale: 160 posts
Posted: Thursday, December 01, 2011 - 02:08 PM UTC
Hi Emre,
Nice start to a great kit! Looking forward to this build.
What are your thoughtson the Ultracast prop? is it worth it over the kit part?
Nice start to a great kit! Looking forward to this build.
What are your thoughtson the Ultracast prop? is it worth it over the kit part?
emroglan
Istanbul, Turkey / Türkçe
Joined: December 16, 2004
KitMaker: 1,163 posts
AeroScale: 255 posts
Joined: December 16, 2004
KitMaker: 1,163 posts
AeroScale: 255 posts
Posted: Thursday, December 01, 2011 - 08:21 PM UTC
Hi Mark,
I wasn't able to use the propeller, so I didn't assemble it. As for the difference, as far as I can see the propeller hub is almost the same. The difference is at the propeller blades. Their shape and width are different compared to Tamiya's propeller. However, unless you put them side by side it's not very noticable. I should also note that I bought that part entirely by mistake. I thought I ordered P-47 closed hub wheels, but ended up with a Hamilton propeller
emroglan
Istanbul, Turkey / Türkçe
Joined: December 16, 2004
KitMaker: 1,163 posts
AeroScale: 255 posts
Joined: December 16, 2004
KitMaker: 1,163 posts
AeroScale: 255 posts
Posted: Thursday, December 01, 2011 - 09:20 PM UTC
I'm also posting progress at P-47 heaven, but just in case anyone wonders, I will also post here.
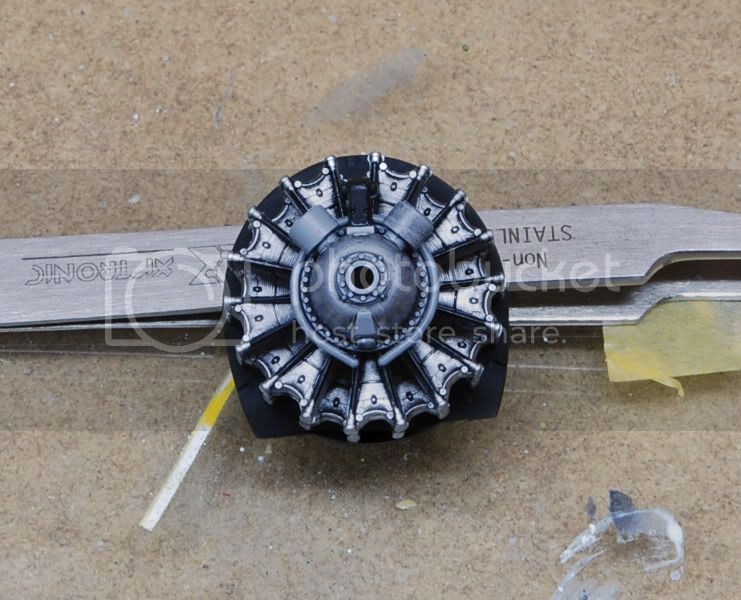
The famous Double Wasp engine was assembled and then given a Dark Wash from MIG productions.
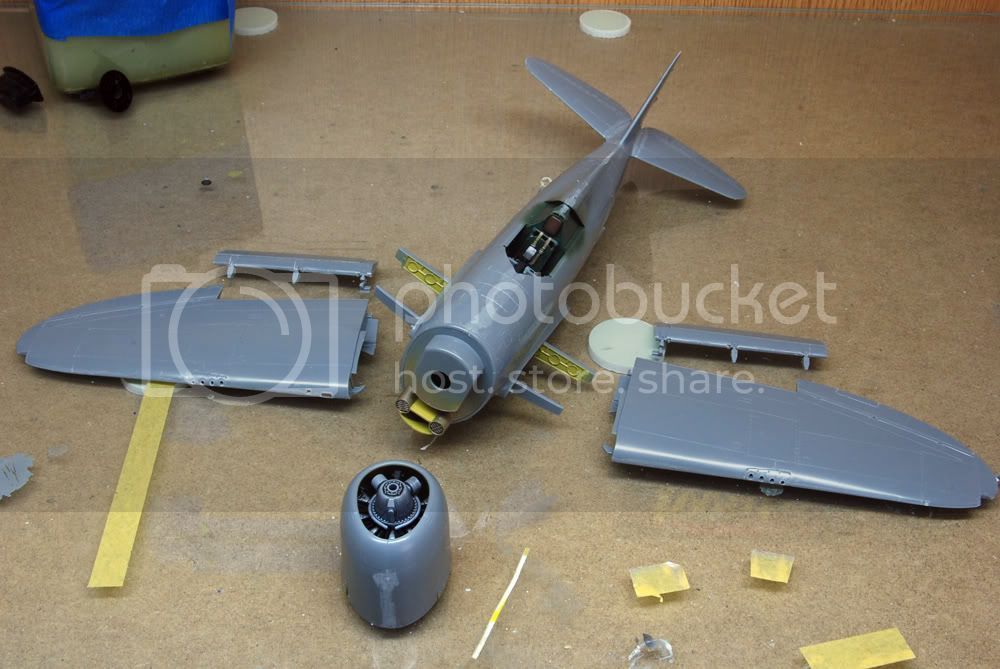
Tamiya gives everything in sub-assemblies, which are then put together. Here are the main assemblies. Be mindful that the two wing root struts are a little thick, if you think them a little by sanding it makes a better fit.
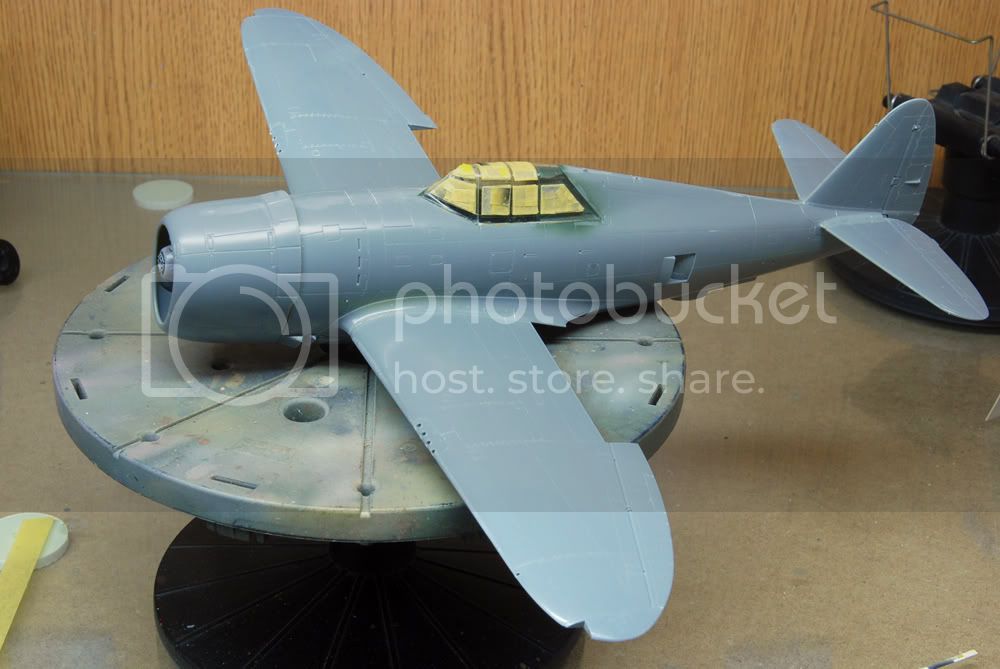
With the canopy in place and masked, I can finally move to the stage I like most: Painting. I will probably use Mr Surfacer 1200 first, though...
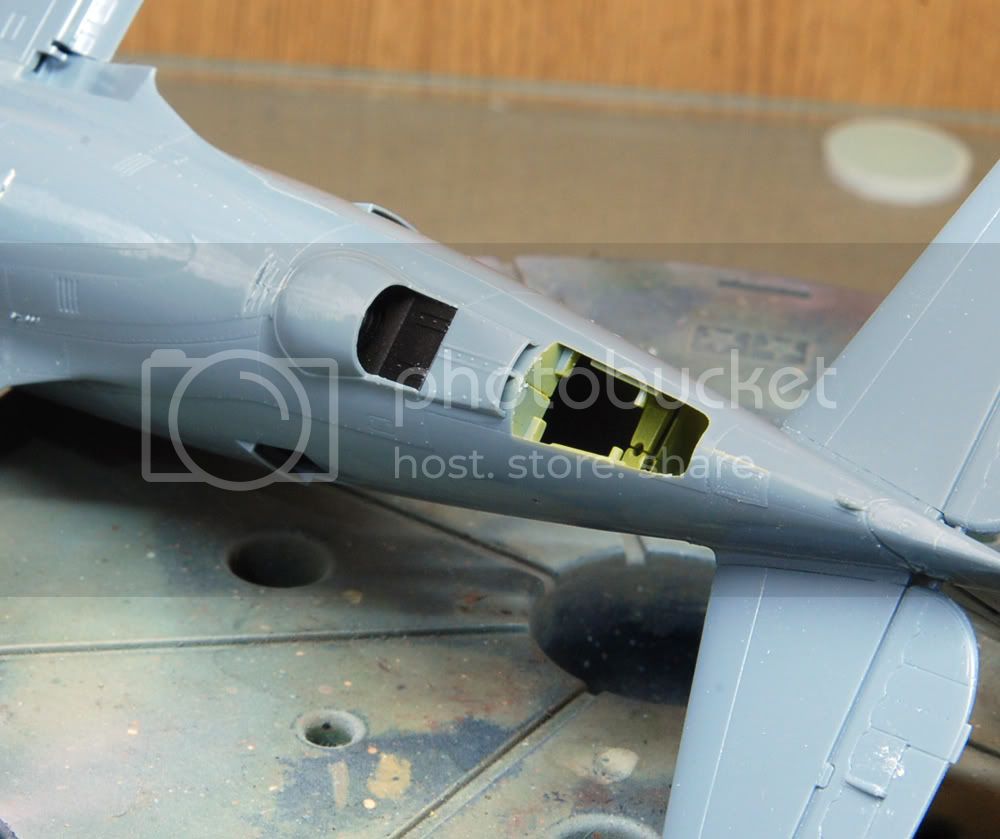
At this stage, I have one important question that I also asked in P-47 forum. There's a part half hidden in a bulge underneath the plane (namely B-18 in the Tamiya kit). The instructions call to paint this part with a mixture of red and metallic grey and I used Burnt Iron to simulate that. What I can't figure out is how much of the part should actually be that color and how much should be Neutral Gray like the remaining underside? The part that is glued after B-18 (B-2) looks like an extension of the same thing. Will that be also gray or burnt iron?
I'm talking about the dark colored part underneath the bulge.
The famous Double Wasp engine was assembled and then given a Dark Wash from MIG productions.
Tamiya gives everything in sub-assemblies, which are then put together. Here are the main assemblies. Be mindful that the two wing root struts are a little thick, if you think them a little by sanding it makes a better fit.
With the canopy in place and masked, I can finally move to the stage I like most: Painting. I will probably use Mr Surfacer 1200 first, though...
At this stage, I have one important question that I also asked in P-47 forum. There's a part half hidden in a bulge underneath the plane (namely B-18 in the Tamiya kit). The instructions call to paint this part with a mixture of red and metallic grey and I used Burnt Iron to simulate that. What I can't figure out is how much of the part should actually be that color and how much should be Neutral Gray like the remaining underside? The part that is glued after B-18 (B-2) looks like an extension of the same thing. Will that be also gray or burnt iron?
I'm talking about the dark colored part underneath the bulge.
Posted: Friday, December 02, 2011 - 04:23 AM UTC
Just mask off the turbine part which you've already sprayed and paint the rest the underside colour.
Looking good. I have no idea how anybody can build so fast though!
Nige
Looking good. I have no idea how anybody can build so fast though!
Nige
emroglan
Istanbul, Turkey / Türkçe
Joined: December 16, 2004
KitMaker: 1,163 posts
AeroScale: 255 posts
Joined: December 16, 2004
KitMaker: 1,163 posts
AeroScale: 255 posts
Posted: Friday, December 02, 2011 - 04:57 AM UTC
Thanks for the info Nigel!
As for fast building... I think giving modelling 1-2 hours each day consistently allows you to do a lot. You should see how much modelling some of the retired folk in my local modelling community can do, compared to them I progress at the speed of a turtle!
emroglan
Istanbul, Turkey / Türkçe
Joined: December 16, 2004
KitMaker: 1,163 posts
AeroScale: 255 posts
Joined: December 16, 2004
KitMaker: 1,163 posts
AeroScale: 255 posts
Posted: Sunday, December 04, 2011 - 12:52 PM UTC
So much for speed building.
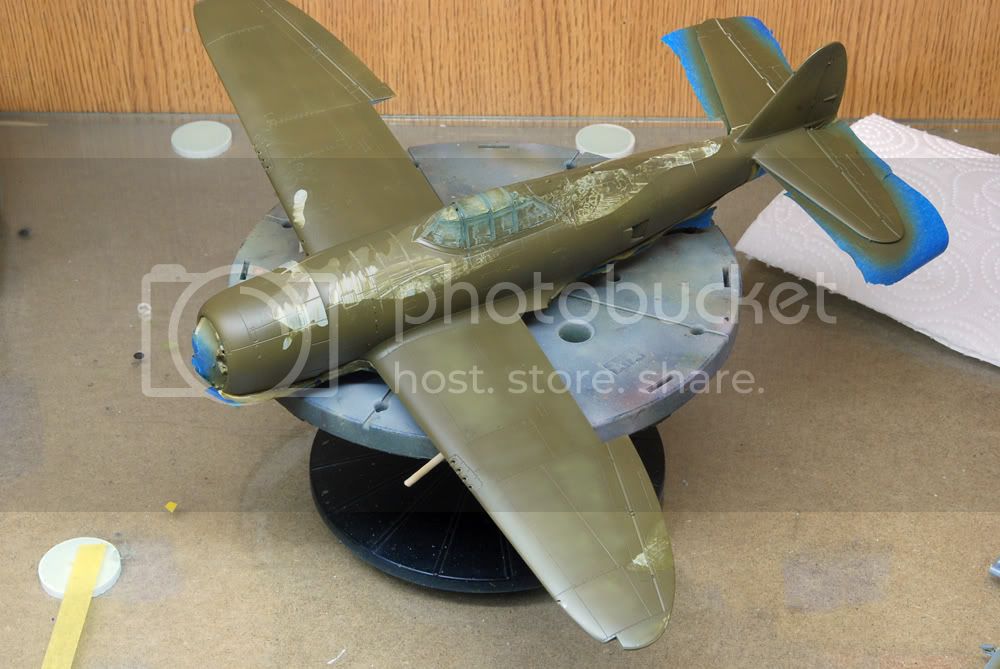
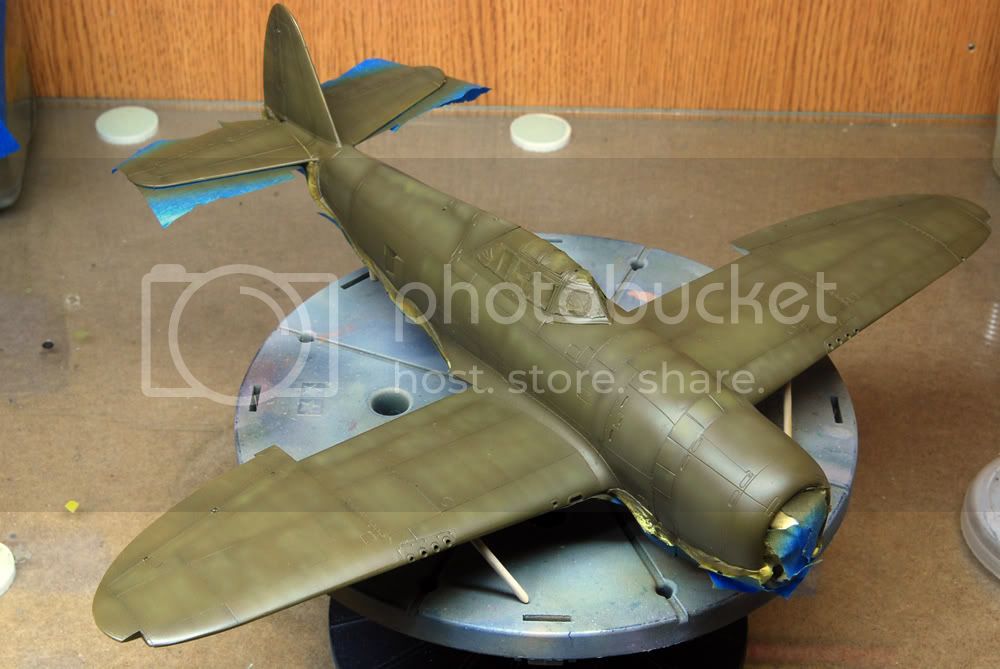
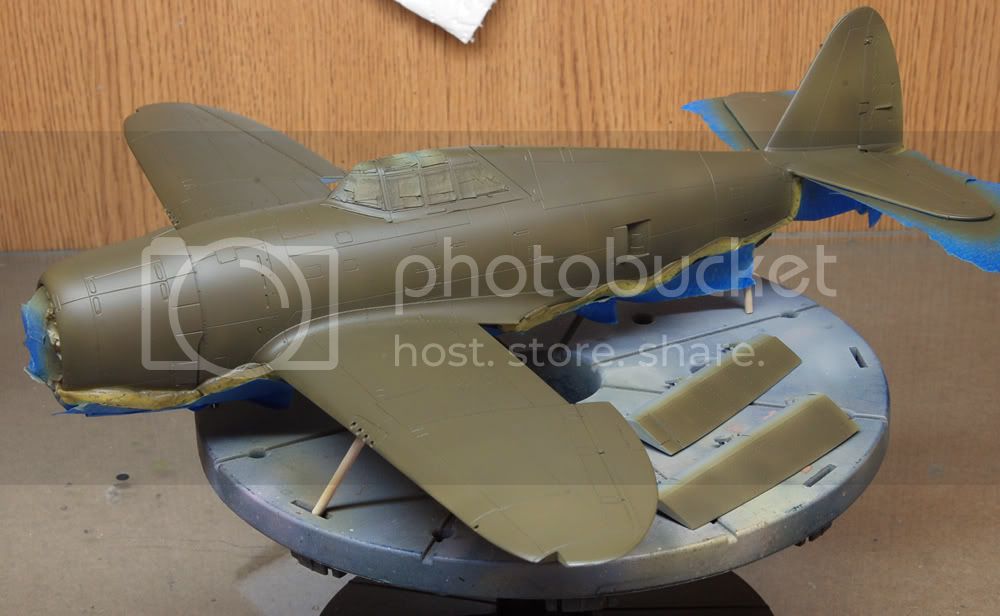
I was happily painting my model and had completed spraying olive drab for the upper surfaces.
Then I was about to apply different shades and simulate fading when disaster struck. The model fell of the bench suddenly, getting tangled and pulling my airbrush hose, which then tipped my hand holding the airbrush. The lacquer thinner in the airbrush spilled and met with the airborne P-47 and then the kit crashed into my lap. Within two seconds, all my clothes were ruined by olive drab color, the P-47 was ruined as the paint on it and its canopy were melted.
What's more, while I was trying to clean up my airbrush after 5 minutes after this incident, my enamel thinner bottle literally burst, making an enamel mess of everything around and burning my right hand somewhat.
This was my 13th aircraft kit this year, maybe I should be superstitious? I'm rather depressed at the moment and might abandon modelling altogether for sometime. Or I might use my rage on the kit and try to repair it. I don't know.
Automaton
United States
Joined: August 12, 2007
KitMaker: 153 posts
AeroScale: 139 posts
Joined: August 12, 2007
KitMaker: 153 posts
AeroScale: 139 posts
Posted: Sunday, December 04, 2011 - 09:43 PM UTC
Unfortunate, but that kind of thing happens all of us occasionally. I'd cool off a couple of days then reexamine it. It takes a lot for a build to be unsalvageable.
Regards;
Automaton
Regards;
Automaton
vanize
Texas, United States
Joined: January 30, 2006
KitMaker: 1,954 posts
AeroScale: 1,163 posts
Joined: January 30, 2006
KitMaker: 1,954 posts
AeroScale: 1,163 posts
Posted: Sunday, December 04, 2011 - 11:55 PM UTC
I HATE it when that happens!!!
every so often the modelling gods demand their sacrifice...
good luck trying to recover it. I usually shelve a project when something like this happens and come back to many months later, once my ego has recovered.
every so often the modelling gods demand their sacrifice...
good luck trying to recover it. I usually shelve a project when something like this happens and come back to many months later, once my ego has recovered.
Jessie_C
British Columbia, Canada
Joined: September 03, 2009
KitMaker: 6,965 posts
AeroScale: 6,247 posts
Joined: September 03, 2009
KitMaker: 6,965 posts
AeroScale: 6,247 posts
Posted: Monday, December 05, 2011 - 12:34 AM UTC
Oh dear. I always use disasters like that as a sign that I'm supposed to go out and get another model.
It looks like a careful session of sanding and a vac canopy will be able to salvage your model. Perhaps it could sit in a vignette with a tarp over the canopy and a bit here and there missing? You could make it a real hangar queen for the hangar queen campaign
emroglan
Istanbul, Turkey / Türkçe
Joined: December 16, 2004
KitMaker: 1,163 posts
AeroScale: 255 posts
Joined: December 16, 2004
KitMaker: 1,163 posts
AeroScale: 255 posts
Posted: Monday, December 05, 2011 - 01:48 AM UTC
Quoted Text
I HATE
every so often the modelling gods demand their sacrifice...
Well I consulted the shaman and he told me an Eduard Bf 110D was sacrifice enough for the modelling gods, so I'm kind of baffled as to why this happened
Jessie, I don't have anywhere left to stash new boxes or the life span to build them all, so your method probably wouldn't work! (besides I would be endangering my life by subjecting to myself to the wrath of our "House God").
I have nearly completed sanding off the ruined paint. It looks like using primer saved the day, as Mr Surfacer 1200 somehow resisted the fury of the lacquer thinner and held it off, so the plastic underneath was saved. Another proper coat of Olive Drab should do the trick.
As for the canopy, I'm not so hopeful. The worst case, I'll do as Jessie suggested and cover the cockpit with a tarp. It would be easier than trying to remove the canopy and replace it with a vacuform one.
emroglan
Istanbul, Turkey / Türkçe
Joined: December 16, 2004
KitMaker: 1,163 posts
AeroScale: 255 posts
Joined: December 16, 2004
KitMaker: 1,163 posts
AeroScale: 255 posts
Posted: Monday, December 05, 2011 - 03:01 PM UTC
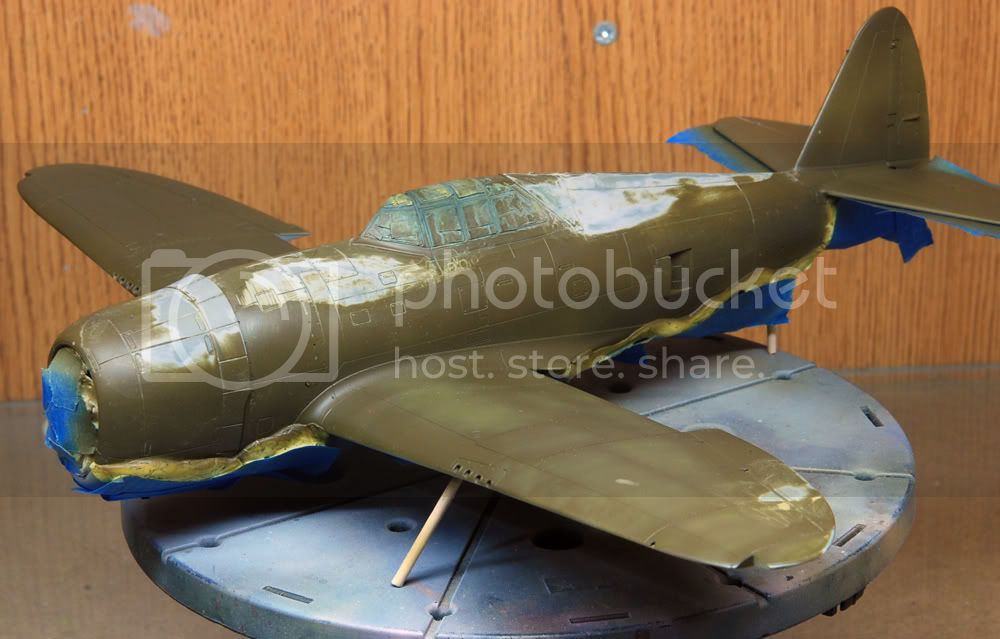
Rescue operations began yesterday evening. With a wet 800 grid sandpaper, I smoothed out the damaged paint areas. As Mr Surfacer thankfully protected the plastic in most areas, the damage was mostly gone with careful sanding. A few damaged spots remained, but they can easily be hidden with paint and weathering.
The P-47 is ready to receive another coat of olive drab.
Yesterday night the P-47 was sprayed with olive drab, last checks were made against damaged areas showing through and I went to bed.
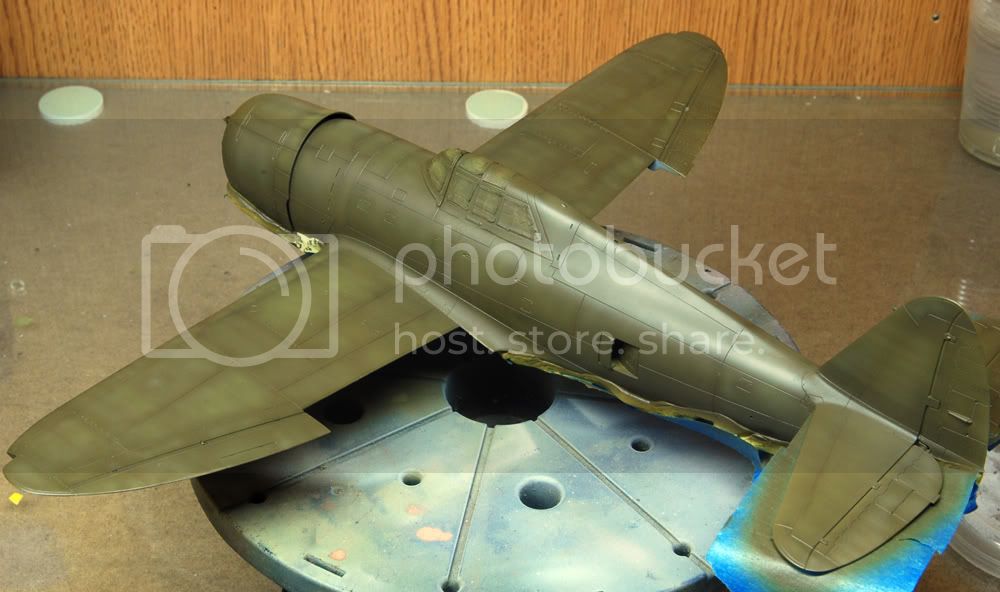
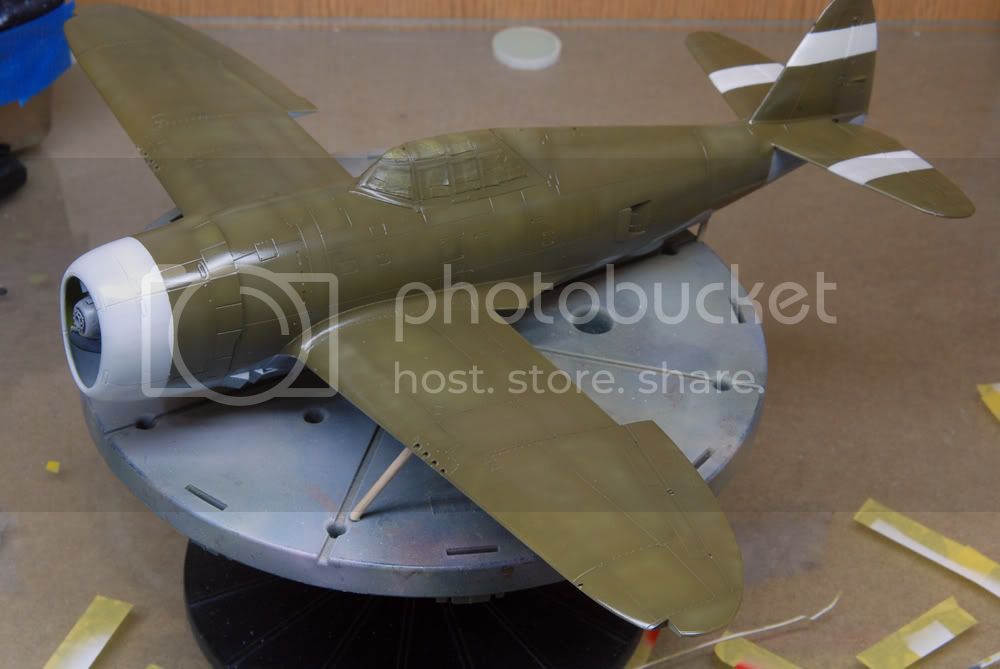
Today I got up very early and after kickstarting my own engine with coffee, I settled down to work. I tried to create different shades of olive drab by adding Tamiya's XF-3 Yellow, XF-4 Yellow-Green and XF-57 Buff, as well as some Gunze H-311 Light Grey to my base olive drab (Gunze's H52). I also made some passes in the direction of flight and did some shading on the panel lines, using a paint mixture of H-52 Olive Drab and flat black.
Please let me know what you think. If all is well, I will mask and paint the white stripes on the rudder, stabilizators and the engine cowling.
GhostHawk
Cordoba, Argentina
Joined: January 27, 2011
KitMaker: 268 posts
AeroScale: 264 posts
Joined: January 27, 2011
KitMaker: 268 posts
AeroScale: 264 posts
Posted: Monday, December 05, 2011 - 05:17 PM UTC
Hi, Emre
It's looking good for me...
Specially after the solvent accident... that shows my how important is a good primer, and now I belive it's an smart investment pick up some jars on my next paints purchase...
I really enjoy your buildings... Thanks
Diego
It's looking good for me...
Specially after the solvent accident... that shows my how important is a good primer, and now I belive it's an smart investment pick up some jars on my next paints purchase...
I really enjoy your buildings... Thanks
Diego
emroglan
Istanbul, Turkey / Türkçe
Joined: December 16, 2004
KitMaker: 1,163 posts
AeroScale: 255 posts
Joined: December 16, 2004
KitMaker: 1,163 posts
AeroScale: 255 posts
Posted: Monday, December 05, 2011 - 07:04 PM UTC
Thank you Diego! I can recommend Gunze's Mr Surfacer 1200 or Tamiya's grey colored (and very bad smelling) primer. I have used both and they are nice.
emroglan
Istanbul, Turkey / Türkçe
Joined: December 16, 2004
KitMaker: 1,163 posts
AeroScale: 255 posts
Joined: December 16, 2004
KitMaker: 1,163 posts
AeroScale: 255 posts
Posted: Wednesday, December 07, 2011 - 02:37 AM UTC
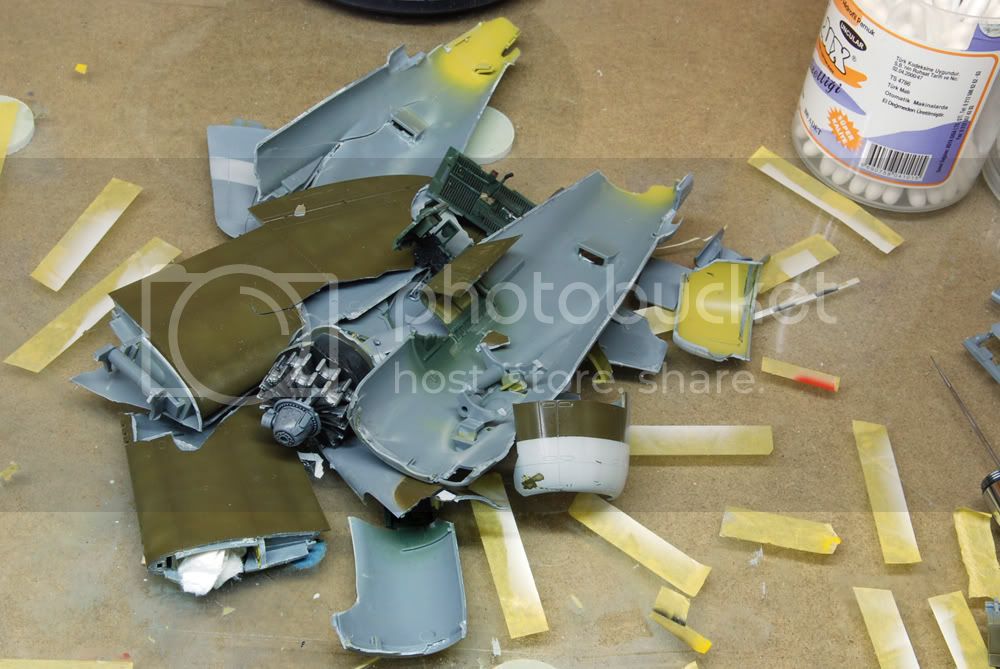
I had sprayed a gloss coat over the P-47 and was preparing for decals when everything started to go terribly wrong. Decals splintered, the model fell of the bench and damaged its paint again, Microsol spilled all over the place. All the while I was getting more furious and furious...
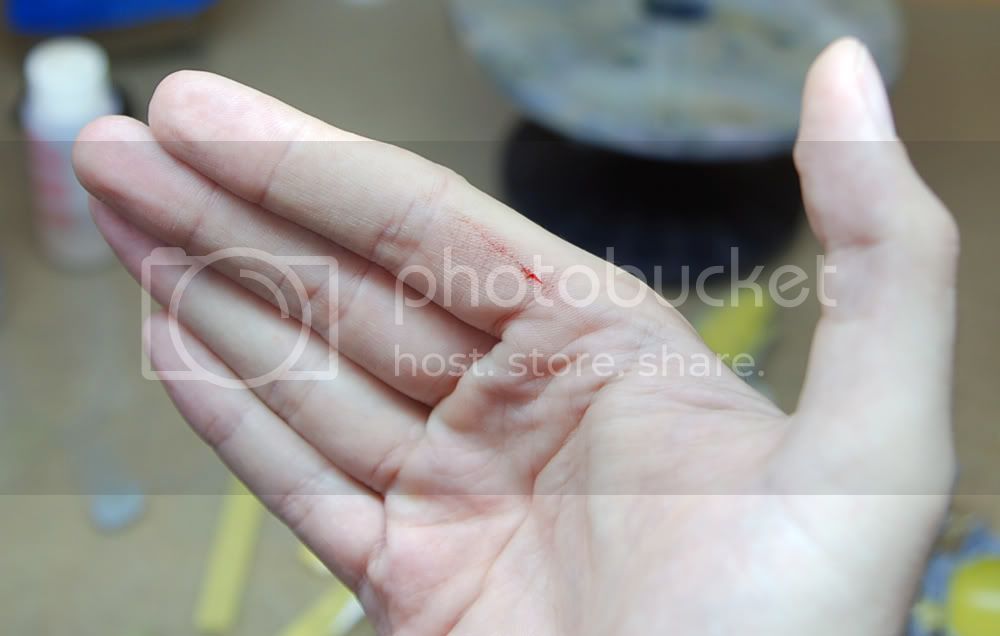
And then the unthinkable happened. The kit slipped and fell and I don't know how but it managed to slice my hand while doing so...
Which in turn caused my safety switches to turn off, and I pushed my fury to MAX. The modelling gods demanded their sacrifice in blood, so yes, they got their sacrifice!
And this is the end to my building blog. I don't think I will be touching any plastic models very soon. Although unlucky 13 is not a common superstition in Turkey, I am beginning to see some sense in it (this was my 13th aircraft build for the year).
GhostHawk
Cordoba, Argentina
Joined: January 27, 2011
KitMaker: 268 posts
AeroScale: 264 posts
Joined: January 27, 2011
KitMaker: 268 posts
AeroScale: 264 posts
Posted: Wednesday, December 07, 2011 - 04:39 AM UTC
Hi Emre,
And I´m sorry for your bad, bad day...
I hope you feel better in a few days...
I can not perform more than two buildings a year, so 12 from 13 its a good ratio (statitistically meaning) any way; and the year not endid yet...
For the future, may be, can you take in consideration the folowing idea...
http://www.model34.com/index.php?topic=289.0
The link it´s in Spanish, but the pics speak by itself... may be you can perform an adaptation your support device...? I do not know but take a look when you wand...
Smile
See you latter...
P/D I´m sorry for my English, the Grammar and the ortography are not my stroger points...
emroglan
Istanbul, Turkey / Türkçe
Joined: December 16, 2004
KitMaker: 1,163 posts
AeroScale: 255 posts
Joined: December 16, 2004
KitMaker: 1,163 posts
AeroScale: 255 posts
Posted: Wednesday, December 07, 2011 - 12:07 PM UTC
Thanks Diego.
I plan to visit IKEA today and purchase their circular serving tray, which can rotate. It's diameter is 30 cm and should give a lot of space to work compared to Tamiya's stand (which was too small for the P-47 and was indirectly responsible for the accidents). The only problem is the tray is made of wood and its surface is glossed up. I must find a way to make it a matt surface, maybe spray primer on it or something.
Yeah, the year didn't end yet, but my modelling enthusiasm did. I have an important licensing exam next week and it's stressing me out. I think until the exam I won't be touching anything. We'll see.
Your English is perfectly fine. I can easily understand you. Compared to Turks who claim they are good English speakers around me, you are an English language professor
tornado64
England - North West, United Kingdom
Joined: August 15, 2009
KitMaker: 203 posts
AeroScale: 57 posts
Joined: August 15, 2009
KitMaker: 203 posts
AeroScale: 57 posts
Posted: Wednesday, December 07, 2011 - 08:35 PM UTC
that'd be"rozzie death" then !!
Posted: Wednesday, December 07, 2011 - 08:41 PM UTC
Quoted Text
that'd be"rozzie death" then !!
"Boche Busted"
Nige
tornado64
England - North West, United Kingdom
Joined: August 15, 2009
KitMaker: 203 posts
AeroScale: 57 posts
Joined: August 15, 2009
KitMaker: 203 posts
AeroScale: 57 posts
Posted: Wednesday, December 07, 2011 - 08:41 PM UTC
Quoted Text
Thanks Diego.
The only problem is the tray is made of wood and its surface is glossed up. I must find a way to make it a matt surface, maybe spray primer on it or something.
try skateboard grip tape !! http://www.ebay.co.uk/itm/UNION-BLACK-SKATEBOARD-GRIPTAPE-9-x-33-GRIP-TAPE-/250576203522?pt=UK_Sporting_Goods_Skateboarding_Skating_ET&hash=item3a57816f02