_GOTOBOTTOM
Modern (1975-today): USA
Modern aircraft of the United States.
OV-10D Bronco ~ USMC
vertigo
_VISITCOMMUNITY
Dublin, Ireland
Joined: November 11, 2004
KitMaker: 388 posts
AeroScale: 225 posts
Posted: Sunday, January 08, 2012 - 05:09 AM UTC
While my MiG-15 sits on the wayside for being irritating I'm starting another build for the Marine Corps Campaign on Armorama.


The kit is from Academy, in 1/72nd scale, and represents an OV-10D Bronco as it would've appeared during Operation Desert Storm. Two squadrons of the USMC, VMO-1 & VMO-2, deployed with both the OV-10A and the OV-10D during the war.

Rather than follow the camouflage scheme as shown on the boxart I intend to a wrap-around Lizard camouflage scheme consisting of grey, green and black. Should look interesting when complete.


A detailed shot of the sprues and decals; this kit is basically the OV-10A available from Academy with extra parts added to make the OV-10D. The giveaway comes from the AIM-9 Sidewinders included with the kit which are actually Vietnam ear AIM-9D's rather than the AIM-9L's used during the Gulf War.


Here we have the fuselage halves which are so short because of the interesting twin tail arrangement of the Bronco. You'll also note the multiple sink marks, I've filled the two most likely to be noticed once the fuselage is joined together.


Barring the ribbed section on the right these are all pieces of the cockpit and nosecone that had visible sink marks. I'm working on filling or removing those at the moment.
Keeperofsouls2099
_VISITCOMMUNITY
Florida, United States
Joined: January 14, 2009
KitMaker: 2,798 posts
AeroScale: 2,443 posts
Posted: Monday, January 09, 2012 - 01:36 PM UTC
This will be interesting to watch.and I also hate sink marks
warreni
_VISITCOMMUNITY
South Australia, Australia
Joined: August 14, 2007
KitMaker: 5,926 posts
AeroScale: 2,201 posts
Posted: Monday, January 09, 2012 - 03:27 PM UTC
hehehehe.. side-lined due to being irritating..
My first ICM TB-3 will never be finished as it was EXTREMELY irritating..
vertigo
_VISITCOMMUNITY
Dublin, Ireland
Joined: November 11, 2004
KitMaker: 388 posts
AeroScale: 225 posts
Posted: Tuesday, January 10, 2012 - 09:37 AM UTC

Quoted Text

hehehehe.. side-lined due to being irritating..
My first ICM TB-3 will never be finished as it was EXTREMELY irritating..


You know I have a Revell Harrier GR.5 in the same state; raised panel lines, bad seams and a horrible experience with Revell putty has condemned it to a box.

I'll get back to the MiG-15 soon though once I work up the enthusiasm, just have to keep picturing the finished product in my mind.
vertigo
_VISITCOMMUNITY
Dublin, Ireland
Joined: November 11, 2004
KitMaker: 388 posts
AeroScale: 225 posts
Posted: Friday, January 13, 2012 - 07:08 AM UTC
Alright guys, I’m going to need some help here. I’ve been looking through Google Images and Flickr trying to get together some good images of the cockpit for the OV-10D, although I’d settle for an OV-10A, but I’m not doing very well.

Most of the pictures I’ve found are of Broncos in fire fighter service with some extra gadgetry added to the aircraft so not very helpful. So if anyone can dig up some good images of the Bronco’s cockpit I’d be more than grateful. I’m particularly interested in the seats, harnesses and the rear of the cockpit.
JClapp
#259
_VISITCOMMUNITY
Massachusetts, United States
Joined: October 23, 2011
KitMaker: 2,265 posts
AeroScale: 1,715 posts
Posted: Friday, January 13, 2012 - 07:23 AM UTC
Did you see the OV-10 Bronco Association web site?
http://www.ov-10bronco.net/

snagged from there
vertigo
_VISITCOMMUNITY
Dublin, Ireland
Joined: November 11, 2004
KitMaker: 388 posts
AeroScale: 225 posts
Posted: Saturday, January 14, 2012 - 07:11 AM UTC
That's a useful site, thank you.
vertigo
_VISITCOMMUNITY
Dublin, Ireland
Joined: November 11, 2004
KitMaker: 388 posts
AeroScale: 225 posts
Posted: Sunday, January 22, 2012 - 12:22 AM UTC
Apologies for the lack of updates lately, I've been trying out a few experimental techniques for making small aircraft display bases while I contemplate what exactly to do with the Bronco cockpit.
vertigo
_VISITCOMMUNITY
Dublin, Ireland
Joined: November 11, 2004
KitMaker: 388 posts
AeroScale: 225 posts
Posted: Friday, February 03, 2012 - 07:12 AM UTC
I've been working away on the cockpit of the Bronco for the last while. What Academy provides is fairly sparse and for the OV-10A I suspect. I've tried to add some detail where I could but super detailing, or whatever you prefer to call it, isn't really my forte. I don't have the patience to carefully cut and shape aftermarket styrene.

I've only got the one picture to show, it was getting the dark as it was taken which didn't help and the gloss coat has made everything look pretty dull. It looks better in person I can assure you and should look even better once weathered.


Some additional detail I've added include seatbelts made from green putty, they're a little on the thick side but once weathered and viewed through the canopy I think they'll look good. I also used green putty to add padding to both seats and I used it yet again on the front sidewalls to put down a few buttons. Academy left this area bare and I felt it needed something. There is a throttle lever there on the real aircraft but I couldn't replicate that. I added a black box to the side of the front seat as there seemed to be one on the real aircraft. I've also added another box to the top of the rear console and I'm going to paint a screen on it.

Finally I noticed that the Bronco has an abundance of cables snaking through the cockpit. I desperately wanted to recreate that as I thought it would look impressive. I first tried simulating the cables using strands of picture hanging wire but it wouldn't bend the way I wanted it too and the super glue wouldn't hold it down. Odd I thought as it was holding the wire to my hands pretty well.

So I settled on thin white thread. The thread was dipped in future and left to dry before 'installation.' You see when I get around to weathering the cockpit I want the wash to pool around the thread but not stain into it, the future should keep it safe. Also the wash could've caused fibres to splay out of the thread which I also didn't want. It happened when I tried to paint un-futured thread, terrible looking.

The plan of action is to build a shelf at the back of the cockpit, another thing Academy neglected to add, and run the threads into a box. Hopefully by the end it'll all come together. It's not something I'd been too keen on jumping into again.

By the way, I've made a small display base for the Bronco using a tea coaster and some sandpaper. If you're interested here's a link to the thread at IPMS Ireland.
AussieReg
Staff MemberAssociate Editor
AUTOMODELER
#007
_VISITCOMMUNITY
Victoria, Australia
Joined: June 09, 2009
KitMaker: 8,156 posts
AeroScale: 3,756 posts
Posted: Friday, February 03, 2012 - 09:37 AM UTC
The cockpit is looking great Vertigo, and I just had a read through your IPMS thread as well. The runway base came up very nicely indeed and your thread is very informative. Just for your interest, one of my clubmates has a good method for making your own Concrete Runways on our club website.

Keep up the great work.

Cheers, D
vertigo
_VISITCOMMUNITY
Dublin, Ireland
Joined: November 11, 2004
KitMaker: 388 posts
AeroScale: 225 posts
Posted: Friday, February 03, 2012 - 12:10 PM UTC
Believe or not but that article was one of the encouraging factors for me to try and make my own base.
AussieReg
Staff MemberAssociate Editor
AUTOMODELER
#007
_VISITCOMMUNITY
Victoria, Australia
Joined: June 09, 2009
KitMaker: 8,156 posts
AeroScale: 3,756 posts
Posted: Friday, February 03, 2012 - 04:18 PM UTC
vertigo
_VISITCOMMUNITY
Dublin, Ireland
Joined: November 11, 2004
KitMaker: 388 posts
AeroScale: 225 posts
Posted: Monday, February 06, 2012 - 06:15 AM UTC
Another update with loads of pictures too.

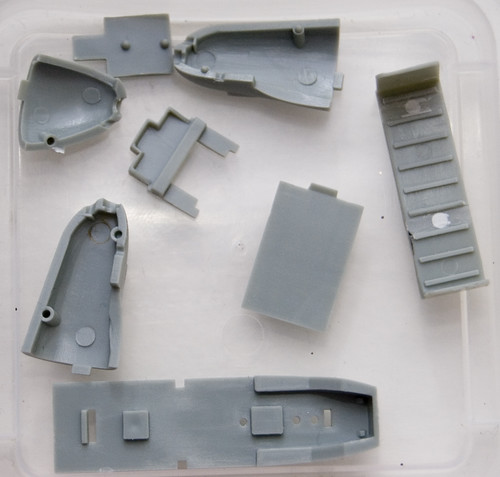
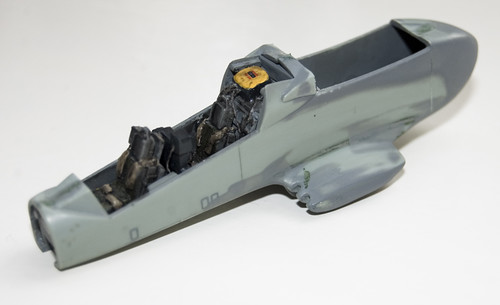
So I've closed up the fuselage halves and thankfully the seams on the tub aren't that bad but I've realized the Bronco is going to have lots of sub assemblies so there will be seams aplenty soon enough.


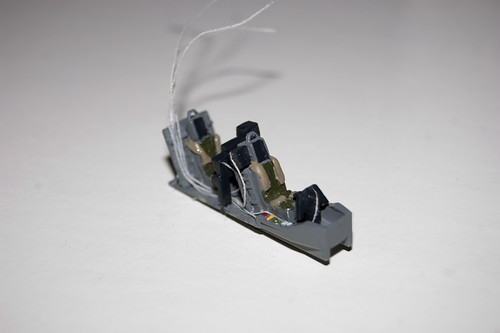
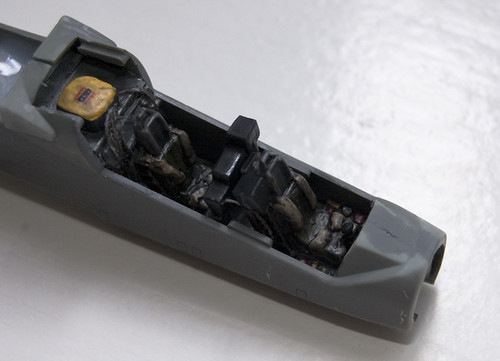
You can see what I was trying to do with the thread here; I made a 'fuse box' of sorts out of green putty with the idea of feeding the threads into it. I don't think the effect was really pulled off very well. In fact once I started weathering the cockpit the thread stained, as you can see, which I didn't really want. I'm just hoping that once the canopy is on it'll all come together.


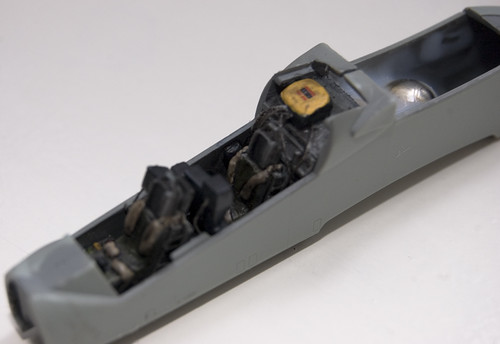
The weathering was done with a Citadel wash, Babab Black in this case, and then a matt coat followed. The shelf the fuse box is sitting on is a piece of evergreen; Academy provided nothing for this area and there would've been a hole into the fuselage visible through the canopy. I still need to block up the back of it.


So that's the cockpit, certainly not the best I've done but it'll do I think. I might add some brake lines to the landing gears later in the build so if anyone has any suggestions for a good, and easily attainable, material for brake lines then let me know.


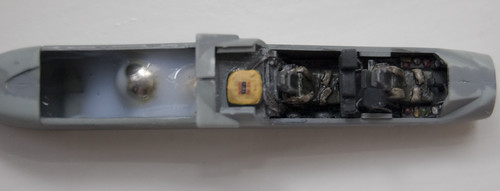
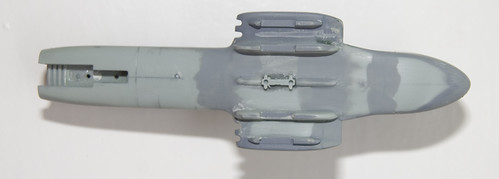
Weight is going to be a big issue for this build, I can tell. Academy suggests about 8g for the nose but there's absolutely no room in there. So I've added to two fishing weights immediately behind the cockpit and I'm hoping this will place weight just forward, or on, the main landing gear. I might be able to squeeze some one cent coins into the tail booms just behind the props to add in more weight.


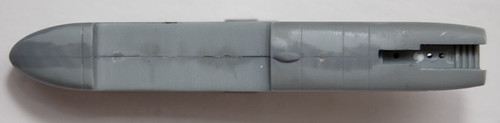
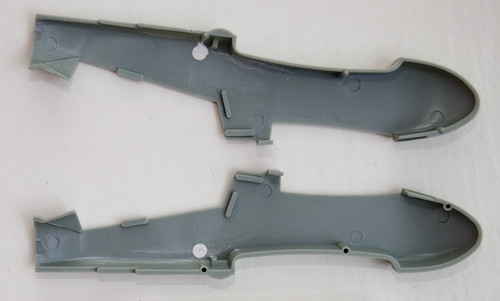
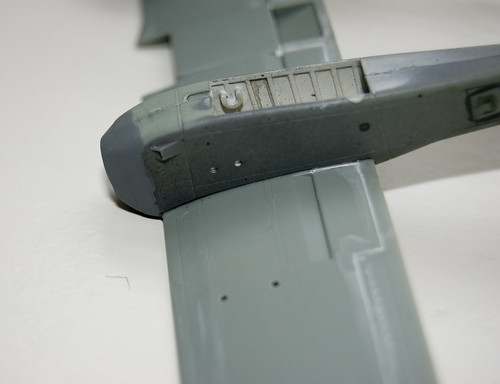
You can see a few seams here on the underside of the fuselage tub. The indented area accepts the weapons station which will create more work as its fit isn't great. The fit of the nose to the fuselage also isn't great.


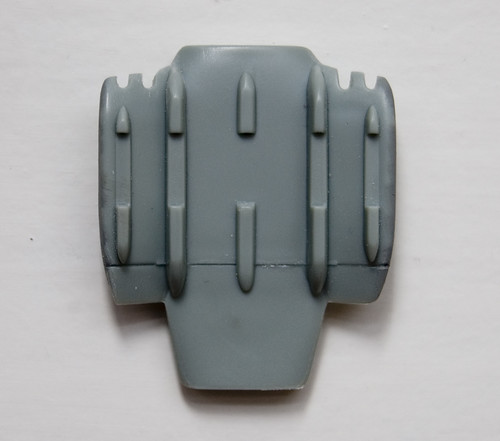
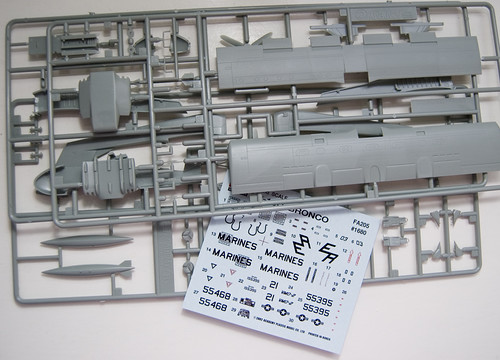
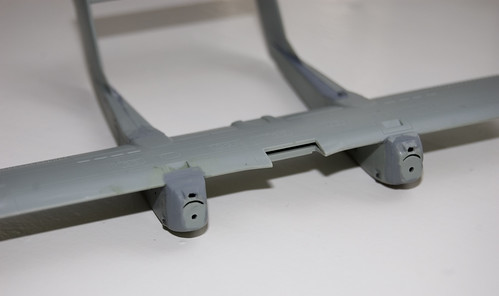
And here is the weapons station; the grooves in the front accept the OV-10's guns which are M60 machine guns. I thought I read somewhere that some OV-10D's had their M60's upgraded to 30mm cannons but I'm not sure. I'll be leaving the guns off until late in the build to make sure I don't damage them.


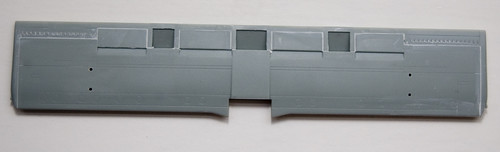
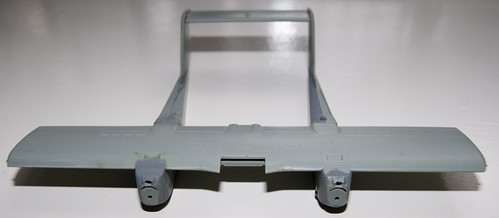
The OV-10 has long 40 foot wing and the kit wing comes in two pieces that need to be joined together with four small holes drilled out first for the wing pylons. The middle gap at the back of the wing slots over the fuselage tub while the other two gaps accept the tail booms. As far as sub assemblies go first I'll need to add the weapon station to the fuselage tub and clean that up. Then I'll add the wing to the top of the fuselage tub and clean that up. The tail booms will be assembled, and cleaned up, then attached to the wing and, again, cleaned up. Lots of seams and gaps to look forward too.


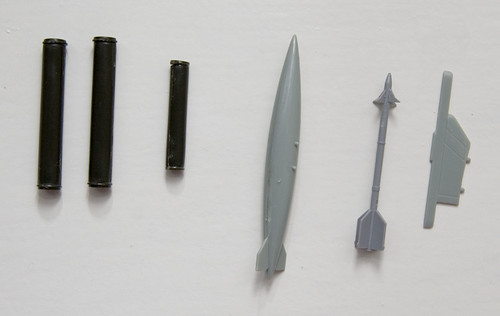
Finally the weapons loadout for the Bronco. Moving from left to right there are two LAU-10 rocket pods, an LAU-68 rocket pod, a 150 gallon fuel tank, an AIM-9L Sidewinder and a wing pylon launch rail for the Sidewinder. I took the loadout information from the Desert Storm website I mentioned earlier in the build blog.

The three rocket pods came from the old Italeri NATO weapons set, two of which I bought recently from eBay. The Sidewinder came from a Hasegawa weapon set and the fuel tank plus the wing pylon are from the kit.

So the next big job is to get the sub assemblies built and start joining everything together, then the Bronco can really start taking shape. There's a lot work involved but it's worth it for a Bronco in my opinion, great looking aircraft.

Now, let me ask everyone one last question. Considering the amount of gaps and seams I'll be facing what is everyone's favoured method for dealing with them?
Jessie_C
_VISITCOMMUNITY
British Columbia, Canada
Joined: September 03, 2009
KitMaker: 6,965 posts
AeroScale: 6,247 posts
Posted: Monday, February 06, 2012 - 06:40 AM UTC
You could try drybrushing the wiring with the base colour of the wires to make the staining less visible.

I like to use Bondo auto putty for gap filling, unless it's a really awkward one where I use gap-filling superglue. For huge gaps that need sculpting I'll use Miliput. I may also layer the different types of filler: gap filling superglue or Miliput for strength and bondo on top so the final shape can be sanded easily.

For gaps around clear parts I like Krystal Clear or regular white glue. You can shape it with a wet fingertip so you don't have to risk sanding the clear areas.
JClapp
#259
_VISITCOMMUNITY
Massachusetts, United States
Joined: October 23, 2011
KitMaker: 2,265 posts
AeroScale: 1,715 posts
Posted: Monday, February 06, 2012 - 07:19 AM UTC
That cockpit detail is fabulous!
The Bronco is such a cool looking beast I agree it will be worth all the affort.

You need to get hold of some good old fashion lead (Pb) to get some serious nose heaviness into that plane.
It comes in thin sheet form and wire. It can be cut with a razor knife and formed into shape with pliers and peening hammer.
I can see there's room for some under the pilots seats, between the cockpit sides and the fuselage, and inside that nose cone.

Just keep your hands away from your mouth while you are working with it, and pick up any filings and shavings with masking tape.

edit to add: I dont know what they make euro one cent coins out of, but over here, US cent coins are no heavier than styrene!
vertigo
_VISITCOMMUNITY
Dublin, Ireland
Joined: November 11, 2004
KitMaker: 388 posts
AeroScale: 225 posts
Posted: Monday, February 06, 2012 - 09:04 AM UTC

Quoted Text


edit to add: I dont know what they make euro one cent coins out of, but over here, US cent coins are no heavier than styrene!


They're made of steel covered with copper. They're not terribly heavy individually but a few add up. I'll have a look around for some lead but I don't think either of the local hardware stores carry any.

@Jessica: I think I'll look into the gap filling super glue. There is a modeller I've been following who uses super glue quite a bit, he has some interesting builds too.
vertigo
_VISITCOMMUNITY
Dublin, Ireland
Joined: November 11, 2004
KitMaker: 388 posts
AeroScale: 225 posts
Posted: Wednesday, February 08, 2012 - 11:21 PM UTC
For anyone interested, this website has colour information for most of the USMC camouflage schemes used on the OV-10 between 1955 and 1991.

The website also has camouflage scheme information for dozens of other aircraft as well, well worth checking out in my opinion.
Jessie_C
_VISITCOMMUNITY
British Columbia, Canada
Joined: September 03, 2009
KitMaker: 6,965 posts
AeroScale: 6,247 posts
Posted: Thursday, February 09, 2012 - 04:04 AM UTC
The trick to working with superglue is to use an accelarator chemical (sold right beside the glue in most cases) and to file it down almost immediately after it hardens. If you leave it, it gets rock hard and then you'll find yourself sanding away the plastic around it without toutching the glue.

The sequence goes:
-apply the glue and get it where you want it to go;
-spritz on the accelerator and allow it to evaporate (about 30 seconds or so);
-file and sand the glue to its final shape.

As with everything, a bit of practise on a test model will teach you the tricks of the trade. If you've got really monstrous gaps it's best to fil them with layers rather than try to get it all at once.
vertigo
_VISITCOMMUNITY
Dublin, Ireland
Joined: November 11, 2004
KitMaker: 388 posts
AeroScale: 225 posts
Posted: Monday, February 20, 2012 - 09:22 PM UTC
I thought it was about time I provided a bit of a verbal update on my build, pictures may follow in a few days.

Basically I've been working on mating the fuselage with the weapons bay which slots in underneath it. Blending them together has been taking a lot of work but I've finally got them to a finish I'm happy with. At the moment I'm working on taking off the nasty seam running along the back of the weapon bay; this is proving tricky due to the tight fit between the pylons.

Meanwhile I've also been working on the two tail booms; I've inserted the sections for the wheel wells and airbrushed them white before closing the tail booms together as it would've been more awkward painting them closed up. Between the wheel wells and the engine cover is a generous space that I've filled with diced up soldering wire to give weight forward of the tail, I've airbrushed the glue metal mass black so that nothing can be seen through the engine intakes.

All of my dryfitting tests suggest that the weight won't be enough though so I may have to glue the Bronco to its base which, on the plus side, means I won't have to give the wheel wells any extra detailing.
windysean
_VISITCOMMUNITY
Wisconsin, United States
Joined: September 11, 2009
KitMaker: 1,917 posts
AeroScale: 563 posts
Posted: Tuesday, February 21, 2012 - 04:57 AM UTC

Quoted Text

For anyone interested, this website has colour information for most of the USMC camouflage schemes used on the OV-10 between 1955 and 1991.

The website also has camouflage scheme information for dozens of other aircraft as well, well worth checking out in my opinion.


Excellent site! Thanks! Now I have my FS colors, so nobody can dispute that (at least), assuming I find them in the paint section.
-Sean H.
vertigo
_VISITCOMMUNITY
Dublin, Ireland
Joined: November 11, 2004
KitMaker: 388 posts
AeroScale: 225 posts
Posted: Thursday, February 23, 2012 - 05:04 AM UTC
I promised pictures and I have them here.

As I said before most of the work I've been doing has involved mating the fuselage and the weapons bay. The mating left two large gaps between the fuselage and the gun pods.


You can see the area I'm talking about, the two dark links above the gun pod. Because of the depth of the gap I couldn't use filler so I used super glue instead. I carefully applied in in layers and used Wet & Dry to sand it smooth and into shape. I also used the new Liquid Green Stuff from Citadel to fill in any pits and tiny gaps.

It's very handy to have around, you can apply it with a brush and just wash the brush off with regular water. It dries quite strong and doesn't crumble on contact like some fillers and putties. I'm growing quite fond of it.

To anyone building a Bronco; on both sides of the fuselage, below the cockpit, there are a series of rectangles that represent boarding steps. These fold down give the pilots a step up into the cockpit but they're only present on one side of the cockpit on the real aircraft. The proper side proper side is the opposite to the side shown in the picture above and so I'll be removing those rectangles.


The underside of the fuselage also requiredrequires a lot of work. First of all the weapon bay needed to be blended into the fuselage which took some work but was achieved with super glue and Liquid Green Putty again. Wet & Dry is also fantastic to work with, I only regret I never tried it until now.

I've also been working on removing the nasty seam between the pylons on the weapon bay. It's a tight fit and I may have altered the shape of the middle pylon but once the fuel tank goes over it, it won't be very noticeable.


While working away on the fuselage I decided to fit the tail booms together. First though I airbrushed the wheel wells white and applied a gloss coat as it would've been awkward once the booms were closed up. With the booms closed up there are some lumps and bumps to be removed that are correct for the OV-10A but not the OV-10D. There are also some seams to removed along the length of each boom, top and bottom.


With the tail booms together there is a nice space in front of each wheel well that the engine cover will fit over. I filled these areas with diced up soldering wire to give some weight forward of the tail. I don't think it's going to work through, the tail is very heavy and the undercarriage doesn't look particularly strong. I seemed to have misplaced the nose wheel as well, sneaky bugger that it is.


I've also, as you can see, fitted the tail booms to the main wing and fitted the rear wing as well. The fit isn't to bad but you need to real careful as the booms can easily shift while the glue is setting and the entire setup can be thrown off. I used multiple clamps to secure the booms to the wing while the glue was setting but even so I think the one boom may have set slightly off to the side, but only slightly. If it has I can't fix it without damaging the wing so I'll have to leave it as is.

There will be plenty of more work involved blending everything together. For example the engine covers didn't fit to the booms perfectly and some shaping is necessary. There are some gaps between the boom and the wing to filled and shaped and also the boom needs to be blended into the wing on the upper surface as well.

The Bronco is really taking shape though and I'm looking forward to getting some paint on her. Now, I just need to track down that pesky nosewheel.
thegirl
_VISITCOMMUNITY
Alberta, Canada
Joined: January 19, 2008
KitMaker: 6,743 posts
AeroScale: 6,151 posts
Posted: Sunday, February 26, 2012 - 01:40 PM UTC
Coming along very well .

I got the Hasegawa kit of this aircraft , pick it up really cheap for 2 bucks . Not much for the cockpit though so I will use your build for a ref's point when I start my build .

How do the two kits compare to each other ?


Terri
vertigo
_VISITCOMMUNITY
Dublin, Ireland
Joined: November 11, 2004
KitMaker: 388 posts
AeroScale: 225 posts
Posted: Monday, February 27, 2012 - 08:32 AM UTC
The Hasegawa and Academy kits look very similar although the Hasegawa looks a bit more basic in moulding quality.

Eduard make a nice photoetch set for the Academy OV-10A that'll really make the cockpit pop. I can't say for certain if it'll fit the Hasegawa kit but I imagine the shape is more or less the same.

There are also some CMK resin sets for the Academy OV-10's that are very nice but, of course, you'd have to pay more.
thegirl
_VISITCOMMUNITY
Alberta, Canada
Joined: January 19, 2008
KitMaker: 6,743 posts
AeroScale: 6,151 posts
Posted: Monday, February 27, 2012 - 03:35 PM UTC
Thank-you for the reply on my question , will have a look into the eduard PE set . The kit will need some dressing up in the pit .


Terri
vertigo
_VISITCOMMUNITY
Dublin, Ireland
Joined: November 11, 2004
KitMaker: 388 posts
AeroScale: 225 posts
Posted: Tuesday, February 28, 2012 - 11:03 PM UTC
If you do get the photo-etch set I'd be interested in seeing how it goes.
 _GOTOTOP