British Columbia, Canada
Joined: September 03, 2009
KitMaker: 6,965 posts
AeroScale: 6,247 posts
Posted: Friday, March 02, 2012 - 03:34 PM UTC
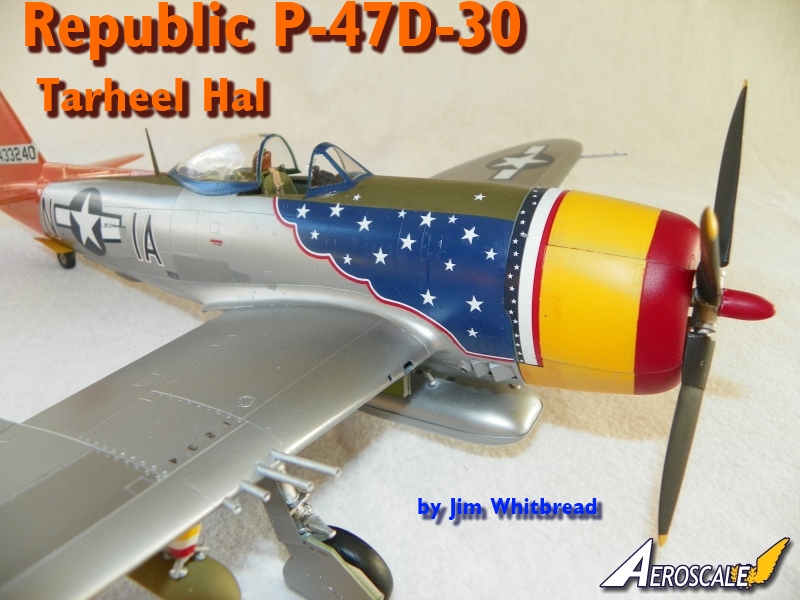
Jim Whitbred shares his recently completed Hasegawa 1/32 Thunderbolt. Jim used several aftermarket upgrade sets and gave his model a very colourful paint job.
 Link to Item
If you have comments or questions please post them here.
Thanks!
When once you have tasted flight you will walk the Earth with your eyes turned skyward.
For there you have been, and there you will always long to return.
-Leonardo Da Vinci
AussieReg
 Associate Editor
#007
Victoria, Australia
Joined: June 09, 2009
KitMaker: 8,156 posts
AeroScale: 3,756 posts
Posted: Friday, March 02, 2012 - 03:58 PM UTC
Beautiful job Jim, it's certainly an eye-catching scheme and very well executed indeed.
Cheers, D
ON the bench
Revell 1/24 '53 Corvette (building as '54)
Revell 1/24 BMW 507 Coupe and Cabrio
Italeri 1/48 Me262 B-1a/U1 Nightfighter
Monogram 1/24 '57 Chevy Nomad
Dragon 1/350 USS Frank Knox DD-742
JPTRR
Managing Editor #051
Tennessee, United States
Joined: December 21, 2002
KitMaker: 7,772 posts
AeroScale: 3,175 posts
Posted: Friday, March 02, 2012 - 06:22 PM UTC
If they demand your loyalty, give them integrity; if they demand integrity, give them your loyalty.--Col John Boyd, USAF
Any plan where you lose your hat is a bad plan.
Washington, United States
Joined: January 15, 2011
KitMaker: 224 posts
AeroScale: 223 posts
Posted: Saturday, March 03, 2012 - 01:26 PM UTC
Thanks a bunch for the kind words guys! It was kinda fun, a departure from the dirty beat up schemes I usually do. Take care and thanks again

Jim Whitbread
Washington State, USA
Tennessee, United States
Joined: September 20, 2005
KitMaker: 1,747 posts
AeroScale: 1,673 posts
Posted: Saturday, March 03, 2012 - 02:36 PM UTC
Very, very good work there!! Thanks for sharing. Russell
To Thine Own Self Be True
Siderius
A.K.A., RTA
Ontario, Canada
Joined: March 29, 2010
KitMaker: 1,151 posts
AeroScale: 985 posts
Posted: Saturday, March 03, 2012 - 03:01 PM UTC
What method did you use for the RMF?
Washington, United States
Joined: January 15, 2011
KitMaker: 224 posts
AeroScale: 223 posts
Posted: Sunday, March 04, 2012 - 02:10 PM UTC
Quoted Text
What method did you use for the RMF?
It was my first Alclad experience. I primed with their primer, several light coats and then followed with Duraluminum and then isolated a couple panels with magnesium. Worked out pretty well I just needed to be a little more careful ilfting the tape, I lifted a bit of Alclad. Otherwise it was a piece of cake. Thanks again for the kind words guys.
Jim Whitbread
Washington State, USA
AussieReg
Associate Editor #007
Victoria, Australia
Joined: June 09, 2009
KitMaker: 8,156 posts
AeroScale: 3,756 posts
Posted: Sunday, March 04, 2012 - 05:04 PM UTC
Quoted Text
I just needed to be a little more careful lifting the tape, I lifted a bit of Alclad.
A handy hint I picked up here on Kitmaker is to use Post-it-notes for masking small panels for colour variation. They are very low-tack and easy to get nice straight lines.
Cheers, D
ON the bench
Revell 1/24 '53 Corvette (building as '54)
Revell 1/24 BMW 507 Coupe and Cabrio
Italeri 1/48 Me262 B-1a/U1 Nightfighter
Monogram 1/24 '57 Chevy Nomad
Dragon 1/350 USS Frank Knox DD-742


