_GOTOBOTTOM
World War II
Discuss WWII and the era directly before and after the war from 1935-1949.
Hosted by Rowan Baylis
1:48 Fw190 Comparison Build
doubtingthomas
_VISITCOMMUNITY
Wisconsin, United States
Joined: March 17, 2009
KitMaker: 156 posts
AeroScale: 153 posts
Posted: Sunday, July 01, 2012 - 08:28 AM UTC
I recently completed my entry for the Wuerger Campaign – Eduard’s 1:48 Fw190A-6, seen here.


Although I was pleased with the end result, it did seem like a lot of work to get there. It set me to thinking….I have a fair number of radial-engine Fw190 kits in the stash, an enormous number of interesting decals, and a limited lifespan. Which kit(s) do I really want to build in the future – potentially multiple times?

So…I decided to turn around after completing the Eduard kit and build one of each of the primary competitive 1:48 Fw190’s: Tamiya, Hasegawa, and Trimaster/Dragon. This way, if one or more kits really turns out to miss the (my?) mark on accuracy or the amount of effort required to get a good result, I can sell those off and not buy them in the future. I know there’s plenty of reviews out there, but there’s no substitute for hands on plastic!

Available radial-engine versions include:
Tamiya: A-3, F-8, A-8/R2
Trimaster/Dragon: A-5, A-7 “Doppelreiter,” A-8, A-8/R8, A-8/R11 “Nachtjaeger,” F-8
Hasegawa: A-3, A-4, A-4/F1, A-5, A-5Y, A-5/U7, A-5/U14, A-6, A-7, A-8, A-8/R8, F-8
Eduard: A-5, A-6, A-7, A-8, A-8/R2, A-8/R11 “Nachtjaeger,” F-8
If I missed a kit, please correct me.

(Note that just because the kit is listed as a particular version doesn’t mean that’s what it really is in the box! Thanks to Tony Hodun’s Hasegawa kit list over at Modeling Madness for the Hasegawa catalogue!)

Looking in my stash, I picked the following kits to build:

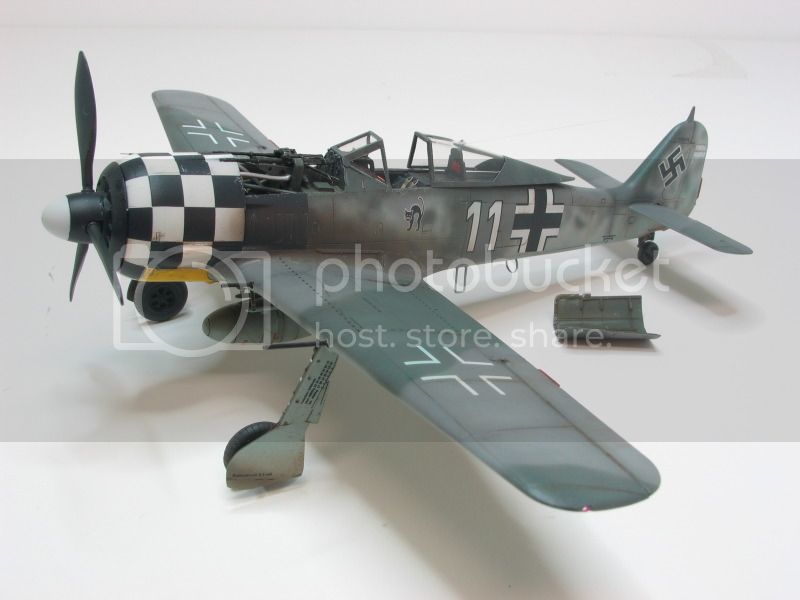
Eduard Fw190 A-6: White 11, Georg Schott, JG1 (Complete)
Hasegawa Fw190 A-4: Big White 10, Wolfgang Kosse, JG5 (SuperScale decal)
Trimaster Fw190 A-8/R11 Nachtjaeger: White 9, Guenther Migge (kit decal)
Tamiya Fw190 F-8: Black 10, SG4 (kit decal)


Now, keep in mind that I’m an average modeler who:
a) is no Fw190 expert
b) has average Fw190 references
c) doesn’t have the time to correct all inaccuracies and mistakes, even if I know about them
So I’m going to go through these builds in my way, and I may or may not correct things. But….feel free to point out the mistakes for the benefit of others.
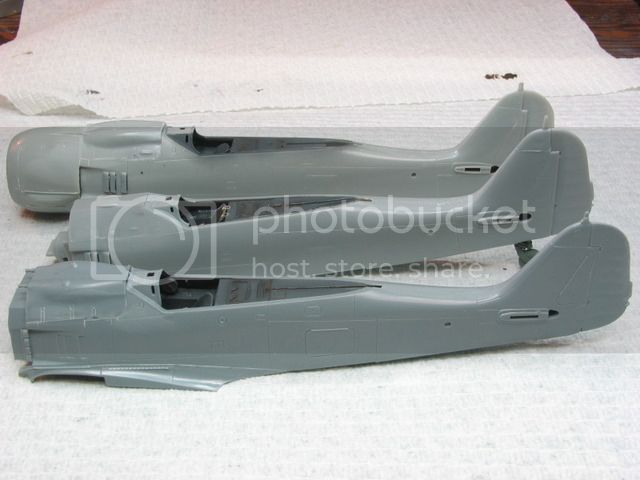
Let’s start by just comparing the kits.

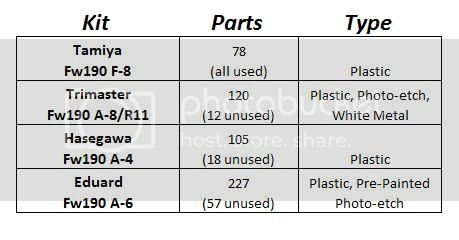
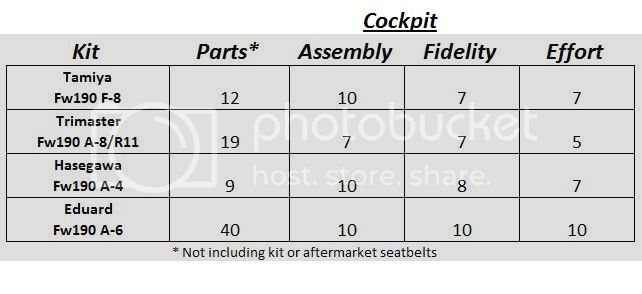
The Tamiya and Hasegawa kits are all-plastic affairs, with the Tamiya kit having the lowest parts count. Tamiya’s approach differs from many other manufacturers in that they will mold in one piece that which other manufacturers choose to do in 2-4 more. That greatly simplifies construction, albeit sometimes at the expense of detail. Hasegawa also uses this approach. Since there is no photo-etch in either kit, I’ll have to source seatbelts using aftermarket.

The Trimaster and Eduard kits include photo-etch, which in the Trimaster kit is required to complete assembly. I think all the Eduard photo-etch has a styrene alternative. Obviously, the Eduard photo-etch is pre-painted whereas the Trimaster parts pre-date this technology. The Trimaster kit also includes white metal parts for the landing gear, ETC rack, and the seat. I’ll note here that if you get a Dragon pressing of the Trimaster kit, most (all?) of the photo-etch and white metal is replaced with styrene.

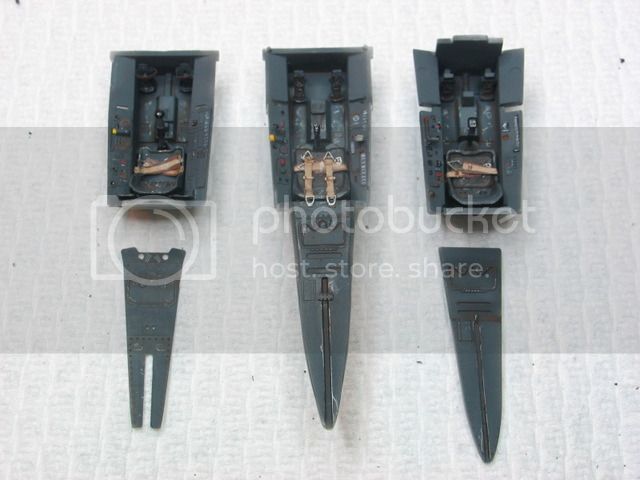
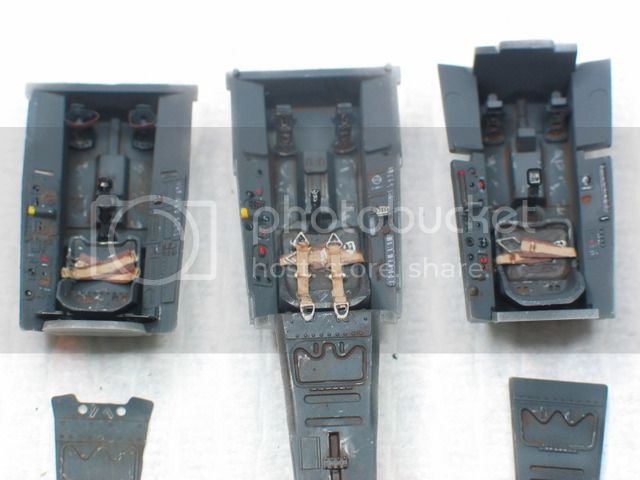
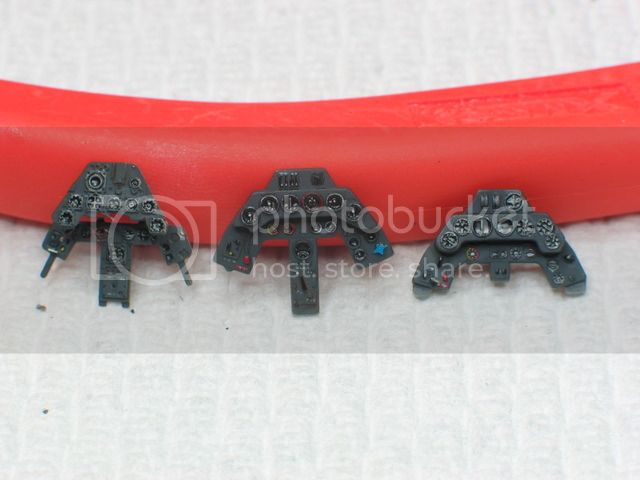
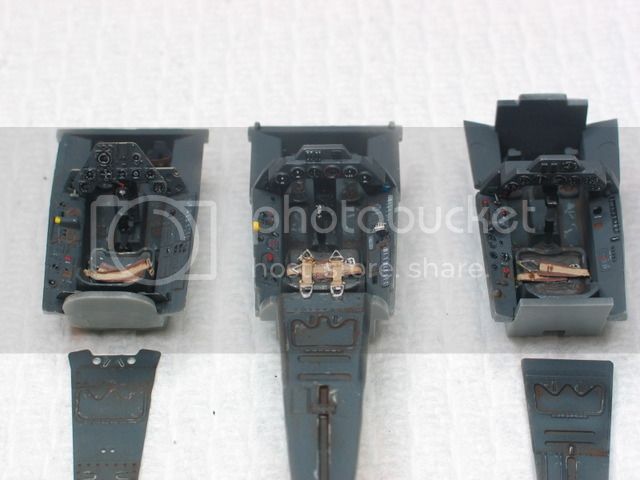
With all four kits, building starts with the cockpit. Here they are, assembled and ready for paint. Sorry, I didn’t have a pre-painted picture of my Eduard cockpit (but since their photo-etch is pre-painted, it wouldn’t really be fair, would it?  ). This allows you to see the design differences between the kits. Hasegawa and Tamiya are aiming for simple, low-parts builds. We’ll see how that translates to the final product.

Left to right: Trimaster, Hasegawa, Tamiya

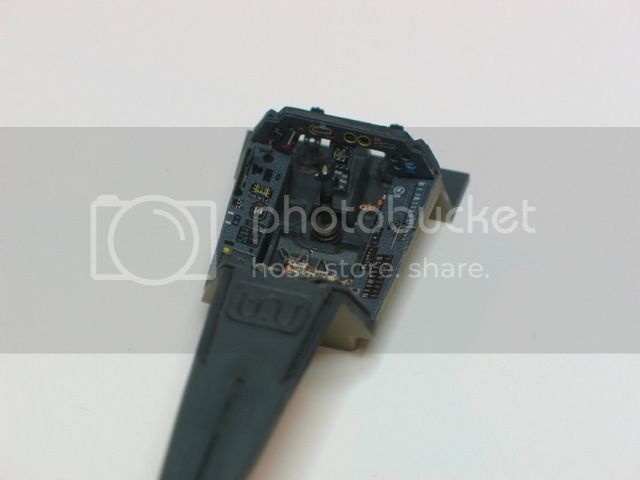
For assembly, I found the Trimaster PE to be very fiddly. It doesn’t bend as well as recent Eduard product. Furthermore, the instrument panel fold does not replicate the depth of the original, with the upper panel sitting to far backward toward the pilot, thus fouling the control stick. That will need to be fixed.

More to come…

Enjoy-

Tom Dungan
Wisconsin, USA
GastonMarty
_VISITCOMMUNITY
Quebec, Canada
Joined: April 19, 2008
KitMaker: 595 posts
AeroScale: 507 posts
Posted: Sunday, July 01, 2012 - 06:18 PM UTC

A few important things to note about the accuracy of all these kits:

-Actual FW-190 windshield dimensions, from a relic measured by modeller Peter Kormos: 245 mm wide by 480 mm long. (Never changed on all 190/Ta models)

Only the Hasegawa kit is correct at 5.1 mm X 10 mm, and this windshield dimension does affects the width dimensions of the entire canopy. (Zoukei-Mura's Ta-152 is, apparently, the only other model to have got this feature right in any scale)

The Dragon kit windscreen is marginally wider than Hasegawa, but is very close and could be considered acceptable.

The other two major 1/48th windscreens (Eduard/Tamiya)are too wide by 20%(!!!) (6 mm instead of 5), with the Tamiya adding a wrong overall slanting angle and being way too short (being thus the worst).

-The Eduard cowl is unique by being untapered on top, which makes the model only suitable for the current FW-190A-8N: 1:1 current "kit" production in Germany, with Russian engines. This is hugely visible.

-Dragon's and Eduard's bulged late-war canopies are terrible, only Hasegawa having got this part correct (along of course Zoukei-Mura in 1/32).

-Being devoid of "pinched" open option, the Hasegawa and all other canopies, except Eduard, cannot be accurately portrayed in the open position.

-The most common narrow metal prop is by far the most accurate on the Tamiya kit.

-Issues with gear legs length and angles are well-known, Hasegawa being at the top yet again, Tamiya at the bottom and the only one where the problem is hardly adjustable with the kit legs, since they are too short, with wheels too small.

Gaston


DougN1
_VISITCOMMUNITY
Georgia, United States
Joined: August 08, 2011
KitMaker: 410 posts
AeroScale: 409 posts
Posted: Monday, July 02, 2012 - 07:18 AM UTC
Sounds like an interesting project Tom! Looking forward to seeing what you think of the respective kits as you build them

Doug
doubtingthomas
_VISITCOMMUNITY
Wisconsin, United States
Joined: March 17, 2009
KitMaker: 156 posts
AeroScale: 153 posts
Posted: Monday, July 02, 2012 - 09:59 AM UTC
Hi Doug – welcome aboard. Keep me in line re: gun covers and such.

Hi Gaston-
I’ll keep these things in mind as I go through the build. Many of them I won’t correct, so that I can put them up next to each other and see if I (or others) can really tell the difference. I know I don’t have the eye for shape fidelity that you do , but sometimes things become obvious and unacceptable when pointed out (like the Tu-2 and Lily noses...thanks...saved me some $ ).

A good example is the Eduard open/closed canopy option – if it weren’t advertised, I don’t think I’d be able to tell the difference if I just looked at 2 kits side by side, each with a different canopy.

As I progress, I intend (photography and software skills permitting), to provide same-perspective shots of the kits. That should help us with the evaluation!

Regards-
Tom
Siderius
_VISITCOMMUNITY
Tennessee, United States
Joined: September 20, 2005
KitMaker: 1,747 posts
AeroScale: 1,673 posts
Posted: Monday, July 02, 2012 - 03:28 PM UTC
Tom, your FW is beautiful! I love JG 1's markings. I want to build one in 72 scale, just have to order the right decals. Thanks for sharing it with us, good job all around! Russell
doubtingthomas
_VISITCOMMUNITY
Wisconsin, United States
Joined: March 17, 2009
KitMaker: 156 posts
AeroScale: 153 posts
Posted: Tuesday, July 03, 2012 - 05:05 PM UTC
Thanks Russell!

Here we go with Part 2:

Each cockpit was sprayed with Tamiya RLM66 equivalent, details painted, oil wash applied, and silver pencil chipping applied. Having the Eduard PE handy was useful as a painting reference (along with my actual…er…references!).

L to R: Trimaster, Hasegawa, Tamiya

I added Reheat seat belts to the Tamiya and Hasegawa seats. The Hasegawa seat is larger than the others, however, and this caused a problem when attaching the belts as there is insufficient width between the cockpit sides to glue lap belts to the sides of the seat and still fit the seat in the cockpit. I cut off the sides of the belts so you just see the top; then the seat fit. Of course, all the belts other than those in the Eduard kit required painting which was extra time.

L to R: Trimaster, Hasegawa, Tamiya
Compare to Eduard:

The Eduard belts look much better, don’t they?

I cheated a bit on the Hasegawa kit and used a few leftover pre-painted PE pieces from my Eduard kit to dress it up a bit. I think the point is, careful painting elevates all the cockpits, but I can’t get the other cockpits as beautiful as the Eduard kit OOB. But you could also buy a Zoom PE set to dress up the other kits.

Vs. Eduard:


Here’s a close-up of the Hasegawa pit, with instrument panel fitted:


Instruments were done by filling the interior with acrylic white, then going back over with enamel gloss black. After drying, a very fine brush was dipped in enamel thinner and then run gently across the instrument faces, exposing the white detail.

L-R: Trimaster, Hasegawa, Tamiya

When compared to my references (principally Merrick), the Hasegawa kit seems accurate other than the oversized seat and a somewhat generic instrument layout (not sure it really matches an A-4). The Tamiya kit is missing some instruments on the lower panel, is missing the lower center console, and does not include a throttle lever on the left-hand side (I made one out of rod). Both the Hasegawa and Tamiya kits feature simplified seats and the mounting to the rear bulkhead.
The Trimaster cockpit seems OK for layout accuracy, but the photo-etch is less detailed than both modern examples of PE and even the competitive styrene parts. The top instrument panel is narrow, but the shape appears correct.
Overall, the Eduard instrument and side panel layouts seem to most closely match the corresponding prototype in my reference (Merrick).

Other notes:
-The Hasegawa instructions would have you put the control stick in backwards. Guess who found out afterward?
-The photo-etch part Trimaster uses for the rear decking has extremely fine panel lines that don’t take a wash well. This results in more effort needed to get the same result as the plastic parts in the Hasegawa and Tamiya kits.


For each stage of the build, I will rate each kit based on Assembly, Fidelity, and Effort. Assembly is the difficulty of putting together what was provided – the engineering of the kit. It doesn’t take into account accuracy correction, adding detail, etc. Fidelity is both the depth and accuracy of detail. Effort is the amount of work that I had to put in to get it to the same level as the others. 1-10 scale, higher numbers are better.

So what did I think, upon reflection?


This chart lists the number of non-seat belt parts used for the cockpit (including those for the rear decking, the canopy armor, and the canopy sliding mechanism. Obviously, the Eduard kit (assuming you use the pre-painted photo-etch parts, is focused on delivering a museum-quality masterpiece.

The Tamiya and Hasegawa kits went together nicely (the low parts count helps), but as noted above, some corrections and additions are needed on both (Effort), a lot of extra detail painting is needed on both (Effort), both simplify many details (including the seat & bulkhead), and I’m not sure the panel layouts are entirely correct (Fidelity). The panel accuracy issues aren't overwhelming - if I wasn't looking at a photo of the real thing, I'd never know.

The Trimaster kit’s PE is not well detailed – honestly, the plastic for the Hasegawa and Tamiya kits paints up better. The extra work to bend their stiff PE and to resolve the instrument panel depth are knocks. The seat and mount look better than the styrene competition, but overall, it just seems like more work to get to the same result.

Eduard wins hands-down. Although the pre-painted PE can be fiddly to assemble, it’s not too bad on this kit, and it completely removes the most arduous painting chore. And it looks fantastic. You can’t beat the pre-painted Eduard seat belts, either.

Next up: fuselages and engines!
MrMtnMauler
_VISITCOMMUNITY
Washington, United States
Joined: January 15, 2011
KitMaker: 224 posts
AeroScale: 223 posts
Posted: Wednesday, July 04, 2012 - 10:02 AM UTC
Hi Tom, I just looked at your build for the first time and want to say that I really enjoyed it. You did an outstanding job and your kit is very impressive. Great job and thank you very much for sharing. Take care

Jim
GhostHawk
_VISITCOMMUNITY
Cordoba, Argentina
Joined: January 27, 2011
KitMaker: 268 posts
AeroScale: 264 posts
Posted: Wednesday, July 04, 2012 - 01:20 PM UTC
Hello Tom,

I likes your idea of a Comparison Build...

Thanks

Bye
vanize
_VISITCOMMUNITY
Texas, United States
Joined: January 30, 2006
KitMaker: 1,954 posts
AeroScale: 1,163 posts
Posted: Thursday, July 05, 2012 - 03:19 AM UTC

Quoted Text

The extra work to bend their stiff PE and to resolve the instrument panel depth are knocks.


FYI, you can make stiff PE a lot more pliable by heating it up with a lighter or candle till it glows then letting it cool (annealing process).

I find that with a small lighter, i can selectively anneal even just small sections of a photo etch fret (sometimes you want some of the PE to remain stiff)
doubtingthomas
_VISITCOMMUNITY
Wisconsin, United States
Joined: March 17, 2009
KitMaker: 156 posts
AeroScale: 153 posts
Posted: Monday, July 09, 2012 - 05:25 PM UTC
Thanks all, for the support!

Vance- I did forget to anneal the Trimaster PE. It's not something I've gotten used to doing with current Eduard PE (IMHO, it doesn't require it). But I will do it for the remaining Trimaster parts - thanks for the reminder.

I've gotten the fuselages together. In all 3 cases, this was a MUCH easier affair than the Eduard kit. But as these are all Fw190's, care is necessary on all of them to assure final fit of fuselage, cowl, and wing roots. Kurt Tank didn't do modelers any favors on the real article by having all those curves, bumps, and bulges in one area.
Front to Back: Tamiya F-8, Hasegawa A-4, Trimaster A-8.

The Hasegawa kit had version-specific inserts for the cooling outlets (more on that later) and the fin tip. All fitted well.
The Tamiya and Eduard kits have engine cooling vents in the closed position (although Eduard does give you PE "open" vents for which you would have to cut out the openings). Advantage goes to Hasegawa and Trimaster for having the open vents in place.
The Trimaster kit has the cowl already on because I found it helpful to attach that first and trim the gun cover to meet it.

Here's a look from the top with all kits lined up at the trailing wing root:
Top to Bottom: Trimaster, Tamiya, Hasegawa

Obviously, the Hasegawa is shorter as it is the pre- A-5 model.
The Tamiya and Eduard cockpit openings are 0.75-1mm wider than Hasegawa and Trimaster. Likewise, the depth of the Tamiya and Eduard coaming-to-firewall is about 1mm shorter. This should translate into shorter, wider windscreens (as Gaston pointed out), so we'll see how that looks. Fuselage width of all kits at the wing gun cover hinge is +/-0.5mm.
The Tamiya seat looks very short now, relative tot he rear cockpit decking.

One things I realized is that I won't be able to do one of the aircraft I planned....Wolfgang Kosse's A-4 from JG5 does not have the cooling louvers - just the slits, making it an early A-4. The Hasegawa kit I'm using only has the louvers. So...I'm actually using the Hasegawa kit (more-or-less) the way it was intended by doing a RLM 79/78/76 Fw190A-4 from Tunisia as pictured on an Eagle Strike sheet and in photos in a Squadron Fw190 Walk-Around title. Unlike the kit, the aircraft in question has sand filters on the sides of the cowl instead of the normal bulges. Fortunately, I had a set of old crusty resin filters from Missing Link Models. Unbelievably, they fit really well and are seen here glued in place:


Next up...cowls and engines!

Regards,
Tom
GastonMarty
_VISITCOMMUNITY
Quebec, Canada
Joined: April 19, 2008
KitMaker: 595 posts
AeroScale: 507 posts
Posted: Monday, July 09, 2012 - 08:19 PM UTC

Quoted Text

Thanks all, for the support!


The Tamiya and Eduard cockpit openings are 0.75-1mm wider than Hasegawa and Trimaster. Likewise, the depth of the Tamiya and Eduard coaming-to-firewall is about 1mm shorter. This should translate into shorter, wider windscreens (as Gaston pointed out), so we'll see how that looks.

Tom


Great comparative! One thing I realize now is that you are using a Hasegawa A-4: These moulding are 2007 releases and have surprisingly little in common with the later versions A-5/6/7/8 and Fs which are all based on the A-5s of 2008...

For instance, the windscreen width of the Hasegawa A-4 is very slightly wider than the same company's A-5 (thus probably very close to the Dragon kit), and the Hasegawa A-5/6/7/8 and Fs are the only ones correct at 5.1 mm wide. Also the A-4 has fit issues that will likely be worse than those on the Hasegawa A-5, or at least of a different nature.

This is how a Hasegawa A-5/6/7/8 and F windscreen (left in yellow) compares next to the Tamiya windscreen (white): The Hasegawa has the correct windscreen length and width of 5.1 mm by 10 mm:


Of note is that the Eduard windscreen is the same width as the Tamiya windscreen, but longer and more correct in sit angle compared to the Tamiya part you see below. (The Eduard blown version sliding portion is much worse than Tamiya's however...)

So there is a considerable difference in the windscreen sit angle, which is very noticeable if you look at the fully assembled kits side-by-side on a table, thus including the gear sit angle: The real aircraft on the ground has the windscreen almost horizontal (as does Hasegawa). Not so by a long way the Tamiya kit, and the effect is worsened by the Tamiya's too short gear legs...:


Again, thanks for the great comparative, and I look forward to the rest of it.

Gaston


Snorri23
_VISITCOMMUNITY
Ontario, Canada
Joined: March 25, 2010
KitMaker: 514 posts
AeroScale: 244 posts
Posted: Tuesday, July 10, 2012 - 02:20 AM UTC
I have found that the Trimaster/DML kit's wingroot to wing fit is atrocious. I have used a spar just behind the cockpit to widen the fuselage. Which gives you a perfect fit. Though this may alter the over all dimensions and make a less than perfect 190. Love the comparison. I do have Has and DML kits in the stash.
 _GOTOTOP