Jessica Cooper reviews and compares 3 new Badger airbrush models, and Badger Modelflex paints
Link to Item
If you have comments or questions please post them here.
Thanks!
General Aircraft
This forum is for general aircraft modelling discussions.
Hosted by Jim Starkweather
REVIEW
Badger airbrushes and paintsJessie_C
British Columbia, Canada
Joined: September 03, 2009
KitMaker: 6,965 posts
AeroScale: 6,247 posts
Joined: September 03, 2009
KitMaker: 6,965 posts
AeroScale: 6,247 posts
Posted: Friday, July 13, 2012 - 02:41 PM UTC
Emeritus
Uusimaa, Finland
Joined: March 30, 2004
KitMaker: 2,845 posts
AeroScale: 1,564 posts
Joined: March 30, 2004
KitMaker: 2,845 posts
AeroScale: 1,564 posts
Posted: Saturday, July 14, 2012 - 06:01 AM UTC
Nice review.
Having been using the 105 Patrior for over a year now, and it's predecessor, the 360, for five years before getting the Patriot (practically using the same brush for more than half a decade), I feel I have to comment on the portion of the review looking at the 105.
True, the trigger is held in place by just the back level and the rear spring when the needle is removed, but it seems to be quite the norm with double action brushes. In my opinion, it's not hard to put back together, the trigger being one-piece and the air valve rather easily accesible. Draw the back lever back - push it to the side to lock it in the horizontal slot - drop in the trigger - release back lever.
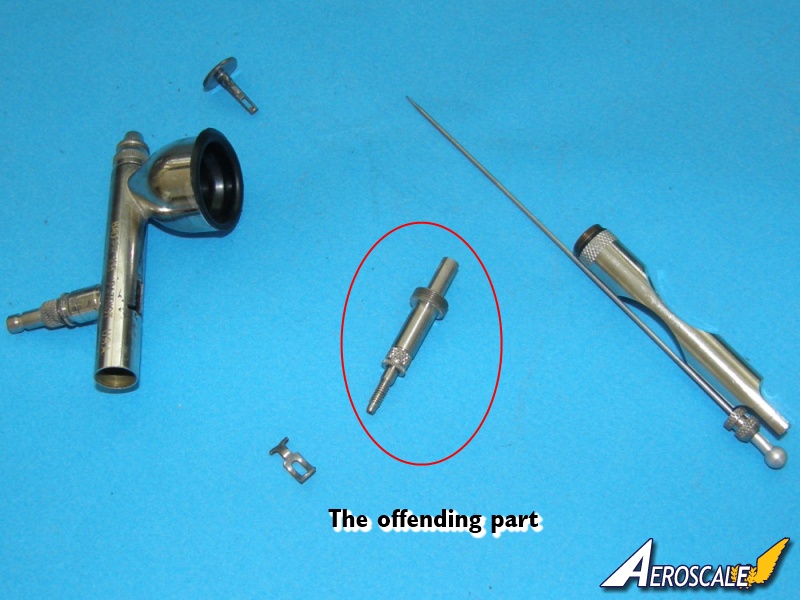
With the needle holder, do you mean the tube shank that screws to the airbrush body or the locking nut that secures the needle to the needle tube? What part you can't get screwed back in?
Both the trouble you reported having with that and the paint ending up in the trigger and valve space would suggest to that there's something not quite right with your sample.
On the paint leakage to the rear, is the needle bearing okay and correctly placed? That bearing should seal the paint cavity off from the rear of the brush.
I completely understand the quick review nature of the spray testing, but the pattern you got seems quite coarse and large for the 105 to me. Did you try any other paint(s) and different pressure settings?
For comparison, here's some quick doodling I did some time ago with my 105. The paint is Xtracrylix black, thinned 50/50 with tap water, and sprayed at around 15-20 psi (can't remember exactly anymore).
Regarding your mention of the unprotected nozzle of the 105, I agree it's a bit of a drawback, but you can use the crown regulator (#41-043) of the Badger 200NH, as the brushes use the same head parts. I sent Badger email asking about more protective caps and they told me about 200NH part. I wish they'd mention this in the 105/155/360 instructions too.
However, please note that 41-043 is a medium regulator requiring the corresponding medium needle and tip to work properly.
Talking of the needle, I found the fine needle and nozzle the 105 ships with to be harder to spray with my usual model paints of choice. Of course, it could be just a matter of thinning down my paints more and playing around with my operating pressure settings, but I just went bought the medium needle, nozzle and regulator to get back to the spraying properties I grow accustomed to with my earlier 360. I've found that to perform well from Luftwaffe mottling to more single color overall coats.
Mecenas
Joined: December 23, 2007
KitMaker: 1,596 posts
AeroScale: 1,275 posts
KitMaker: 1,596 posts
AeroScale: 1,275 posts
Posted: Saturday, July 14, 2012 - 06:11 AM UTC
I just got their "all black" Sotar 20/20 so I read your review Jessie and Eetu's comment with great interest. I haven't tried mine in action yet but I'm very eager to do so.
Jessie_C
British Columbia, Canada
Joined: September 03, 2009
KitMaker: 6,965 posts
AeroScale: 6,247 posts
Joined: September 03, 2009
KitMaker: 6,965 posts
AeroScale: 6,247 posts
Posted: Saturday, July 14, 2012 - 07:28 AM UTC
It's the portion behind the trigger that the needle holding nut screws onto. It came out of the barrel and it wouldn't stay stationary. It's the circled one:
Once I put the brush back together after taking that picture, I discovered that I hadn't screwed it completely into place; thus the lose trigger, bubbling and general sloppy performance. Now that everything is right and tight again, it performs much better. I've updated the review to show this and my new test spray at 20 PSI is much nearer to what your picture shows.
Emeritus
Uusimaa, Finland
Joined: March 30, 2004
KitMaker: 2,845 posts
AeroScale: 1,564 posts
Joined: March 30, 2004
KitMaker: 2,845 posts
AeroScale: 1,564 posts
Posted: Saturday, July 14, 2012 - 11:38 AM UTC
Glad you got it sorted out.
Spraying much better now!
vonHengest
Texas, United States
Joined: June 29, 2010
KitMaker: 5,854 posts
AeroScale: 372 posts
Joined: June 29, 2010
KitMaker: 5,854 posts
AeroScale: 372 posts
Posted: Sunday, July 15, 2012 - 02:54 PM UTC
If this is your first time using an airbrush, or three , then I'd say you had a really good experience overall. It really is a testament to how well the Badger airbrushes are designed. What did you think of the color selection(s) of the paint sets?
Jessie_C
British Columbia, Canada
Joined: September 03, 2009
KitMaker: 6,965 posts
AeroScale: 6,247 posts
Joined: September 03, 2009
KitMaker: 6,965 posts
AeroScale: 6,247 posts
Posted: Sunday, July 15, 2012 - 03:05 PM UTC
As sets they're good but not necessarily complete. There are frequently used colours in my preferred paint spectrum that aren't there and which I'd like to see, but I'm aware that Badger can't cater to the preferences of every individual modeller. The sets do make a decent starter core to a comprehensive paint collection. I certainly like the fast drying time and the ease of use.
Snorri23
Ontario, Canada
Joined: March 25, 2010
KitMaker: 514 posts
AeroScale: 244 posts
Joined: March 25, 2010
KitMaker: 514 posts
AeroScale: 244 posts
Posted: Sunday, July 15, 2012 - 04:18 PM UTC
I picked up my 105 at the nationals at Columbus, they were flogging them at half price. I enjoy using it, the only problem I have is with spraying metallics through it. I suspect that the particulates clog up the brush. With this brush I find that I spray at a lower psi 10 or less, use thinner paint to achieve same results. Which is a good thing for me. If anyone has any suggestions about spraying metallics let me know. I have no problem using them through my other brushes which are siphon fed. With this brush I think I will stop collecting them unless a good Iwata crosses my path.
Posted: Sunday, July 15, 2012 - 04:43 PM UTC
Jessica,
A fine, comprehensive review of these beauties. Your layout and execution is impressive.
I rarely use Modelflex but they have always worked well for me. They do spray on well.
A fine, comprehensive review of these beauties. Your layout and execution is impressive.
I rarely use Modelflex but they have always worked well for me. They do spray on well.
Quoted Text
I remember that! Badger badger badger
Jessie_C
British Columbia, Canada
Joined: September 03, 2009
KitMaker: 6,965 posts
AeroScale: 6,247 posts
Joined: September 03, 2009
KitMaker: 6,965 posts
AeroScale: 6,247 posts
Posted: Tuesday, July 17, 2012 - 07:02 AM UTC
I've discovered something new again!
The Renegade has an adjustable screw stop to allow for consistent spray width. I updated the article with new pictures showing it.
c5flies
California, United States
Joined: October 21, 2007
KitMaker: 3,684 posts
AeroScale: 4 posts
Joined: October 21, 2007
KitMaker: 3,684 posts
AeroScale: 4 posts
Posted: Wednesday, July 18, 2012 - 11:59 AM UTC
Great review Jessica, thanks for doing these. What's really refreshing is seeing them in the hands of someone fairly new to airbrushes and some of the common problems that can occur when you're not used to these tools. Sounds like you're working your way through the hurdles and getting the hang of them very quickly!
What's also nice is the relative low cost of replacement parts...I think the needle on my first brush lasted about 2 days before it looked like a pretzel
usethermite
Washington, United States
Joined: February 14, 2012
KitMaker: 252 posts
AeroScale: 209 posts
Joined: February 14, 2012
KitMaker: 252 posts
AeroScale: 209 posts
Posted: Wednesday, July 18, 2012 - 02:39 PM UTC
So, Jessica, are you going to be using an airbrush more often now? Remember, the critters can sense fear, so approach them with confidence and a smile on your face, and you should have few problems.
Happy Gluing (and mixing), JT