_GOTOBOTTOM
World War II: Japan
Aircraft of Japan in WWII.
Hosted by Rowan Baylis
filling seems in 1/72
daredevil
_VISITCOMMUNITY
California, United States
Joined: May 22, 2003
KitMaker: 54 posts
AeroScale: 0 posts
Posted: Wednesday, November 05, 2003 - 03:33 PM UTC
I'm working on a 1/72 Hasegawa Rex "late type". I haven't built a model is some time and I am using zap-a-gap. Try as I might, I cannot get the halves to mate properly, that is, without even a small seam gap. It seems ludicris to sit and try to fill all those hairline cracks with green putty, then try to sand it down without wiping away all the tiny surface details on the fuselage.
I test fit the parts, sand down irregularities--I've even cut off the mounting pegs--and still there are hairline gaps.
Should I worry about this or will priming & painting take care of some of them?
What am I doing incorrectly?
HELP!!!! I want my models to look good. And I want to learn the fine points before I dive in to some of my larger, more expensive kits that I have stashed away.
--daredevil
--daredevil
bytepilot
_VISITCOMMUNITY
Karnataka, India / भारत
Joined: June 01, 2002
KitMaker: 381 posts
AeroScale: 0 posts
Posted: Wednesday, November 05, 2003 - 04:01 PM UTC
Hi daredevil,

i also have faced this problem many times. The cracks simply never seem to give up, do they ??

From my experience, here's what you can do:
1. use stretched sprue as a filler. There's a whole bunch of articles over at ARC in the Tools and Tips section, which explains the details.
2. use minute amounts of CA glue(superglue) as a filler. For this, pour out a drop or two of glue onto a cardboard sheet, dip a thin wire in it, and pull the glue over the gaps. Allow to dry for at least 10-15 min, and then sand off excesses.
3. Use a piece of fine sandpaper wrapped around an pencil eraser to get at the smaller areas, instead of a sanding stick. Cut an eraser into small parts for this.

I've generally found that using putty works fine for me. Also, priming will help to bring out the voids, not cover them up. Painting will increase the mess, believe me!

All the best,
BP.
firemann816
_VISITCOMMUNITY
Alabama, United States
Joined: September 14, 2003
KitMaker: 790 posts
AeroScale: 0 posts
Posted: Wednesday, November 05, 2003 - 04:47 PM UTC
BytePilot -
Great URL

I like the white glue one and this one:
http://www.aircraftresourcecenter.com/tnt1/001-100/TNT029_Filler_WO_Sanding/tnt029.htm

Thanks
capnjock
_VISITCOMMUNITY
United States
Joined: May 19, 2003
KitMaker: 860 posts
AeroScale: 75 posts
Posted: Wednesday, November 05, 2003 - 06:53 PM UTC
After cutting the locating pins off, I sand the mating edges on a large sheet of sandpaper affixed to a flat board. Then I use CA cement to bring things together. If there still is a gap or two left, I will fill it with putty or white writing fluid depending on the thickness of the gap. The CA cement is applied all along the joint with a thin brass wire. Yes the joint has to be sanded afterwards, but by using sanding bits cut narrow, I do not lose much detail. I find that the CA cement makes a much more solid fuselage that regular liquid glue. Hope it helps
capnjock
bytepilot
_VISITCOMMUNITY
Karnataka, India / भारत
Joined: June 01, 2002
KitMaker: 381 posts
AeroScale: 0 posts
Posted: Wednesday, November 05, 2003 - 07:31 PM UTC

Quoted Text

I find that the CA cement makes a much more solid fuselage that regular liquid glue


Amen to that!!! I've always found that you get a better mating of fuse halves using CA than liquid glue, especially at 1/72 scale. However, it can be a problem at 1/48, since you have to spread the glue over a longer area, and by the time you have got to that last bit, the earlier applied glue would have already half dried, or worse, a part of the model decides to stick to your fingers !

One more thing, daredevil. Ashey, in his book, explains that CA glue can be used as a filler for small voids. Try it out, but use it very sparingly, and apply with a brass wire.

Cheers,
BP.
daredevil
_VISITCOMMUNITY
California, United States
Joined: May 22, 2003
KitMaker: 54 posts
AeroScale: 0 posts
Posted: Thursday, November 06, 2003 - 01:43 PM UTC
fireman816-
The link to the article on filling seams was the BOMB! I tried it--it works like a charm (kind of stinky and muy toxic, though!). It's amazing to me all the cool stuff people have come up with in pursuit of thier modeling.
Thanks for the great tip,
daredevil
firemann816
_VISITCOMMUNITY
Alabama, United States
Joined: September 14, 2003
KitMaker: 790 posts
AeroScale: 0 posts
Posted: Thursday, November 06, 2003 - 04:11 PM UTC
I'll be trying it when I finish the fuselage halfes of my F15E this weekend, already stole a bottle of
"she who must be obeyed" 's nail polish remover.
(Added it back to the shopping list)
I didnt provide the URL, but have always wanted a way to just smooth an application of putty into the seam the way we wanted. If it worked for you at 1/72 thats great news
After I finish the Eagle, I go on to some Fine Molds Star Wars kits. (Cant wait)

Glad to hear it worked for you, I hate the smell but still have the fan in my office from summer to help the A/C overpower my many computers, and a ceiling fan.
I'll crank both fans prior to smoothing, cleaning the putty.

Did you mask with the tape as the author recommended???
I thought that on some joints that may be necessary but not all...
Any pics you can post???

Cheers and thank BytePilot for the Full URL...
bilko
_VISITCOMMUNITY
Queensland, Australia
Joined: April 22, 2003
KitMaker: 584 posts
AeroScale: 96 posts
Posted: Thursday, November 06, 2003 - 11:50 PM UTC
firemann816

I discovered this method quite a while ago on ARC and have used it with the Tamiya putty (orange lid) with a pretty good first time strike rate. This putty shrinks a fair bit sometimes so occasionally a second application is needed. Fortunately I usually wait a week before painting!!

Regarding use of masking tape. in tight places where a cotton bud (Q-tip) might have trouble getting into a corner - then I mask. If it is something like a wing root then generally I don't - just means that there is a bit of extra putty to clean up.

Brian
firemann816
_VISITCOMMUNITY
Alabama, United States
Joined: September 14, 2003
KitMaker: 790 posts
AeroScale: 0 posts
Posted: Friday, November 07, 2003 - 06:29 PM UTC
Thanks Bilco
I guess the rule is:
If you clean it with a QTip easily dont bother masking (dont hurt the detail of course)
but if you cant get the QTip in easily and are going to have to scrunch it into the corners to work away the excess, cover up with the tape beforehand.
Will airbrush the Eagle fuselage tomorrow hopefully, and glue it Sunday, putty trick in the evenings after work next week.
Thanks for the feedback !!!
newtothegame
_VISITCOMMUNITY
Washington, United States
Joined: October 05, 2003
KitMaker: 588 posts
AeroScale: 468 posts
Posted: Sunday, November 09, 2003 - 04:26 AM UTC
Firemann816

Thanks for the link to the great article - very helpful. Now I am trying to look through all the other articles on ARC - another great, helpful site.
firemann816
_VISITCOMMUNITY
Alabama, United States
Joined: September 14, 2003
KitMaker: 790 posts
AeroScale: 0 posts
Posted: Sunday, November 09, 2003 - 05:46 AM UTC
I used the putty/acetone technique on my Eagle wings this morn.
Photo is in my gallery, and below:


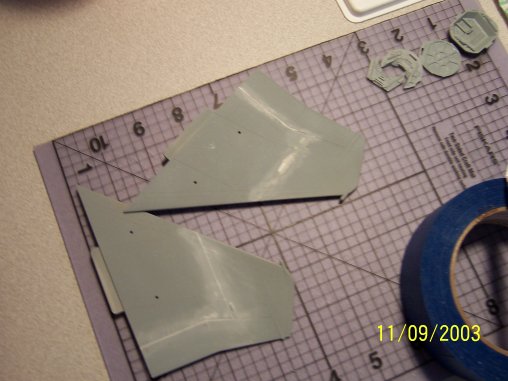
I did lose some paint, look on the upper wing of the two.
(A masking or glossing first may have preserved it though, still
Light Ghost Grey matte finish on the wings.)

This is my first kit in years. (Long hiatus, now I'm back)
I think I should've painted long after puttying the two peices together.
I painted first because it seemed a lot of the surfaces were more acceseble for washing and drybrushing before they were mated together.

It also helped to soak a portion of a paper towel with the nail polish remover (acetone) and rub it over the smooth parts and get the excess off, in supplement to the QTip.

Newt and all -
BytePilot should be credited for providing the URL to ARC, and the techniques we are learning/modifying from it. I learned from his resource as you have.

THANKS BYTEPILOT !!!
daredevil
_VISITCOMMUNITY
California, United States
Joined: May 22, 2003
KitMaker: 54 posts
AeroScale: 0 posts
Posted: Sunday, November 09, 2003 - 04:01 PM UTC
Thanks to all that responded to my question! Looks Like a few of us learned some tricks along the way.
I did use masking tape on my wing & tail seams--and used the "real" masking tape, not the low-tack Tamiya stuff--just in case.
I have not primed anything yet--waiting until all the body work is done, then will prime to reveal the flaws that I missed!
I actually found a fairly low odor nail polish remover at Long's Drugs (their brand). The Cutex was way too stinky for me--fan or no fan!
Well, back to the worktable!
--daredevil
4-Eyes71
_VISITCOMMUNITY
Metro Manila, Philippines
Joined: December 02, 2003
KitMaker: 424 posts
AeroScale: 0 posts
Posted: Tuesday, December 02, 2003 - 12:00 AM UTC
For filling seamlines and gaps, I use alternatives since modeling putty is scarce and expensive here in my locale. I use a variety:

1. CA (Super) glue.
2. Auto Body Filler (Glasurit)
3. Wall filler. Water soluble, also good for making Zimmerit on German armor
4. Elmer's Wood filler. Water soluble. I can attest to this filler. After priming and paiting, the gaps and seam lines are no longer visible.

firemann816
_VISITCOMMUNITY
Alabama, United States
Joined: September 14, 2003
KitMaker: 790 posts
AeroScale: 0 posts
Posted: Tuesday, December 02, 2003 - 12:49 PM UTC
Someone else was just talking about how great the Elmers wood filler is

I'd have thought there would be something in that that could melt styrene
but I guess not.
Your not alone in your appreciation of that product.
4-Eyes71
_VISITCOMMUNITY
Metro Manila, Philippines
Joined: December 02, 2003
KitMaker: 424 posts
AeroScale: 0 posts
Posted: Tuesday, December 02, 2003 - 11:03 PM UTC

Quoted Text

Someone else was just talking about how great the Elmers wood filler is

I'd have thought there would be something in that that could melt styrene
but I guess not.
Your not alone in your appreciation of that product.


Glad you agree. I've used Wood Filler numerous times and I can attest that it will not melt the styrene. I also use it for providing ballast for some aircraft instead of putty which will melt the plastic. But if it's not enough, I'd put in a few pebbles which I would break into tinier bits and to keep them in place, I apply the filler or (I like to experiment) based on a friend's advice, I use Elmer's Wood Glue (this is different).

Ron
 _GOTOTOP