

Hi,
I'm building the JU87G-1 STUKA, Scale=1/72, from "ACADEMY".
The decal sheet has no Swastika symbols (I need 2).
First, I intended to buy the Luftwaffe Swastika decals from Aeromaster, Code number=AMD72184, but the price is very high=7.21Euro, almost equal to the cost of the airplane kit.
So, because I'm not wealthy, I think to print a template on a Tamiya masking tape width=18mm, using my deskJet Canon Pixma printer or HP Laserjet 1010 (I prefer the Canon).
I will stamp the strip of tape on a A4 acetate transparency sheet and print.
Then, after cutting the strip using a cutter and a scissor, I will obtain 2 templates.
They will be stucked on the rudder.
Last step = airbrush.
I would like to hear your comments.
Thank you
Kind Regards
José
Hosted by Rowan Baylis
Print Swastika on Tamiya masking tape

Jose_Barbosa

Joined: November 17, 2012
KitMaker: 35 posts
AeroScale: 25 posts
Posted: Wednesday, November 21, 2012 - 11:47 AM UTC
Holdfast

#056

Joined: September 30, 2002
KitMaker: 8,581 posts
AeroScale: 4,913 posts

Posted: Wednesday, November 21, 2012 - 08:24 PM UTC
Hi Jose,
Why not use Paint Masks drop me an email at [email protected] with information about size and style and I will cut you some for just the postage
For your information I give 15% off to all kitmaker members for my masks.
Alternatively I'm sure that someone will have some swastika decals that they can send you
Why not use Paint Masks
drop me an email at [email protected] with information about size and style and I will cut you some for just the postage For your information I give 15% off to all kitmaker members for my masks.
Alternatively I'm sure that someone will have some swastika decals that they can send you

Jose_Barbosa
Joined: November 17, 2012
KitMaker: 35 posts
AeroScale: 25 posts
Posted: Thursday, November 22, 2012 - 01:01 AM UTC
Hi Mal,
What do you mean by paint masks ?
I started this hobby when I was 16 years old, stopped for 40 years, now I am a newcomer with 56 years old !!
Sorry for my lack of knowledge.
As I understand from your post, what I must do is to draw 2 Swastikas using AutoCAD or another software and provide you a file with what extension?(dwg, dxf,...).
No problem for me as I am a Mechanical Design Engineer.
I work in 2D and 3D models.
Then you cut the masks and send me them by mail at what price?
Will it be a water decal or a dry decal,...?
If someone in the forum can provide me 2 water decals, will be wonderfull !
Greetings
José

Jessie_C


Joined: September 03, 2009
KitMaker: 6,965 posts
AeroScale: 6,247 posts
Posted: Thursday, November 22, 2012 - 04:23 AM UTC
Hi Jose,
Mal already has all the drawings and such already done so you don't have to worry. Take a look at Chris' Fw-190 thread about midway down the second page. He used Mal's masks to paint all the markings on.
Here's another thread where Mal demonstrates how the masks work.
Mal already has all the drawings and such already done so you don't have to worry. Take a look at Chris' Fw-190 thread about midway down the second page. He used Mal's masks to paint all the markings on.
Here's another thread where Mal demonstrates how the masks work.
Jose_Barbosa
Joined: November 17, 2012
KitMaker: 35 posts
AeroScale: 25 posts
Posted: Thursday, November 22, 2012 - 05:46 AM UTC
Hi Jessica,
Thank you for the wonderfull info!!
I must read it carefully.
After doing it, I hope I will not become fat !
I want a Swastika with a white boarder, equal to Aeromaster decal, Code number=AMD72184.
Can you explain what is the the meaning of sizes? (= 250mm, 300mm, 350mm, 400mm, 480mm, 650mm, 800mm, 900mm and 1000mm), stated in the description of this decal?
Now, I do not know which I must pick, to fit in the rudder.
I am also building Revell WW1 biplane RAF SE5a,1/72, and must also read a lot !!
Thank you for your help.
Greetings
Jose
Jessie_C
Joined: September 03, 2009
KitMaker: 6,965 posts
AeroScale: 6,247 posts
Posted: Thursday, November 22, 2012 - 08:12 AM UTC
I haven't seen that sheet so I can only speculate that the sizes refer to the size of the swastika in scale. The Luftwaffe had standard sizes of swastika from small to large. I can't remember offhand whether the measurement was from tip to tip as the swastika sits on its 45 degree angle, or whether it was from side to side along an edge. In any case there were several different sizes depending on which aircraft they were applied to. Obviously a smaller aircraft got a smaller marking. Mal has a library of sizes so if you let him know which model you're doing he will be able to give you the correct sized mask.
For your SE5, look in the Early Aviation forum. One was just posted recently and you can find many experts there who can guide you through building it
For your SE5, look in the Early Aviation forum. One was just posted recently and you can find many experts there who can guide you through building it
Jose_Barbosa
Joined: November 17, 2012
KitMaker: 35 posts
AeroScale: 25 posts
Posted: Thursday, November 22, 2012 - 10:01 AM UTC
Hi Jessica,
I made a Google search.
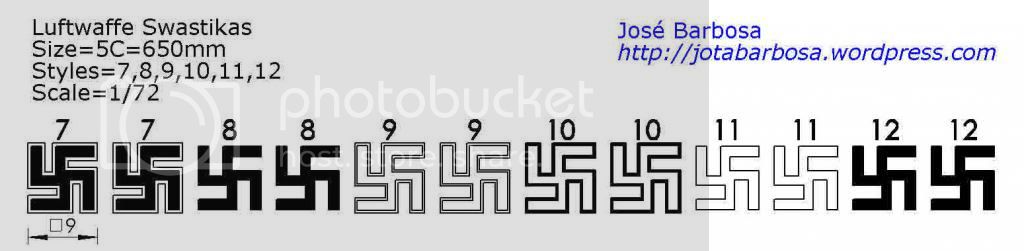
1) Size
http://forum.keypublishing.com/attachment.php? attachmentid=161278&d=1206406217
In the second page watch the table "fuselage and undersaface
Choose row=5C=500.
Divide 500 by 72. Equals=6.94mm.
This is the size I want.
2)Style
Below this table you have the styles
I want style=9
3)Link to = http://www.modelaces.com/modelgallery.php
In the left menu, select model photos.
From the gallery, select airplane model=Junkers JU 87 G-2 "Stuka" Dive Bomber(Hans-Ulrich Rudel).
Photo Thumbnails will be displayed.
Select one which shows the rudder.
This is the Swastika I want = only the white boarder.
4) How can I attach a image to my posts ?
Thank you
Greetings
Jose
I made a Google search.
1) Size
http://forum.keypublishing.com/attachment.php? attachmentid=161278&d=1206406217
In the second page watch the table "fuselage and undersaface
Choose row=5C=500.
Divide 500 by 72. Equals=6.94mm.
This is the size I want.
2)Style
Below this table you have the styles
I want style=9
3)Link to = http://www.modelaces.com/modelgallery.php
In the left menu, select model photos.
From the gallery, select airplane model=Junkers JU 87 G-2 "Stuka" Dive Bomber(Hans-Ulrich Rudel).
Photo Thumbnails will be displayed.
Select one which shows the rudder.
This is the Swastika I want = only the white boarder.
4) How can I attach a image to my posts ?
Thank you
Greetings
Jose

c4willy

#305

Joined: February 01, 2006
KitMaker: 1,673 posts
AeroScale: 1,517 posts

Posted: Thursday, November 22, 2012 - 10:18 AM UTC
Hi Jose I've got the Aeromaster AN72184 decal sheet and I'd be happy to send some Swastika decals over to you. Send me a private message with your details and we'll sort something out.
Jessie_C
Joined: September 03, 2009
KitMaker: 6,965 posts
AeroScale: 6,247 posts
Posted: Thursday, November 22, 2012 - 10:43 AM UTC
Quoted Text
Hi Jessica,
4) How can I attach a image to my posts ?
If you look in the general modelling section of the forum, you'll see a "User Support" forum. In there, there's a friendly tutorial on how to add images.
In brief:
1. Find an online hosting service like Flickr or Photobucket and upload your photos
2. Copy the location of the photo (right-click the photo and select "copy image location")
3. When you're writing your post, look just below the composing window for a little white button that says "img". It should be the one farthest right. Click that and you'll see something like this appear:
{img}http://put.url.here/image.file{/img} except that the brackets will be square.
4. Replace the part that says "http://put.url.here/image.file" with the location of your picture that you copied way back in step two.
Now to solve your swastika problem, you can send Mal the measurements you found, or you can ask Chris to send you his spare decals. Isn't it nice to have choices?

Jose_Barbosa
Joined: November 17, 2012
KitMaker: 35 posts
AeroScale: 25 posts
Posted: Thursday, November 22, 2012 - 11:03 AM UTC
Hi to all of you,
Thanks for all of your kindness.
I sent a private message to Chris.
Jessica, I will test to attach images.
Greetings
Jose
Web= http://jotabarbosa.wordpress.com
Thanks for all of your kindness.
I sent a private message to Chris.
Jessica, I will test to attach images.
Greetings
Jose
Web= http://jotabarbosa.wordpress.com
Removed by original poster on 11/23/12 - 13:44:48 (GMT).
Jose_Barbosa
Joined: November 17, 2012
KitMaker: 35 posts
AeroScale: 25 posts
Posted: Friday, November 23, 2012 - 01:54 AM UTC
Hi Jessica,
This is a test to attach Photos to my posts.
I hope it will be well displayed.

Greetings
Jose
This is a test to attach Photos to my posts.
I hope it will be well displayed.
Greetings
Jose
Jessie_C
Joined: September 03, 2009
KitMaker: 6,965 posts
AeroScale: 6,247 posts
Posted: Friday, November 23, 2012 - 05:22 AM UTC
That worked
Can I offer you a tip for the canopy frames? Get some clear decal film and some decal solvent (Micro sol, Solvaset or something similar) from your hobby shop, then paint it.
You want to paint the interior colour first, let it dry, then paint the exterior. Once the paint is completely cured, carefully cut the decal into small strips the width of your canopy framing using a sharp knife and a straightedge. Cut a strip to the length of the frame, soak it and apply it like any other decal, then brush on the solvent to help the decal conform to the canopy shape.
Decal solvent will also help those two on the front of the wheel spats.
Jose_Barbosa
Joined: November 17, 2012
KitMaker: 35 posts
AeroScale: 25 posts
Posted: Friday, November 23, 2012 - 08:56 AM UTC
Hi Jessica,
Thank you for the hint !
Some weeks ago, I masked all the canopy, but the width of the frames was very uneven.
The canopy has square glasses with edges=2mm !!
Backlight for the cutter was also poor.
1)For clear film do you mean this?
http://www.hannants.co.uk
Manufacturer = Experts Choice
Code number = EC121
2)What do you mean by paint the interior and exterior?
3)Wheel spats:
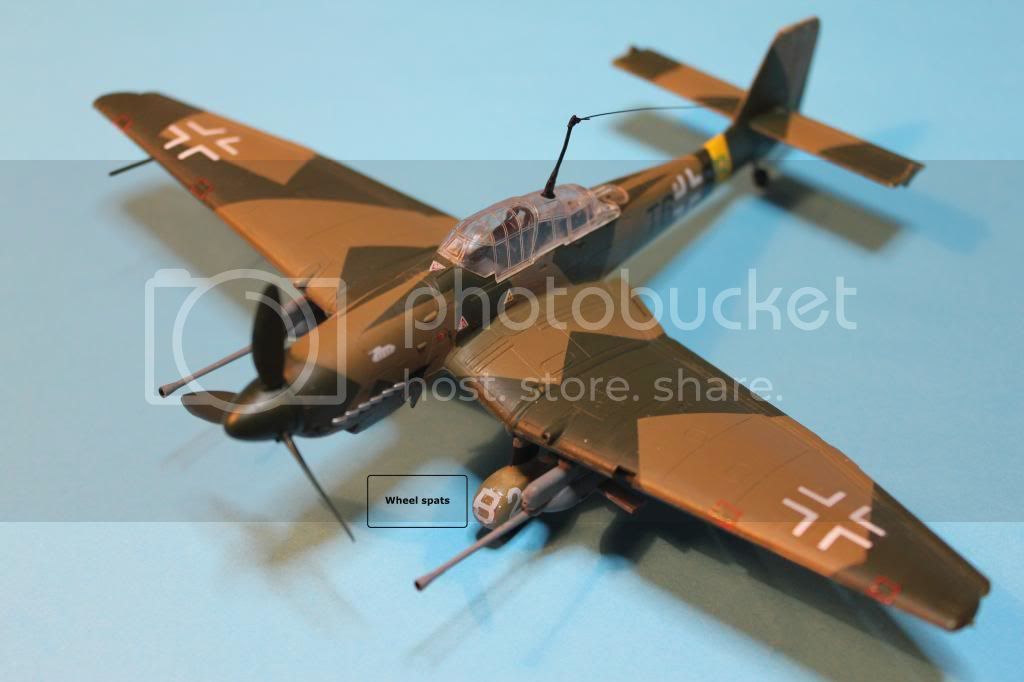
do you refer to the letter "B" decal, shown in the above image by a rectangular box near the left wheel?
What I understand from you post, is that I must:
apply the decal clear film over the canopy > paint > Cut frames > apply Micro Sol.
By the way I have a strip of Parafilm M.
Did not tried it yet.
Greetings
Jose
Thank you for the hint !
Some weeks ago, I masked all the canopy, but the width of the frames was very uneven.
The canopy has square glasses with edges=2mm !!
Backlight for the cutter was also poor.
1)For clear film do you mean this?
http://www.hannants.co.uk
Manufacturer = Experts Choice
Code number = EC121
2)What do you mean by paint the interior and exterior?
3)Wheel spats:
do you refer to the letter "B" decal, shown in the above image by a rectangular box near the left wheel?
What I understand from you post, is that I must:
apply the decal clear film over the canopy > paint > Cut frames > apply Micro Sol.
By the way I have a strip of Parafilm M.
Did not tried it yet.
Greetings
Jose
Jessie_C
Joined: September 03, 2009
KitMaker: 6,965 posts
AeroScale: 6,247 posts
Posted: Friday, November 23, 2012 - 09:23 AM UTC
Yes, that film would work perfectly. What I mean is to paint two colours onto a piece of the film before soaking it. The first colour is the interior grey that you painted the insides of the cockpit with, and the second colour (after the first one is dried) is the same colour as the outside of the aircraft. In this case it's RLM 70.
Once the paint is thoroughly dry, take your knife and cut thin slivers of the decal (paper and all) that are exactly the same width as the canopy frames. Trim them to the length of the piece of frame you're doing and then soak them like regular decals. Slide them in position , then brush on some Micro Sol to help them set in the proper position.
Yes, that's the wheel spat. You can see where the decal wrinkled because it couldn't bend around the curves, right? the Micro Sol will help that by softening the decal so it kind of "melts" into position. When you've treated a decal with Micro Sol, it will appear to get wrinkly, which is normal. As it dries out, it will mould itself over and into all the detail and dry smoothly. It is very important that you never touch a decal that's been treated with Micro Sol until it's dry or you'll destroy it because it's so soft.
If the Micro Sol doesn't work, you can try boiling water. Take a pair of kitchen tongs and pick up a small cloth or piece of sponge, dip it in the water and then press it straight down onto the troublesome decal. Whatever you do, don't move the sponge sideways, just press straight on (not too hard) for 10 to 20 seconds. That should convince the decal to behave itself.
I'll post a little tutorial in the Beginner's forum that shows how to do the decal frames.
Jose_Barbosa
Joined: November 17, 2012
KitMaker: 35 posts
AeroScale: 25 posts
Posted: Monday, November 26, 2012 - 07:52 AM UTC
Hi Jessica,
Just for information, I attach Luftwaffe Swastika image.
Is it possible to attach PDF, DWG, DXF files..., in a post or in a private message ?
To upload photos to my gallery, I must subscribe, Yes or No?
Greetings:-H
Just for information, I attach Luftwaffe Swastika image.
Is it possible to attach PDF, DWG, DXF files..., in a post or in a private message ?
To upload photos to my gallery, I must subscribe, Yes or No?
Greetings:-H
Jessie_C
Joined: September 03, 2009
KitMaker: 6,965 posts
AeroScale: 6,247 posts
Posted: Monday, November 26, 2012 - 08:41 AM UTC
Since you've already subscribed to Aeroscale, you should already have a personal gallery. Look up at the top of the page to the black buttons just below the blue bar. On the right you should see "Events", "Gallery", Links"
Click Gallery to be transferred to the Kitmaker image gallery, then look up in the top right corner for your username. If it doesn't appear, then you'll need to log in again (sometimes the system randomly logs you out; we're still not sure why).
Once you're logged in, look in the upper left for "Welcome $_username" and above that links to "My Photos", "My Albums", "My favorites"
Your kitmaker album is not that large because of the large number of members we have, so you'll need to be careful to keep the image sizes down when you upload them. Make them 800 X 600 or smaller to get the maximum number.
The best format to post is .jpg or .gif. PDFs take up a lot of space. Images don't work in Private messages.
If you use an offsite image host, the size restriction can be bypassed.
 |

WEB HOSTING BY


Copyright ©2021 AeroScale and Kitmaker Network, a subsidiary of Silver Star Enterprises
All Rights Reserved. Please read our Conditions of Use and Privacy Policy.
All Rights Reserved. Please read our Conditions of Use and Privacy Policy.