_GOTOBOTTOM
Rotary Wing
Discuss helicopters and other rotary wing aircraft from any era.
Revell 1/48 WAH-64D Longbow Apache (AAC)
ljames0874
_VISITCOMMUNITY
England - South East, United Kingdom
Joined: August 15, 2012
KitMaker: 408 posts
AeroScale: 365 posts
Posted: Monday, January 14, 2013 - 10:37 PM UTC
Here we go with my first build for this year and my first helicopter on this forum. I am building this pretty much out of the box, with the slight addition of the Heritage conversion set, to bring it up to UK specs, featuring the CVR-7 rocket pods.

For the instrument panels I have used the kit parts with the supplied decals, and then I have glazed the green screens using a mixture of Future and light green ink, which seems to have worked quite well (first time I have tried this).


I've got a question for all you Rotorheads on here, and that is, what is the best way to replicate "rotor droop" on model helicopters? I have seen one method, which involves putting the constructed rotor unit upside down on a dinner plate, pouring boiling water over the whole thing, and then weighting the blades down while the water cools down. Is this correct, and if not, is there a better way?

Cheers in advance!
drabslab
_VISITCOMMUNITY
European Union
Joined: September 28, 2004
KitMaker: 2,186 posts
AeroScale: 1,587 posts
Posted: Tuesday, January 15, 2013 - 01:06 AM UTC

Quoted Text

I've got a question for all you Rotorheads on here, and that is, what is the best way to replicate "rotor droop" on model helicopters? I have seen one method, which involves putting the constructed rotor unit upside down on a dinner plate, pouring boiling water over the whole thing, and then weighting the blades down while the water cools down. Is this correct, and if not, is there a better way?


careful not to overdo it, it appears from foto's I have that the rotor drop on the apache is quite small

;-)
fy
ShawnM
_VISITCOMMUNITY
Missouri, United States
Joined: November 24, 2008
KitMaker: 564 posts
AeroScale: 510 posts
Posted: Tuesday, January 15, 2013 - 06:41 AM UTC
I draw them through my fingers to imapart a droop to them.
The Apache's dont have a whole lot so a little will do.


HeavyArty
_VISITCOMMUNITY
Florida, United States
Joined: May 16, 2002
KitMaker: 17,694 posts
AeroScale: 1,728 posts
Posted: Wednesday, January 16, 2013 - 01:01 AM UTC
Looking pretty good. A couple pointers on the cockpit colors though. The rear wall and seats should also be black. Everything in the cockpit is various shades of black to not interfere with the pilots' NVGs. Also, the pilots' IHADSS helmets are usually dark green as well.

Here is a pic to illustrate it.
ljames0874
_VISITCOMMUNITY
England - South East, United Kingdom
Joined: August 15, 2012
KitMaker: 408 posts
AeroScale: 365 posts
Posted: Wednesday, January 16, 2013 - 02:20 AM UTC

Quoted Text

Looking pretty good. A couple pointers on the cockpit colors though. The rear wall and seats should also be black. Everything in the cockpit is various shades of black to not interfere with the pilots' NVGs. Also, the pilots' IHADSS helmets are usually dark green as well.


Thanks for that fella! The grey you saw on the cockpit wall and the helmets was just the primer coat, and there are a few more colours on it now, but quite a ways to go before I stick the cockpit into the hull. Here are the pics I'm working from, mostly for the pilots uniform markings etc:

SGTJKJ
#041
_VISITCOMMUNITY
Kobenhavn, Denmark
Joined: July 20, 2006
KitMaker: 10,069 posts
AeroScale: 3,788 posts
Posted: Saturday, January 19, 2013 - 09:17 AM UTC
Looks good so far, Lee. I am definitely going to steal that trick with the green ink and varnish. Looks great!

Looking forward to see more
ljames0874
_VISITCOMMUNITY
England - South East, United Kingdom
Joined: August 15, 2012
KitMaker: 408 posts
AeroScale: 365 posts
Posted: Sunday, January 20, 2013 - 02:51 AM UTC

Quoted Text

Looks good so far, Lee. I am definitely going to steal that trick with the green ink and varnish. Looks great!

Looking forward to see more


Thanks for that dude!

Time for an update - first of all, the conversion kit arrived yesterday:

This inspired me to finish the cockpit off (once I knew that there were no bits in the conversion set to add at this stage!).


So far I'm quite happy with the accuracy of the cockpit, it all seems to match up to these pictures:


As usual, all comments are appreciated - cheers!
ljames0874
_VISITCOMMUNITY
England - South East, United Kingdom
Joined: August 15, 2012
KitMaker: 408 posts
AeroScale: 365 posts
Posted: Sunday, January 27, 2013 - 04:34 AM UTC
Small update time, fuselage is together, stub wings are on, and gaps are filled and sanded. Time for a quick word about the kit in general, as I understand it, this kit is a Revell reissue of the old Monogram AH-64A kit, with an extra sprue of parts to convert it to an AH-64D. This is made fairly obvious in the quality differences between the sprues. All the original sprues are moulded in Olive drab plastic, which is fairly chunky and quite brittle, with a large amount of flash betraying their age. The newer sprue is crisply moulded in bottle green plastic, as you can see in this picture. Overall the kit is going together quite nicely, next I'll be starting to add the resin conversion parts - should be fun!
ljames0874
_VISITCOMMUNITY
England - South East, United Kingdom
Joined: August 15, 2012
KitMaker: 408 posts
AeroScale: 365 posts
Posted: Friday, March 15, 2013 - 04:43 AM UTC
It's update time again! All the resin and white metal bits are on now, ready for priming. A word on this fist pic - the last time I saw this many different colours on an unprimed model, it was on the Matchbox B-17G in about 1986!

After the first coat of primer, it was back to the tube of filler:


Time for more sanding methinks!
phantom_phanatic309
#372
_VISITCOMMUNITY
United Kingdom
Joined: March 10, 2010
KitMaker: 2,568 posts
AeroScale: 1,619 posts
Posted: Monday, March 18, 2013 - 10:52 AM UTC
Looking good.
The different colour plastic parts give it a retro matchbox look.
ljames0874
_VISITCOMMUNITY
England - South East, United Kingdom
Joined: August 15, 2012
KitMaker: 408 posts
AeroScale: 365 posts
Posted: Monday, May 06, 2013 - 03:56 AM UTC
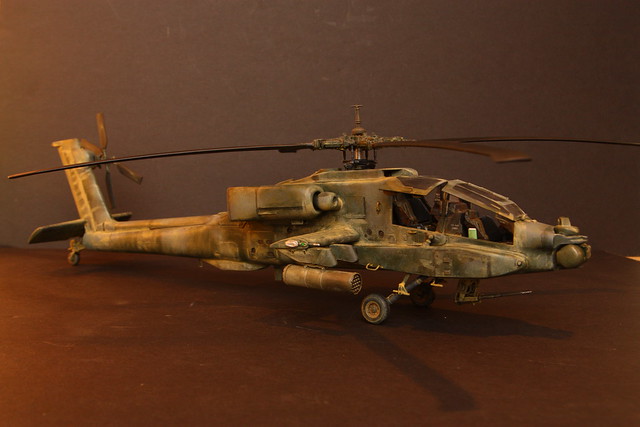
Hi everybody! I think we are overdue for another update, mainly because I've finally finished the beast! I'm quite relieved to be honest, as I've had one or two major headaches with the latter stages, which is why it's been so long since the last post. First off, a freak gust of wind caused the model to hit the deck while I was airbrushing the main colour, causing me to have to scratch build a new tail rotor blade . After coating the model with Future, I applied the decals, naturally using Micro Set and Micro Sol as per usual. What wasn't usual was the silvering of some of the decals - does this sound like I screwed up somewhere, or are they just crappy decals?

Anyway, after this I gave the whole thing a coat of Humbrol Satin Cote, which was still a bit too glossy looking, so I waited a few days and then hit it with a coat of Humbrol Matt Cote which was an improvement, but still too shiny for the Apache. Does anyone know a really good matt varnish? I have heard that Vallejo Matt is pretty good. Anyhow, onto the pics:

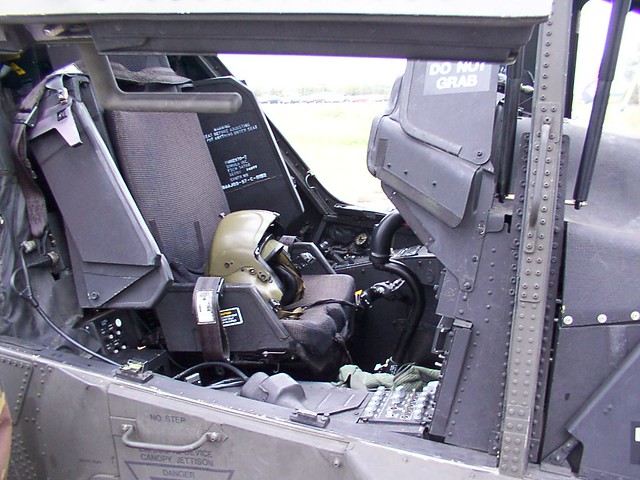
This was my initial inspiration for posing the doors open.

OK slightly out of focus here, but I'm quite happy with the similarity between the two pics above.


And finally, here is a pic of the airframe that this kit is based on:


A word on the Hellfire Missiles, the kit supplied items are typical Monogram efforts, ie all one piece and minimal detail. I decided that the best way to use these items was to paint them as dummy drill rounds, and there was plenty of photographs to match them up with online. What I didn't have was the correct "drill inert" stencil decals, so I improvised and used some spare "no step" stencils - it's fine if you don't look too closely! Other than that, I had to add my own indicator lights, and several antennae (especially the tall one on top of the tail).

That's all for this build folks, as always all comments are welcome. Cheers y'all it's beer o'clock!
 _GOTOTOP