_GOTOBOTTOM
Early Aviation
Discuss World War I and the early years of aviation thru 1934.
1:72 Fokker D.VII Dutch Navy 1919/1920
FAUST
#130
_VISITCOMMUNITY
Noord-Holland, Netherlands
Joined: June 07, 2002
KitMaker: 8,797 posts
AeroScale: 190 posts
Posted: Thursday, April 11, 2013 - 06:34 AM UTC
Ola people

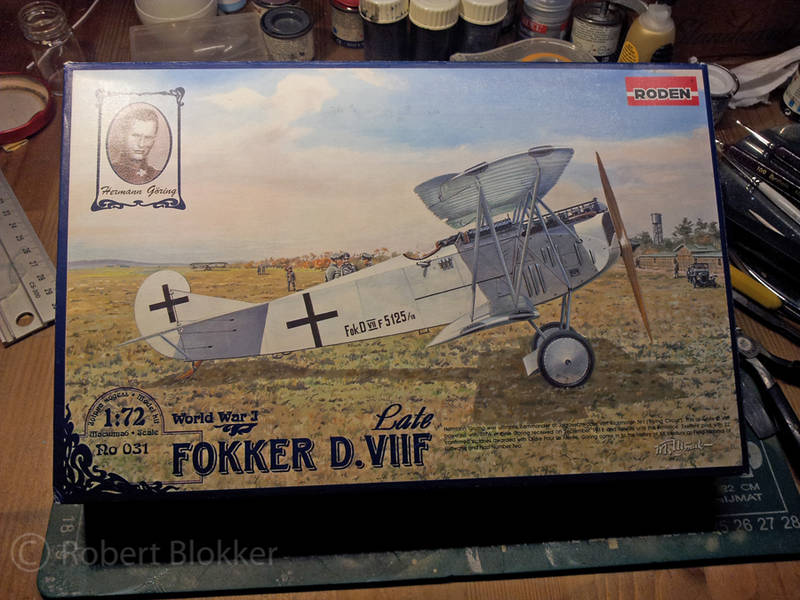
After binning the Stuka I decided to quickly start something new to forget it. And the other week I bought myself a 1:72 Fokker D.VII by Roden.

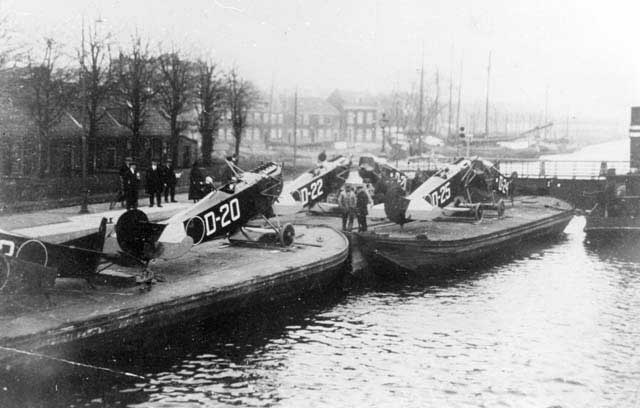
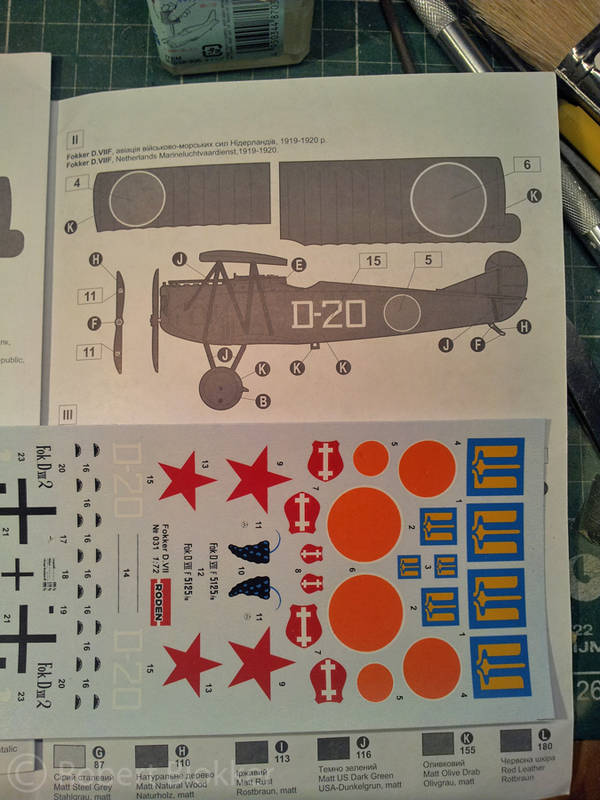
I saw when I checked the kits contents that one of the decaloptions was a D.VII in service of the Marineluchtvaartdienst (Dutch navy airforce) And well... bit of national pride... Of course I had to make it.


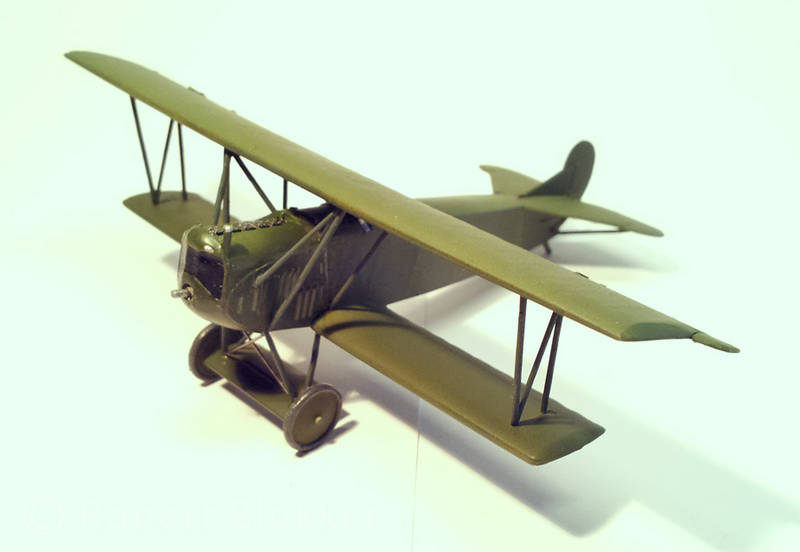
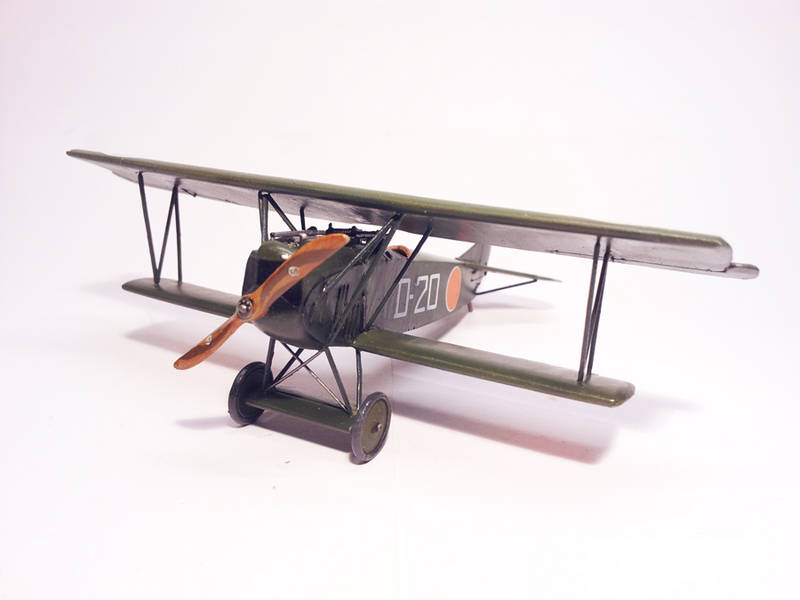
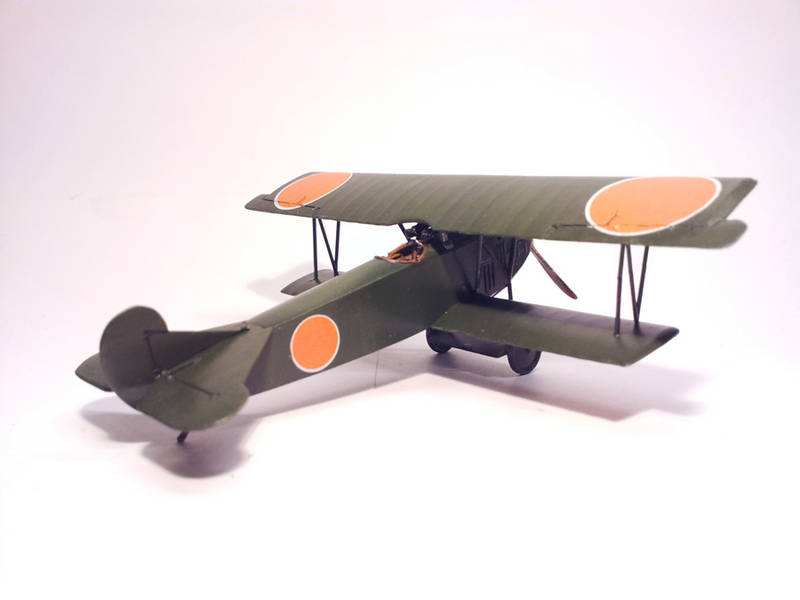
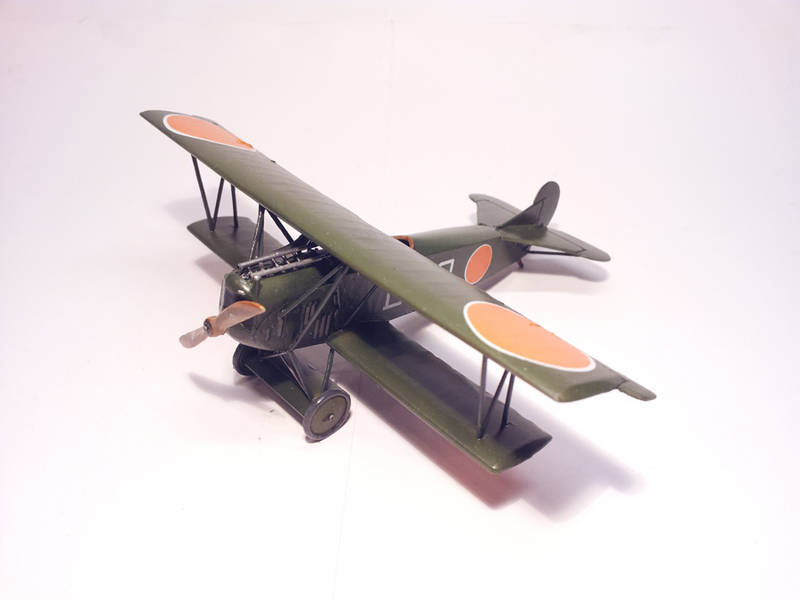
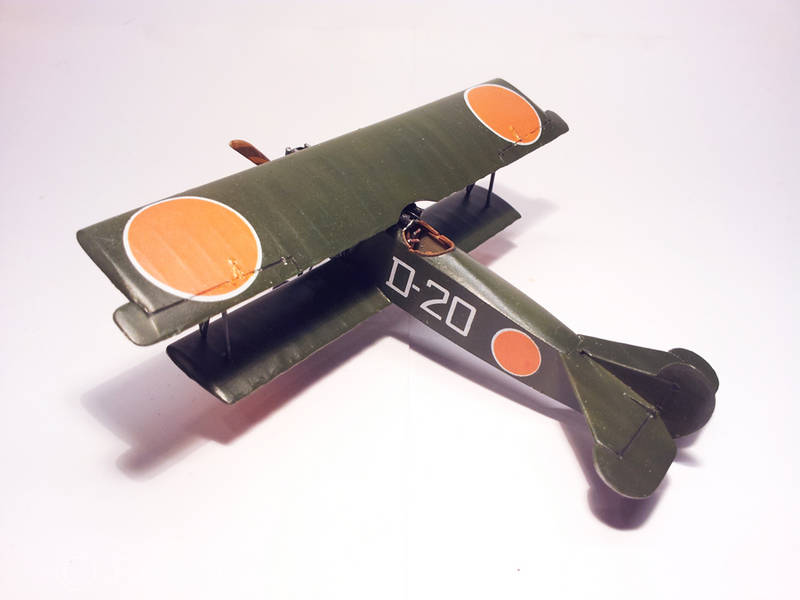
This is the decaloption I'm going for. If a Dutchman can't shout that he is a Dutchman... he simply isn't a Dutch man. And nothing shouts more Dutch then huge roundels in our national and royal color. On an olivedrab basecoat.


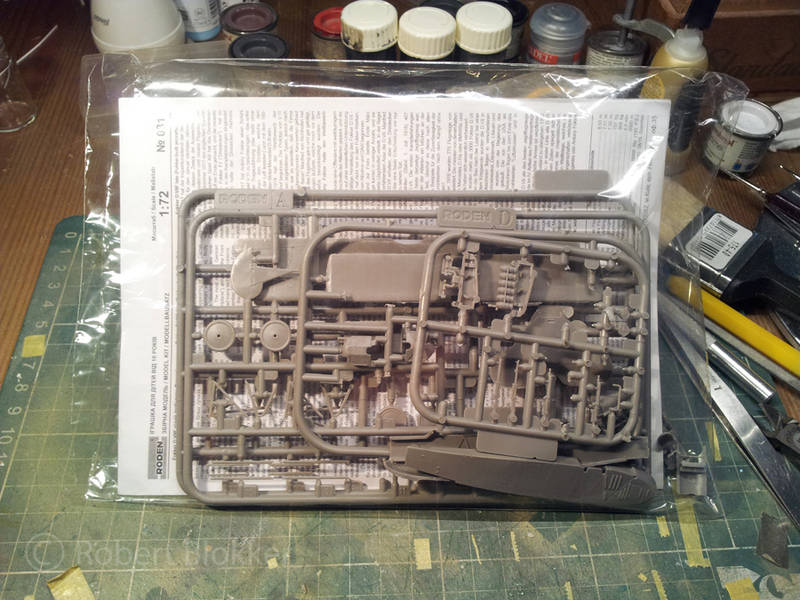
Overview of the contents.


Step 1. sans machineguns. I paint those separately before attaching them.


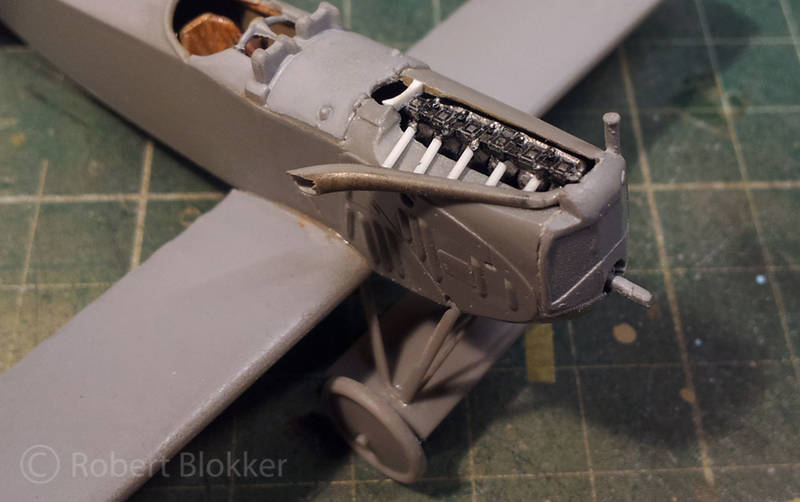
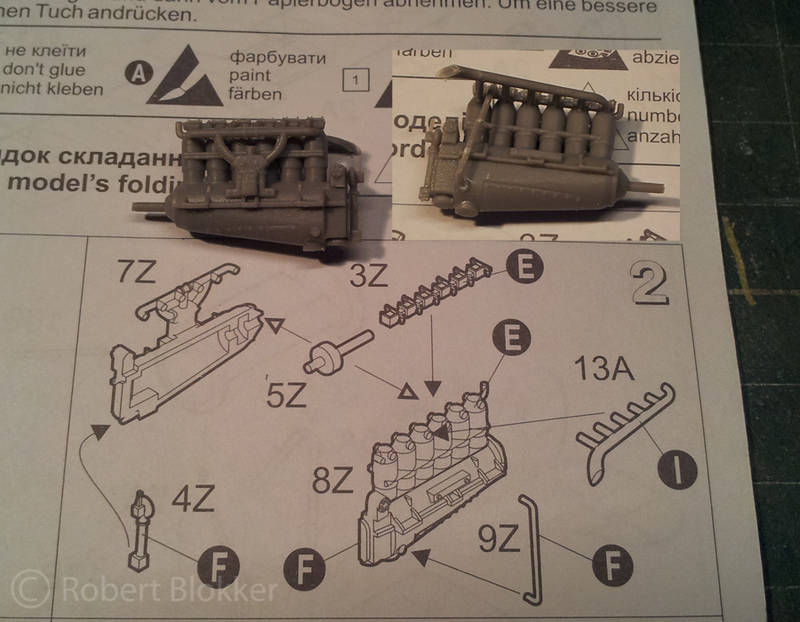
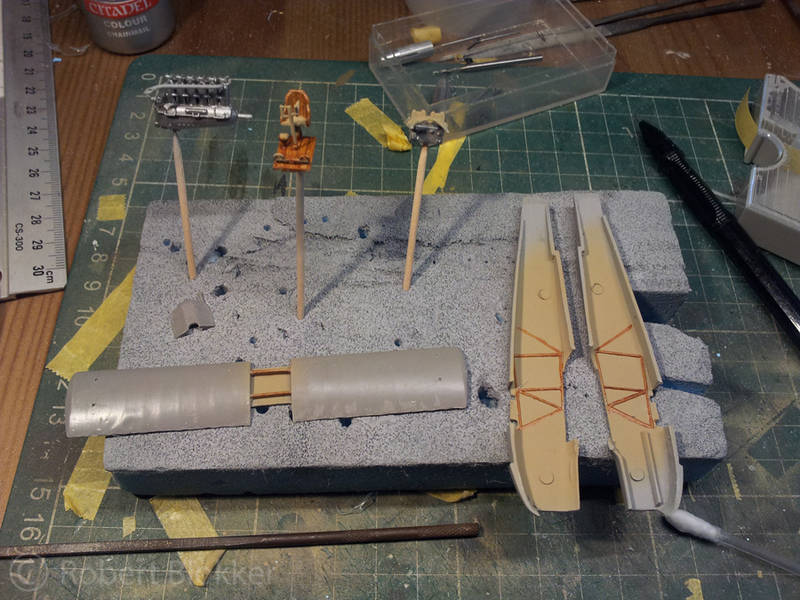
Step 2. Very neat engine for this little kit
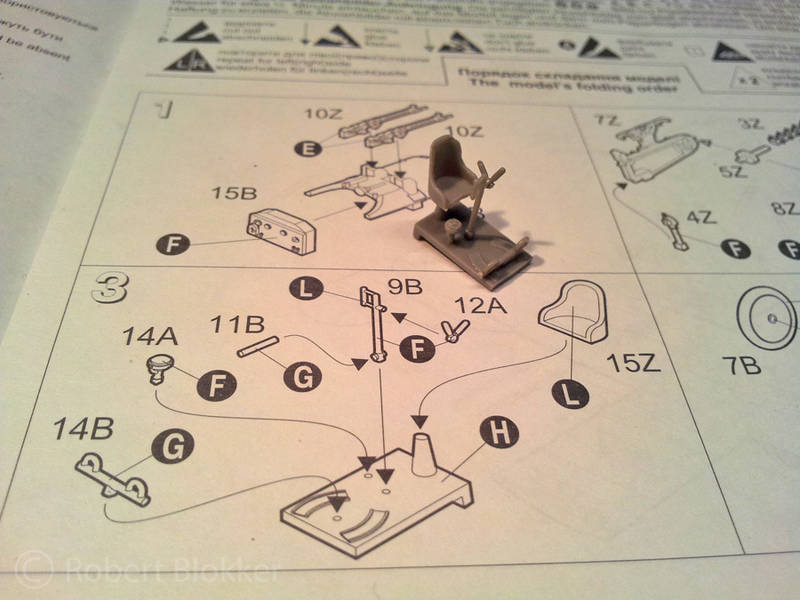

Stap 3. Cockpit


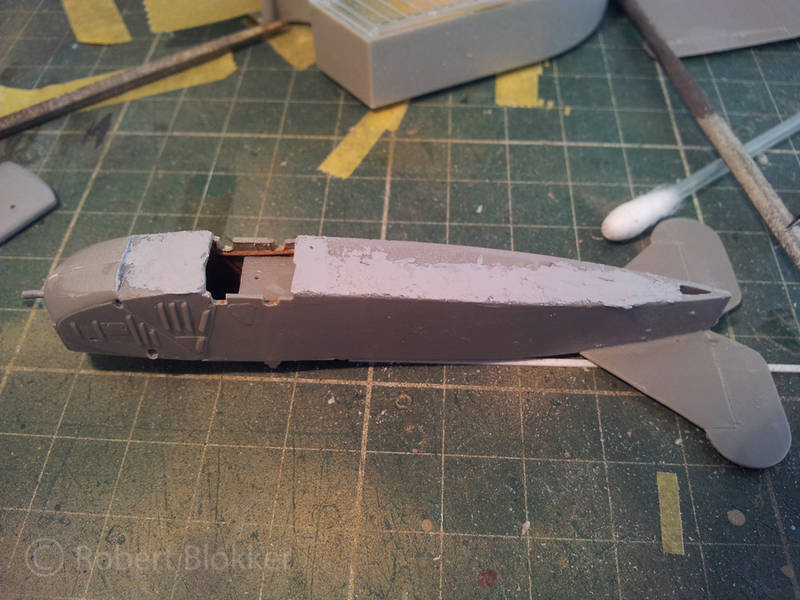
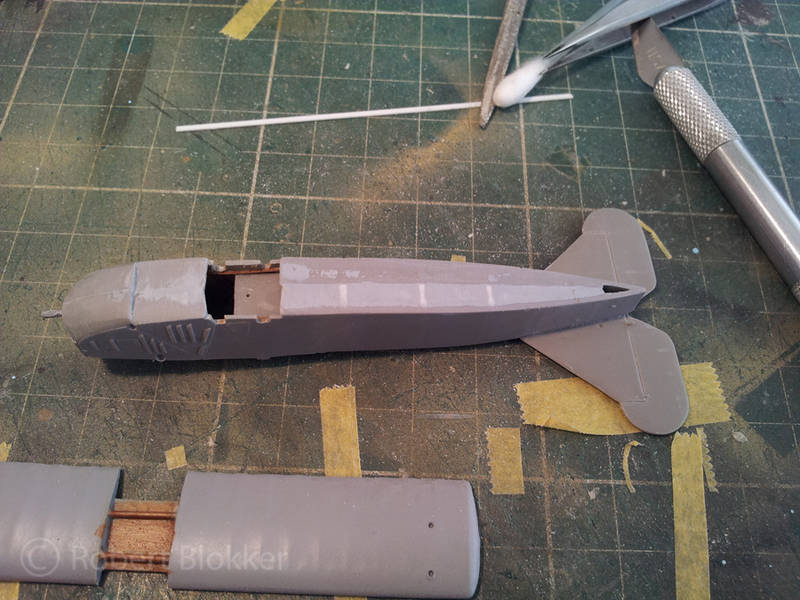
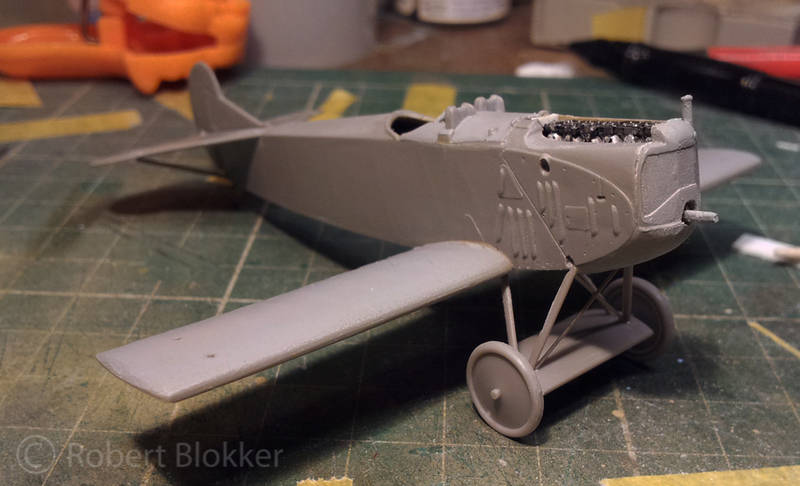
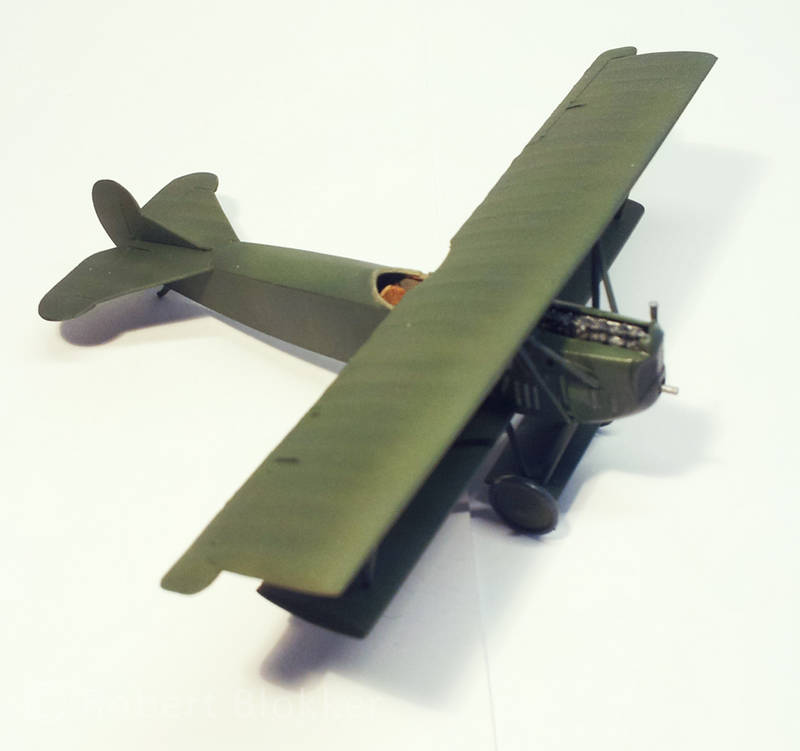
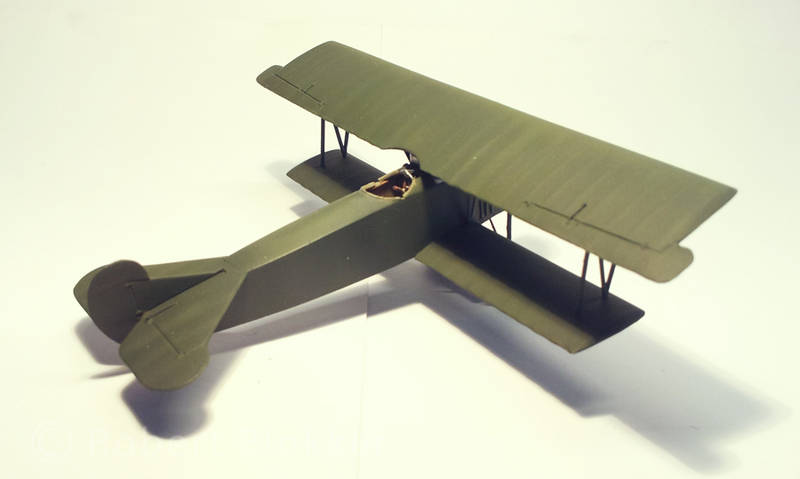
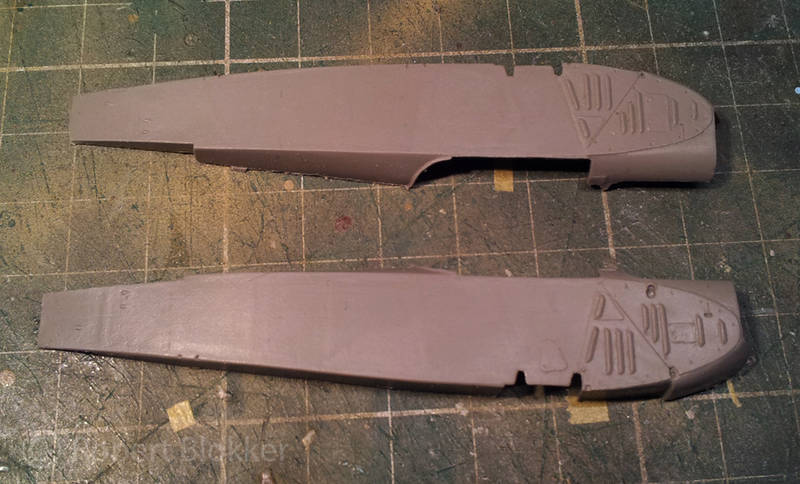
Overview of the hull. you can even see the ribs vaguely pressing against the canvas skin. Very neat. And inside the cockpit area is some more rib detail.


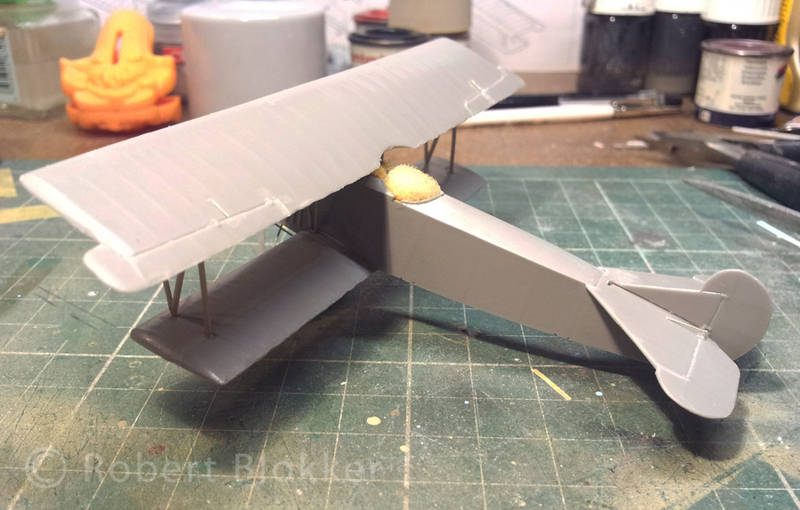
Painted the inside of the aircraft in buff


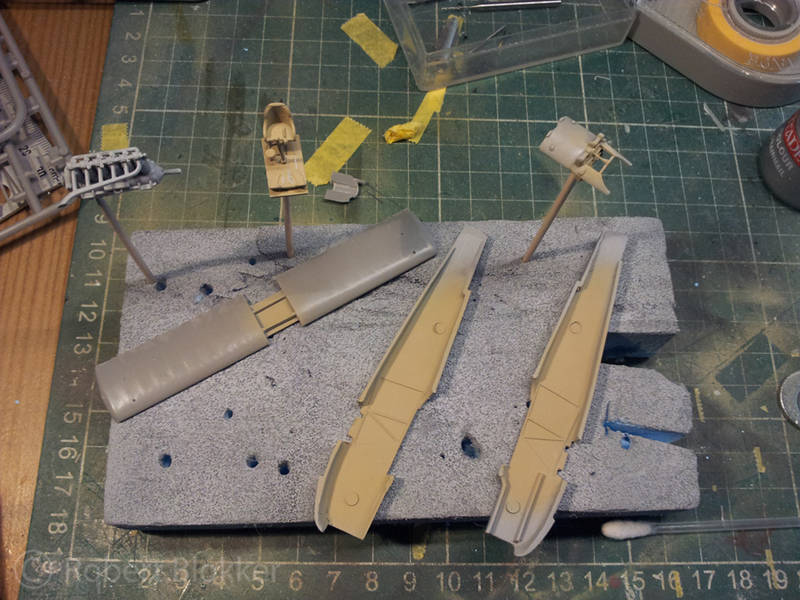
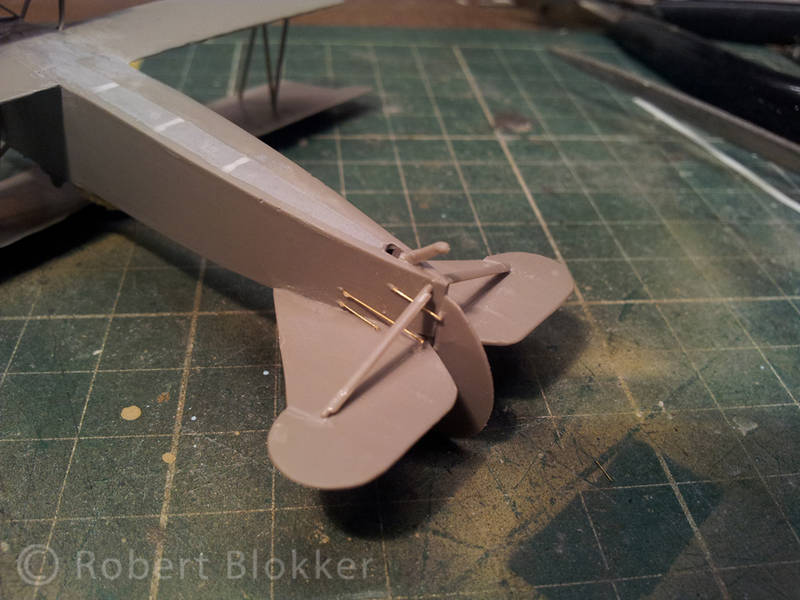
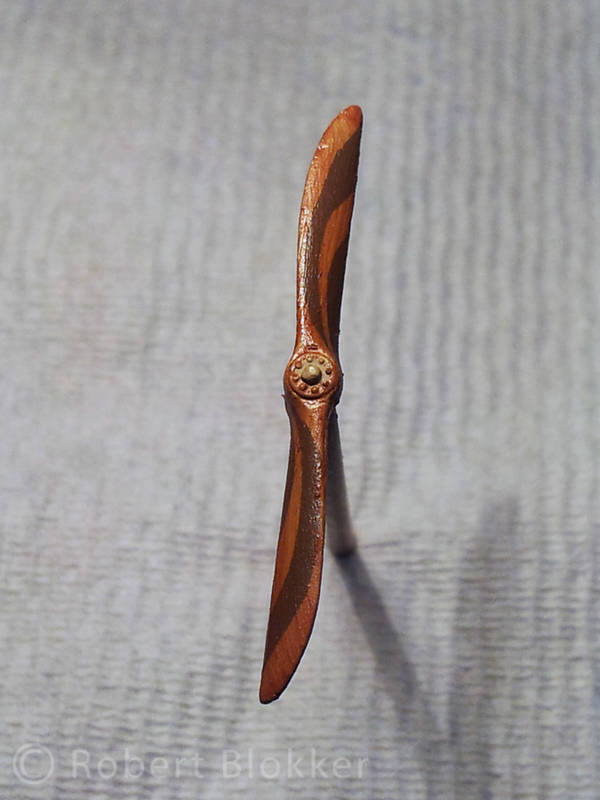
Added some thin pencil stripes on the wooden parts and then coated it with diluted Burnt Sienna oilpaint


You probably won't see much of it in the end... but I simply like painting wood


More to follow

With a friendly greetz

Robert Blokker
JackFlash
_VISITCOMMUNITY
Colorado, United States
Joined: January 25, 2004
KitMaker: 11,669 posts
AeroScale: 11,011 posts
Posted: Thursday, April 11, 2013 - 12:30 PM UTC
Here is a bit of fun on the subject.
FAUST
#130
_VISITCOMMUNITY
Noord-Holland, Netherlands
Joined: June 07, 2002
KitMaker: 8,797 posts
AeroScale: 190 posts
Posted: Friday, April 12, 2013 - 04:50 AM UTC
Ola Stephen

That is a pretty cool result on that Roden kit. My paintjob will be a bit less extravagant... Just green.
JackFlash
_VISITCOMMUNITY
Colorado, United States
Joined: January 25, 2004
KitMaker: 11,669 posts
AeroScale: 11,011 posts
Posted: Friday, April 12, 2013 - 06:12 AM UTC

Quoted Text

Ola Stephen

That is a pretty cool result on that Roden kit. My paintjob will be a bit less extravagant... Just green.


Even just green can have a unique dynamic.


This is the late Schwerin Roden 1/48 scale Fokker D.VII kit. The amount of photos available are minimal so I stick to the basis. Blue Rider did the decals. Serial no. unknown, 2nd Soviet Aviatryad, 1922. No. 1 OIAE stationed at Petrograd (Leningrad) in 1923. Pilot was A. T. Kozhevnikov. The aircraft of the squadron appear to have been divided into three flights of five plus a leaders aircraft. Here we have the squadron leaders aircraft, the famous Pharaoh emblem was Kozhevnikov's personal badge. It seems that the machine is purchased in 1922. Fokker sold 50 D.VII, C.I & C.III types to the Soviets. The shipment was sent by sea from Amsterdam arriving at Petrograd in May 1922. These were detailed to fighter units in Petrograd, Moscow and Kiev. The last components of this shipment were written off in 1930. Fokker was still using BMW and Mercedes motors in these airframes. Though I am of the opinion that the Mercedes may have been rebuilt versions rather than newer manufactured motors.


FAUST
#130
_VISITCOMMUNITY
Noord-Holland, Netherlands
Joined: June 07, 2002
KitMaker: 8,797 posts
AeroScale: 190 posts
Posted: Friday, April 12, 2013 - 07:53 AM UTC
Ola Stephen

That is indeed a nice green Fokker. It gives me a good idea what my plane is going to look like. And with oranges for some extra flavor

How did you do the propellor? First sand color, then masking and then the darkbrown? Or vice versa. Or is there another way to do this?
JackFlash
_VISITCOMMUNITY
Colorado, United States
Joined: January 25, 2004
KitMaker: 11,669 posts
AeroScale: 11,011 posts
Posted: Friday, April 12, 2013 - 12:57 PM UTC

Quoted Text

Ola Stephen

That is indeed a nice green Fokker. It gives me a good idea what my plane is going to look like. And with oranges for some extra flavor

How did you do the propellor? First sand color, then masking and then the darkbrown? Or vice versa. Or is there another way to do this?


Light colour always as a base coat - drying time 3 - 5 days. Then the dark laminations. Here is a bit of fun on the subject.
FAUST
#130
_VISITCOMMUNITY
Noord-Holland, Netherlands
Joined: June 07, 2002
KitMaker: 8,797 posts
AeroScale: 190 posts
Posted: Saturday, April 13, 2013 - 03:12 AM UTC
@ Stephen
With that 3 to 5 day drying time I assume you paint them with oils. I was actually planning to airbrush my prop in 2 colors and applying a coat of diluted oilpaint burned sienna over it. And then gloss lacquer the whole thing.
Making my own wooden props is far from my skills. I even doubt if it will ever get that far.


In the meantime I have another small update.

One last shot of the interior for I close up the 2 fuselage halves.


And when I glued the fuselagehalves together another problem presented itself. The top of the fuselage behind the cockpit was nice and flush. The bottom side had a 1mm height difference. Which had to receive some putty to get it nice and flush.


And this is what it looked like after sanding. The white strips is my attempt to try to recreate the rib detail with evergreen that the other side of the Fuselage had.


More to follow soon

With friendly greetz

Robert Blokker
FAUST
#130
_VISITCOMMUNITY
Noord-Holland, Netherlands
Joined: June 07, 2002
KitMaker: 8,797 posts
AeroScale: 190 posts
Posted: Saturday, April 13, 2013 - 09:53 PM UTC
another small update. Added the tail fin, Some struts, the tailskid and fixed the landing gear. Te rigging is probably way too thick. But I had to improvise when one of the struts on the small wing between the wheels snapped and the whole structure lost whatever little rigidity it had. So I fixed it with a bit of stretched sprue. And now luckily it is as strong as a house.


And I gave the Machineguns a coat of gloss varnish to finish them off.


And I had to scratchbuilt a new exhaust when the original kitpart escaped and after a bit of searching I decided it would probably save me time if I simply built it myself. Still needs to be cleaned in this picture.


Slowly it starts to look like a little aircraft. Next comes an interesting step as I need to mount the top wing with all the struts but also make it detatchable for priming.
phantom_phanatic309
#372
_VISITCOMMUNITY
United Kingdom
Joined: March 10, 2010
KitMaker: 2,568 posts
AeroScale: 1,619 posts
Posted: Tuesday, April 16, 2013 - 08:33 AM UTC
Following with interest. I have the Rudolf Berthold boxing of this kit. Any other problems beside the bottom needing filling?
JackFlash
_VISITCOMMUNITY
Colorado, United States
Joined: January 25, 2004
KitMaker: 11,669 posts
AeroScale: 11,011 posts
Posted: Tuesday, April 16, 2013 - 08:59 AM UTC
The lower wing roots may need some filing back. While this is the 1:72 kit I know the 1:48 Roden and Eduard kit benefit from this.
FAUST
#130
_VISITCOMMUNITY
Noord-Holland, Netherlands
Joined: June 07, 2002
KitMaker: 8,797 posts
AeroScale: 190 posts
Posted: Tuesday, April 16, 2013 - 10:20 AM UTC
@ Stephen W
Well the kit went together pretty well. Even though I had to sand a lot to make that happen. The 2 fuselage halfs need to be sanded down otherwise they will not fit between the wings. From what I read on another forum the Engine sits too far back. I solved this by filing the slot in the back of the radiator deeper. And made a sort of concave hole where the axle end fits in both bottom backside of the radiator as in the nose under it. The radiator fitted in place but left me a gap underneath it. I filled this with strips of Evergreen. The bottom side and the wings where they meet the fuselage needed filling and sanding.
And be carefull of the struts for the wings and the landinggear. The plastic Roden uses makes them quite fragile I had a few struts snapped. Which makes it a bit annoying to assemble them. I also had a problem with the outer wing struts which somehow differed from angle with the struts on the fuselage making it impossible to line them up I countered this by cutting a little bit off the back leg of the strut and swivel the whole thing to the back. The last few things might be something that was only wrong with my kit. But be aware that this is a possibility.

Another update.
The pre-primer shots. Assembly completed. The struts really were frustrating to do with some of them snapping and as you can read with my reply to Stephen W. Not matching up in angles and such. But Everything kinda worked out in the end. I also did the control cables to the flaps with the thinnest copper wire I had available. And when I checked online afterwards I found out that those wires were even thinner. Will take that with me on the next WW1 aircraft I built.


The aircraft is primed and ready for paint which it will receive in the next update.

With friendly greetz

Robert Blokker
FAUST
#130
_VISITCOMMUNITY
Noord-Holland, Netherlands
Joined: June 07, 2002
KitMaker: 8,797 posts
AeroScale: 190 posts
Posted: Saturday, April 20, 2013 - 12:29 PM UTC
Ola People

Paint has been flung. I have worked hard to make the olive drab look less drab. Spend quite a lot of time on the highlights and shadows. It doesn't show up very well but also the rib detail on the sides are highlighted. I am pretty pleased with it so far.


And this evening I have painted the prop. First sprayed a sandcolored base. Then a lot of intricate masking. Sprayed a dark brown. And then when dry I gave the whole prop a layer of diluted burned sienna oilpaint.


Next up giving it a layer of future before I can apply the decals.

With friendly greetz

Robert Blokker
FAUST
#130
_VISITCOMMUNITY
Noord-Holland, Netherlands
Joined: June 07, 2002
KitMaker: 8,797 posts
AeroScale: 190 posts
Posted: Wednesday, April 24, 2013 - 10:05 AM UTC
Another update.

I found out what kind of stuff Future/Kleer is and where to get it so I applied some of it on the aircraft and started applying decals to the aircraft. At first glance I thought they were nice in register but when I examined them up close this seemed not to be the case. Still I went ahead and put them on. I also did not know the Roden decals were cut so finely and this resulted in me screwing up one of the aircrafts ID numbers. If anybody has these left over from their 1:72 Roden D.VII F and doesn't mind parting with them I would gladly take them over.

Enough talk here are the pics.


As soon as I manage to get hold on one of those Id numbers then I can put matt lacquer on the canvas parts of the aircraft and call it finished
Jessie_C
_VISITCOMMUNITY
British Columbia, Canada
Joined: September 03, 2009
KitMaker: 6,965 posts
AeroScale: 6,247 posts
Posted: Wednesday, April 24, 2013 - 12:32 PM UTC
That looks almost Japanese
Don't be too quick to put too matte a finish on it. Fabric covered aircraft are quite glossy. Satin is about as matte as one should go for an aircraft from that time.
JackFlash
_VISITCOMMUNITY
Colorado, United States
Joined: January 25, 2004
KitMaker: 11,669 posts
AeroScale: 11,011 posts
Posted: Wednesday, April 24, 2013 - 03:25 PM UTC
Lets spend a few minutes on the topic of WWI aircraft finish. Now I am not speaking about the post WWI or pre WWII aircraft.

The main function of camouflage paint was to cut down the shine on machines so they did not reflect light and give your opponent an indication about where you were at. Rotary engines did spew oily exhaust but in the ideal circumstance this was to be wiped or sanded off painted or varnished surfaces after the patrol. It was part of the maintenance schedule for all aircraft of all combatants. Inline motors did not spew oily exhaust except when damaged.

The secondary function of camouflage was to resemble the local landscape when viewed from above. The British found that the PC10 or PC12 had some changes that took place in its overall appearance during the service life of the machine it was applied to. Harry Woodman did a series of articles in Windsock about this.

When a rotary engine did spew out its exhaust it tended to cover the wing roots (upper and lower surfaces) and the underside of the fuselage and tail unit.

Original WWI aircraft from the factory had a Gloss to semi gloss to the varnish and some paints on interior parts (UsuallY black and gray.) This is termed "Japanned" by some. Any exterior finish was dulled an operational machine the longer it stayed at the front.

Modern day replica WWI aircraft are shiny as many of them are doped, varnished and then painted with oil based gloss.
CaptnTommy
_VISITCOMMUNITY
Connecticut, United States
Joined: October 26, 2009
KitMaker: 424 posts
AeroScale: 389 posts
Posted: Friday, April 26, 2013 - 03:42 AM UTC
Nit Pick Alert!!!!!!!
I noticed you painted the internal fuselage structure a wood color, my data shows a black or grey or green painted tubing.
End Alert

Love the Dutch finish. The only finishes I've seen on the Dutch Fokkers was Gloss. Were any of these D-VII's sent to Indonessia? Now that would be a diarama!

Captn Tommy
FAUST
#130
_VISITCOMMUNITY
Noord-Holland, Netherlands
Joined: June 07, 2002
KitMaker: 8,797 posts
AeroScale: 190 posts
Posted: Friday, April 26, 2013 - 05:38 AM UTC

Quoted Text

That looks almost Japanese


They wished they had invented it. They look better in orange anyway.... It is probably the pride for our national color speaking here.

To both Jessica and Stephen
on the subject of gloss vs matt finish. I did some searching online on the D.VII's as used by the MLD and found the following pictures:


It appears that on most of the pictures I found that the wings at least were gloss. The body changes from picture to picture but that could very well be due to the angle of the light. On some it seems to be matt on others it appears glossy.
@ Stephen
You info is very welcome. This won't be the last WW1 era aircraft I will be building so I'll definately keep it in mind.

@ Tom
You are quite likely right. I have no references of the plane. And I was kinda tricked by the square shape of the tubing in the Roden kit to think it was wood. That is pretty much the whole explanation
In my latest search that also delivered the photo's above I found a page that had quite a good summary of the 45 Dutch D.VII's and there was no mention at all that any of those ever left Europe. Funny detail is that the D.VII's of the MLD were once stationed at de Kooy airfield near Den Helder which is quite close to where I live.
As for interesting dio ideas. You pretty much can't get it more Dutch then this. And the fun thing is it shows exactly my D.VII there on that barge.
 _GOTOTOP