

Hosted by Jim Starkweather
masked canopy failure

McKeever

Joined: October 14, 2012
KitMaker: 246 posts
AeroScale: 22 posts
Posted: Tuesday, June 25, 2013 - 02:34 AM UTC
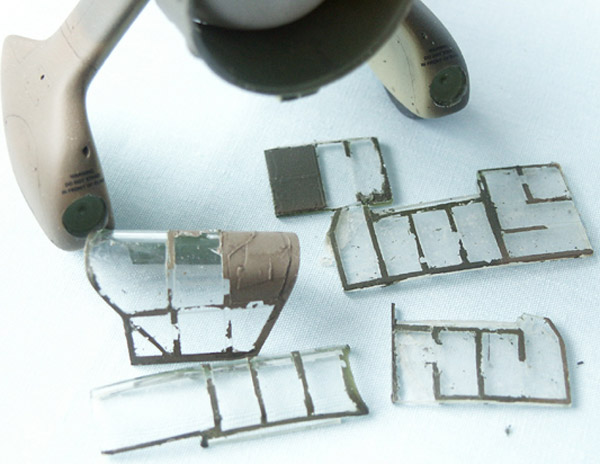
So I peeled off the Eduard mask of my Stuka canopy. Some of the paint lines stuck to the tape, rather than the canopy. Wondering how best to rectify this. I don't really relish cutting each individual piece. Also, what did I do wrng. I am thinking I applied to thick of a coat. ...

Siderius
Joined: September 20, 2005
KitMaker: 1,747 posts
AeroScale: 1,673 posts
Posted: Tuesday, June 25, 2013 - 08:39 AM UTC
Hi there, I would recommend getting, if you don't already have, a very fine brush and touching up the canopy framing that way. I have never been able to mask canopies, I always use a fine brush and do the best I can. It may not be exactly as good as a mask, but if you take your time, you can get a pretty good result. Hope this helps some. Russell


cinzano
Joined: January 13, 2009
KitMaker: 419 posts
AeroScale: 378 posts
Posted: Tuesday, June 25, 2013 - 09:45 AM UTC
I have some thoughts that might help, but first a question: Do you dip your clear parts in Future or Klear before masking and painting?
If you do not, I highly suggest you try it. (especially if you're airbrushing acrylic enamels.
With out that coating acrylic paint has trouble adhering to naked clear plastic. Dipping in Future also helps with clarity of parts as well as protecting from fogging from CA glues (though I still prefer to expoxy clear parts whenever I can as it does not risk crazing and the bond is so much stronger than white glue).
Cheers,
Fred
McKeever
Joined: October 14, 2012
KitMaker: 246 posts
AeroScale: 22 posts
Posted: Tuesday, June 25, 2013 - 10:13 AM UTC
I spray future over a model after it is painted but befure applying decals. I had no idea this woudl help with the adhesin.
I am skeptical to hand paint with a brush---doest not sound like a good idea. I might mask off the edeges and do it by hand.
One problem is I use acrylics so it is not pragmatic to mask and paint as I go, particularly as it is getting warm.
I am skeptical to hand paint with a brush---doest not sound like a good idea. I might mask off the edeges and do it by hand.
One problem is I use acrylics so it is not pragmatic to mask and paint as I go, particularly as it is getting warm.

AussieReg

#007

Joined: June 09, 2009
KitMaker: 8,156 posts
AeroScale: 3,756 posts
Posted: Tuesday, June 25, 2013 - 10:52 AM UTC
I always lightly run a blade along the edge of my canopy masks after the paint dries to separate the paint before I remove the mask. By doing this I very rarely get any paint coming away from the canopy.
Hope this helps, D
Hope this helps, D

cinzano
Joined: January 13, 2009
KitMaker: 419 posts
AeroScale: 378 posts
Posted: Tuesday, June 25, 2013 - 11:11 AM UTC
Quoted Text
I spray future over a model after it is painted but befure applying decals. I had no idea this woudl help with the adhesin.
I am skeptical to hand paint with a brush---doest not sound like a good idea. I might mask off the edeges and do it by hand.
One problem is I use acrylics so it is not pragmatic to mask and paint as I go, particularly as it is getting warm.
OK,
I airbrush most most everything (esp. canopies). Try dipping your canopy in future. (extra tip: rest canopy, edges down, on lint free paper towel while it dries and put glass or tupperware container over drying canopy to prevent lint or dust from falling on it). Let set overnight. After that do your masking before mounting on airframe if this is easier for you. spray your interior color first. I also like to spray black over that to increase the opacity of the color on the frames.
If you can (up to you though) prime airframe before mounting canopies, then mount them and proceed with spraying airframe color as normal...
...anyway its how I tend to do it and I've been pretty pleased with the results.
Cheers,
Fred
McKeever
Joined: October 14, 2012
KitMaker: 246 posts
AeroScale: 22 posts
Posted: Tuesday, June 25, 2013 - 11:21 AM UTC
That's good to know going forward. BUt as thngs stand now whats the best way to rememdy this?
cinzano
Joined: January 13, 2009
KitMaker: 419 posts
AeroScale: 378 posts
Posted: Tuesday, June 25, 2013 - 12:45 PM UTC
Can you post a pic so we can see the extent of the damage?
As an aside: I like to use a wooden toothpick to clean up canopy framing lines where the paint bled over.
In your case I'd like to see how badly the framing has been undermined. If the canopy is attached to the plane already, did you use white glue by chance?
Cheers,
Fred
As an aside: I like to use a wooden toothpick to clean up canopy framing lines where the paint bled over.
In your case I'd like to see how badly the framing has been undermined. If the canopy is attached to the plane already, did you use white glue by chance?
Cheers,
Fred
McKeever
Joined: October 14, 2012
KitMaker: 246 posts
AeroScale: 22 posts
Posted: Tuesday, June 25, 2013 - 02:07 PM UTC
The canopy is not attached. I think to attach is a bad idea given the low psi one should use for delicate work for that, versus the higer psi for basic coat work.
I'd say about 1/3 of te work is gone or compromised. I am tinking of just masking and hand painting as I go along.
Thanks guys, btw. I am an intermediate armor modeller wit limited experienec doing airplanes. I built this kit once before and am redoing it to achieve a better result. Even so, some of the skill sets required are foreign to the world of Panzer modelling.
Holdfast
#056

Joined: September 30, 2002
KitMaker: 8,581 posts
AeroScale: 4,913 posts

Posted: Tuesday, June 25, 2013 - 06:44 PM UTC
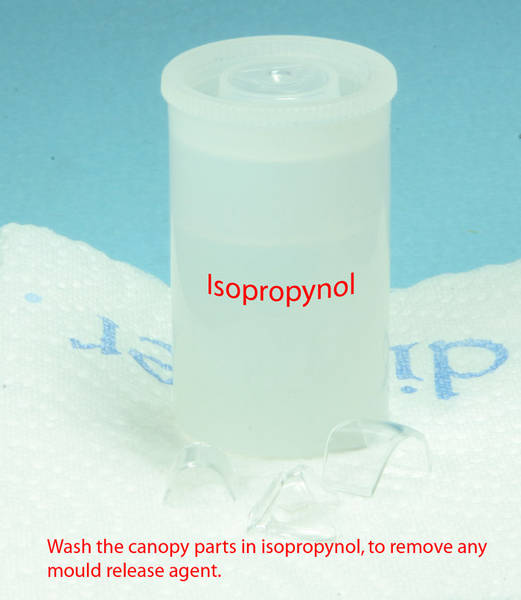
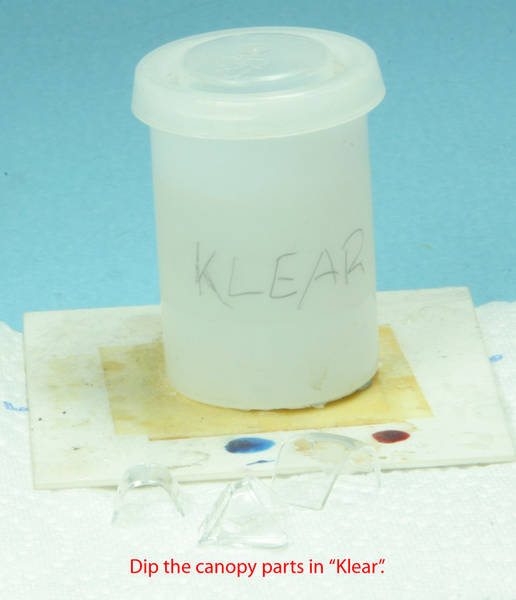
Did you wash the canopy first? Before painting anything it should be cleaned of mould release oil; also be aware of finger oils. You can wash all plastic parts in warm water and a little dish washing liquid, but allow the parts to full dry before painting. I use Isopropynol (rubbing alcohol/surface cleaner)as it evaporates very fast. For canopies I but them, individually, into a small container filled with Isopropynol and give them a shake, then, when dry, dip them in Klear/Future.
Certainly if you didn't wash the canopy parts this will be the main cause of your problem; it will have been been made worse by an over thick coat of paint which will bridge the masking causing the tape to pull up the paint when removed. The answer is to strip the parts, wash them (dip in Klear/Future if you wish) and repaint. apply the internal colour first, this shows through on the inside and gives you the necessary 2 coats when you apply the camo colours. 2 coats are required because the clear plastic allows light to shine through from both sides, which will make the frames look lighter than the surrounding camo if the paint isn't opaque.
How I know your pain!
This picture will hopefully show how easy it is to mask canopies
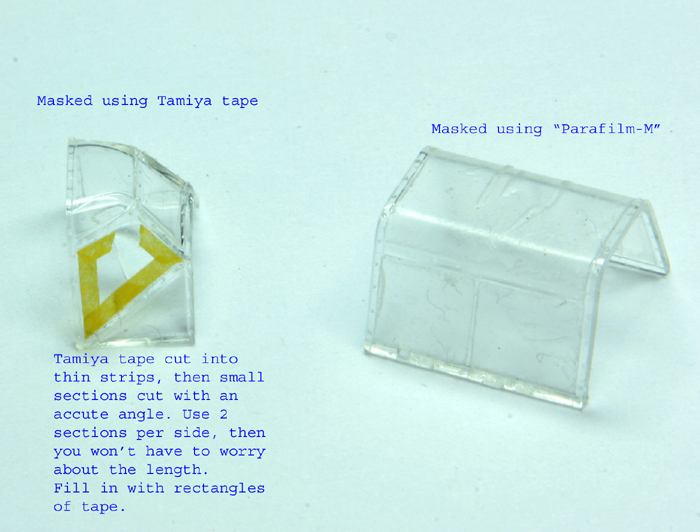
I found this sequence from my 1/48 Spit Mk V build.
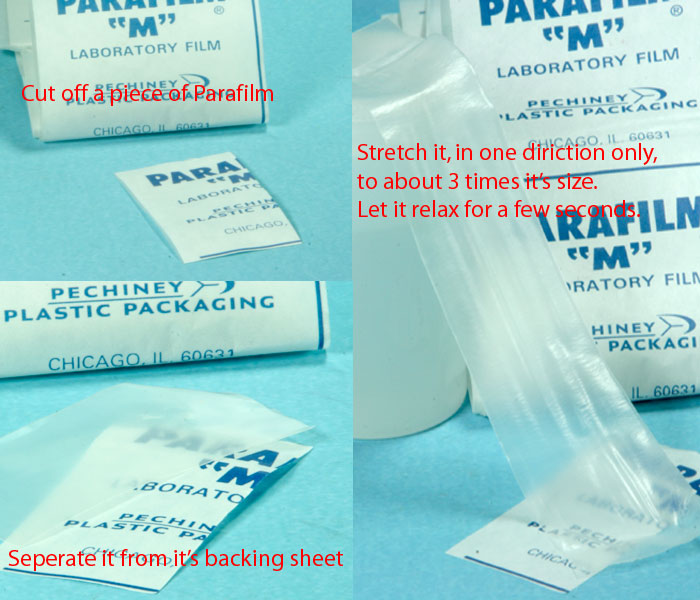


I haven't got a picture of the masking removed but I will get one and post it. I wouldn't suggest using Parafilm M, Tamiya masking tape is the way to go, bite the bullet, do the penance and strip and re-mask and paint the canopies :-)
Certainly if you didn't wash the canopy parts this will be the main cause of your problem; it will have been been made worse by an over thick coat of paint which will bridge the masking causing the tape to pull up the paint when removed. The answer is to strip the parts, wash them (dip in Klear/Future if you wish) and repaint. apply the internal colour first, this shows through on the inside and gives you the necessary 2 coats when you apply the camo colours. 2 coats are required because the clear plastic allows light to shine through from both sides, which will make the frames look lighter than the surrounding camo if the paint isn't opaque.
How I know your pain!
This picture will hopefully show how easy it is to mask canopies
I found this sequence from my 1/48 Spit Mk V build.
I haven't got a picture of the masking removed but I will get one and post it. I wouldn't suggest using Parafilm M, Tamiya masking tape is the way to go, bite the bullet, do the penance and strip and re-mask and paint the canopies :-)

McKeever
Joined: October 14, 2012
KitMaker: 246 posts
AeroScale: 22 posts
Posted: Thursday, July 04, 2013 - 09:15 AM UTC
SOrry I did not respond earlier.
I would be inclinded to strip te canopy and get another eduard mask. I am tempted to try and touch up by masking and hand painting areas where the paint peeled. ...
I would be inclinded to strip te canopy and get another eduard mask. I am tempted to try and touch up by masking and hand painting areas where the paint peeled. ...
Joel_W
Joined: December 04, 2010
KitMaker: 11,666 posts
AeroScale: 7,410 posts
Posted: Thursday, July 18, 2013 - 03:36 AM UTC
Your masking issue was certainly caused by a canopy that had oils from either mold release (unlikely), or from your fingers prior to painting. I use Isopropyl Alcohol to clean the canopy sections applied with a Q-tip. Then I mask using Tamiya tape cut into thin strips, then fill in. I glue the windscreen in place, putty and blend as needed. Then I re-clean the canopy when I prepare the aircraft for painting. I carefully clean the exposed areas with a Quip & Iso alcohol. Same applies to the canopy sections not glued to the fuselage. I've already masked the inside and attached them to a painting stick. My fingers never touch the bare surfaces after cleaning. You can buy white cotton gloves at any pharmacy that you can use over and over again so that your fingers don't touch the bare plastic. That's super important.
I paint with Tamiya Acrylics with a 1:1 mix @ 18-20 psi. I don't treat the canopy sections any differently because I'm not detail painting them. I apply a few light tack coats, let dry, and then more light coats till I get the coverage I want. I don't apply a heavy color coat as this tends to build up paint over to the point where it is above the masking tape, and that can cause peeling issues.
I use to prime the canopies with Tamiya lacquer primer so that the paint had a flat surface to bite into, but I stopped that step as I just don't have any paint pulling issues.
Joel

ludwig113

Joined: February 05, 2008
KitMaker: 1,381 posts
AeroScale: 1,110 posts

Posted: Thursday, July 18, 2013 - 03:46 AM UTC
i normally dip the canopy in future then let it dry for a couple of days.
use masks in the normal way, spray the base colour/primer, then the top coat.
BEFORE removing the masks, score around the edge with your modelling knife, then peel away the mask. your basically cutting the paint away from the mask so it doesn't lift when you take the mask off.
paul
use masks in the normal way, spray the base colour/primer, then the top coat.
BEFORE removing the masks, score around the edge with your modelling knife, then peel away the mask. your basically cutting the paint away from the mask so it doesn't lift when you take the mask off.
paul

drabslab

Joined: September 28, 2004
KitMaker: 2,186 posts
AeroScale: 1,587 posts

Posted: Thursday, July 18, 2013 - 07:15 AM UTC
Most of your frames are straight lines. You could also print straight strips of the correct width and colour on decal paper (microscal), cut these to length and put them on.


Emeritus

Joined: March 30, 2004
KitMaker: 2,845 posts
AeroScale: 1,564 posts

Posted: Thursday, July 18, 2013 - 07:58 AM UTC
Quoted Text
BEFORE removing the masks, score around the edge with your modelling knife, then peel away the mask. your basically cutting the paint away from the mask so it doesn't lift when you take the mask off.
Interestingly, I've experienced far more paint lifting when scoring along the edges than when peeling the masks off without such preparation, so I stopped doing that. Seems like coat(s) of Future don't like being cut. Or they just somehow know it's me and start acting up...

Real life example: A Blenheim kit I finished a couple of years ago had the canopies dipped in Future, the plane assembled and clear parts masked, then primed with Mr. Surfacer (from a spray can). After that, the kit sat back in my stash for *over a year*, after which I finally got it painted and finished. Not a single piece of masking tape lifted any paint.
I think I must have gotten the clear parts cleaned and free of grease pretty well prior to dipping in Future.
Of course, everyone's mileage may vary, so its worth experimenting and finding what works the best for you.
P.S. Oh btw, is it enamels or acrylics you're painting with? I used acrylics, and I think the paint type could have something to do with paint lifting, as enamels tend to dry much harder than acrylics
ludwig113
Joined: February 05, 2008
KitMaker: 1,381 posts
AeroScale: 1,110 posts
Posted: Thursday, July 18, 2013 - 08:03 AM UTC
Quoted Text
Quoted TextBEFORE removing the masks, score around the edge with your modelling knife, then peel away the mask. your basically cutting the paint away from the mask so it doesn't lift when you take the mask off.
Interestingly, I've experienced far more paint lifting when scoring along the edges than when peeling the masks off without such preparation, so I stopped doing that. Seems like coat(s) of Future don't like being cut. Or they just somehow know it's me and start acting up...
Real life example: A Blenheim kit I finished a couple of years ago had the canopies dipped in Future, the plane assembled and clear parts masked, then primed with Mr. Surfacer (from a spray can). After that, the kit sat back in my stash for *over a year*, after which I finally got it painted and finished. Not a single piece of masking tape lifted any paint.
I think I must have gotten the clear parts cleaned and free of grease pretty well prior to dipping in Future.
Of course, everyone's mileage may vary, so its worth experimenting and finding what works the best for you.
P.S. Oh btw, is it enamels or acrylics you're painting with? I used acrylics, and I think the paint type could have something to do with paint lifting, as enamels tend to dry much harder than acrylics
it just shows that there is no right or wrong way to do things, you just need to find something that works for you
...either that or only paint after leaving the mask on for a year!
...paul

jphillips
Joined: February 25, 2007
KitMaker: 1,066 posts
AeroScale: 214 posts
Posted: Thursday, July 18, 2013 - 10:04 AM UTC
Oh my, you NEVER want to paint canopy frames with enamel. If you get to the store and they don't have acrylic paint in the color you need, try another store.

Joel_W
Joined: December 04, 2010
KitMaker: 11,666 posts
AeroScale: 7,410 posts
Posted: Friday, July 19, 2013 - 03:33 AM UTC
Quoted Text
Oh my, you NEVER want to paint canopy frames with enamel. If you get to the store and they don't have acrylic paint in the color you need, try another store.
Why do you say this? If the color match, enamels will bite into the surface better then acrylics, which actually dry by forming a tight coating over the surface. Enamels do take much longer to dry and properly cure.
Acrylics need the surface to be free of finger oils as there is less bite. Prep with ISO Alcohol is the answer, and airbrush on light, thin coats. If top coats are built up over the masking tape, pulling the paint up is a real concern.
Joel

wychdoctor92394
Joined: July 07, 2013
KitMaker: 219 posts
AeroScale: 136 posts
Posted: Friday, July 19, 2013 - 04:37 AM UTC
I beleive that Tamiya came out with paint markers. Yes, you read that right... paint, but in marker form. Look for them and you might find most of your problems solved.
Joel_W
Joined: December 04, 2010
KitMaker: 11,666 posts
AeroScale: 7,410 posts
Posted: Friday, July 19, 2013 - 04:42 AM UTC
Quoted Text
I beleive that Tamiya came out with paint markers. Yes, you read that right... paint, but in marker form. Look for them and you might find most of your problems solved.
Interesting concept. I will have to check this out. Hope that they make the markers in all their flat colors.
Joel
jphillips
Joined: February 25, 2007
KitMaker: 1,066 posts
AeroScale: 214 posts
Posted: Friday, July 19, 2013 - 12:30 PM UTC
Quoted Text
Quoted TextOh my, you NEVER want to paint canopy frames with enamel. If you get to the store and they don't have acrylic paint in the color you need, try another store.
Why do you say this? If the color match, enamels will bite into the surface better then acrylics, which actually dry by forming a tight coating over the surface. Enamels do take much longer to dry and properly cure.
Acrylics need the surface to be free of finger oils as there is less bite. Prep with ISO Alcohol is the answer, and airbrush on light, thin coats. If top coats are built up over the masking tape, pulling the paint up is a real concern.
Joel
Acrylic paint can easily be removed if you slop a little outside the canopy frame by using a toothpick, or a bit of rubbing alcohol. Enamel paint has to be removed with thinner, which will ruin clear plastic.
McKeever
Joined: October 14, 2012
KitMaker: 246 posts
AeroScale: 22 posts
Posted: Sunday, January 12, 2014 - 06:38 PM UTC
Ok,
I have regained the intestinal fortitude to complete this project. First and foremost, what is the best method to strip the canopy? Thanks.
I have regained the intestinal fortitude to complete this project. First and foremost, what is the best method to strip the canopy? Thanks.

Jessie_C


Joined: September 03, 2009
KitMaker: 6,965 posts
AeroScale: 6,247 posts
Posted: Sunday, January 12, 2014 - 08:02 PM UTC
Use some easy-off oven cleaner in a ziplock bag. Soak the parts for several hours to loosen the paint, then scrub it off with an old toothbrush. Wear rubber gloves to protect your hands 
You may need some toothpicks to pry the stubborn bits of paint off without scratching the plastic. After the paint is removed, flush the parts off with plain water, then wash in soapy water to make sure you get any fingerprints off.
You may need some toothpicks to pry the stubborn bits of paint off without scratching the plastic. After the paint is removed, flush the parts off with plain water, then wash in soapy water to make sure you get any fingerprints off.
 |

WEB HOSTING BY


Copyright ©2021 AeroScale and Kitmaker Network, a subsidiary of Silver Star Enterprises
All Rights Reserved. Please read our Conditions of Use and Privacy Policy.
All Rights Reserved. Please read our Conditions of Use and Privacy Policy.