_GOTOBOTTOM
General Aircraft: Tips & Techniques
Discussions on specific A/C building techniques.
Klear Kock-Up...
Merlin
Staff MemberSenior Editor
AEROSCALE
#017
_VISITCOMMUNITY
United Kingdom
Joined: June 11, 2003
KitMaker: 17,582 posts
AeroScale: 12,795 posts
Posted: Saturday, June 29, 2013 - 08:02 AM UTC
Hi there

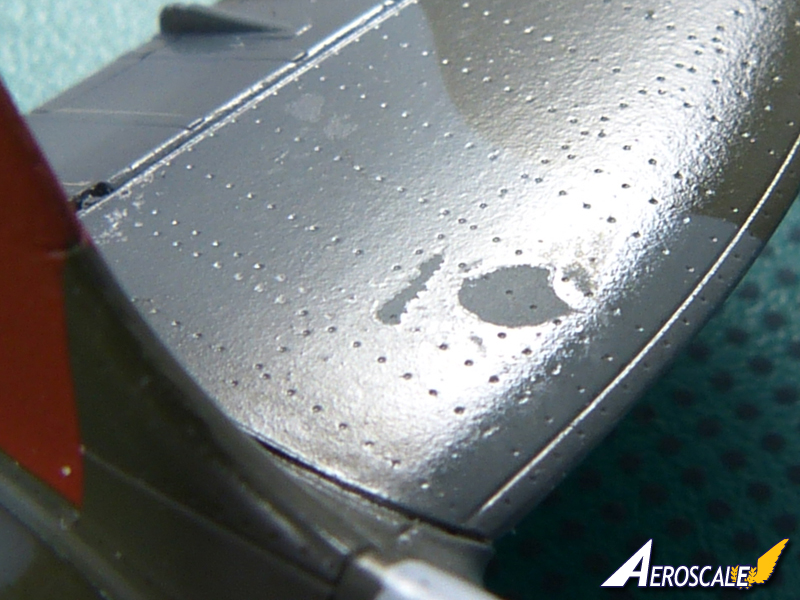
Over the years I thought I'd experienced most modelling "disasters", but I hit a new one this morning - a couple of post-it notes kindly taking off several layers of (what I thought was thoroughly dried (i.e. a week)) Johnson's Klear (Future) when I removed them after a masking session.

I'm left with something resembling shallow craters. Way too deep to paint over, and if I mask around them I'm worried I'll just take more of the varnish off!

Any suggestions? Put the whole project on long-term hold and wait until the Kleer is definitely "fossilised" and try to sand the areas smooth, or remove the lot and re-do the whole paint job?

All the best

Rowan
Antoni
_VISITCOMMUNITY
England - East Midlands, United Kingdom
Joined: June 03, 2006
KitMaker: 574 posts
AeroScale: 573 posts
Posted: Saturday, June 29, 2013 - 10:40 AM UTC
If the paint underneath is enamel you should be able to remove the Kleer with something containing ammonia. If it is acrylic the ammonia may affect the paint as well. You should be able to sand it with 12000 grit wet and dry. It seems for some reason the Kleer has not bonded to the paint so you might find it comes away very easily. Not been using the new stuff that smells of lemons have you? Humbrol have a replacement for Kleer/Future now. Takes longer to dry but by all accounts is very good.
TedMamere
_VISITCOMMUNITY
Moselle, France
Joined: May 15, 2005
KitMaker: 5,653 posts
AeroScale: 4,347 posts
Posted: Saturday, June 29, 2013 - 11:14 AM UTC
Hi Rowan,

Ouch, that's bad!

I never had such problems with Klir, our french Future. But I mostly use it with Tamiya paints and both work very well together.

I know it must be painful but can you shoot some pictures and post them here so we can see what we are talking about?

Jean-Luc
Merlin
Staff MemberSenior Editor
AEROSCALE
#017
_VISITCOMMUNITY
United Kingdom
Joined: June 11, 2003
KitMaker: 17,582 posts
AeroScale: 12,795 posts
Posted: Saturday, June 29, 2013 - 07:06 PM UTC
Cheers Antoni and Jean-Luc

I'll try to take a photo that shows the problem well later.

I used "proper" old Klear from the stock I bought before it was discontinued, and applied it over WEM Colourcoats - a combination that's worked perfectly for me in the past.

Maybe there was something in the adhesive on the non-brand post-it note that attacked the Klear? Kabuki tape and latex applied nearby caused no problem at all.

All the best

Rowan
Holdfast
Staff MemberPresident
IPMS-UK KITMAKER BRANCH
#056
_VISITCOMMUNITY
England - South West, United Kingdom
Joined: September 30, 2002
KitMaker: 8,581 posts
AeroScale: 4,913 posts
Posted: Saturday, June 29, 2013 - 07:52 PM UTC
Hi Rowan,
That's bad news, ouch!

I have recently used clear over WEM colourcoats and I have not had any problems such as you describe and there has been a lot of masking going on, as you can image You may be right about the adhesive on the post it, or there may have been finger oils on the paint, which cause the Klear not to adhere properly?

Klear is safe to mask over after around 30mins probably less. I do leave it overnight, as I do with all coats, so there is definitely something going on out of the norm; I have had a little bit of paint lifting off with masks over Klear recently and I put that down to finger oils on the Klear coat?
Merlin
Staff MemberSenior Editor
AEROSCALE
#017
_VISITCOMMUNITY
United Kingdom
Joined: June 11, 2003
KitMaker: 17,582 posts
AeroScale: 12,795 posts
Posted: Saturday, June 29, 2013 - 11:06 PM UTC

Quoted Text

You may be right about the adhesive on the post it, or there may have been finger oils on the paint, which cause the Klear not to adhere properly?


Hi Mal

I couldn't swear there were no finger oils, but I think it's unlikely as I haven't picked the model up by the horizontal tail in the course of painting it.

Here's a shot of some of the damage - it's all over the other stabiliser too:


You can see all the layers of Klear have lifted, revealing the matt enamel underneath.

I had a look round the local shops that are open on a Sunday morning, but none of the cleaners they have in stock have ammonia in them. I'll try the hardware shop tomorrow.

Meanwhile, to cheer myself up, I'll make a start on a (hopefully!) simple and accident-free build of Hasegawa's heavy gun-toting Fw 190A-5/U12.

All the best

Rowan
Antoni
_VISITCOMMUNITY
England - East Midlands, United Kingdom
Joined: June 03, 2006
KitMaker: 574 posts
AeroScale: 573 posts
Posted: Saturday, June 29, 2013 - 11:58 PM UTC
I too use WEM colorcoats and Kleer without any problems. Not much help is it. I have had the odd small patch that does not adhere very well and flake off like sunburnt skin. I once made the mistake of using masking fluid on a canopy dipped in Kleer and that turned the Kleer into a right mess because it contained ammonia. Try some masking fluid on a small patch and see if that fetches it off.

Did you spray the Kleer on? If so perhaps some areas went on dry and did not bond to surface.
WoodshedWings
_VISITCOMMUNITY
Ontario, Canada
Joined: October 11, 2012
KitMaker: 141 posts
AeroScale: 139 posts
Posted: Sunday, June 30, 2013 - 01:18 AM UTC
As Clear is self leveling, you could try just shooting another coat over the damaged area.
drabslab
_VISITCOMMUNITY
European Union
Joined: September 28, 2004
KitMaker: 2,186 posts
AeroScale: 1,587 posts
Posted: Sunday, June 30, 2013 - 02:05 AM UTC

Quoted Text

As Clear is self leveling, you could try just shooting another coat over the damaged area.


I was thinking exactly the same, it has worked for me once
Merlin
Staff MemberSenior Editor
AEROSCALE
#017
_VISITCOMMUNITY
United Kingdom
Joined: June 11, 2003
KitMaker: 17,582 posts
AeroScale: 12,795 posts
Posted: Sunday, June 30, 2013 - 03:26 AM UTC
Cheers Mike and Drabslab

The photo doesn't really give an impression of how deep the pits are, so I think an overall coat would still show the change in levels. But you've got me thinking about flooding the flaked-away areas very carefully with more Klear applied with a fine brush to bring them up to the surrounding finish - as you say, relying on it's self-levelling nature.

I reckon it's worth a try before stripping the lot off. I'll give it a go and post an update.

All the best

Rowan
Emeritus
_VISITCOMMUNITY
Uusimaa, Finland
Joined: March 30, 2004
KitMaker: 2,845 posts
AeroScale: 1,564 posts
Posted: Sunday, June 30, 2013 - 04:59 AM UTC
Hand-brushing to fill the pits is what I about to suggest as well. Can't say how well it'll work, but as you said, it's worth a try.
Btw, is that the only area affected? Doesn't look that big an area to me. Looks like it could simply be sanded and repainted?

Anyway, that's something I've never come across myself. The only time(s) I've had future lift off with tape have been with canopies dipped in Future where I did the mistake of scoring along the edges of masking tape with a knife prior to their removal, never with a painted surface like this. And that's on a flat paint to boot. Weird.

However, an issue I've had a couple of times is Future forming cracks, but that's caused by either the underlying paint still being in the process of drying, and "pulling" the already dried Future into cracking, or the same occurring with several coats of Future. But that's obviously not the case here, though.
drabslab
_VISITCOMMUNITY
European Union
Joined: September 28, 2004
KitMaker: 2,186 posts
AeroScale: 1,587 posts
Posted: Sunday, June 30, 2013 - 07:50 PM UTC

Quoted Text

Cheers Mike and Drabslab

The photo doesn't really give an impression of how deep the pits are, so I think an overall coat would still show the change in levels. But you've got me thinking about flooding the flaked-away areas very carefully with more Klear applied with a fine brush to bring them up to the surrounding finish - as you say, relying on it's self-levelling nature.

I reckon it's worth a try before stripping the lot off. I'll give it a go and post an update.

All the best

Rowan


What I did was:

I airbrushed very carefully some future on the "spots" and let it dry.

Then a few hours later I gave the whole plane a new coat of future. The result was perfect (as far as something that I do can be perfect ).

Just as xtra info: I always mix future with 40 to 50% isopropanol. This makes the future flow easier


Joel_W
Staff MemberAssociate Editor
AUTOMODELER
_VISITCOMMUNITY
New York, United States
Joined: December 04, 2010
KitMaker: 11,666 posts
AeroScale: 7,410 posts
Posted: Tuesday, July 02, 2013 - 03:38 AM UTC
Rowan, just read through your thread. Sorry about the future issue. Never had anything like that happen to me.

How did the re-application go? Should have self leveled enough to apply a new overall coat without any issues.
Joel
taildragger7AC
_VISITCOMMUNITY
United States
Joined: November 27, 2011
KitMaker: 10 posts
AeroScale: 3 posts
Posted: Tuesday, July 02, 2013 - 05:21 AM UTC
Hi All,

Been there, done that once before many years ago when I shot Clear over Model Master Oils. Switched to acrylics; has happened since.
That said, I filled them in with Future/Clear/Klir delivered with a small brush. I put enough in to make a little puddle being sure it didn't over flow. The Clear loses a lot of the volume as it dries (as you know) so after 2-3 applications (over many days of drying) I had a surface that was sufficiently flush that another coat of Clear, delivered from an airbrush, gave me an acceptable finish. Acceptable, not perfect; I could always see it. I knew where to look. I think we all have a kit or two on the shelf like that though eh?

Hope this helps and good luck. From what little I can see of the build in the photo, you've done some nice work.
Best,

--J

javascript:PasteSmiley(':-H')
Merlin
Staff MemberSenior Editor
AEROSCALE
#017
_VISITCOMMUNITY
United Kingdom
Joined: June 11, 2003
KitMaker: 17,582 posts
AeroScale: 12,795 posts
Posted: Tuesday, July 02, 2013 - 06:11 AM UTC
Cheers Joel and John

John - You pretty much took the words out of my mouth - I think it's working, but it's surprising just how much Klear the pits are soaking up as they dry. But they are definitely looking better already.

As you say, I'll always know where to look, so I doubt it'll ever be quite right to my eyes.

I'll post a comparison pic as it gets closer to finished.

All the best

Rowan
taildragger7AC
_VISITCOMMUNITY
United States
Joined: November 27, 2011
KitMaker: 10 posts
AeroScale: 3 posts
Posted: Tuesday, July 02, 2013 - 09:22 AM UTC
Hey Rowan,

Glad it's working out. I think delivering a "puddle" by brush first may seal it, then blending with an airbrush might work best. With regards to diluting Klear for airbrushing, I'm sure there are formulae a-plenty out there. I've tried a lot of them including some alcohols and most work fine. However, I get the best results with Clear diluted 1:1 with Vallejo thinner; successive coats build up real nice.

The real trick is placing the completed model strategically in your display cabinet such that people can't see the mistake (that only you can see of course)

All the best and happy modeling,


--J

Holdfast
Staff MemberPresident
IPMS-UK KITMAKER BRANCH
#056
_VISITCOMMUNITY
England - South West, United Kingdom
Joined: September 30, 2002
KitMaker: 8,581 posts
AeroScale: 4,913 posts
Posted: Tuesday, July 02, 2013 - 07:11 PM UTC
Glad to hear that the plan is working Rowan When the matt coat is applied this problem will disappear
Joel_W
Staff MemberAssociate Editor
AUTOMODELER
_VISITCOMMUNITY
New York, United States
Joined: December 04, 2010
KitMaker: 11,666 posts
AeroScale: 7,410 posts
Posted: Wednesday, July 03, 2013 - 02:47 AM UTC
Rowan, Glad to hear that it's working. Once you overspray with a few coats, the self leveling will make it almost impossible for anyone to spot the offending areas. And after a while, you'll even forget about them.
Joel
 _GOTOTOP