

I've been very selective in my choice of kits, if it had a vacform canopy, it was a no-go.
I tried once, and I came to the conclusion that an airplane without its canopy looks kind of strange...(there's a reason most vendors deliver two where only one is needed, right?)
But maybe it is time for a change.
So the question here is how do you deal with these canopies, what glue to use, how to mask them, when to install them...how to get them in a shape that fits;-)
any insights you have are more than welcome,
H.
General Aircraft
This forum is for general aircraft modelling discussions.
This forum is for general aircraft modelling discussions.
Hosted by Jim Starkweather
Vac formed canopies...how???

48thscale

Joined: January 31, 2009
KitMaker: 229 posts
AeroScale: 104 posts

Posted: Thursday, August 01, 2013 - 10:26 AM UTC

Jessie_C


Joined: September 03, 2009
KitMaker: 6,965 posts
AeroScale: 6,247 posts

Posted: Thursday, August 01, 2013 - 11:05 AM UTC
Doing a vac canopy calls for a bit of care and patience, but not nearly as much as you fear 
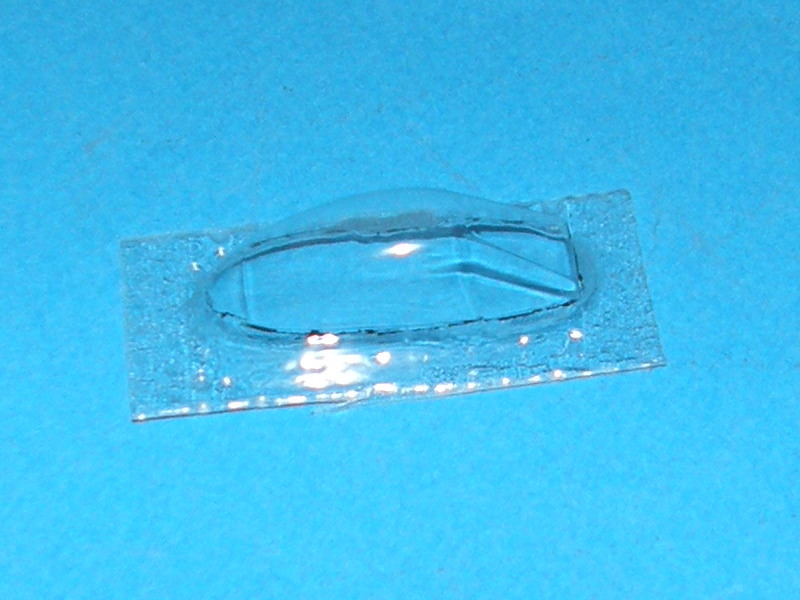
The first trick is to deal with cutting them out of their backing. You need a black sharpie marker and a brand new razor knife. (I can't stress how important it is to use a new blade. If it's at all even the slightest bit dull, you risk ruining the canopy). You'll also benefit from a pair of cuticle scissors for cutting away most of the scrap.
First, mark around the edges of the canopy with your marker.
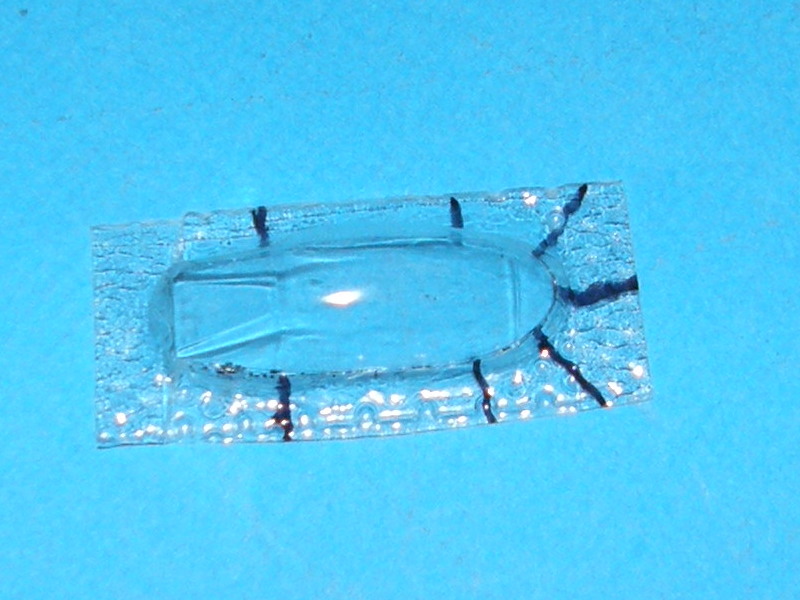
Run the tip of your blade along the marked line with just enough pressure so it scores the plastic, but doesn't cut through. Take this step slowly and carefully. Two or three shallow passes are better than one heavy one. Cut in stages instead of making one complete circuit around the canopy.
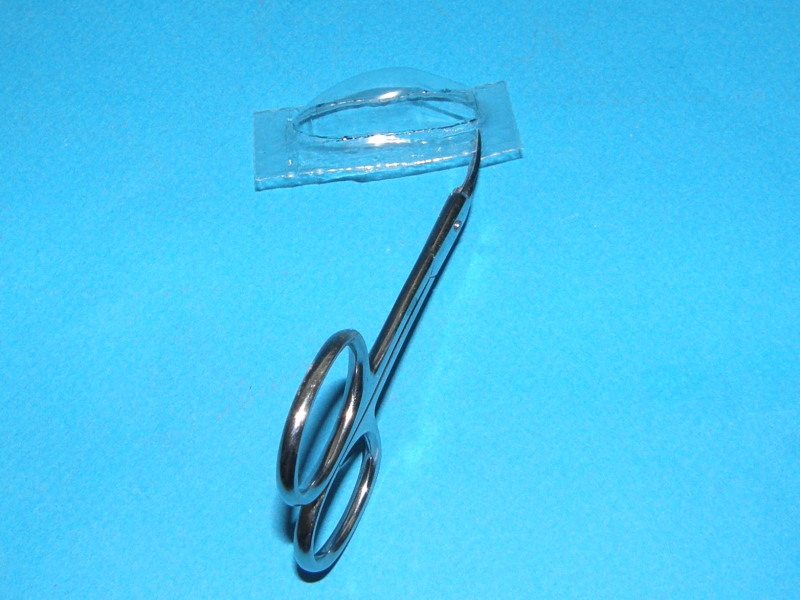
Then cut the scrap backing plastic with the cuticle scissors until the cuts go just to the edge of the canopy but not into the frame. Be very careful with this step. In the case of this Venom canopy, I've used the Sharpie marker to illustrate where the cuts should go. In highly curved areas make the cuts closer together.
The scored line along the canopy base makes the plastic weaker there. Now take one of the cut segments and carefully bend it down and towards the centre of the canopy. You'll have to bend it back and forth a few times before it snaps off but eventually you'll get this:
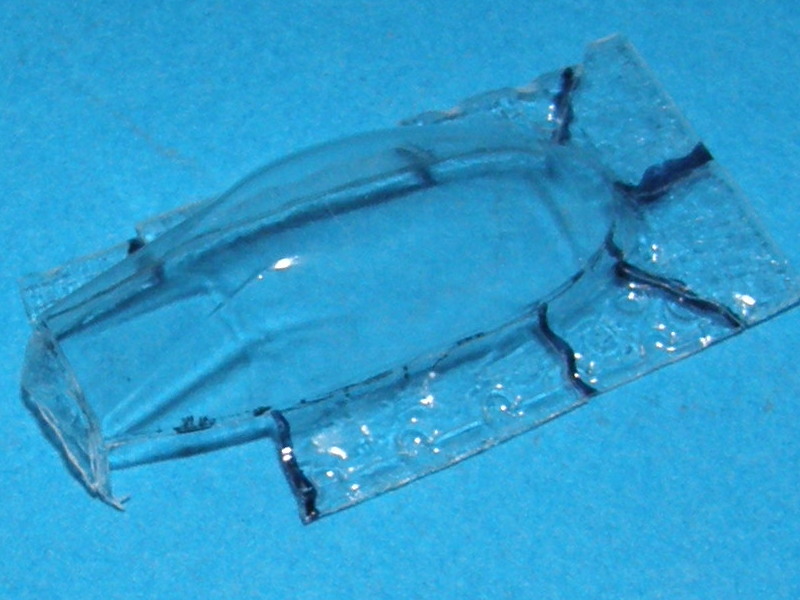
Repeat this step until you've snapped off all of the waste plastic from your canopy. Avoid the temptation to rush! Now your canopy is free of its base, but the edges are quite rough. You'll need to carefully sand the edges of the canopy using a sanding stick until it's all smoothed off.
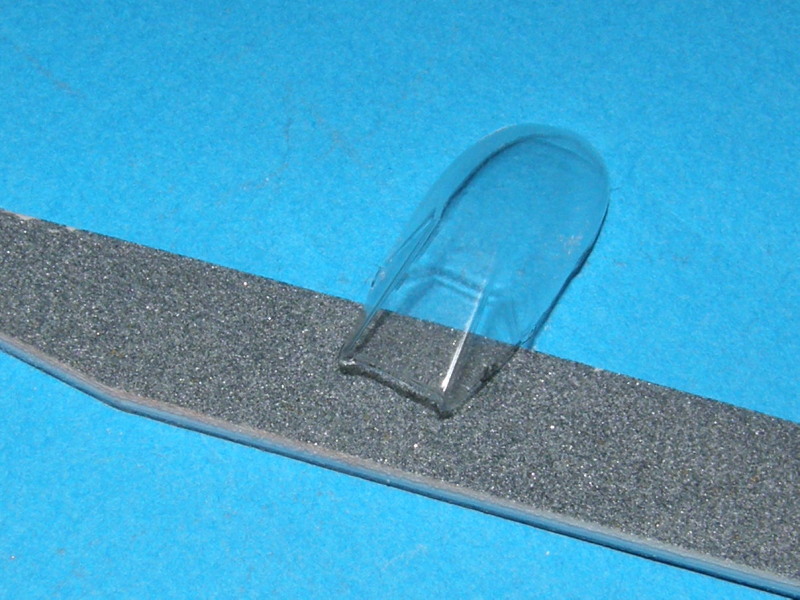
The sanding stick may be used along the edges in order to properly shape the canopy to fit the model. Work slowly and carefully. Remember that it's easier to remove material than add it. If you must add material, add it to the fuselage rather than to the canopy. A nice trick here is to roll a rope of epoxy putty around the cockpit opening and squish the canopy into it while it's soft (Use a little water to make sure the putty won't stick to the canopy). Sculpt the putty to shape then remove the canopy. Once the putty hardens you can paint it, then glue the canopy into place.
Now you have your canopy ready to glue (you may wish to repeat the score and bend steps to open it if it was moulded shut and you want to display it open). Since vac canopies are not made from styrene, regular model cement will not affect it. Glues of choice are epoxy, superglue (non-fogging is best) Krystal Kleer or white glue (PVA. White glue is very good for filling small gaps without damaging the canopy or the model. Apply a blob, then smooth it into place with a wet fingertip). Once the canopy is glued in place, it will be fairly robust, but you should obviously avoid crushing it.
To mask, you can use thin strips of masking tape to outline the canopy panes and then fill in with other small pieces of tape. If Eduard or other manufacturers make pre-cut masks they may be used. Another way is to place a piece of masking tape on the canopy, trace the outline of the glazing on the tape with a pencil, remove it and cut to shape before placing the freshly-cut mask back on the canopy.
I would put a vac canopy on at the same time I'd do an injection one. Usually the windscreen goes on before painting so the frames get the same paint as the fuselage. If I'm displaying the canopy open, I'll mask and paint it at the same time I do the fuselage but I'll install it last after decalling and weathering.
The first trick is to deal with cutting them out of their backing. You need a black sharpie marker and a brand new razor knife. (I can't stress how important it is to use a new blade. If it's at all even the slightest bit dull, you risk ruining the canopy). You'll also benefit from a pair of cuticle scissors for cutting away most of the scrap.
First, mark around the edges of the canopy with your marker.
Run the tip of your blade along the marked line with just enough pressure so it scores the plastic, but doesn't cut through. Take this step slowly and carefully. Two or three shallow passes are better than one heavy one. Cut in stages instead of making one complete circuit around the canopy.
Then cut the scrap backing plastic with the cuticle scissors until the cuts go just to the edge of the canopy but not into the frame. Be very careful with this step. In the case of this Venom canopy, I've used the Sharpie marker to illustrate where the cuts should go. In highly curved areas make the cuts closer together.
The scored line along the canopy base makes the plastic weaker there. Now take one of the cut segments and carefully bend it down and towards the centre of the canopy. You'll have to bend it back and forth a few times before it snaps off but eventually you'll get this:
Repeat this step until you've snapped off all of the waste plastic from your canopy. Avoid the temptation to rush! Now your canopy is free of its base, but the edges are quite rough. You'll need to carefully sand the edges of the canopy using a sanding stick until it's all smoothed off.
The sanding stick may be used along the edges in order to properly shape the canopy to fit the model. Work slowly and carefully. Remember that it's easier to remove material than add it. If you must add material, add it to the fuselage rather than to the canopy. A nice trick here is to roll a rope of epoxy putty around the cockpit opening and squish the canopy into it while it's soft (Use a little water to make sure the putty won't stick to the canopy). Sculpt the putty to shape then remove the canopy. Once the putty hardens you can paint it, then glue the canopy into place.
Now you have your canopy ready to glue (you may wish to repeat the score and bend steps to open it if it was moulded shut and you want to display it open). Since vac canopies are not made from styrene, regular model cement will not affect it. Glues of choice are epoxy, superglue (non-fogging is best) Krystal Kleer or white glue (PVA. White glue is very good for filling small gaps without damaging the canopy or the model. Apply a blob, then smooth it into place with a wet fingertip). Once the canopy is glued in place, it will be fairly robust, but you should obviously avoid crushing it.
To mask, you can use thin strips of masking tape to outline the canopy panes and then fill in with other small pieces of tape. If Eduard or other manufacturers make pre-cut masks they may be used. Another way is to place a piece of masking tape on the canopy, trace the outline of the glazing on the tape with a pencil, remove it and cut to shape before placing the freshly-cut mask back on the canopy.
I would put a vac canopy on at the same time I'd do an injection one. Usually the windscreen goes on before painting so the frames get the same paint as the fuselage. If I'm displaying the canopy open, I'll mask and paint it at the same time I do the fuselage but I'll install it last after decalling and weathering.

drabslab

Joined: September 28, 2004
KitMaker: 2,186 posts
AeroScale: 1,587 posts

Posted: Thursday, August 01, 2013 - 09:08 PM UTC
Quoted Text
I've been very selective in my choice of kits, if it had a vacform canopy, it was a no-go.
I tried once, and I came to the conclusion that an airplane without its canopy looks kind of strange...(there's a reason most vendors deliver two where only one is needed, right?)
But maybe it is time for a change.
So the question here is how do you deal with these canopies, what glue to use, how to mask them, when to install them...how to get them in a shape that fits;-)
any insights you have are more than welcome,
H.
Likewise, I have never used a vacform of any kind. Its on my wishlist of things I want to learn. But that list is very long


cinzano

Joined: January 13, 2009
KitMaker: 419 posts
AeroScale: 378 posts
Posted: Friday, August 02, 2013 - 01:46 AM UTC
Great tutorial, Jessie.
FWIW, I was intimidated by vac canopies for a long time. After playing with vacuform kits and practicing the skills outlined by Jessie, I became much less intimidated, and gradually eased my way towards using vac canopies. (not always, but whenever the kit really needed one.
I'll just add that I dip my vacuformed clear parts in Future just like injection molded pieces. (this helps paint adhere.) I also use clear epoxy to attach my clear parts in most cases.
Cheers,
Fred
drabslab
Joined: September 28, 2004
KitMaker: 2,186 posts
AeroScale: 1,587 posts
Posted: Friday, August 02, 2013 - 02:50 AM UTC
Quoted Text
Great tutorial, Jessie.
FWIW, I was intimidated by vac canopies for a long time. After playing with vacuform kits and practicing the skills outlined by Jessie, I became much less intimidated, and gradually eased my way towards using vac canopies. (not always, but whenever the kit really needed one.
I'll just add that I dip my vacuformed clear parts in Future just like injection molded pieces. (this helps paint adhere.) I also use clear epoxy to attach my clear parts in most cases.
Cheers,
Fred
I thought that vacform was a cheap alternative but you make it sound as though there are advantages to vacform, could you please explain?

kevsiew

Joined: August 02, 2013
KitMaker: 3 posts
AeroScale: 3 posts
Posted: Friday, August 02, 2013 - 03:36 AM UTC
Whilst on the subject of vac canopies, I've some old kits where the vac canopies has turn brown.
Are there any way of cleaning it out?
Thanks.
Kev
Are there any way of cleaning it out?
Thanks.
Kev
ludwig113

Joined: February 05, 2008
KitMaker: 1,381 posts
AeroScale: 1,110 posts

Posted: Friday, August 02, 2013 - 04:00 AM UTC
another tip, if your worried about bending/creasing the canopy when cutting the excess off, get some blue tack, put a little cling film over it and put it into the canopy.
this gives you something firm to cut against.
paul
this gives you something firm to cut against.
paul
Jessie_C
Joined: September 03, 2009
KitMaker: 6,965 posts
AeroScale: 6,247 posts
Posted: Friday, August 02, 2013 - 04:34 AM UTC
The advantages of vac canopies are that they're usually much less distorted than injection canopies (because they're much thinner) so you can see all the hard work you did in the cockpit even with the lid closed. Also because they're thin, they look much more 'in scale'.
Vac plastic turns brown because that's how it reacts to ultraviolet light. There's no known cure for it but to keep your models out of direct sunlight (which only delays the process).
Vac plastic turns brown because that's how it reacts to ultraviolet light. There's no known cure for it but to keep your models out of direct sunlight (which only delays the process).
48thscale
Joined: January 31, 2009
KitMaker: 229 posts
AeroScale: 104 posts
Posted: Friday, August 02, 2013 - 04:59 AM UTC
Jessie,
thanks for this!
I've actually invested in a huge set of Spitfire canopies.
When the temperature goes back to normal here I'll give it a shot, I'll let you know how that ends;-)
Thanks again,
Harald
thanks for this!
I've actually invested in a huge set of Spitfire canopies.
When the temperature goes back to normal here I'll give it a shot, I'll let you know how that ends;-)
Thanks again,
Harald

JClapp

#259
Joined: October 23, 2011
KitMaker: 2,265 posts
AeroScale: 1,715 posts

Posted: Friday, August 02, 2013 - 05:51 AM UTC
Quoted Text
there are advantages to vacform,
quoting this
because VACFORM, GRR


kevsiew
Joined: August 02, 2013
KitMaker: 3 posts
AeroScale: 3 posts
Posted: Sunday, August 04, 2013 - 03:34 AM UTC
Quoted Text
The advantages of vac canopies are that they're usually much less distorted than injection canopies (because they're much thinner) so you can see all the hard work you did in the cockpit even with the lid closed. Also because they're thin, they look much more 'in scale'.
Vac plastic turns brown because that's how it reacts to ultraviolet light. There's no known cure for it but to keep your models out of direct sunlight (which only delays the process).
But my vac is not even out of the box?????


Emeritus

Joined: March 30, 2004
KitMaker: 2,845 posts
AeroScale: 1,564 posts

Posted: Sunday, August 04, 2013 - 05:52 AM UTC
I've come across one kit with a discolored vac canopy still in the box - Classic Airframes Fokker D.XXI I bought second-hand several years ago. That being their very first kit (from 1994 IIRC), I guess it had simply gone brown with age.
When the vastly superior Special Hobby kits were released, I sold the old bugger. The PE looked nice, but otherwise I was glad I managed to get rid of it.
When the vastly superior Special Hobby kits were released, I sold the old bugger. The PE looked nice, but otherwise I was glad I managed to get rid of it.
Jessie_C
Joined: September 03, 2009
KitMaker: 6,965 posts
AeroScale: 6,247 posts
Posted: Sunday, August 04, 2013 - 06:03 AM UTC
Quoted Text
But my vac is not even out of the box?????
That happens too; it seems to be only a matter of time. I have a Rareplanes DC-4 which suffers from the same problem. You may be able to replace your canopy by using the old one to make a new mould.
 |

WEB HOSTING BY


Copyright ©2021 AeroScale and Kitmaker Network, a subsidiary of Silver Star Enterprises
All Rights Reserved. Please read our Conditions of Use and Privacy Policy.
All Rights Reserved. Please read our Conditions of Use and Privacy Policy.