_GOTOBOTTOM
Early Aviation
Discuss World War I and the early years of aviation thru 1934.
KotS III GB Albatros D.II
Mcleod
_VISITCOMMUNITY
Alberta, Canada
Joined: April 07, 2010
KitMaker: 1,028 posts
AeroScale: 939 posts
Posted: Wednesday, September 11, 2013 - 02:20 PM UTC
Following a dismal failure with my Travel Air Mystery Ship entry, and subsequent de-enlisting from the Kots program, I was battling myself as to whether I should re-enlist. Alas, I'm the type that has to build what I feel like building when I want to build. Resistance is futile.
So, just like in the old movie, 'I'm back'.
This time with an Eduard 1/48 Albatros D.II, which I've been working on for the last couple of days.

Some pictures:


After the parts clean-up, I primed everything with a Tamiya rattle can. The fuselage interior is Tamiya Buff, and the framework parts are done in Tamiya Desert Yellow. I formed a couple of seat cushions out of Milliput and put on dark green as the basecoat. The seat is Red/Brown.


I know my idea of using color crayons and pencil to do the fuselage interior frame is rather goofy, but I did want to try it.
Everything has a light coat of Future applied at this point.


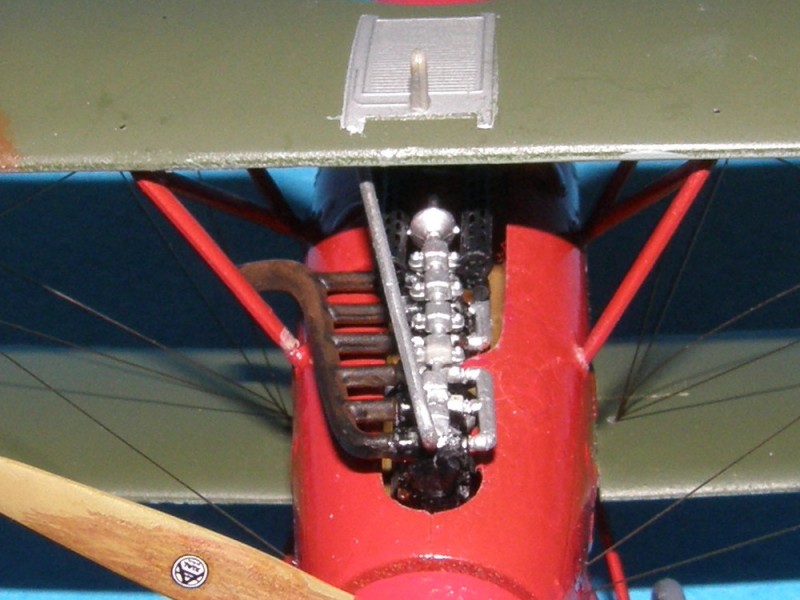
I've also applied Alclad to the engine and some other metal parts. Waiting for all to dry before continueing.
JackFlash
_VISITCOMMUNITY
Colorado, United States
Joined: January 25, 2004
KitMaker: 11,669 posts
AeroScale: 11,011 posts
Posted: Wednesday, September 11, 2013 - 03:41 PM UTC
Glad to see you back with us!
phantom_phanatic309
#372
_VISITCOMMUNITY
United Kingdom
Joined: March 10, 2010
KitMaker: 2,568 posts
AeroScale: 1,619 posts
Posted: Sunday, September 29, 2013 - 09:01 AM UTC
You can never go wrong with an Albatros, lovely little aeroplane.
I'll be watching with interest as I have Roden's 1/72 DII in my stash.
Ste
Mcleod
_VISITCOMMUNITY
Alberta, Canada
Joined: April 07, 2010
KitMaker: 1,028 posts
AeroScale: 939 posts
Posted: Thursday, October 03, 2013 - 12:14 PM UTC
Hi folks. Even though life's been too busy to work on models, and I've not posted anything the last couple of weeks; I thought I should post what little progress I'm making.


I sprayed the engine with Alclad some time ago. Tonight, I intend to color the cylinders with Humbrol enamel. I'm not sure it will work, as I've heard bad things happen when you coat Alclad with dissimilar paint. Trying it out anyway. When its dry, I would like to attempt some plug wiring. Might be too small for me to work that out.
I'm also hoping to get the seat harness on and some interior parts installed.
I will update as it comes along. Thanks for looking.
Mcleod
_VISITCOMMUNITY
Alberta, Canada
Joined: April 07, 2010
KitMaker: 1,028 posts
AeroScale: 939 posts
Posted: Monday, October 14, 2013 - 11:24 PM UTC
The 48 scale D.II is one of 3 models I was playing with over the weekend.
After some slight retouching, the cockpit module will be ready for installation:


And I've been picking on the other small interior parts and engine. You can see I'm over liberal with the glue, and not very accurate with the drill. I broke the 2 bits drilling for some wiring.

Mcleod
_VISITCOMMUNITY
Alberta, Canada
Joined: April 07, 2010
KitMaker: 1,028 posts
AeroScale: 939 posts
Posted: Saturday, October 19, 2013 - 09:13 AM UTC
I've been installing the pit interior, and working on engine to prepare for placement. Obviously, I need to work on my wash technique; just can't seem to get it right.
I never really went hard on it to much, yet. Most of the pit and engine will hardly be seen. Still, I'm putting in some effort because I know its there.


I still need to add some lead wiring to the engine, and the brass fuel bulbs before it can be put into the fuselage halves. Very soon, though, I'll be able to close her up.
JackFlash
_VISITCOMMUNITY
Colorado, United States
Joined: January 25, 2004
KitMaker: 11,669 posts
AeroScale: 11,011 posts
Posted: Saturday, October 19, 2013 - 11:58 AM UTC
Proceeding nicely.
Mcleod
_VISITCOMMUNITY
Alberta, Canada
Joined: April 07, 2010
KitMaker: 1,028 posts
AeroScale: 939 posts
Posted: Sunday, November 03, 2013 - 02:43 PM UTC
Was able to do some little today. In the spirit of the campaign rules, I did install wiring to the engine.


I also began work on the guns. This was my first successful attempt at rolling PE barrel jackets onto a metal cylinder. It turned out ok, I think. Still have to add some barrel snubs, then I'll prime and metalize with enamel.


There was an issue when I joined the fuselage halves. The gun post wasn't lined up properly, and as a consequence it broke loose unnoticed. It was a real bear to reattach with the fuse glued together. Its still not quite right.


All I can do is proceed; I'm happy.
JackFlash
_VISITCOMMUNITY
Colorado, United States
Joined: January 25, 2004
KitMaker: 11,669 posts
AeroScale: 11,011 posts
Posted: Sunday, November 03, 2013 - 04:17 PM UTC
While anyone of us might do it differently if your happy with it thats really all that matters. For me it drives me crazy not to scratchbuild the reserve and main fuel cells. I dry fit the fueslage halves probably a dozen times. Its almost like a compulsion with me. Then I'm happy with the reselts. . .usually.
Mcleod
_VISITCOMMUNITY
Alberta, Canada
Joined: April 07, 2010
KitMaker: 1,028 posts
AeroScale: 939 posts
Posted: Monday, November 04, 2013 - 01:27 AM UTC

Quoted Text

it drives me crazy not to scratchbuild the reserve and main fuel cells.


Your quite right, Stephen. That should have been done, at least to fill in that empty void in the fuselage, where the fuel tank should be.
I suppose even the Eduardian model gods make shortcuts.
JackFlash
_VISITCOMMUNITY
Colorado, United States
Joined: January 25, 2004
KitMaker: 11,669 posts
AeroScale: 11,011 posts
Posted: Monday, November 04, 2013 - 03:41 AM UTC
No worries! Model on!
Jessie_C
_VISITCOMMUNITY
British Columbia, Canada
Joined: September 03, 2009
KitMaker: 6,965 posts
AeroScale: 6,247 posts
Posted: Monday, November 04, 2013 - 04:10 AM UTC

Quoted Text


Quoted Text

it drives me crazy not to scratchbuild the reserve and main fuel cells.


Your quite right, Stephen. That should have been done, at least to fill in that empty void in the fuselage, where the fuel tank should be.
I suppose even the Eduardian model gods make shortcuts.


Once the guns are in place and that top wing goes on it's very difficult to see that the tanks aren't there

Someone who doesn't know what to look for will be very unlikely to notice.
Mcleod
_VISITCOMMUNITY
Alberta, Canada
Joined: April 07, 2010
KitMaker: 1,028 posts
AeroScale: 939 posts
Posted: Thursday, December 05, 2013 - 03:33 AM UTC
I was prepping this project for primer, when I noticed the integrity of the fuselage halves joint was splitting open. So thats been reglued and refilled. Now, she has to be re-sanded.

Obviously, I can make this entry another failed event in the campaign world. She is on my want to complete list, but not on the pressured hurry-up list. It will become a winter project, the basis of my desire to learn plywood fuselage modeling technique.

So, I need to withdraw.
 _GOTOTOP