The kits arrived lunch time yesterday. Of course I had to open them right away and see what was inside.
As expected there is a lot of similarity with the P.24 kits.
Oil cooler, under-wig blisters and machine guns are supplied in resin.
The PE parts have painted seat belts but the buckles will still have to be painted steel. Aileron tabs. These are difficult to attach with CA and prone to break off. Even if you manage to get to the painting stage without losing them, masking tape will detach them when you remove it. On the P.24 kits I used Microstrip. Lots of tiny pieces such as hinges for the ailerons and elevators that I don't think I can use successfully. I would rather they left this out and provided the strap that hold the jettisonable fuel tank in place. On the P.24 kits I cut a piece from a spare seat belt for this. There is no instrument panel and plastic film.
The windscreen is injection moulded and fairly good. Small, so masking and painting could be a little bit fiddly. It comes in its own plastic bag which helps to prevent it being lost.
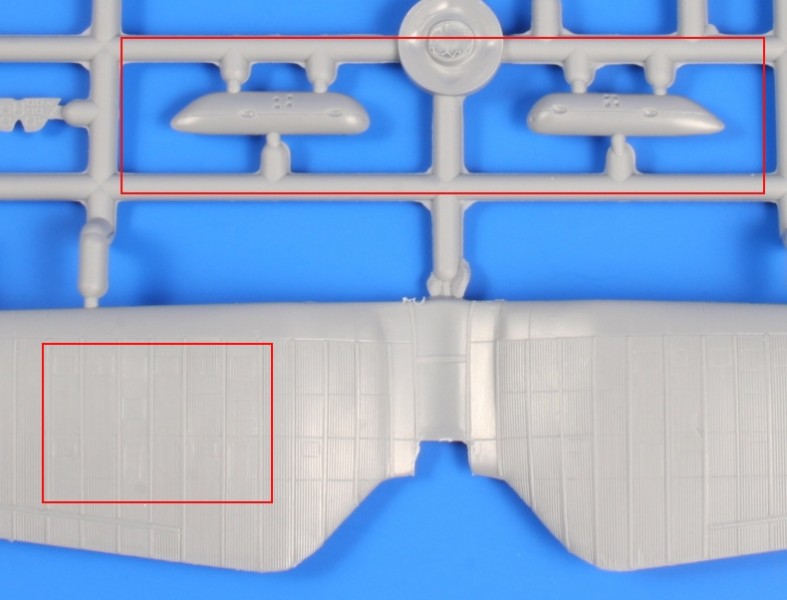
The plastic itself comes on two sprues, one of which is the wings from the P.24. These are not entirely accurate for a P.11 but I can live with them. The instructions show all the options fitted with machine guns in the wings. Only a few Polish P.11cs had mgs in the wings and I can only think of two examples. None of the options in the kit had them so you should ignore the instructions and fill both of the holes in each wing.
Interior detail is very basic, some on the side walls, basic seat, floor and chunky control column. No attempt to reproduce the 'cage'. There is an apology along with instructions to grind down the edges of the fuselage bulkhead part B10. It would seem that the wrong bulkhead got into the moulds. Part have a very comprehensive PE set for a P.11c (for another kit) from which you may be able to extract parts if you want super-detail the cockpit. They also have separate PE sets for the internal mgs.
There are no struts from the bell housing to the inside of the cowling. These could be fashioned from stretched sprue or, as they were flat in section, Microstrip. Likewise the braces for the undercarriage legs were also flat in section so I always use Microstrip for those instead of wire.
Part B9 is a fairing on the side of the fuselage that was a modification for fitting a radio. Some P.11s would not have had it but more P.11s were modified to carry a radio than actually had a radio. So even if the aircraft was not fitted with a radio it may still have had the bulge as well as the attachments for the wires on the wings and fin.
There are decals for four options, all Khaki over light blue grey. Only Gunze paint codes are given and the required colours are mixes. This may be a little troublesome for some people as Gunze means mail order for most of us and my experience of mixing paint is that it seldom gives the correct or consistent results. I use Agama P4 Polish Khaki and P5 Polish Blue. These are acrylic, high quality, but not very airbrush friendly and only available from the Jadar Shop. They are matched to the original colours found when they restored the only P.11c that has survived. The Khaki matches Humbrol 142 Field Drab. This is what we used in the prehistoric days of modelling but unfortunately it is now 'out of print'. Humbrol 155, a brownish shade of Olive Drab, is a slightly darker shade that matches the so called 'Late Khaki'. There is in fact very little difference and, depending upon how fastidious you are, can make a suitable substitute. You can always lighten it if you like. The blue is easier as it is an exact match for RLM 76. Well it matches exactly White Ensign Models version of RLM 76 but cannot vouch for anyone elses RLM 76. So Mr Synder, if you are watching, how about some Polish Khaki to go with it?
The Romanian P.11f kit is sold under the name Ffrom and costs a little bit more. What do you get for your money? An extra sprue with engine, cowling and propeller. Resin exhaust and skis for one of the options.
The decal sheet has five options, all olive green over light blue grey, and they are all found in 'Romanian Fighter Colours 1941-1945' published by MMP, about the only reference that is obtainable. Painting is much simpler, according to the book RLM 64 and RLM 76. I obtained White Ensign Model's RLM 64 to use on a P.24 and found it to be very similar to RAF Dark Green so you could use that.
The yellow used on the decal sheet is a rather bright lemon colour. Other manufactures such as Mirage or Techmod use a darker yellow shade. If it's important to you for the yellow theatre markings to match the decals then you will not be able to use the common standbys, Insignia Yellow, or Trainer Yellow. According to my paint conversion tables Humbrol H69 should match the Gunze colour noted on the instruction sheet but H69 looks to me to still be a bit darker.