#439
Washington, United States
Joined: November 05, 2005
KitMaker: 4,950 posts
AeroScale: 3,192 posts
Posted: Wednesday, October 02, 2013 - 06:58 PM UTC
OK, any ideas how to get out of this mess? The kit took a bit of heat damage. I'm thinking about strapping the bing to something stiff and then using hot water or steam to soften the part and straighten it. Any luck with that?


Hanger Queens in Waiting:
Monogram 1/72 F8F-1
Corsair the Sky Pirate - 1/72 Ace A-7D
Century Series - Airfix 1/72 F-105G
Anti Shipping - Academy 1/72 PBJ-1D
Academy 1/72 F-84E
Virginia, United States
Joined: December 13, 2002
KitMaker: 1,434 posts
AeroScale: 403 posts
Posted: Wednesday, October 02, 2013 - 07:08 PM UTC
The boiling pot should fix it. just use a hard surface for cooling as it may warp again. A few years ago, I had DML JU88 I got at a yard sale that was warped like that in the wings and my GF at the time teased me for cooking the wings in my stock pot to get a bad warp out of them. She kept asking when the chicken soup would be ready. HTH
Steve Manchur
US Navy Damage Controlman 1st Class (DC1)
Proud Veteran
STRONG LIKE AXE, HUNG LIKE MAUL!
Fair winds and following seas.
TCS and DBF
Merlin
 Senior Editor
#017
United Kingdom
Joined: June 11, 2003
KitMaker: 17,582 posts
AeroScale: 12,795 posts
Posted: Wednesday, October 02, 2013 - 07:16 PM UTC
Hi Mark
Yep, I'd try hot water too, or a hair-dryer on full as an alternative. Are the wing top halves straight? If so, they'll also help take out some of the warp once you get rid of the worst of it. It also might be worth adding a "spar" from scrap rod or a piece of balsa to hold everything to shape.
All the best
Rowan

BEWARE OF THE FEW...
As I grow older, I regret to say that a detestable habit of thinking seems to be getting a hold of me. - H. Rider Haggard

#439
Washington, United States
Joined: November 05, 2005
KitMaker: 4,950 posts
AeroScale: 3,192 posts
Posted: Thursday, October 03, 2013 - 08:00 AM UTC
Thanks, Right now my plan includes a hair drier, cold water, a stiff stick and a new metal spar. Could be interesting....

Hanger Queens in Waiting:
Monogram 1/72 F8F-1
Corsair the Sky Pirate - 1/72 Ace A-7D
Century Series - Airfix 1/72 F-105G
Anti Shipping - Academy 1/72 PBJ-1D
Academy 1/72 F-84E
Joel_W
 Associate Editor
New York, United States
Joined: December 04, 2010
KitMaker: 11,666 posts
AeroScale: 7,410 posts
Posted: Thursday, October 03, 2013 - 10:46 AM UTC
Mark, trying to fix the warp issue could very well cause twisting in the repair process. I would approach the repair issue by first deciding on a flat stiff surface to tape the wing to that is water & heat resistant. Start off taping the flat, unwarped portion to the flat surface working your way up to the warp. Not necessarily the other side unless the wing is supposed to be flat all the way across. Then using hot water, a heat gun, or hair dryer, start to heat the warped end. As it becomes pliable, tape it a little at a time, then repeat till you have the whole wing taped. Then Gently heat again. I would let it air cool, not dunking it in cold water, which will make the plastic even more brittle, and it could crack.
Whatever little warpage is left can be removed using a wing spare as Rowan suggested.
Good luck, and let us know how it turns out.
Joel
On my Workbench:
Monogram 1/24 scale 427 Shelby Cobra
Just Completed:
Beemax 1/24 scale BMW M3 E30 1992 Evolution II
Alberta, Canada
Joined: January 19, 2008
KitMaker: 6,743 posts
AeroScale: 6,151 posts
Posted: Thursday, October 03, 2013 - 11:38 AM UTC
Take a box that will kit the wing . Cut a hole on both ends . Take a solid ruler or something that will work the same . Fasten the wing to this with rubber bands . End of the wings and the middle place box lid on and blow hot air into the box with a hair drier for a few minutes , hit the cool button and do the same . remove the box lid and let cool a bit more . You might have to try this a few times but it will take the wrap out .
Terri

#439
Washington, United States
Joined: November 05, 2005
KitMaker: 4,950 posts
AeroScale: 3,192 posts
Posted: Thursday, October 03, 2013 - 12:06 PM UTC
Hi Terri, long time no see.

Good idea, thanks for suggesting using a ruler. I have a couple of steel scales around that might just help.

Hanger Queens in Waiting:
Monogram 1/72 F8F-1
Corsair the Sky Pirate - 1/72 Ace A-7D
Century Series - Airfix 1/72 F-105G
Anti Shipping - Academy 1/72 PBJ-1D
Academy 1/72 F-84E
Joel_W
 Associate Editor
New York, United States
Joined: December 04, 2010
KitMaker: 11,666 posts
AeroScale: 7,410 posts
Posted: Monday, October 07, 2013 - 01:41 AM UTC
Mark, have you tried to straighten the wing yet?
Joel
On my Workbench:
Monogram 1/24 scale 427 Shelby Cobra
Just Completed:
Beemax 1/24 scale BMW M3 E30 1992 Evolution II

#439
Washington, United States
Joined: November 05, 2005
KitMaker: 4,950 posts
AeroScale: 3,192 posts
Posted: Monday, October 07, 2013 - 02:26 AM UTC
Yes, I've tried a couple of things. It's not fully solved, but I'm making progress. I'll try and post pictures tonight.

Hanger Queens in Waiting:
Monogram 1/72 F8F-1
Corsair the Sky Pirate - 1/72 Ace A-7D
Century Series - Airfix 1/72 F-105G
Anti Shipping - Academy 1/72 PBJ-1D
Academy 1/72 F-84E

#084
Quebec, Canada
Joined: September 14, 2005
KitMaker: 2,485 posts
AeroScale: 95 posts
Posted: Monday, October 07, 2013 - 04:29 AM UTC
Clamp your part between 2 pieces of rigid wood and soak in
very hot water....almost boiling water...allow to cool...
should resolve the problem.
Cheers,
Joe

#439
Washington, United States
Joined: November 05, 2005
KitMaker: 4,950 posts
AeroScale: 3,192 posts
Posted: Monday, October 07, 2013 - 06:17 PM UTC
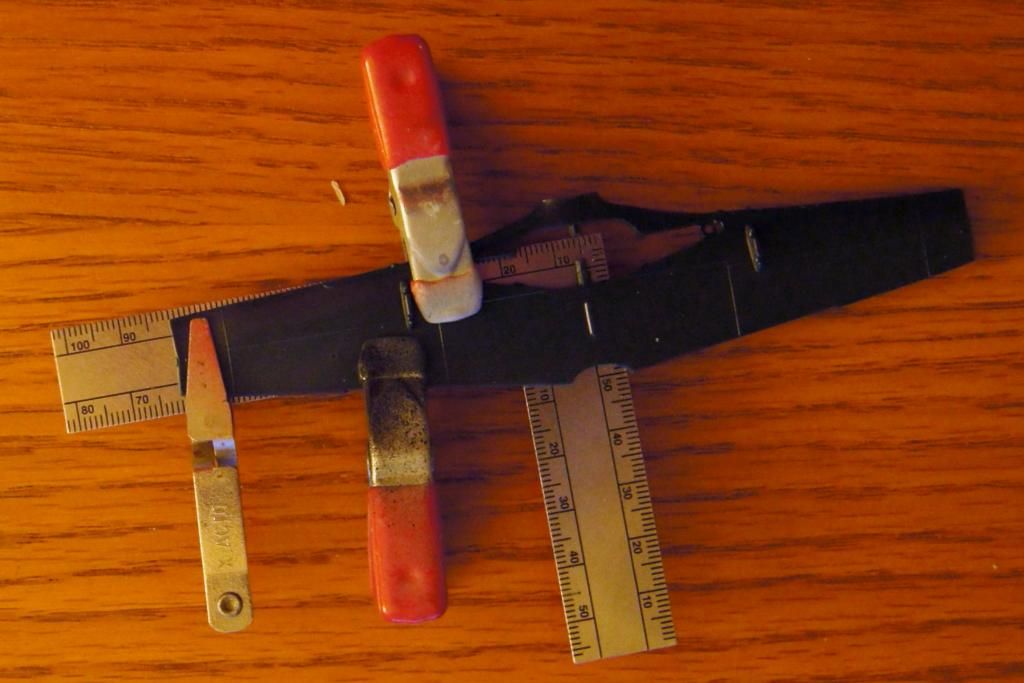
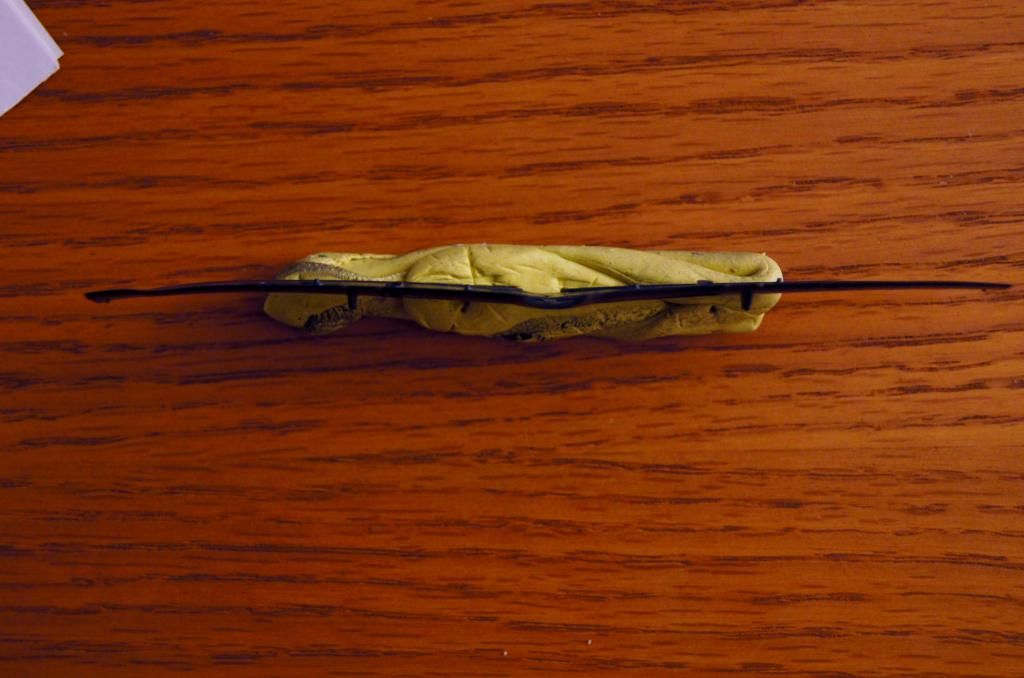
Well, my first try was to clamp the wing to a scale and heat it with my hair drier.
Starting here:


it took a little bit of the warp out:

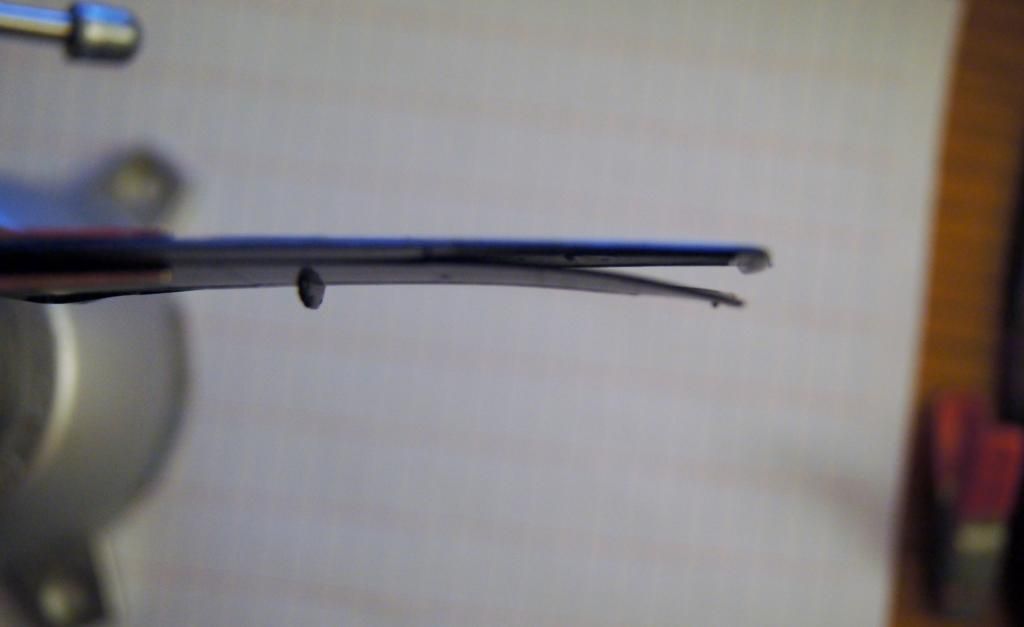
but it's clearly not fixed;

Second pass was into a cup of hot 130-140 F water.

I've started trying to superglue a steel dowell in place to pull the last of the warp out.

Hanger Queens in Waiting:
Monogram 1/72 F8F-1
Corsair the Sky Pirate - 1/72 Ace A-7D
Century Series - Airfix 1/72 F-105G
Anti Shipping - Academy 1/72 PBJ-1D
Academy 1/72 F-84E
British Columbia, Canada
Joined: September 03, 2009
KitMaker: 6,965 posts
AeroScale: 6,247 posts
Posted: Monday, October 07, 2013 - 06:19 PM UTC
The water needs to be hotter. Try it with water that's just been boiling, then bend it against the warp (gently) before clamping it straight to cool.
When once you have tasted flight you will walk the Earth with your eyes turned skyward.
For there you have been, and there you will always long to return.
-Leonardo Da Vinci

#439
Washington, United States
Joined: November 05, 2005
KitMaker: 4,950 posts
AeroScale: 3,192 posts
Posted: Monday, October 07, 2013 - 06:28 PM UTC
I'm hesitating on the boiling water, melted a car trying that trick a few years ago (like the Johnson Administration).
Hanger Queens in Waiting:
Monogram 1/72 F8F-1
Corsair the Sky Pirate - 1/72 Ace A-7D
Century Series - Airfix 1/72 F-105G
Anti Shipping - Academy 1/72 PBJ-1D
Academy 1/72 F-84E
Croatia Hrvatska
Joined: November 06, 2009
KitMaker: 624 posts
AeroScale: 609 posts
Posted: Monday, October 07, 2013 - 08:48 PM UTC
Mark,
Sorry if I am late, but drop a look
here.
All the best,
Entoni
"When everything else fails, read the instructions"

#439
Washington, United States
Joined: November 05, 2005
KitMaker: 4,950 posts
AeroScale: 3,192 posts
Posted: Tuesday, October 08, 2013 - 02:26 AM UTC
Thanks, I'll have to look at it tonight (Content filtering at work)
Hanger Queens in Waiting:
Monogram 1/72 F8F-1
Corsair the Sky Pirate - 1/72 Ace A-7D
Century Series - Airfix 1/72 F-105G
Anti Shipping - Academy 1/72 PBJ-1D
Academy 1/72 F-84E
British Columbia, Canada
Joined: September 03, 2009
KitMaker: 6,965 posts
AeroScale: 6,247 posts
Posted: Tuesday, October 08, 2013 - 04:24 AM UTC
Quoted Text
I'm hesitating on the boiling water, melted a car trying that trick a few years ago (like the Johnson Administration).
Yes, it can't be actually boiling, but cooled for about 20 or 30 seconds. Dip in the wingtip for 5 - 10 seconds or so and then try bending it. Be ready to clamp it flat right away if the bending is successful. To be really extra-certain, have a pot full of ice water standing by to dip it in to cool it quickly.
When once you have tasted flight you will walk the Earth with your eyes turned skyward.
For there you have been, and there you will always long to return.
-Leonardo Da Vinci
Merlin
 Senior Editor
#017
United Kingdom
Joined: June 11, 2003
KitMaker: 17,582 posts
AeroScale: 12,795 posts
Posted: Tuesday, October 08, 2013 - 08:22 AM UTC
Hi Mark
If you don't like the idea of actual boiling water, try the steam from a kettle. It gives an extra element of control. Tape the part to a level surface first - and, obviously,
be careful - it's still at boiling point, so you can scald your fingers...
All the best
Rowan

BEWARE OF THE FEW...
As I grow older, I regret to say that a detestable habit of thinking seems to be getting a hold of me. - H. Rider Haggard

#435
Nelson, New Zealand
Joined: February 14, 2013
KitMaker: 480 posts
AeroScale: 478 posts
Posted: Tuesday, October 08, 2013 - 12:37 PM UTC
Quoted Text
If you don't like the idea of actual boiling water, try the steam from a kettle.
The best way, Rowan. That is a technique I use when scratch-building a wing and need to curve the plastic. For 'washout' of wingtips or even a length of wing, a la Harry Woodman.
Wear
oven gloves and tape the plastic to a thick board and allow the steam, which is super-heated water, and slowly work the board across a steam kettle or upside-down over a pot of boiling water. It cools quickly.
It may pay to have a friend with you if this is your first attempt to avoid scalding yourself, but it really is a simpler process than most as we are familiar with steam and can have a good idea of what it can do.
Cheers
Karl


#439
Washington, United States
Joined: November 05, 2005
KitMaker: 4,950 posts
AeroScale: 3,192 posts
Posted: Tuesday, October 08, 2013 - 01:49 PM UTC
On another project tonight, but I'm looking forward to the challenge.
Hanger Queens in Waiting:
Monogram 1/72 F8F-1
Corsair the Sky Pirate - 1/72 Ace A-7D
Century Series - Airfix 1/72 F-105G
Anti Shipping - Academy 1/72 PBJ-1D
Academy 1/72 F-84E
Joel_W
 Associate Editor
New York, United States
Joined: December 04, 2010
KitMaker: 11,666 posts
AeroScale: 7,410 posts
Posted: Sunday, October 20, 2013 - 03:59 AM UTC
Mark, just curious how the warp fix went, and what process you decided to use.
Joel
On my Workbench:
Monogram 1/24 scale 427 Shelby Cobra
Just Completed:
Beemax 1/24 scale BMW M3 E30 1992 Evolution II

#439
Washington, United States
Joined: November 05, 2005
KitMaker: 4,950 posts
AeroScale: 3,192 posts
Posted: Sunday, October 20, 2013 - 04:18 AM UTC
Today's the day I try the steam and clamp method.

Hanger Queens in Waiting:
Monogram 1/72 F8F-1
Corsair the Sky Pirate - 1/72 Ace A-7D
Century Series - Airfix 1/72 F-105G
Anti Shipping - Academy 1/72 PBJ-1D
Academy 1/72 F-84E

#439
Washington, United States
Joined: November 05, 2005
KitMaker: 4,950 posts
AeroScale: 3,192 posts
Posted: Sunday, October 20, 2013 - 06:20 PM UTC
Well, that didn't work. It doesn't look any less warped, and the piece of wire I was hoping to reinforce the unbend popped off. I asume the super glue failed.
I took one of the backer boards I used, and make some holes in it to clear the underwing pylons. I'll try it again tomorrow.

Hanger Queens in Waiting:
Monogram 1/72 F8F-1
Corsair the Sky Pirate - 1/72 Ace A-7D
Century Series - Airfix 1/72 F-105G
Anti Shipping - Academy 1/72 PBJ-1D
Academy 1/72 F-84E
Joel_W
 Associate Editor
New York, United States
Joined: December 04, 2010
KitMaker: 11,666 posts
AeroScale: 7,410 posts
Posted: Monday, October 21, 2013 - 06:12 AM UTC
Mark, sorry to hear that. Enough steam should eventually soften the plastic enough for it to relax, so that the warp is gone. Perhaps more intense steam (closer to the source) for a longer period of time will do the trick.
Joel
On my Workbench:
Monogram 1/24 scale 427 Shelby Cobra
Just Completed:
Beemax 1/24 scale BMW M3 E30 1992 Evolution II

#439
Washington, United States
Joined: November 05, 2005
KitMaker: 4,950 posts
AeroScale: 3,192 posts
Posted: Monday, October 21, 2013 - 06:18 AM UTC
First next step is more steam, I've already pocketed one of the blocks to clear the pylons. I may not have gotten the plastic hot, let alone hot enough.
Final step may be to make some kerf cuts along the back side of the wing and bend the remaining plastic into contact with the upper wing.

Hanger Queens in Waiting:
Monogram 1/72 F8F-1
Corsair the Sky Pirate - 1/72 Ace A-7D
Century Series - Airfix 1/72 F-105G
Anti Shipping - Academy 1/72 PBJ-1D
Academy 1/72 F-84E

#439
Washington, United States
Joined: November 05, 2005
KitMaker: 4,950 posts
AeroScale: 3,192 posts
Posted: Wednesday, October 23, 2013 - 06:29 PM UTC
Well, no joy. 3 passes across the steam out of the tea kettle, into the clamp, and the warp is no better, if not worse.

Next up; kerf cuts into the bottom of the wing and try to glue it to the upper wing.

Hanger Queens in Waiting:
Monogram 1/72 F8F-1
Corsair the Sky Pirate - 1/72 Ace A-7D
Century Series - Airfix 1/72 F-105G
Anti Shipping - Academy 1/72 PBJ-1D
Academy 1/72 F-84E


