F6F-5 early - 1/48 Eduard
Germany
Joined: September 07, 2005
KitMaker: 5,609 posts
AeroScale: 5,231 posts
Posted: Monday, October 21, 2013 - 10:23 PM UTC
Hi all,
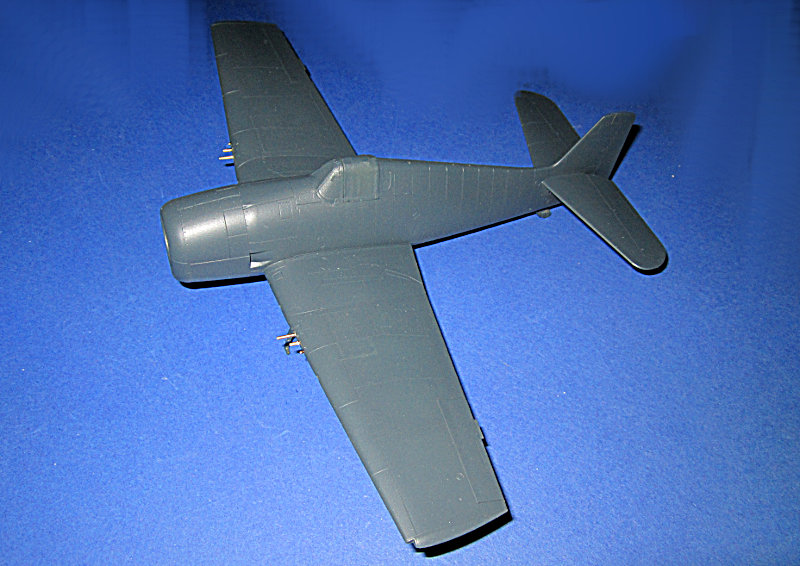
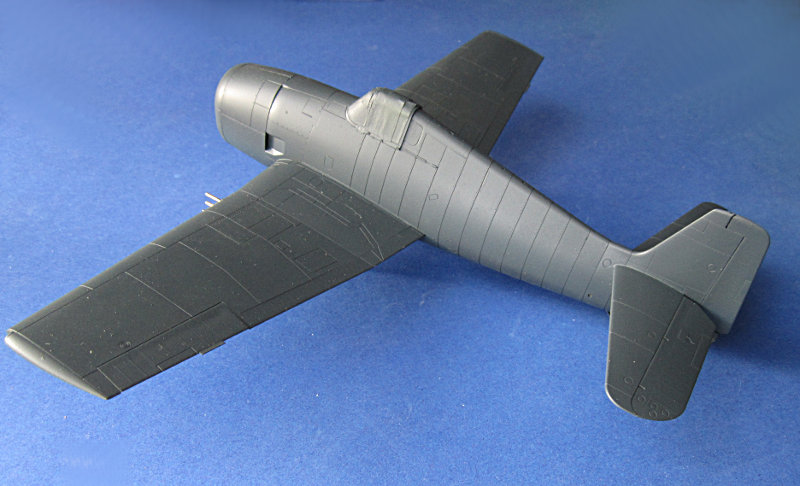
well, this is a project that started early this year when I got the kit. I immediately started and progressed quite well in the pit. But then all the little knobs and levers were too much (remember how much I like doing cockpits). So it was sitting around for several months collecting dust.

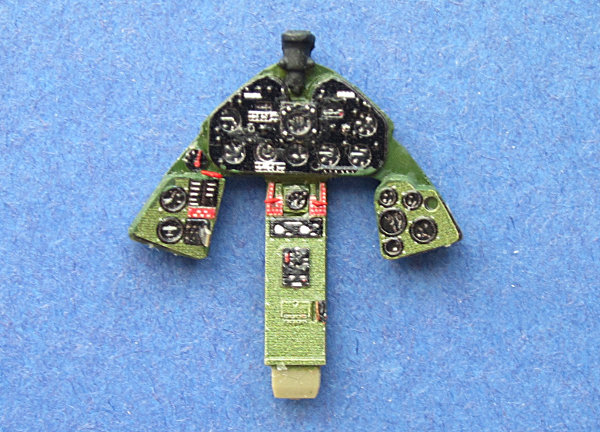

At the moment I am ill and cannont concentrate for longer than ten minutes or so, but thats enough to do a few bits set a model aside and rest for some time. This way I got that darn pit done and the fuselage closed up

all the best
Steffen
DULCE ET DECORUM EST PRO HOBBY MORI
Joel_W
 Associate Editor
New York, United States
Joined: December 04, 2010
KitMaker: 11,666 posts
AeroScale: 7,410 posts
Posted: Tuesday, October 22, 2013 - 04:19 AM UTC
Stephen, looking good. Your cockpit certainly looks busy enough.
Being a -5, are you going to be doing a over all Glossy Sea Blue paint scheme.
Looking forward to your next update. And feel better.
Joel
On my Workbench:
Monogram 1/24 scale 427 Shelby Cobra
Just Completed:
Beemax 1/24 scale BMW M3 E30 1992 Evolution II
Germany
Joined: September 07, 2005
KitMaker: 5,609 posts
AeroScale: 5,231 posts
Posted: Tuesday, October 22, 2013 - 06:32 PM UTC
Thanks Joel,
and yes it will be dark blue.
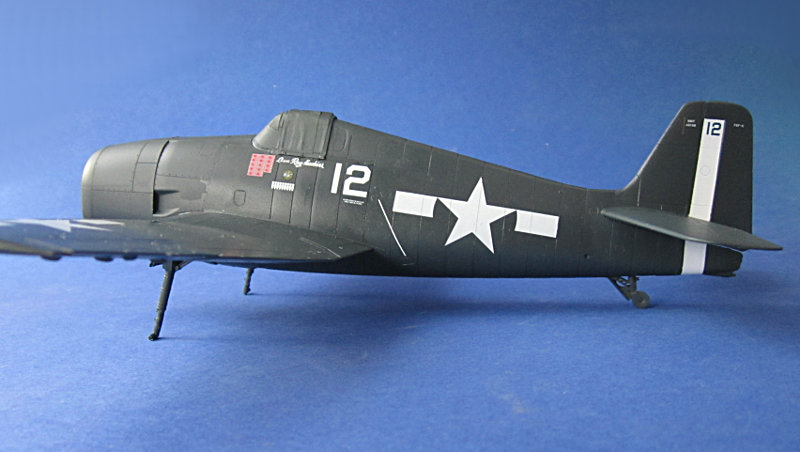
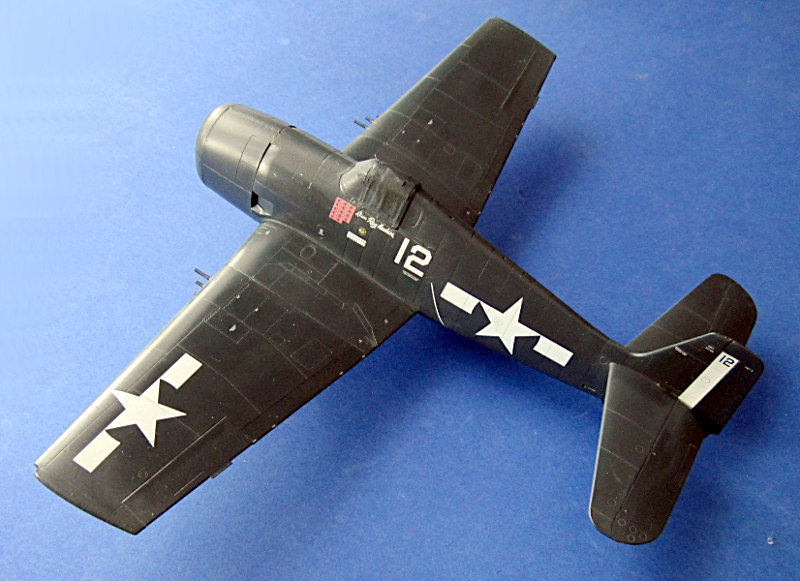
So here is the next update. I put on the u/c parts (I shortened the legs by about 1-2mm) and gave it some paint. I did some preshading but the blue is covering this. Pre shading is no technique that works well for me, but as I used Tamiya black it gave the following JPS ANA 623 kind of a base.
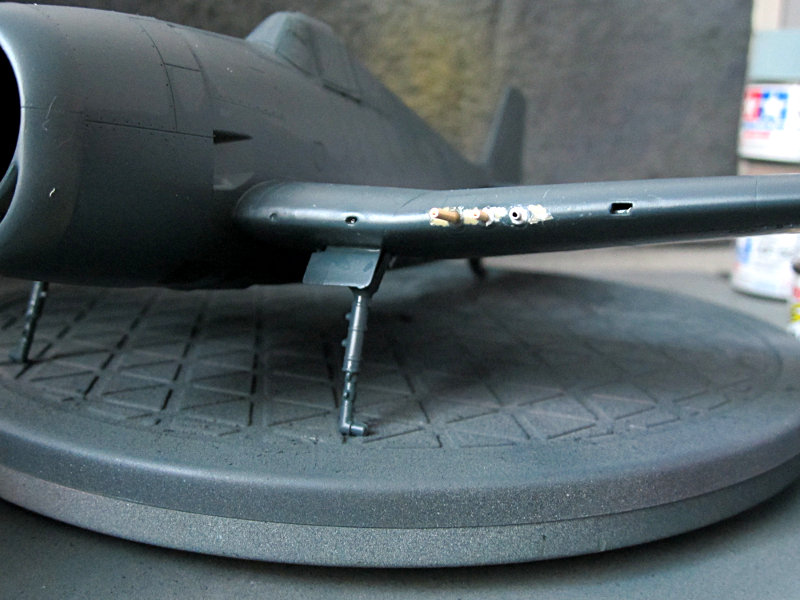
In the last picture you see the new gun barrels. I am not 100½ sure, but some picture checks persuaded me that these have no cooling jackets but "over tubes". Thus I used a Master set for a P-47. The 2 outboard guns were done with small pieces of hypodermic needle as these were easier to handle and I did not want to waste the Master barrels for a mm.
all the best
Steffen
DULCE ET DECORUM EST PRO HOBBY MORI
Joel_W
Associate Editor New York, United States
Joined: December 04, 2010
KitMaker: 11,666 posts
AeroScale: 7,410 posts
Posted: Wednesday, October 23, 2013 - 01:06 AM UTC
Stephen, The Big Cat is looking real good. Your gun barrels and the wing area right around them really came out nice.
As for pre-shading, I have my own ideas on when to use it, and when not to. I don't with dark colors, just gets covered right up. With light bottom colors it works well, but I tend to go with a darker compatible color, not black, which for me always comes out looking phony. I much prefer to post shade, fade, stain, & weather.
We tend to look at our models up close and personal, way too close, and detail, especially with weathering way too much. A 1/48 scale model would be for us looking at the real deal from 48 ft. away. The vast majority of what we do would never be seen, especially all that pre-shading.
Joel
On my Workbench:
Monogram 1/24 scale 427 Shelby Cobra
Just Completed:
Beemax 1/24 scale BMW M3 E30 1992 Evolution II
Germany
Joined: September 07, 2005
KitMaker: 5,609 posts
AeroScale: 5,231 posts
Posted: Wednesday, October 23, 2013 - 08:02 AM UTC
Hi all,
@ Joel: well of course it will be repainted. I just checked for imperfections in the leading edge before I put in the barrels.
I am too hamfisted for preshading but as I wrote the black paint also served as a base for the blue.
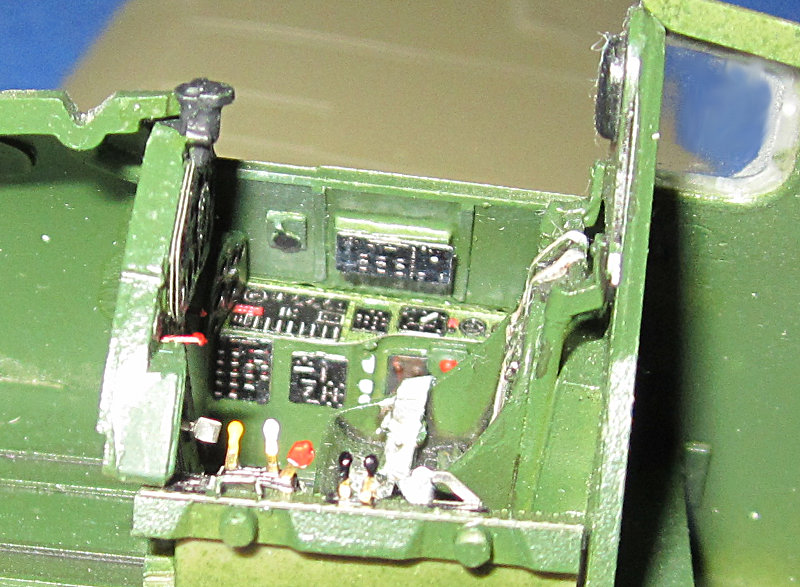
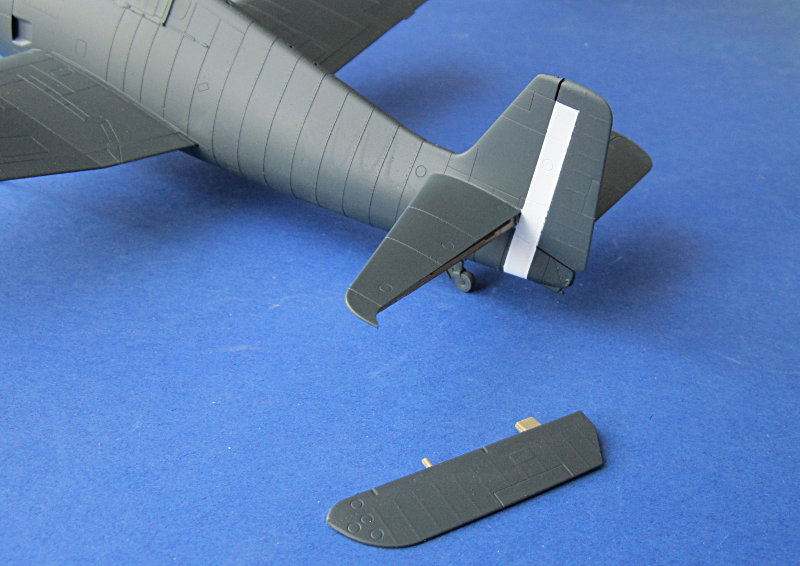
Meanwhile I went on with decaling. First I had to airbrush the white stripe on the rudder. I left off the elevators as I thought this would be easier for decaling the model .. when I searched for the decals I noticed that only the blue numbers are included. Not a nice move from Eduard as it took me half a meter of masking tape.
I then proceeded with the larger decals. I prefer this way as you see kind of a result very fast and the tedious work of applying stencils is no good motivation. Still working on it...

all the best
Steffen
DULCE ET DECORUM EST PRO HOBBY MORI
Joel_W
Associate Editor New York, United States
Joined: December 04, 2010
KitMaker: 11,666 posts
AeroScale: 7,410 posts
Posted: Wednesday, October 23, 2013 - 08:17 AM UTC
Steffen, looking really good with the decals. You're certainly a fast worker.
Joel
On my Workbench:
Monogram 1/24 scale 427 Shelby Cobra
Just Completed:
Beemax 1/24 scale BMW M3 E30 1992 Evolution II
Germany
Joined: September 07, 2005
KitMaker: 5,609 posts
AeroScale: 5,231 posts
Posted: Wednesday, October 23, 2013 - 08:21 AM UTC
I am certainly not, but my illness fits the requirements for this task. I can work for 5 minutes and the rest for 20 minutes or half an hour. And I cannot work on articles and the like for my website right now as this requires longer working stints,,,
DULCE ET DECORUM EST PRO HOBBY MORI
Joel_W
Associate Editor New York, United States
Joined: December 04, 2010
KitMaker: 11,666 posts
AeroScale: 7,410 posts
Posted: Wednesday, October 23, 2013 - 10:45 AM UTC
Steffen, Sorry to hear about your illness. Feel better my friend.
Joel
On my Workbench:
Monogram 1/24 scale 427 Shelby Cobra
Just Completed:
Beemax 1/24 scale BMW M3 E30 1992 Evolution II
Germany
Joined: September 07, 2005
KitMaker: 5,609 posts
AeroScale: 5,231 posts
Posted: Friday, October 25, 2013 - 03:19 AM UTC
Thanks Joel, I am back at work since yesterday .. still hard but luckily now it is weekend.
After I have added all stencils the kit got a good layer of Klear. When this was dry I did a sludge wash on the kit using a mid grey oil colour. I know it looks bright, but on the white parts it is dark. Again after some drying time I wiped away the excess paint.

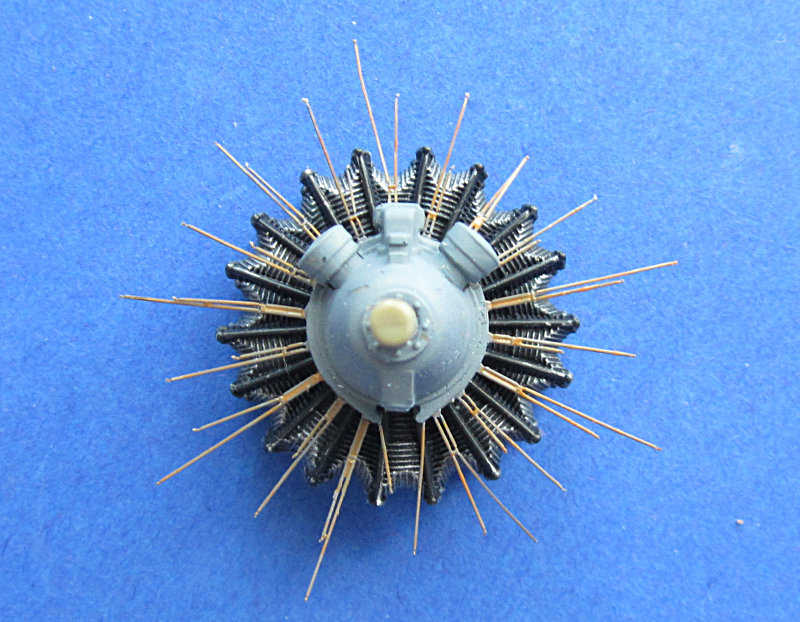
Now it is time to cope with the engine...(the cowl is just glued on with Maskol)
all the best
Steffen
DULCE ET DECORUM EST PRO HOBBY MORI
California, United States
Joined: November 28, 2007
KitMaker: 817 posts
AeroScale: 729 posts
Posted: Friday, October 25, 2013 - 04:31 AM UTC
That looks great Steffen- cheers! You're absolutely right about the blast tubes- your look just fine. That second-to-last pic scared me, but then I scrolled down to see perfection. ;D
[url]http://chukw.blogspot.com/[/url]
Germany
Joined: September 07, 2005
KitMaker: 5,609 posts
AeroScale: 5,231 posts
Posted: Friday, October 25, 2013 - 07:31 PM UTC
Many thanks Chuck!
Well, you are like Jean-Luc you can work hours and hours on the model adding effects gradually until your satisfied. I have not enough patience for this approach. I want to see the effect and work on it "backwards" (so to say).
Also I like to see the structure of an aircraft. So panel line wash is my preferred method (even if it is not always true to the real thing). BTW I'm not able use preshading properly (though I try from time to time).
all the best
Steffen
DULCE ET DECORUM EST PRO HOBBY MORI
Joel_W
Associate Editor New York, United States
Joined: December 04, 2010
KitMaker: 11,666 posts
AeroScale: 7,410 posts
Posted: Saturday, October 26, 2013 - 01:52 AM UTC
Steffen, Your weathering looks really good. The effects of the light wash on the dark Gloss Sea Blue, especially on the wings, really brings out the panel lines nicely.
Joel
On my Workbench:
Monogram 1/24 scale 427 Shelby Cobra
Just Completed:
Beemax 1/24 scale BMW M3 E30 1992 Evolution II
Germany
Joined: September 07, 2005
KitMaker: 5,609 posts
AeroScale: 5,231 posts
Posted: Saturday, October 26, 2013 - 08:54 AM UTC
Arrggh, disaster struck (again) .. seems I can get no build through without it.
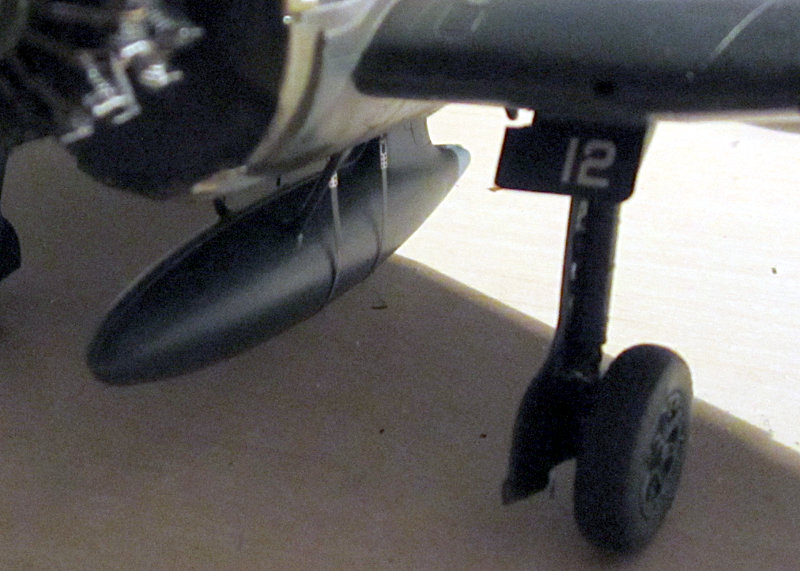
When working on my Gripen I lost the grip (no joke) and that crated dived onto my Hellcat (which had some u/c parts newly attached). Of course the u/c leg broke (no big deal) but in the curse the oleo scissors disappeared (really - no sound and nowhere to find)
Any idea where I can get a new (AM) set of those?
DULCE ET DECORUM EST PRO HOBBY MORI
Joel_W
Associate Editor New York, United States
Joined: December 04, 2010
KitMaker: 11,666 posts
AeroScale: 7,410 posts
Posted: Sunday, October 27, 2013 - 01:15 AM UTC
Were the missing parts AM parts? You could always contact the manufacture and see if he's willing to sell you just the missing parts. Worse case scenario is buying the complete AM parts package again.
The other route, which I personally would take, is to try to make them out of plastic strip.
Joel
On my Workbench:
Monogram 1/24 scale 427 Shelby Cobra
Just Completed:
Beemax 1/24 scale BMW M3 E30 1992 Evolution II
Uusimaa, Finland
Joined: March 30, 2004
KitMaker: 2,845 posts
AeroScale: 1,564 posts
Posted: Sunday, October 27, 2013 - 04:57 AM UTC
Scale Aircraft Conversions does make a white metal set for the Eduard kit (
-link-), but if that product photo shows full content of the set, it doesn't have the oleo scissors... : |
Edit: yep, seems the set only includes the gear legs:
http://www.cybermodeler.com/hobby/details/sac/detail_sac_48044.shtml
Germany
Joined: September 07, 2005
KitMaker: 5,609 posts
AeroScale: 5,231 posts
Posted: Sunday, October 27, 2013 - 05:32 AM UTC
Thanks Eetu and Joel.
@Eetu: Too bad there are no scissors included.
@Joel: these are small parts and they are 3D (i.e. not flat) so doing these myself is out of question.
I have taken the parts from another kit I have in the stash but that really is no solution but a stop gap trick to get it finished for Telford. Still busy with the engine and Quickboost belly tank.
all the best
Steffen
DULCE ET DECORUM EST PRO HOBBY MORI
New Jersey, United States
Joined: May 01, 2013
KitMaker: 60 posts
AeroScale: 56 posts
Posted: Thursday, October 31, 2013 - 03:48 AM UTC
Hi Steffen,
This looks great so far! Quick question about the oil wash: did you just paint over the whole plane before wiping it off?
I have Eduard's F6F-5 Late version on my to-do list, so I'll be following your build with interest!
On the Bench:
Eduard 1/48 F6F-5 Hellcat
Tamiya 1/48 A6M3 Zero
Germany
Joined: September 07, 2005
KitMaker: 5,609 posts
AeroScale: 5,231 posts
Posted: Thursday, October 31, 2013 - 06:06 AM UTC
Hi Kervin,
yes, whole kit. thats, why Chuk was "scared".
all the best
Steffen
DULCE ET DECORUM EST PRO HOBBY MORI
Germany
Joined: September 07, 2005
KitMaker: 5,609 posts
AeroScale: 5,231 posts
Posted: Thursday, October 31, 2013 - 07:35 AM UTC
P.S. I forgot to add two pictures, progress is slow as I am back at work but still suffering from the illness I got

Still hope to get it done on the weekend and keep working on another project...
all the best
Steffen
DULCE ET DECORUM EST PRO HOBBY MORI
Joel_W
Associate Editor New York, United States
Joined: December 04, 2010
KitMaker: 11,666 posts
AeroScale: 7,410 posts
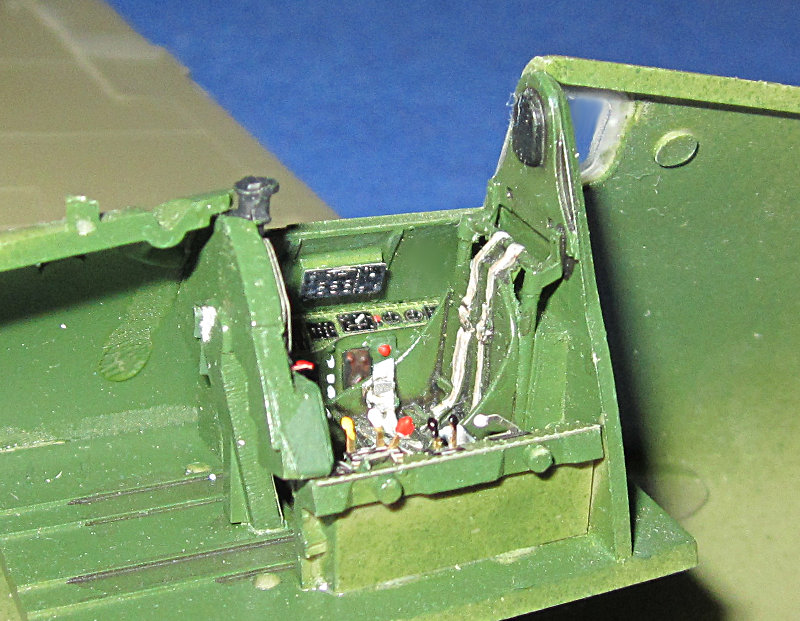
Posted: Friday, November 01, 2013 - 02:27 AM UTC
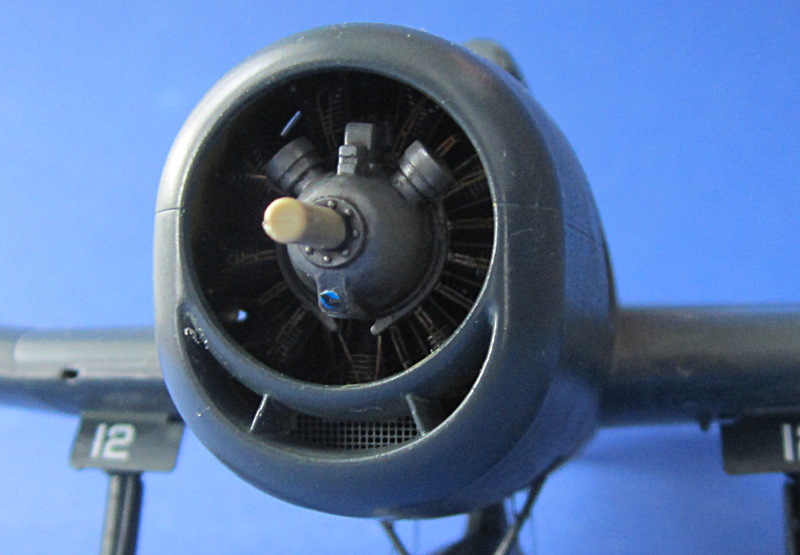
Stephen, The wiring harness really looks good. It's not PE since the wires are actually round, at least they look that way to me. If they're resin, how do you bend them so that you can attach them to the cylinder heads? One wire goes in the top front, and the other goes in the top of the head.
I've always made my own wiring harness out of soft, solid, enamel coated wire.
Joel
On my Workbench:
Monogram 1/24 scale 427 Shelby Cobra
Just Completed:
Beemax 1/24 scale BMW M3 E30 1992 Evolution II
Germany
Joined: September 07, 2005
KitMaker: 5,609 posts
AeroScale: 5,231 posts
Posted: Friday, November 01, 2013 - 02:46 AM UTC
Hi Joel,
well, it is the PE provided in the kit! I just primed it (alclad grey primer with a brush) and painted it light brown -- it is dark inside the cowl and thus won't be seen if painted dark brown/black...
cheers
Steffen
DULCE ET DECORUM EST PRO HOBBY MORI
Germany
Joined: September 07, 2005
KitMaker: 5,609 posts
AeroScale: 5,231 posts
Posted: Saturday, November 02, 2013 - 02:55 AM UTC
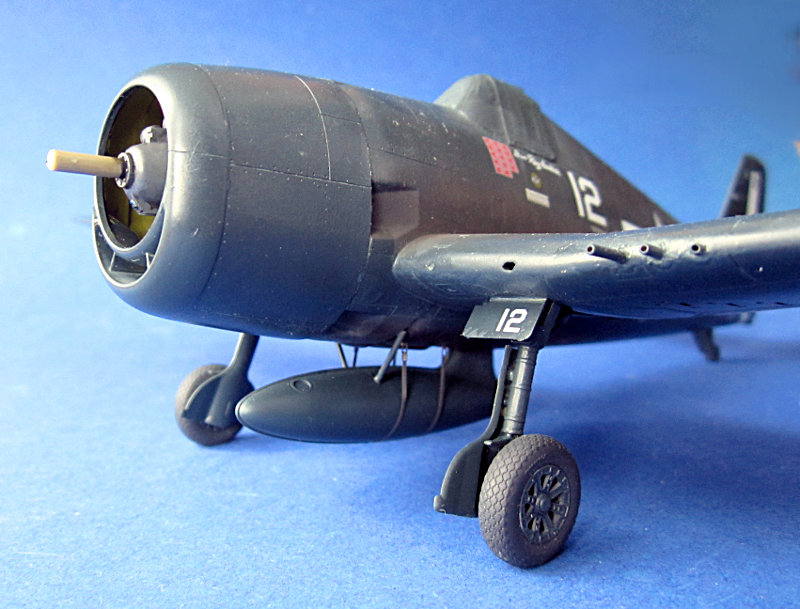
Some more pictures of the progress. I attached the drop tank, the engine and then the cowling...

all the best
Steffen
DULCE ET DECORUM EST PRO HOBBY MORI
British Columbia, Canada
Joined: September 03, 2009
KitMaker: 6,965 posts
AeroScale: 6,247 posts
Posted: Saturday, November 02, 2013 - 03:45 AM UTC
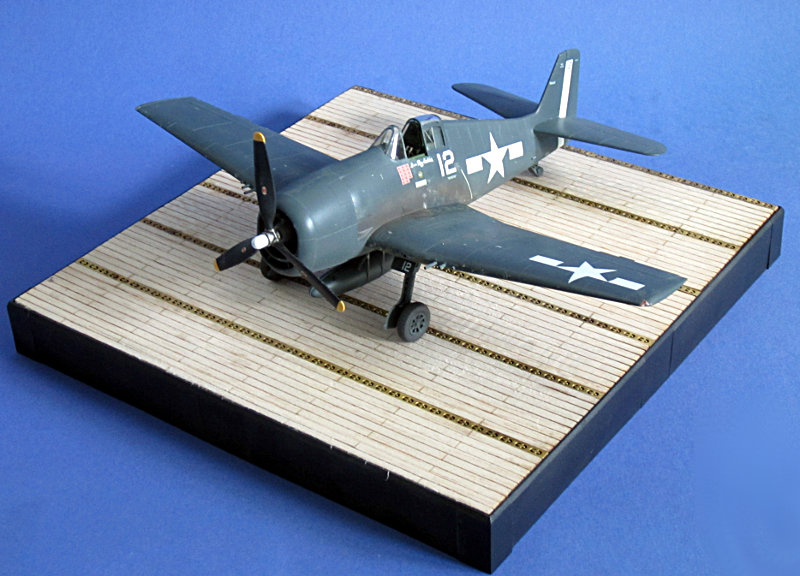
It definitely looks happy to be nearly finished

When once you have tasted flight you will walk the Earth with your eyes turned skyward.
For there you have been, and there you will always long to return.
-Leonardo Da Vinci
Germany
Joined: September 07, 2005
KitMaker: 5,609 posts
AeroScale: 5,231 posts
Posted: Saturday, November 02, 2013 - 11:02 PM UTC
You might be right
still a few bits missing but it is on the home stretch
all the best
Steffen
DULCE ET DECORUM EST PRO HOBBY MORI
England - South East, United Kingdom
Joined: September 15, 2004
KitMaker: 4,728 posts
AeroScale: 1,351 posts
Posted: Sunday, November 03, 2013 - 01:41 AM UTC
Nice work Steffen, I'm looking forward to seeing it in the flesh err plastic at Telford
On the bench...
Italeri A129 Mangusta
British Bulldog Spitfire theme build