OFFICIAL: Then and Now Campaign
MichaelSatin
 Campaigns Administrator
Colorado, United States
Joined: January 19, 2008
KitMaker: 3,909 posts
AeroScale: 2,904 posts
Posted: Thursday, December 26, 2013 - 08:00 AM UTC
Great work as usual Jess!
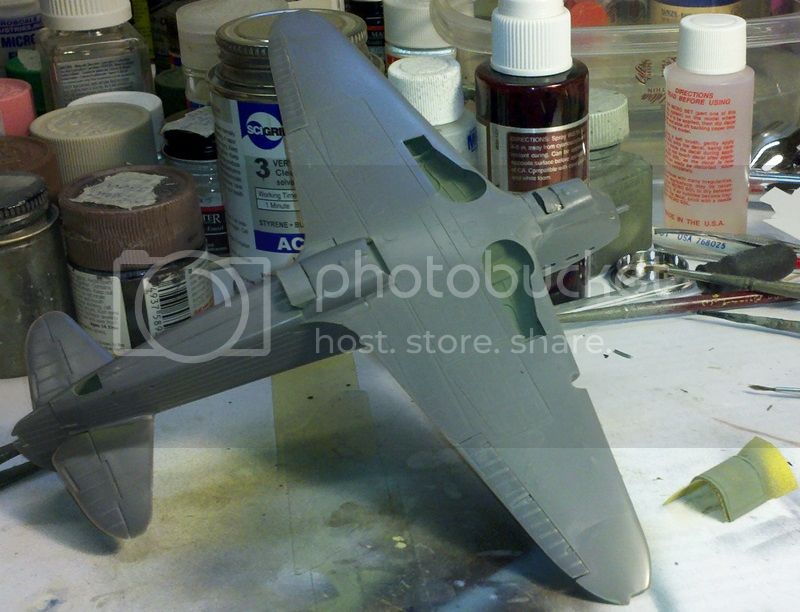
Got a couple of days off, getting some work done on the Accurate Miniatures 1/48 Yak-1:
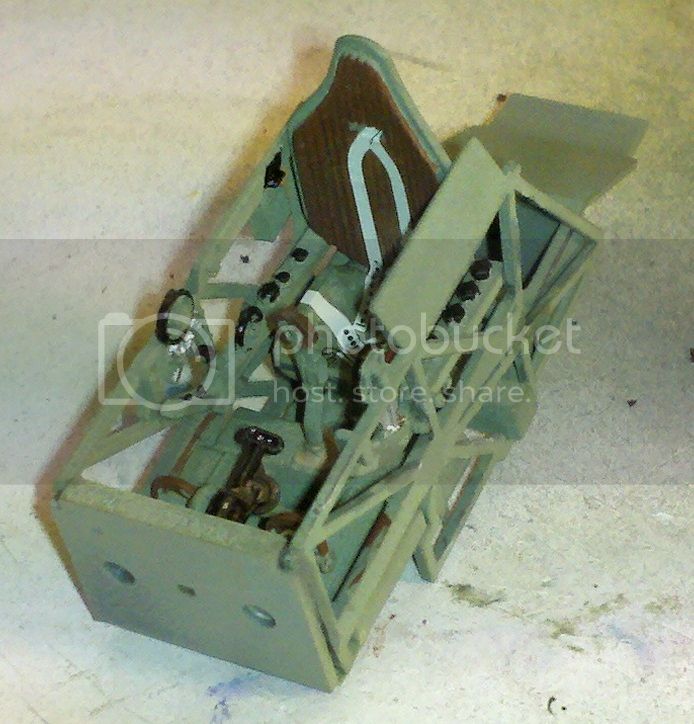
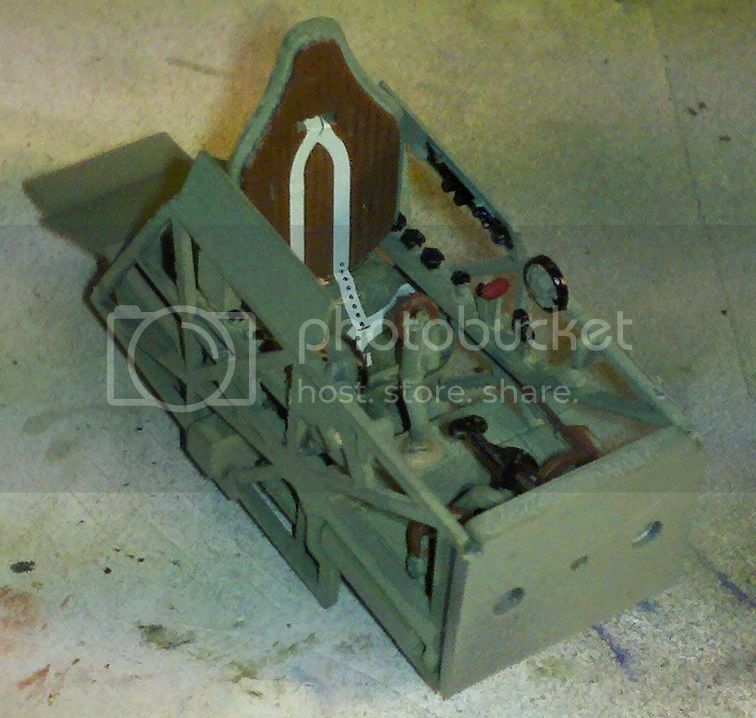
Cockpit actually went together better than I feared. Kinda lousy pics though, not sure what happened there.
Michael
On the bench:
Sorta depends on your definition of "on the bench"...
MichaelSatin
Campaigns Administrator Colorado, United States
Joined: January 19, 2008
KitMaker: 3,909 posts
AeroScale: 2,904 posts
Posted: Sunday, December 29, 2013 - 07:03 AM UTC
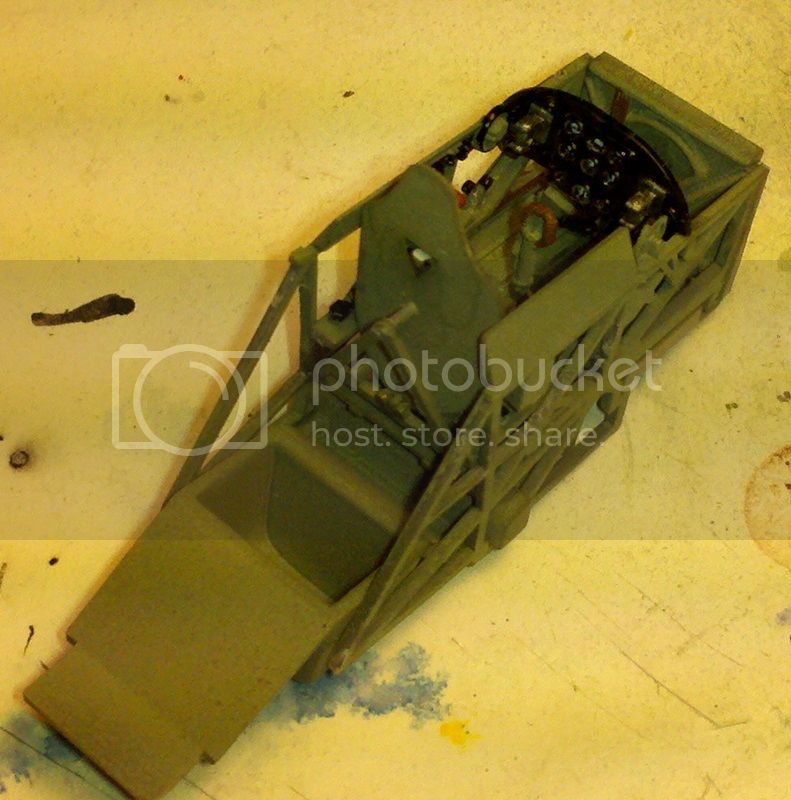
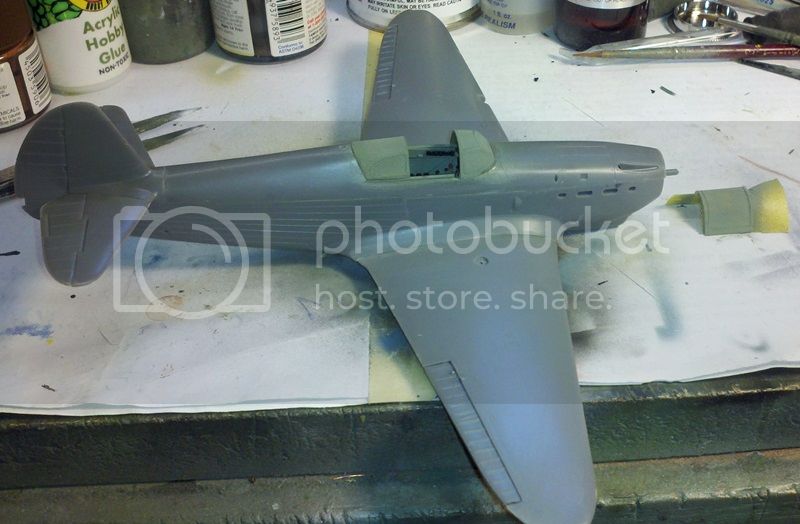
Just about ready for painting:
Michael
On the bench:
Sorta depends on your definition of "on the bench"...
British Columbia, Canada
Joined: September 03, 2009
KitMaker: 6,965 posts
AeroScale: 6,247 posts
Posted: Monday, December 30, 2013 - 04:41 PM UTC
That Yak goes together so very well

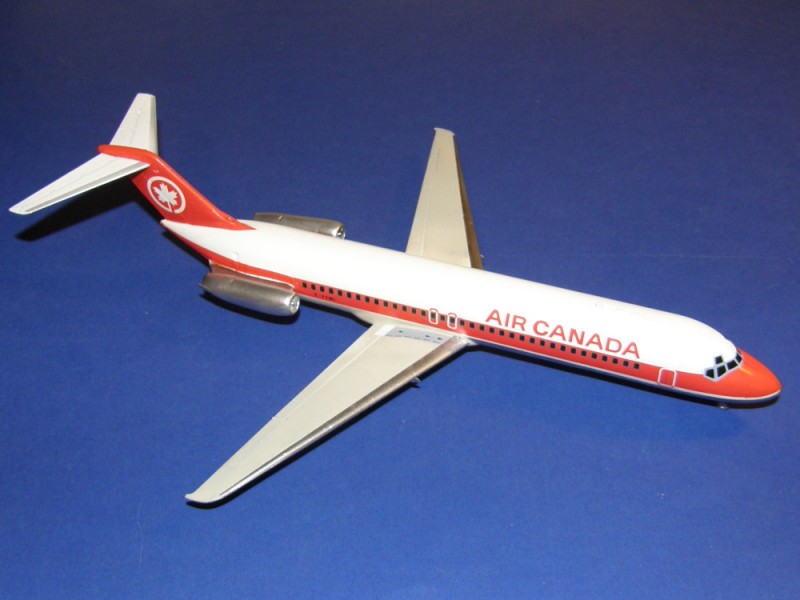
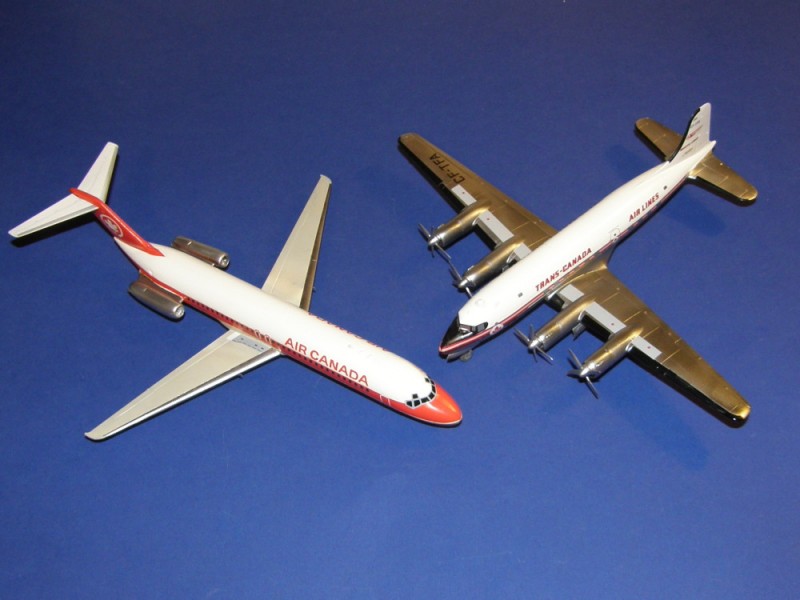
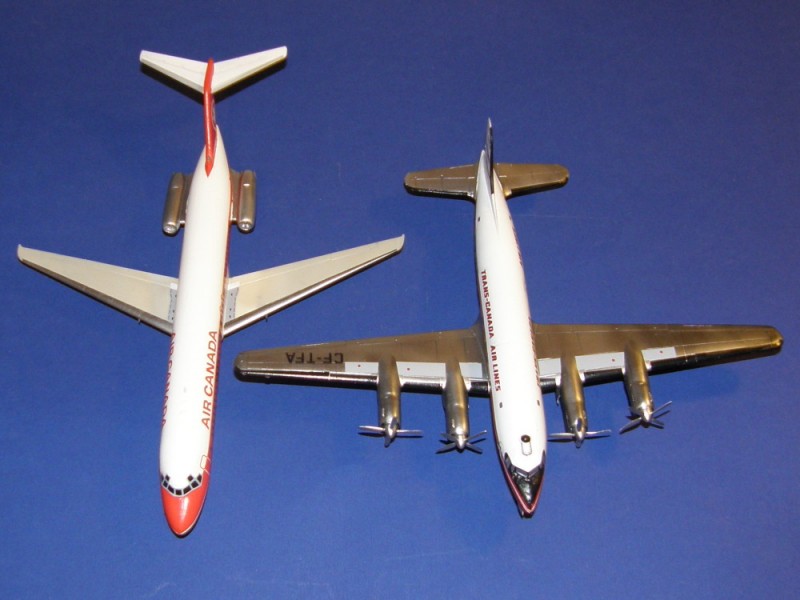
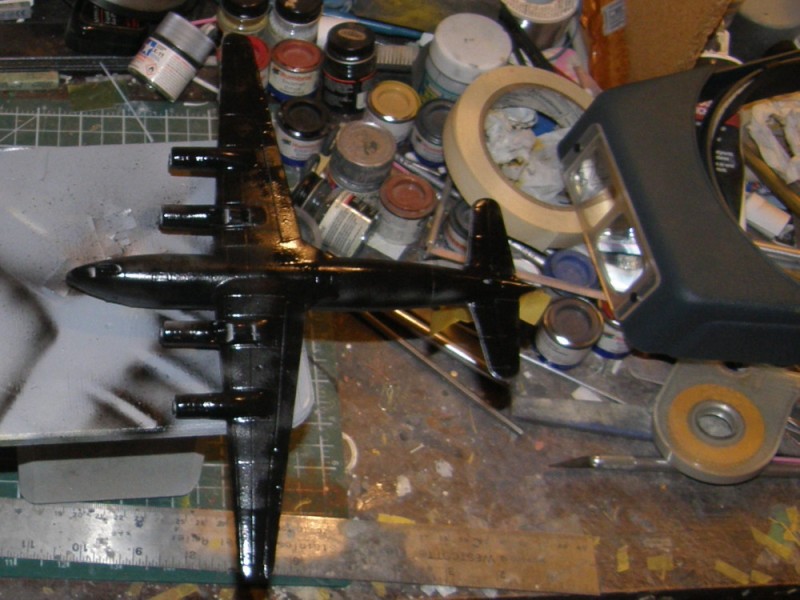
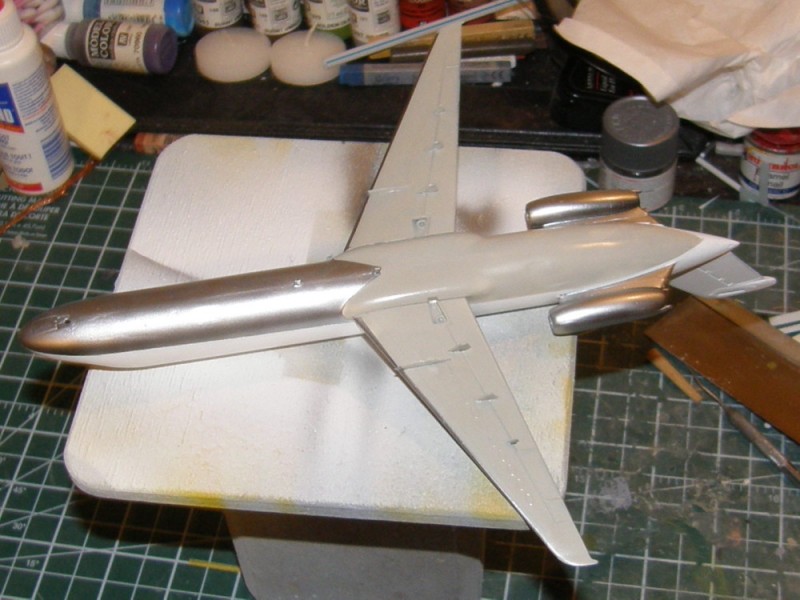
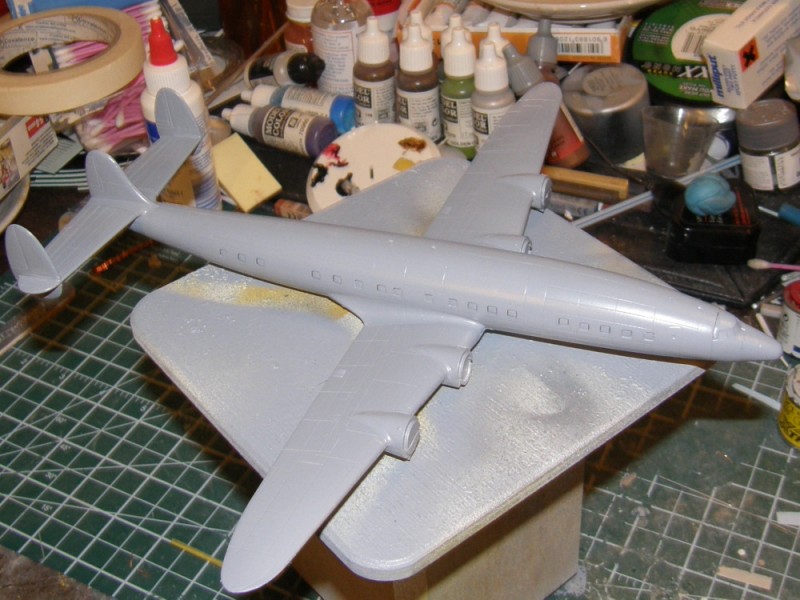
Here's the North Star and DC-9 wearing Alclad black primer. It went seriously splattery as I sprayed it, which is strange given how it's supposed to be glass smooth
When once you have tasted flight you will walk the Earth with your eyes turned skyward.
For there you have been, and there you will always long to return.
-Leonardo Da Vinci
British Columbia, Canada
Joined: September 03, 2009
KitMaker: 6,965 posts
AeroScale: 6,247 posts
Posted: Tuesday, December 31, 2013 - 05:14 PM UTC
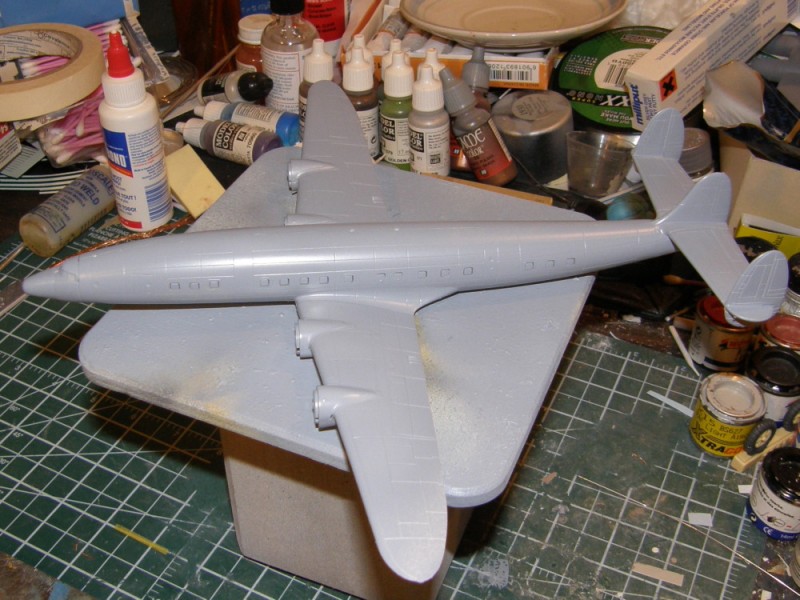
My first foray into spraying Alclad Aluminium went well enough, although it reveals the fact that I could have spent far longer cleaning up the undersides.
I need to sand the orange peel off the North Star so it didn't get painted tonight. I'll have to leave that job until next year.
When once you have tasted flight you will walk the Earth with your eyes turned skyward.
For there you have been, and there you will always long to return.
-Leonardo Da Vinci

#259
Massachusetts, United States
Joined: October 23, 2011
KitMaker: 2,265 posts
AeroScale: 1,715 posts
Posted: Tuesday, December 31, 2013 - 05:27 PM UTC
When I first investigated using Alclad , I was warned off using Alclad's black undercoat.
Tamiya rattle can gloss black enamel was recommended to me, and you know how relaible and nice that comes out, nothing better -
and it worked perfectly under the Alclad, the few times Ive done it.
British Columbia, Canada
Joined: September 03, 2009
KitMaker: 6,965 posts
AeroScale: 6,247 posts
Posted: Tuesday, December 31, 2013 - 05:43 PM UTC
I can see why. Perhaps you're supposed to thin the Alclad black? It felt like it was clogging in the nozzle as I sprayed it, and then splattering off in huge blobs.
When once you have tasted flight you will walk the Earth with your eyes turned skyward.
For there you have been, and there you will always long to return.
-Leonardo Da Vinci
MichaelSatin
Campaigns Administrator Colorado, United States
Joined: January 19, 2008
KitMaker: 3,909 posts
AeroScale: 2,904 posts
Posted: Wednesday, January 01, 2014 - 04:13 AM UTC
It can be tricky using new stuff. Alclad works great once you get the hang of it, but I've chickened out since then and gone back to the old standby, Floquil. Still, looks like you've got a great job going there Jessie!
Michael
On the bench:
Sorta depends on your definition of "on the bench"...
Ontario, Canada
Joined: March 29, 2010
KitMaker: 1,151 posts
AeroScale: 985 posts
Posted: Wednesday, January 01, 2014 - 06:46 AM UTC
I had the same issue with the grey alclad primer. It's effectively useless.
British Columbia, Canada
Joined: September 03, 2009
KitMaker: 6,965 posts
AeroScale: 6,247 posts
Posted: Wednesday, January 01, 2014 - 02:29 PM UTC
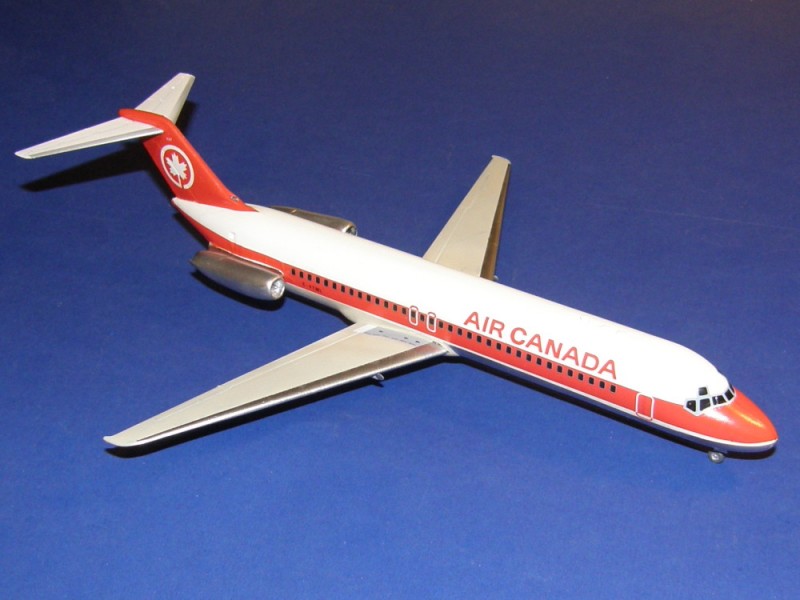
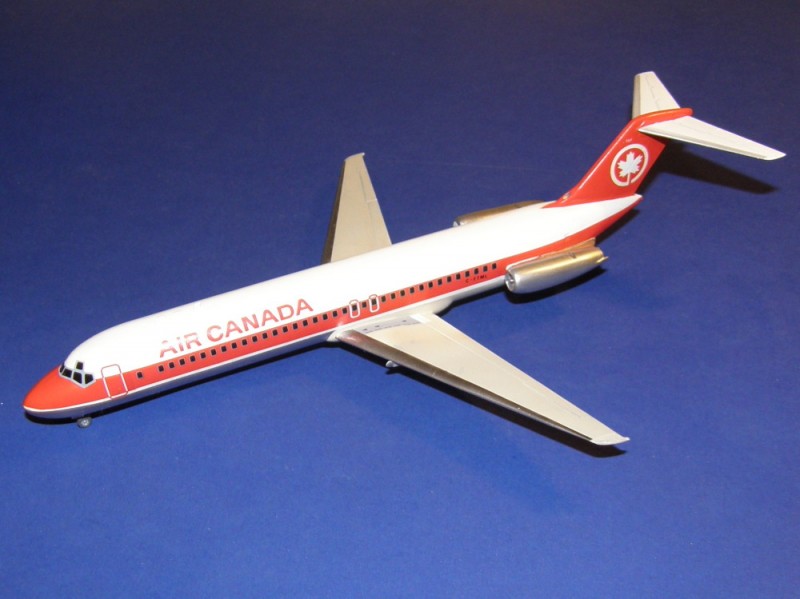
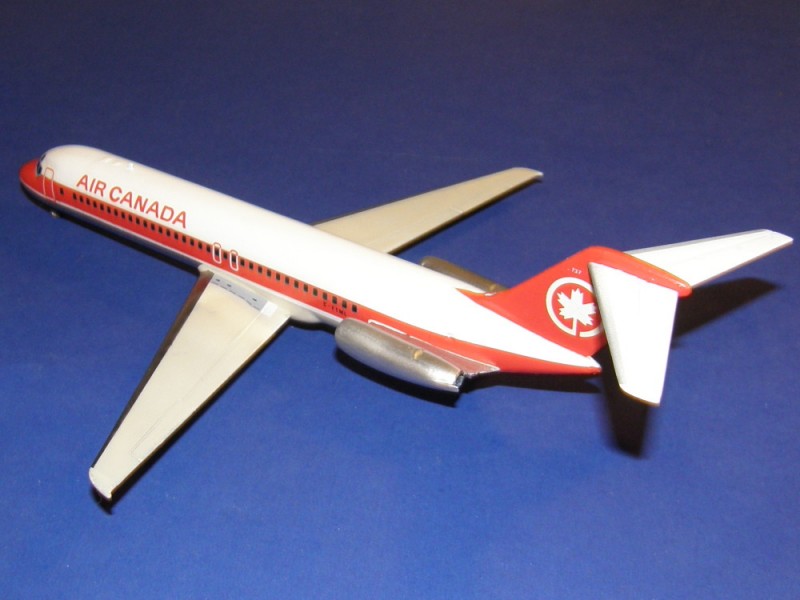
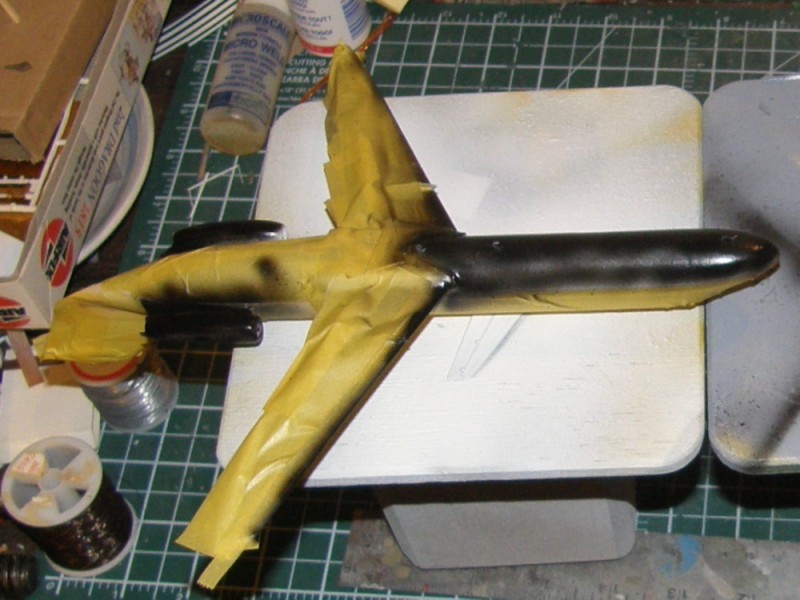
Masking off

Decals going on
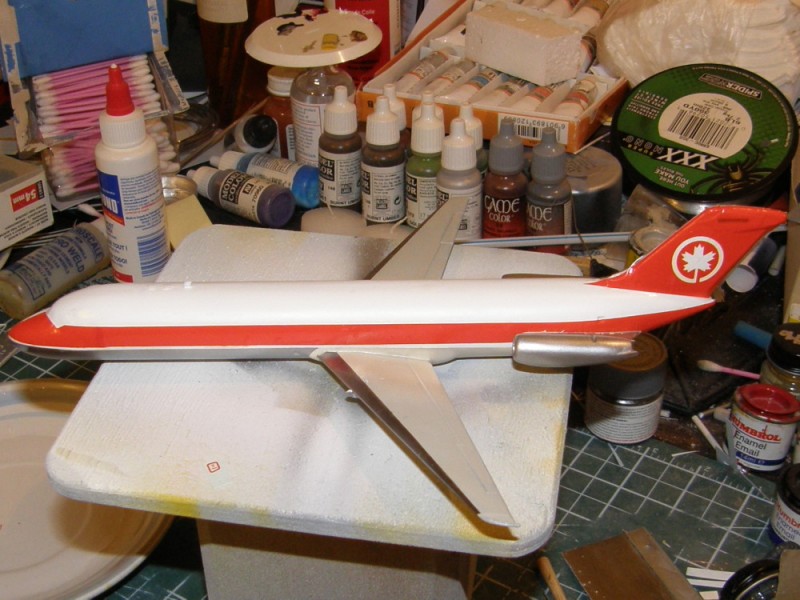
Now to let that lot dry and get on with the layering.
When once you have tasted flight you will walk the Earth with your eyes turned skyward.
For there you have been, and there you will always long to return.
-Leonardo Da Vinci
MichaelSatin
Campaigns Administrator Colorado, United States
Joined: January 19, 2008
KitMaker: 3,909 posts
AeroScale: 2,904 posts
Posted: Wednesday, January 01, 2014 - 04:01 PM UTC
Good Lord, you DO move fast!
Michael

On the bench:
Sorta depends on your definition of "on the bench"...
British Columbia, Canada
Joined: September 03, 2009
KitMaker: 6,965 posts
AeroScale: 6,247 posts
Posted: Wednesday, January 01, 2014 - 06:51 PM UTC
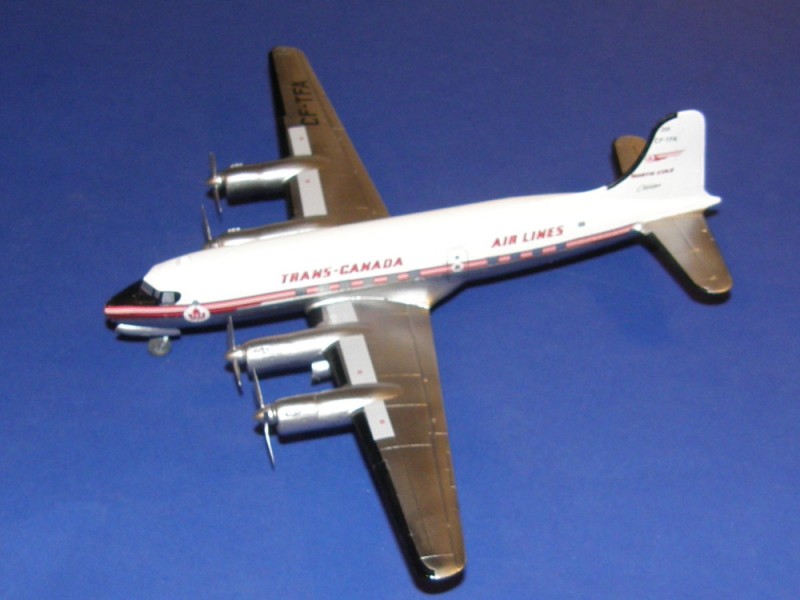
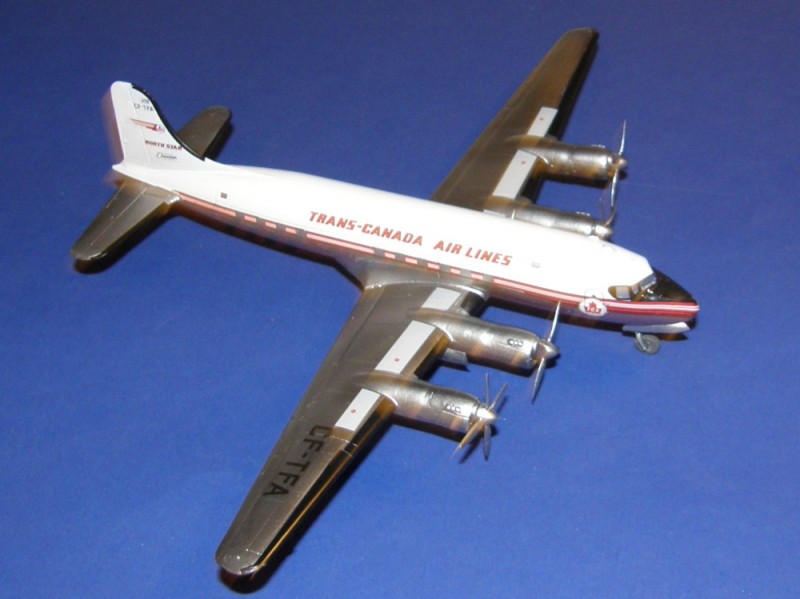
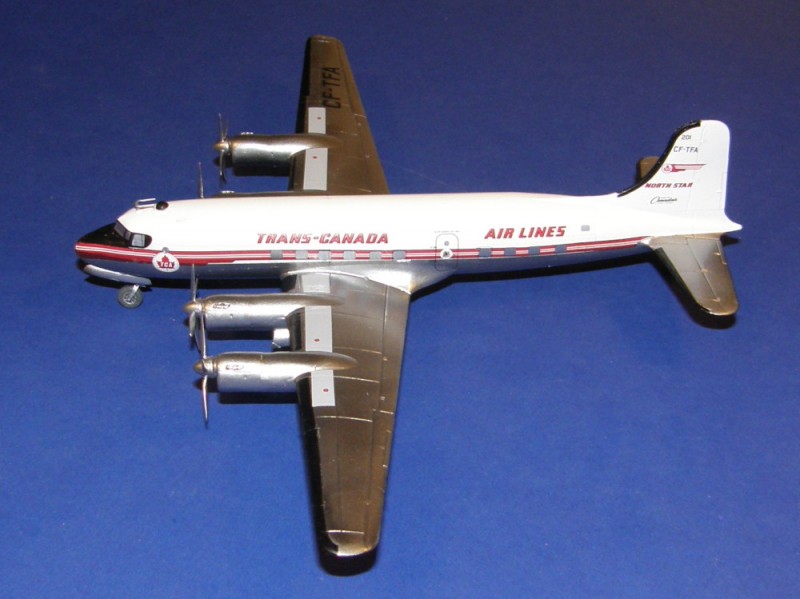
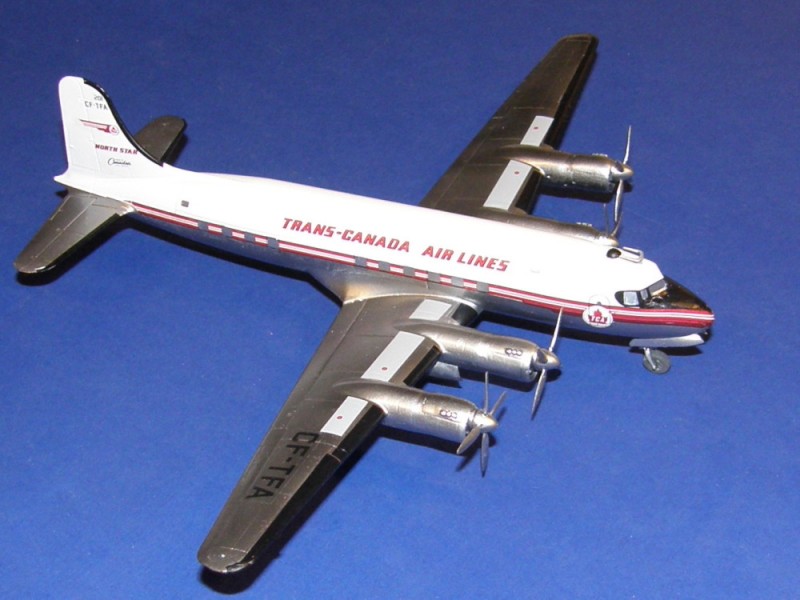
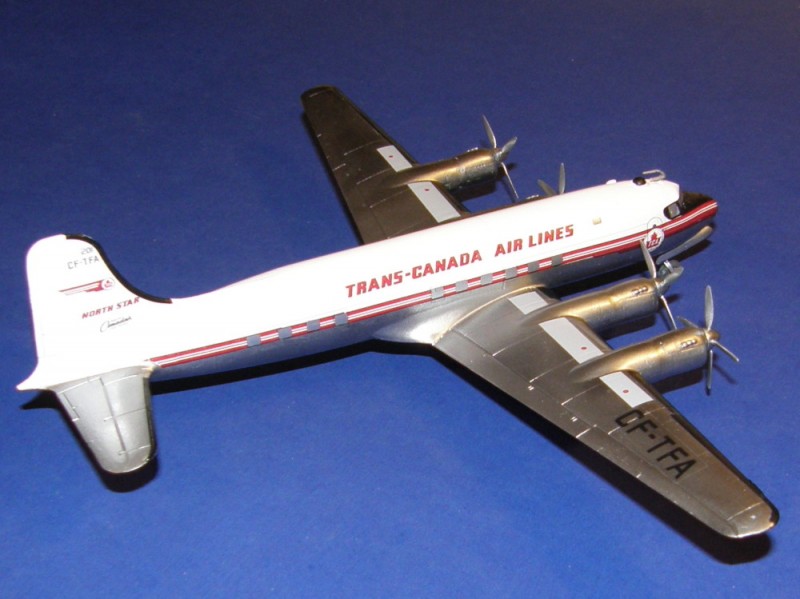
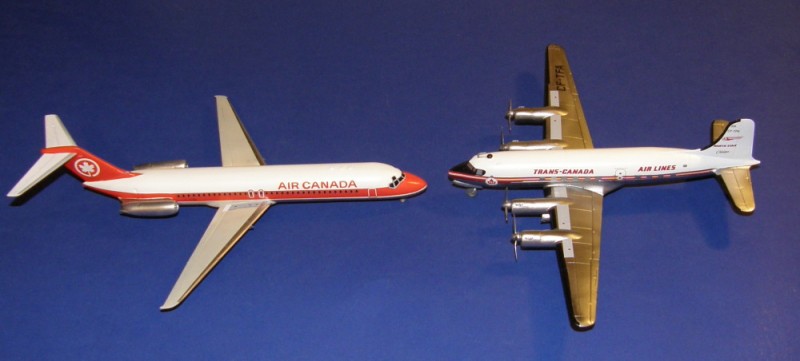
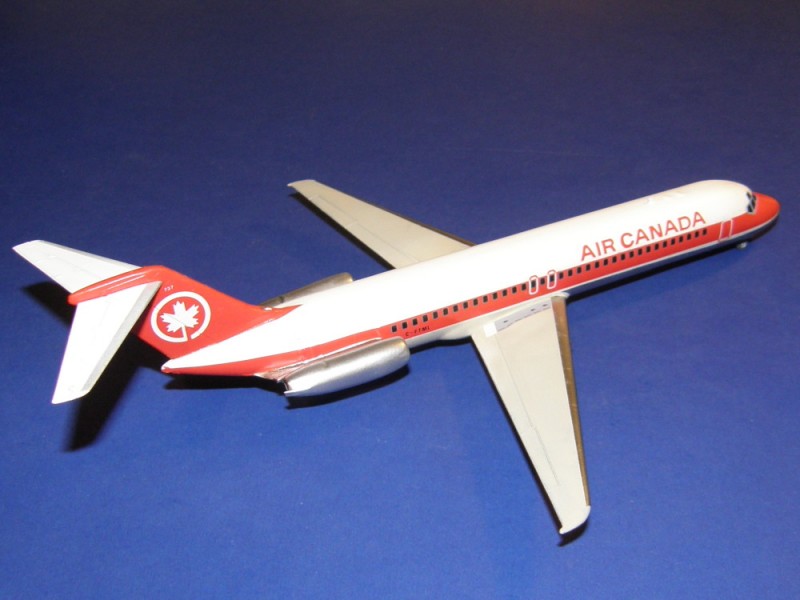
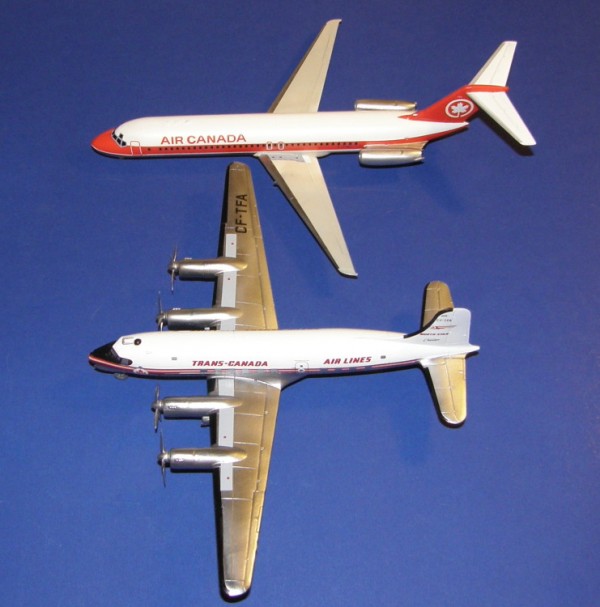
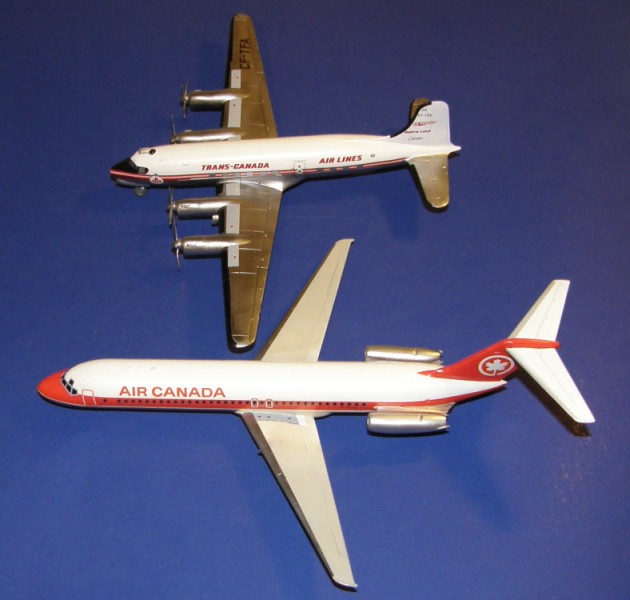
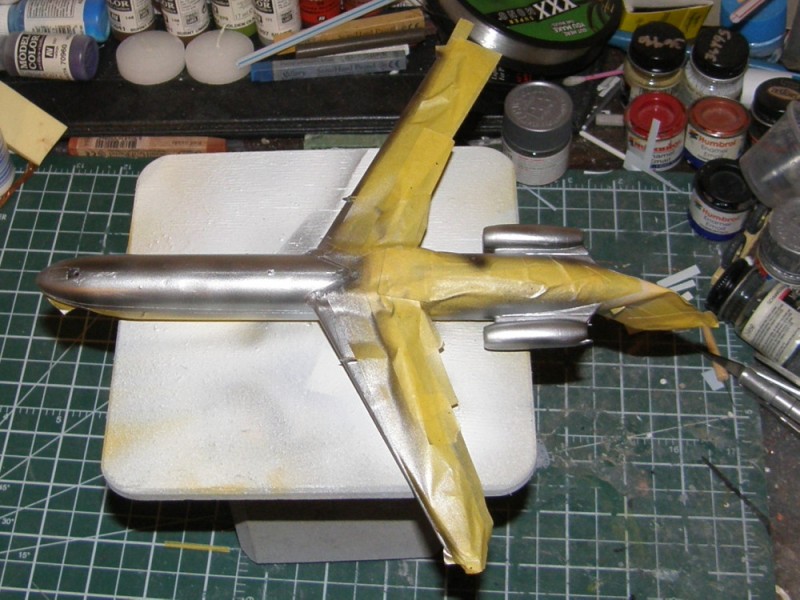
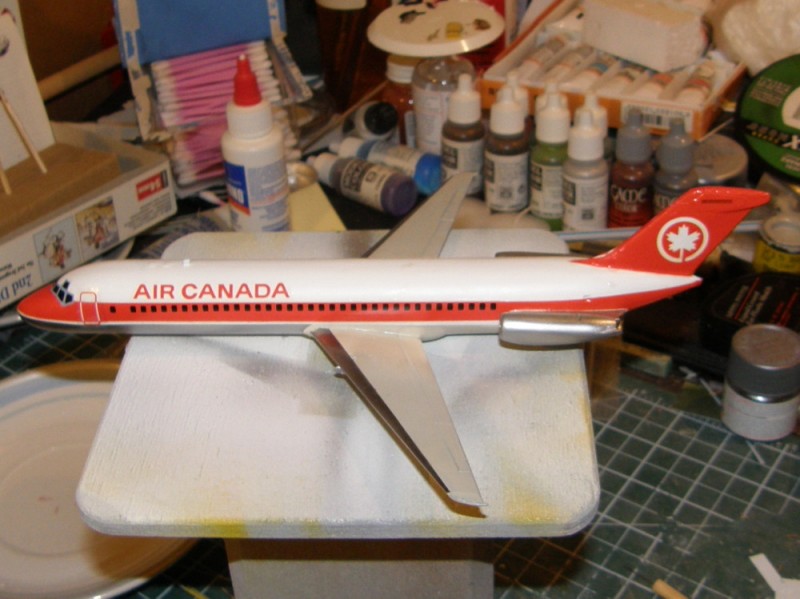
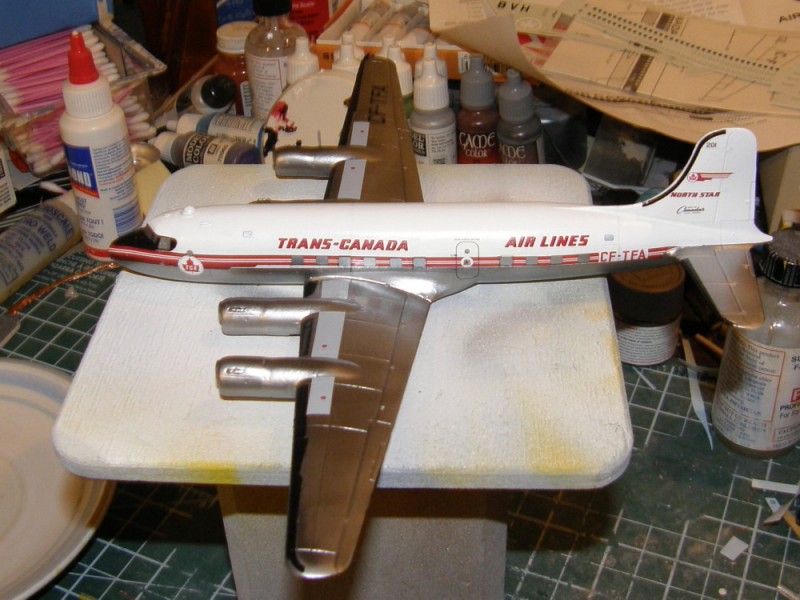
After a nerve wracking hour with the North Star, the decals are on. I used the Minicraft de-icing boot and wing walk decals. They were somewhat troublesome and will need some touching up tomorrow. The Main colour scheme decals were very fragile, and insisted on breaking, trying to fold into useless little balls and otherwise not co-operate. I've finally fought them into submission although they didn't line up well at the nose. Don't look at this one from head on
When once you have tasted flight you will walk the Earth with your eyes turned skyward.
For there you have been, and there you will always long to return.
-Leonardo Da Vinci
British Columbia, Canada
Joined: September 03, 2009
KitMaker: 6,965 posts
AeroScale: 6,247 posts
Posted: Wednesday, January 01, 2014 - 09:15 PM UTC
When once you have tasted flight you will walk the Earth with your eyes turned skyward.
For there you have been, and there you will always long to return.
-Leonardo Da Vinci
Ontario, Canada
Joined: February 04, 2008
KitMaker: 2,507 posts
AeroScale: 1,814 posts
Posted: Wednesday, January 01, 2014 - 10:05 PM UTC
Well done Jessica!
Nice to see, like Canada a Civil entry

" The Die Hards"
43rd MIDDLESEX REGIMENT
MACHINE GUN CORPS
XXX CORP
The most effective way to do it, is to do it.
- Amelia Earhart
MichaelSatin
Campaigns Administrator Colorado, United States
Joined: January 19, 2008
KitMaker: 3,909 posts
AeroScale: 2,904 posts
Posted: Thursday, January 02, 2014 - 01:50 AM UTC
Excellent work!
Michael
On the bench:
Sorta depends on your definition of "on the bench"...
#259
Massachusetts, United States
Joined: October 23, 2011
KitMaker: 2,265 posts
AeroScale: 1,715 posts
Posted: Thursday, January 02, 2014 - 04:22 AM UTC
Jessie, I like that North star! Your Alclad came out pretty dam shiny!
Ive been hoping to build one of those, with (most of ) that decal as well.
This one in fact, owned by AVCO electronics, formerly CF-TFF -
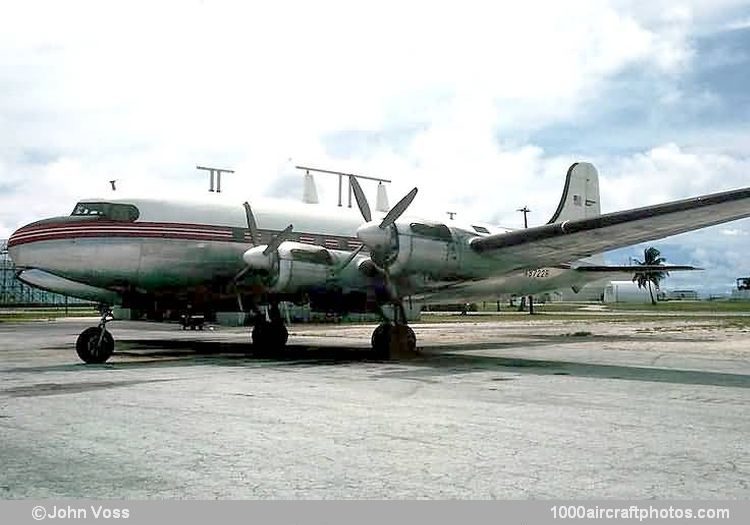
Photographed on Kwajalein by JD Voss with a lot of spooky antennas stuck on it.
Where did you get the Merlin engines?
Welsh has a Northstar kit, but its been on back order for close to a year, along with my DHC dash 8 for the DeHavilland campaign.
British Columbia, Canada
Joined: September 03, 2009
KitMaker: 6,965 posts
AeroScale: 6,247 posts
Posted: Thursday, January 02, 2014 - 06:18 AM UTC
The Merlins are from Bra.Z resin. I bought them from
AHS.
When once you have tasted flight you will walk the Earth with your eyes turned skyward.
For there you have been, and there you will always long to return.
-Leonardo Da Vinci
#259
Massachusetts, United States
Joined: October 23, 2011
KitMaker: 2,265 posts
AeroScale: 1,715 posts
Posted: Thursday, January 02, 2014 - 06:25 AM UTC
Quoted Text
The Merlins are from Bra.Z resin. I bought them from AHS.
cool. they look great. i will bookmark this thread for guidance on the install.
British Columbia, Canada
Joined: September 03, 2009
KitMaker: 6,965 posts
AeroScale: 6,247 posts
Posted: Thursday, January 02, 2014 - 01:49 PM UTC
When once you have tasted flight you will walk the Earth with your eyes turned skyward.
For there you have been, and there you will always long to return.
-Leonardo Da Vinci
British Columbia, Canada
Joined: September 03, 2009
KitMaker: 6,965 posts
AeroScale: 6,247 posts
Posted: Thursday, January 02, 2014 - 01:51 PM UTC
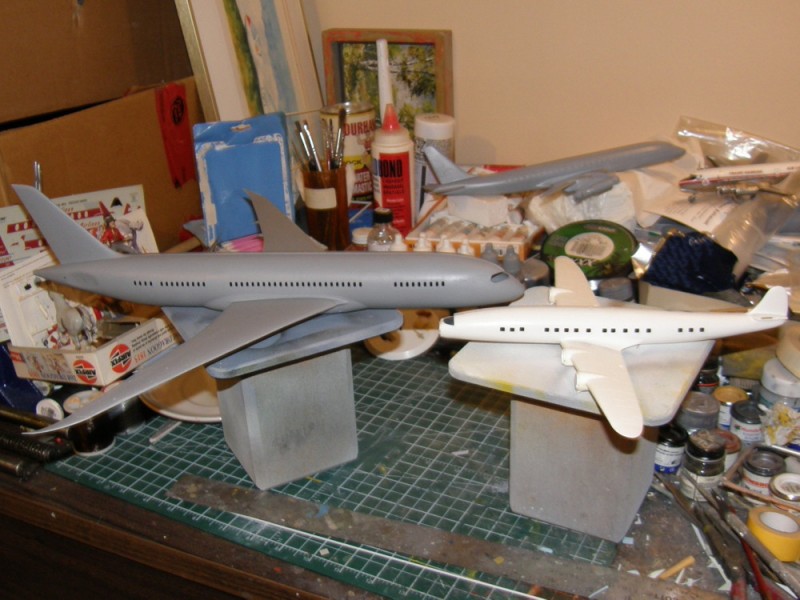
For my next pair, Lockheed's L-1049 Super Constellation and Boeing's 787-800
When once you have tasted flight you will walk the Earth with your eyes turned skyward.
For there you have been, and there you will always long to return.
-Leonardo Da Vinci
MichaelSatin
Campaigns Administrator Colorado, United States
Joined: January 19, 2008
KitMaker: 3,909 posts
AeroScale: 2,904 posts
Posted: Thursday, January 02, 2014 - 01:54 PM UTC
You are certifiable. There, I said it, and I ain't takin' it back.
Nice work though!
Michael
On the bench:
Sorta depends on your definition of "on the bench"...
Alberta, Canada
Joined: April 07, 2010
KitMaker: 1,028 posts
AeroScale: 939 posts
Posted: Thursday, January 02, 2014 - 02:48 PM UTC
Nice work on the first two, Jessica. I'm more attracted to the North Star. Thats only because I'm a prop-head, though. Plus, I've flown Air Canada and have memories making me wish I'd flown Air Cessna instead.
To prevent being called an 'expert', screw something up good every now and again.
British Columbia, Canada
Joined: September 03, 2009
KitMaker: 6,965 posts
AeroScale: 6,247 posts
Posted: Friday, January 03, 2014 - 11:20 AM UTC
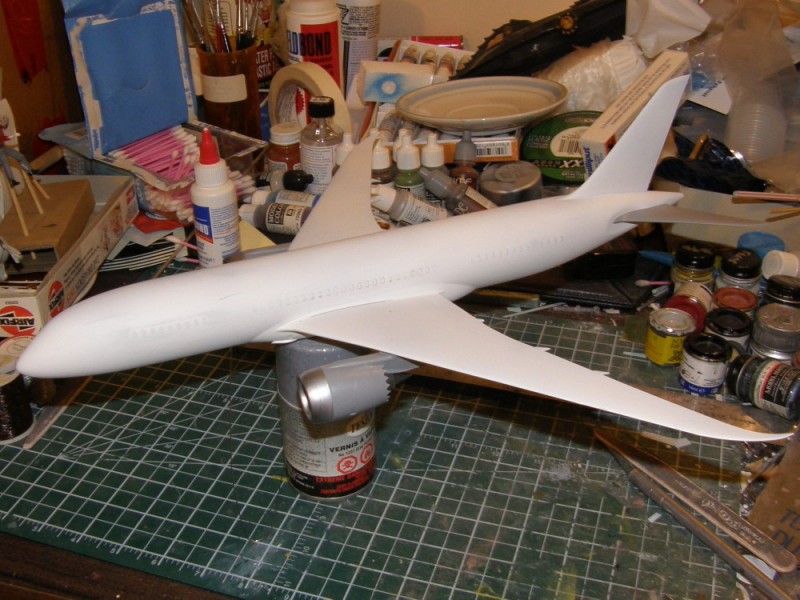
Moving on to the 787, the fuselage fit is pretty good
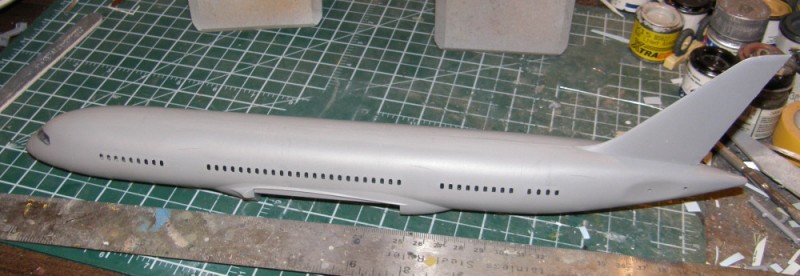
Only a skim of filler is needed on the bottom
I blocked off the APU exhaust hole with a piece of styrene tube and filed it to shape

The wings also fit well
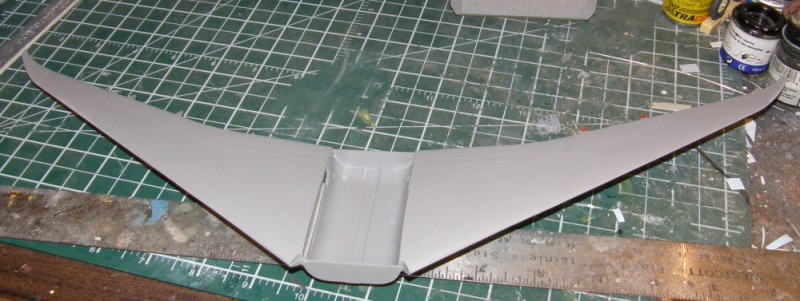
except where I stuffed up the assembly. But filler and sanding will save that
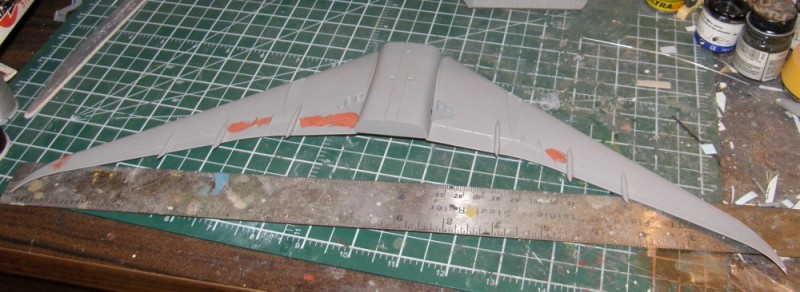
A test fit reveals the size of the beast
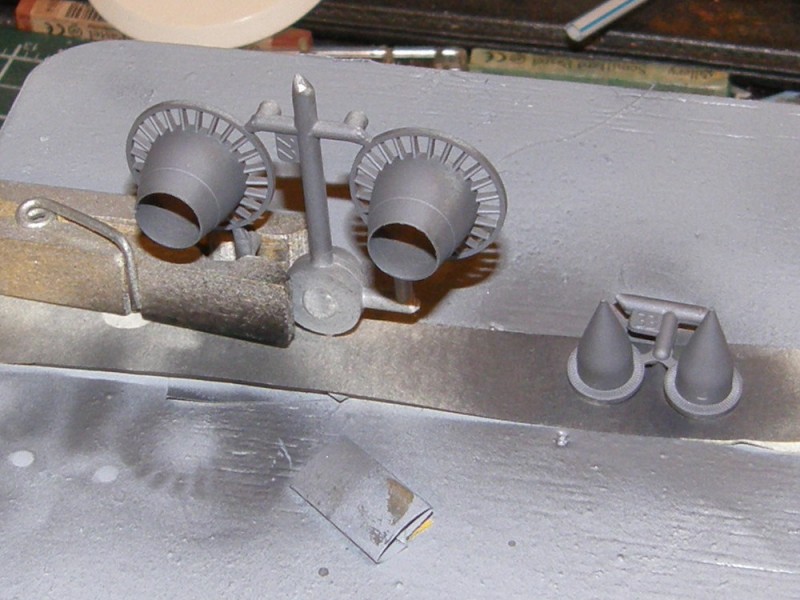
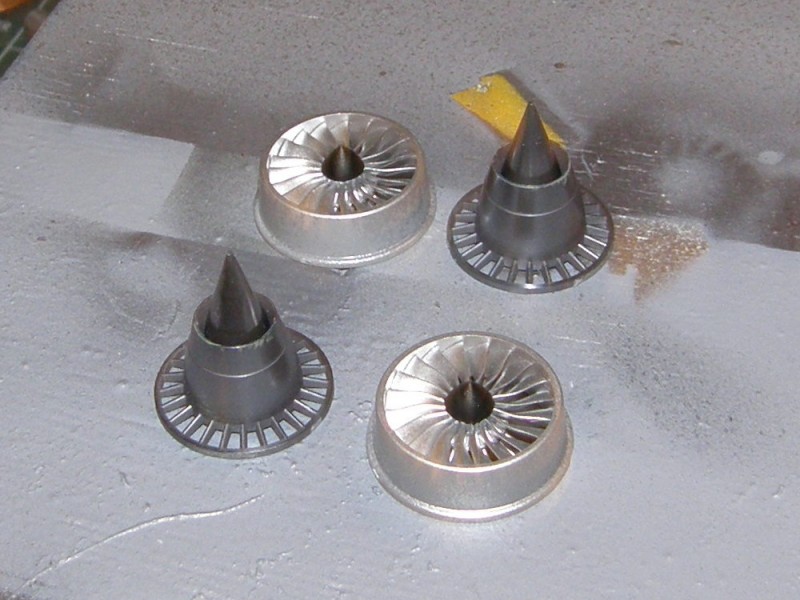
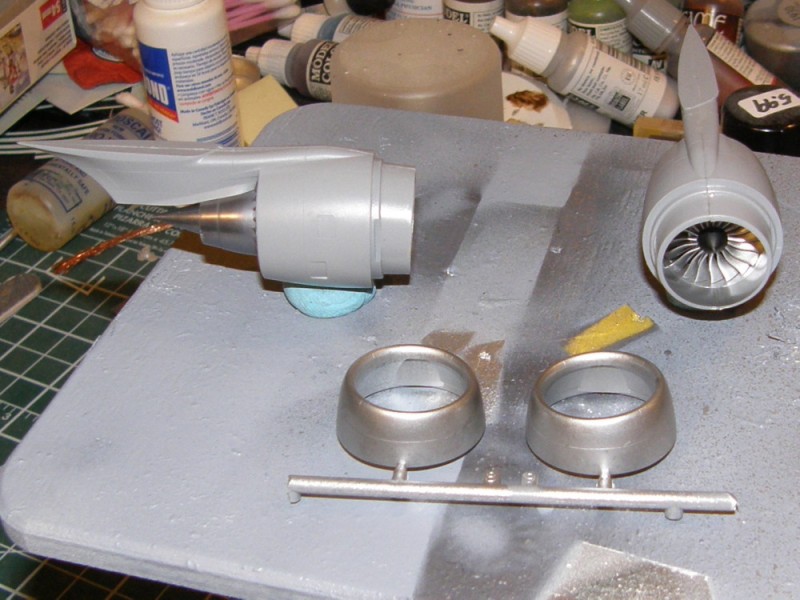
Turning to the engines, a coating of Humbrol Polished Aluminium on the fan bits
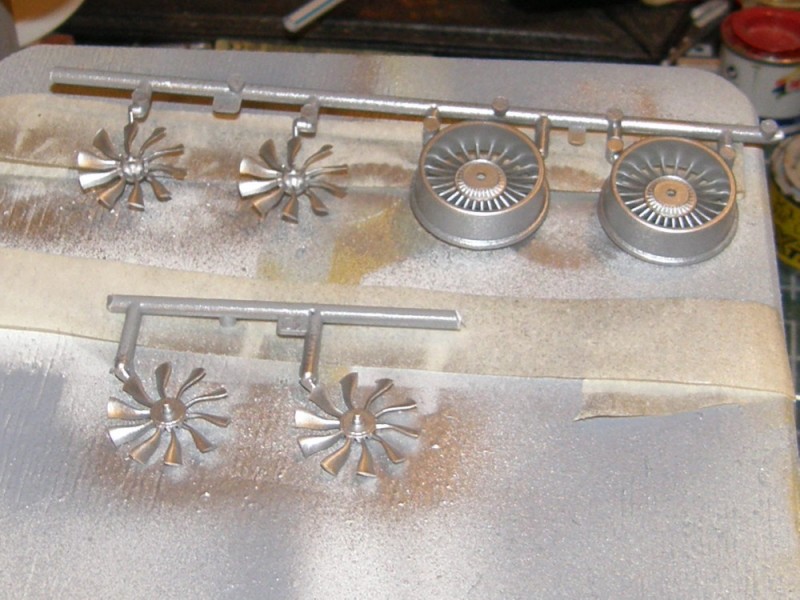
While the hot section gets Polished Steel
That lot can sit aside and dry while the primer dries on the Constellation
When once you have tasted flight you will walk the Earth with your eyes turned skyward.
For there you have been, and there you will always long to return.
-Leonardo Da Vinci
British Columbia, Canada
Joined: September 03, 2009
KitMaker: 6,965 posts
AeroScale: 6,247 posts
Posted: Friday, January 03, 2014 - 03:28 PM UTC
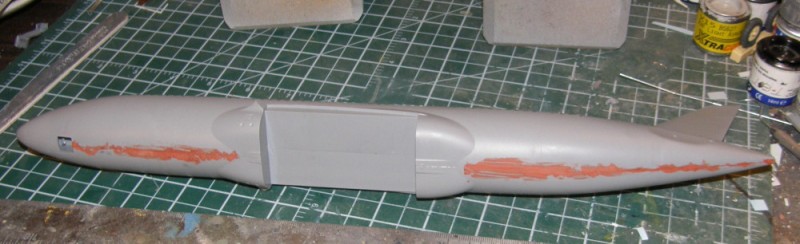
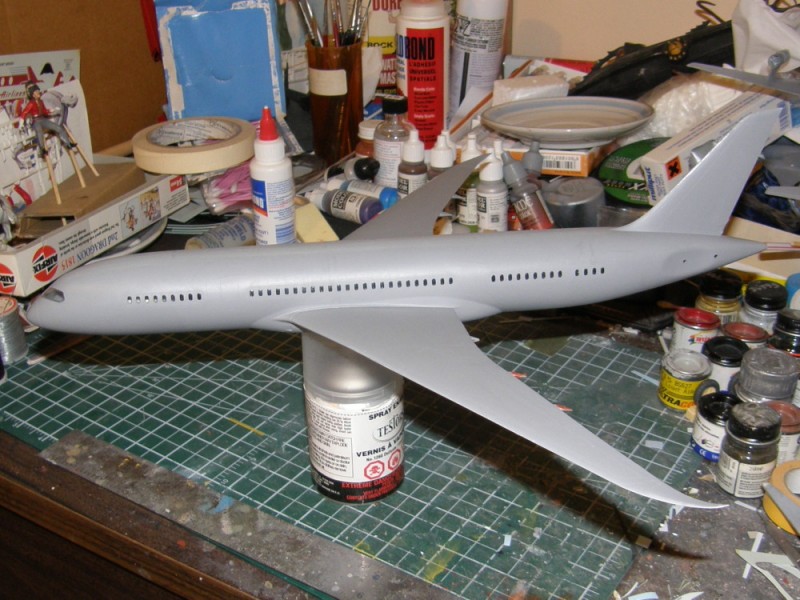
Boeing paints the 787 in mostly overall white rather than their usual grey. Thus I'll use white as a primer
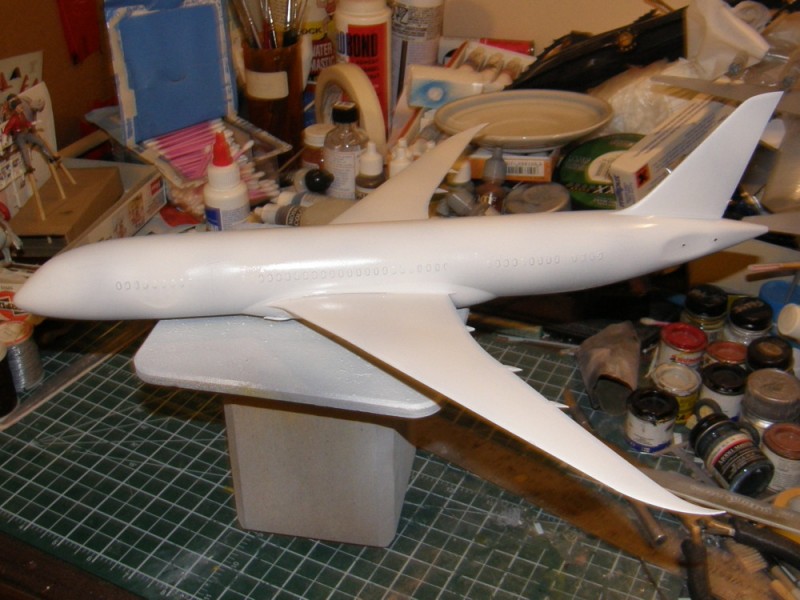
Oh dear, the camera reveals a nasty paint sag below the forward windows. Must remember to sand that out once it's dry.
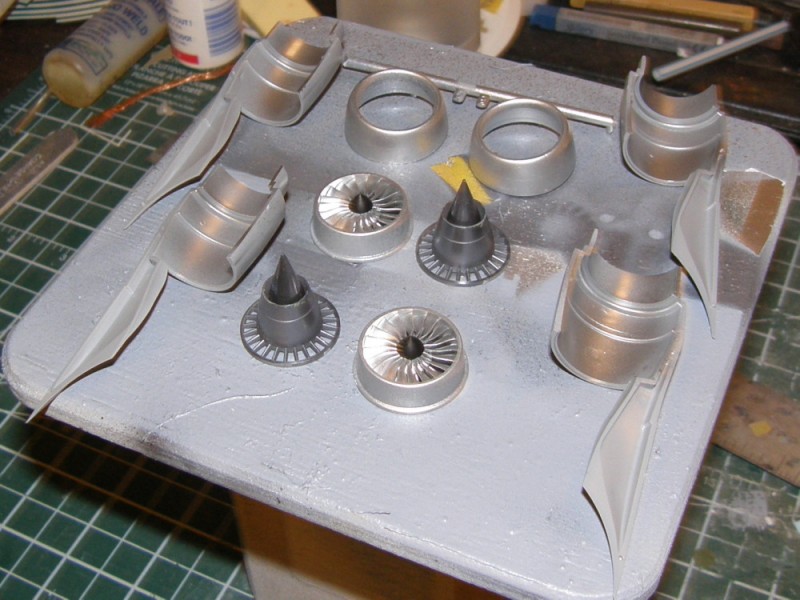
The engines are lovely little assemblies. What I thought would be a two layer fan turned out to interlock into a one layer fan which would have been impossible to mould cleanly because the blades are so close together. Zvezda's engineering here is very clever
I painted the insides of the cowlings with Alclad Duraluminium on the bare plastic, hoping to achieve a light metallic colour
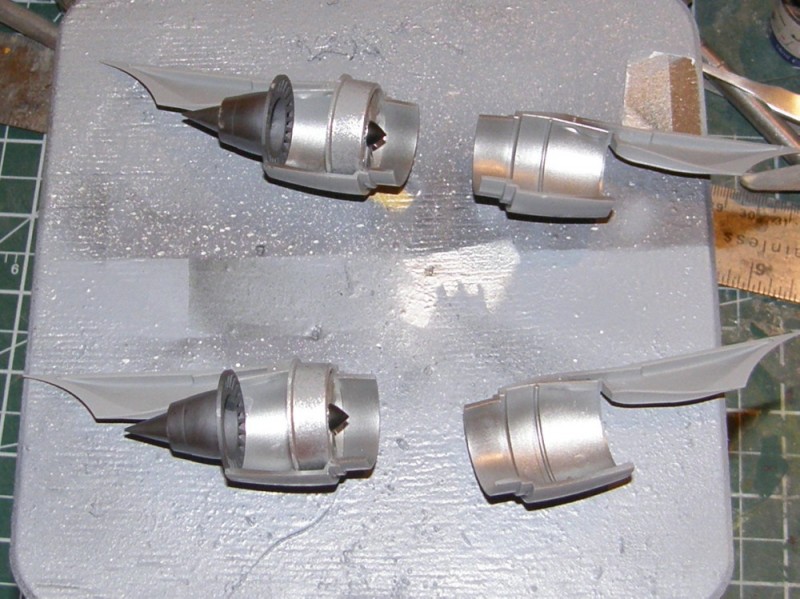
The engine assembly is very positive with no fit problems
As I had hoped, there's a subtle tone difference between the fan cowl and the intake
Engines assembled and awaiting their intake rings
When once you have tasted flight you will walk the Earth with your eyes turned skyward.
For there you have been, and there you will always long to return.
-Leonardo Da Vinci
British Columbia, Canada
Joined: September 03, 2009
KitMaker: 6,965 posts
AeroScale: 6,247 posts
Posted: Friday, January 03, 2014 - 08:04 PM UTC
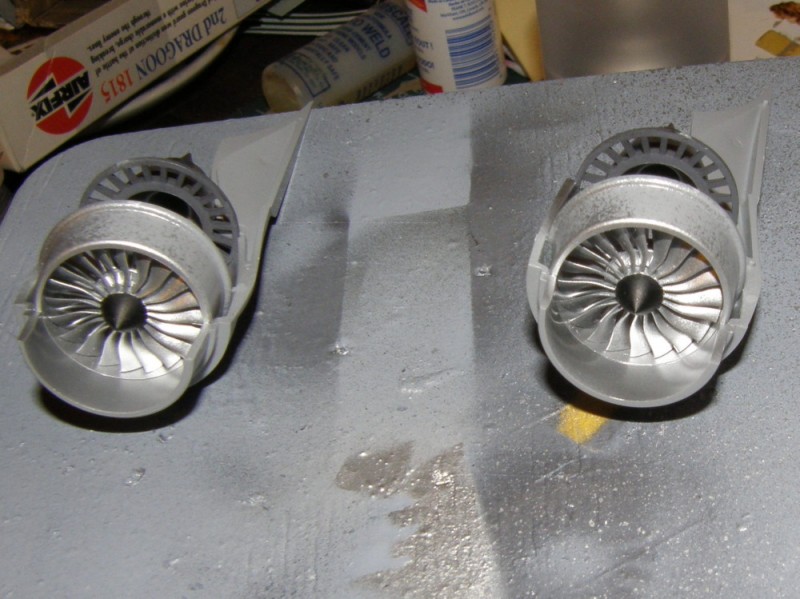
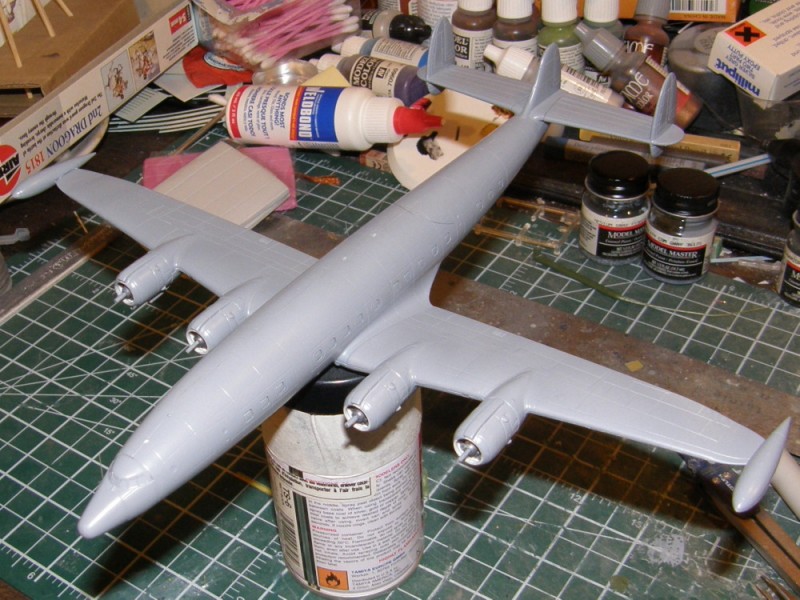
The engines and tailplanes are a friction fit
It looks like an airplane now.
When once you have tasted flight you will walk the Earth with your eyes turned skyward.
For there you have been, and there you will always long to return.
-Leonardo Da Vinci
British Columbia, Canada
Joined: September 03, 2009
KitMaker: 6,965 posts
AeroScale: 6,247 posts
Posted: Sunday, January 05, 2014 - 04:39 PM UTC
The Constellation is mostly assembled, apart from the tiny bits which are so easy to knock off
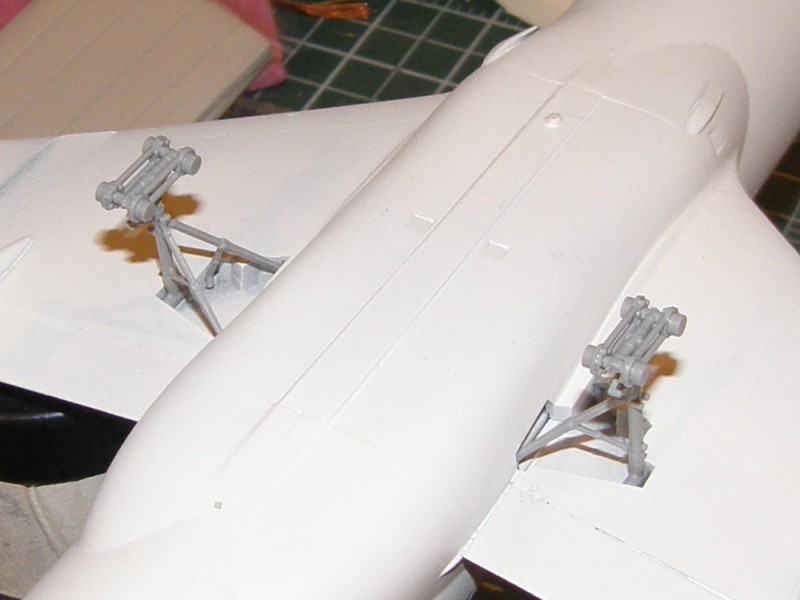
And the 787's main gear is assembled and drying. The fit is tight enough that I didn't need to glue the struts into the well, which will make painting so much easier when I can take them out after the glue dries.
When once you have tasted flight you will walk the Earth with your eyes turned skyward.
For there you have been, and there you will always long to return.
-Leonardo Da Vinci