_GOTOBOTTOM
Pre-Flight Check
Constructive critique of your finished or in-progress photos.
Finished! Tamiya P-51D 'Petie 2nd'
PeeJay74
#363
_VISITCOMMUNITY
Pennsylvania, United States
Joined: January 08, 2014
KitMaker: 425 posts
AeroScale: 401 posts
Posted: Friday, January 10, 2014 - 04:01 PM UTC
Now let's see if I can figure out how to link to my album...


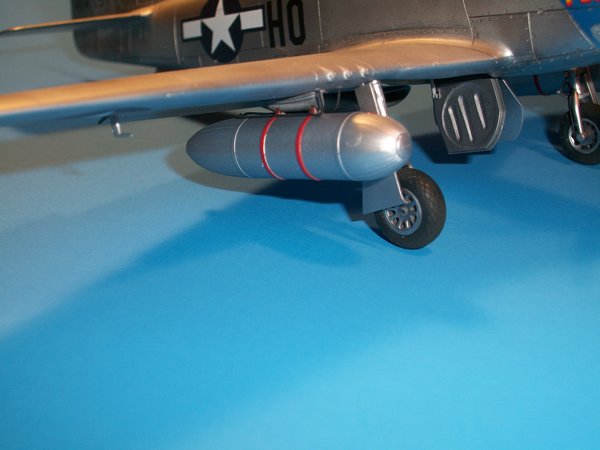
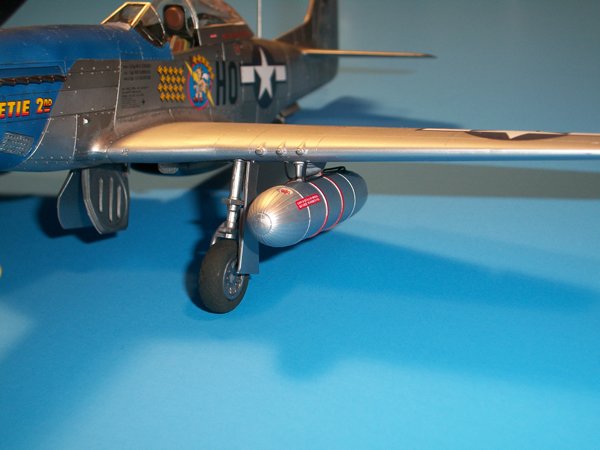
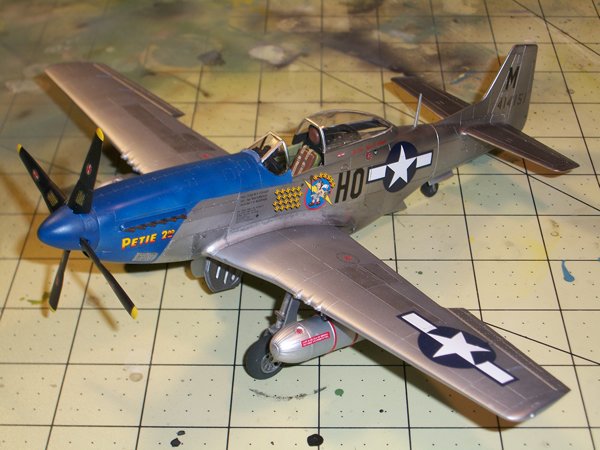
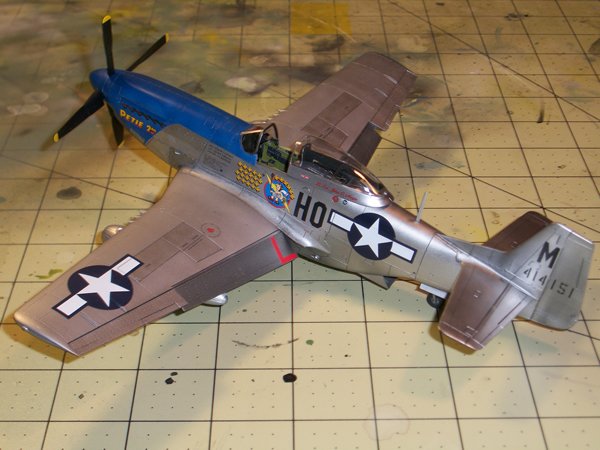
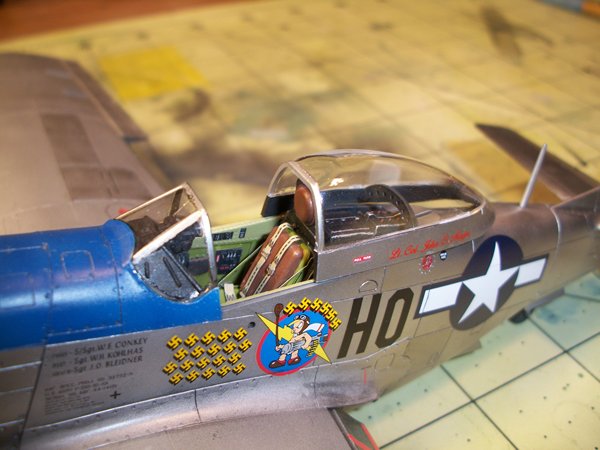
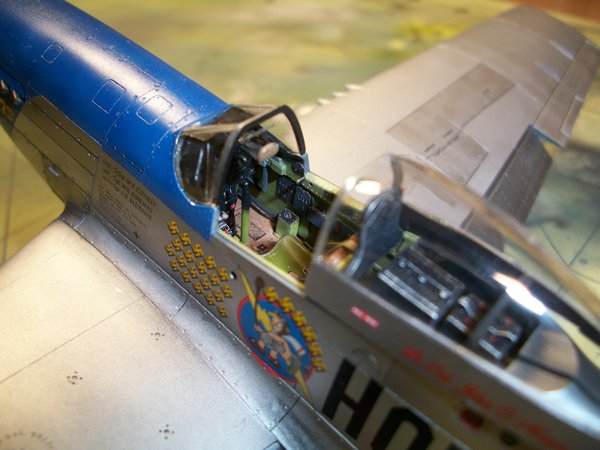
Tamiya's 1/48 P-51D; I added an Eduard Color Zoom, EagleCal decals, plumbed the tanks (stolen from a P-51B) and added brake lines using 26 gauge jeweler's wire. The canopy brace was thinned down and then drilled with a pin vice using Eduard's PE brace from the P-51D Detail Set as a template (I can use it again this way instead of buying set). I painted it with Alclad II and Tamiya acrylics, panels lines were done mixing black and aluminum enamels, then everything was sealed with Micro Satin and Micro Flat. Tamiya's kit is so easy to work with, it practically falls together by itself. I made some mistakes but I think it came out looking good in the end. Not too bad?

suntze
_VISITCOMMUNITY
California, United States
Joined: April 03, 2010
KitMaker: 59 posts
AeroScale: 9 posts
Posted: Friday, January 10, 2014 - 04:20 PM UTC
Very Nice Indeed !
AussieReg
Staff MemberAssociate Editor
AUTOMODELER
#007
_VISITCOMMUNITY
Victoria, Australia
Joined: June 09, 2009
KitMaker: 8,156 posts
AeroScale: 3,756 posts
Posted: Friday, January 10, 2014 - 05:50 PM UTC
Very nice work Paul. I like the panel shade variations.

Cheers, D
Holdfast
Staff MemberPresident
IPMS-UK KITMAKER BRANCH
#056
_VISITCOMMUNITY
England - South West, United Kingdom
Joined: September 30, 2002
KitMaker: 8,581 posts
AeroScale: 4,913 posts
Posted: Friday, January 10, 2014 - 06:59 PM UTC
Looks very nice
If you go into edit and take a look at the lines of code within the image tags there will probably be the word "thumbs", see below ( I have altered this by removing a bracket from each of the image tags so that the code and not the picture shows.

[img http://gallery3.kitmaker.net/data/26657/thumbs/05315.jpg [/img
This is what you get if you don't remove "thumbs", for thumbnail:


When you remove "thumbs" make sure that you also remove one of the /, only one and it doesn't matter from which side of the "thumbs" you remove it, If you just remove "thumbs" you would have this:
[img http: //gallery3.kitmaker.net/data/26657//05315.jpg[/img

note the double //

When the "thumbs" and / is removed you get this:


I'm not sure if you will be able to edit your post but if you can there will be an edit button in the right hand lower corner
PeeJay74
#363
_VISITCOMMUNITY
Pennsylvania, United States
Joined: January 08, 2014
KitMaker: 425 posts
AeroScale: 401 posts
Posted: Friday, January 10, 2014 - 11:34 PM UTC
Worked like a charm Mal, thanks!
Holdfast
Staff MemberPresident
IPMS-UK KITMAKER BRANCH
#056
_VISITCOMMUNITY
England - South West, United Kingdom
Joined: September 30, 2002
KitMaker: 8,581 posts
AeroScale: 4,913 posts
Posted: Saturday, January 11, 2014 - 07:37 PM UTC
There ya go we can now see exactly how good it is. This is one of the schemes that I love for the P-51
Joel_W
Staff MemberAssociate Editor
AUTOMODELER
_VISITCOMMUNITY
New York, United States
Joined: December 04, 2010
KitMaker: 11,666 posts
AeroScale: 7,410 posts
Posted: Sunday, January 12, 2014 - 03:24 AM UTC
Paul, a most impressive P51-D build. Your NMF came out superb. You varied just enough panels to make it interesting, yet not over whelming. Decaling is just near on perfect. You said that you plumbed the tanks, could you please include a few pictures for us to see your work.

I keep on reading from various builds and reviews of this release, that Tamiya's 2 pc canopy is the only issue with the kit. Namely that the clear glass is slightly oversized for the separate frame, making sanding it down after gluing it to the frame a necessary procedure. Yet your frame & glass looks spot on. Since your glass looks crystal clear, did you have to do this, or has Tamiya fixed this issue?

You seem to be specializing in the P51 family. Are you planning on doing as many versions as possible?

Joel
PeeJay74
#363
_VISITCOMMUNITY
Pennsylvania, United States
Joined: January 08, 2014
KitMaker: 425 posts
AeroScale: 401 posts
Posted: Sunday, January 12, 2014 - 12:32 PM UTC
Thanks for the feedback Joel. The decals did come out really nice. Two coats of Future before I applied them, and then a third to seal them. This was the first time I used EagleCals and I was really impressed with their stuff, if it is a bit pricey ($15). There are no traces of the decal film though, so I got my money's worth.

The Tamiya canopy is not as bad as people have made it out to be IMO. The big complaint seems to be that the clear half has a sprue gate and an overflow plug that have to be removed before you can glue it to the frame. I dipped the entire sprue in Future and let it cure for a week while I worked on the kit. Once I needed it, I avoided stress fractures by removing it from the sprue with a new #11 blade, slowly cutting the sprue gate instead of using cutters or just sawing through it. Then I just trimmed down the gate stub and the plug a sliver at a time until they were almost gone. I smoothed the edge with a set of flex-i-files (Medium, then Fine, then X-Fine)...


Great investment, I love these things.

...until it was totally flush. I attached it to the frame with a really thin layer of Testor's Clear Parts Cement applied with a small brush, making sure I didn't let the glue bead up. You can still see the locating pin on the very back, but you have to look straight down at it to see it. I imagine you could sand that flush and fill the hole on the frame with CA if you really wanted to. Either way, it took me about 5min to assemble it as is. I had already thinned the canopy brace and drilled it, which did take some time to do as I didn't want to mess the frame up.

To plumb the tanks, I drilled two holes into the back of the tanks where the attachments are molded as caps, CA'd black 26 gauge wire into them that I had bent into the approximate shapes of the lines in my reference, then drilled two attachment points at the front of the pylon and connected them. I am pretty sure I messed them up though, I was in a hurry and didn't get better pics. I think they should enter the wing one in front of the other close to the pylon, I put them side by side which I am pretty sure now is wrong. Here's a couple of better pics of them, pardon my weak camera...


Maybe not perfectly accurate but I really like what it adds to the finished kit, and I can always improve on the next one.
MichaelSatin
Staff MemberCampaigns Administrator
AEROSCALE
_VISITCOMMUNITY
Colorado, United States
Joined: January 19, 2008
KitMaker: 3,909 posts
AeroScale: 2,904 posts
Posted: Sunday, January 12, 2014 - 01:17 PM UTC
Very nice Paul, I thought for sure it was the 1/32 kit until you said it was 1/48.

Mal, maybe I don't understand, but I can't figure out how if Paul took some code out of the image link his P-51 would turn into a Spitfire...

Michael
Holdfast
Staff MemberPresident
IPMS-UK KITMAKER BRANCH
#056
_VISITCOMMUNITY
England - South West, United Kingdom
Joined: September 30, 2002
KitMaker: 8,581 posts
AeroScale: 4,913 posts
Posted: Sunday, January 12, 2014 - 08:22 PM UTC

Quoted Text

Mal, maybe I don't understand, but I can't figure out how if Paul took some code out of the image link his P-51 would turn into a Spitfire...

Michael


Yes Michael, it isn't easy and you have to know what you are doing and it isn't for the faint hearted but, in the end, it is all worth while because, as everyone knows, "you just can't have too many Spitfires"

Nice work on the canopy and drop tank plumbing Paul
Joel_W
Staff MemberAssociate Editor
AUTOMODELER
_VISITCOMMUNITY
New York, United States
Joined: December 04, 2010
KitMaker: 11,666 posts
AeroScale: 7,410 posts
Posted: Monday, January 13, 2014 - 02:19 AM UTC
Paul, Thanks for that very in-depth description of the Tamiya canopy. At least you verified that the fit issue isn't what I keep on reading about. The Hasegawa canopy is one piece, so the sprue attachment point is on the frame.

I remove large clear pcs from the sprue with cutters that I slowly rotate back and forth while applying as light as pressure as possible, but don't clip near the part. Once the part is removed, I then use a blade to score a line, followed by a micro saw. So far that method hasn't caused me to damage any parts. All my other methods over the years were less then satisfactory. If the part is completely accessible on the sprue so I can use the micro saw, then I skip the cutters.

Not sure if your plumbing is correct or not, but it sure looks darn good. Rarely does one see that added detail. Honestly, it's something that I never even thought of, but will certainly add to my next build as needed.

Joel
PeeJay74
#363
_VISITCOMMUNITY
Pennsylvania, United States
Joined: January 08, 2014
KitMaker: 425 posts
AeroScale: 401 posts
Posted: Monday, January 13, 2014 - 03:05 AM UTC
Oh, as far as specializing in Mustangs...

Since I started building again, I have built a few Mustangs over the last year:
Tamiya P-51D 'Tuskegee' boxing (which I utterly botched the paint job on)
Tamiya P-51B as 'Ding Hao' (where I learned all about decal silvering )
AM A-36 (shiny new factory paint job but I didn't mess it up!)
Tamiya P-51D 'Petie 2nd' (which might be my best effort yet, I put a lot of skills I gleaned from other modellers to use)

On my bench:
AM P-51 'Betty Jean' (I had to have a 20mm cannon version)

In the stash and planned:
Tamiya F-51D as P-51D 'The Enchantress' loaded for VLR Strike (Kagero Pacific Mustangs decal set. A P-51D with HVAR's, 165gal tanks, and great nose art will be very different IMO)
AM P-51A in 1st Air Commando garb (I need weathering skills first, it should look abused)

I didn't intend to do this many I swear, it's just a plane whose history I really enjoy. I have a thing for Lightnings too, but my only build (Academy as an F-5E) had fit problems and was difficult for my skills. I have the Eduard Pacific Lightning stashed, but I want to improve before I risk all that resin and PE getting wrecked.

Edit: Does anyone have a good method for drilling out barrels? I attempted to do it with pin vice on a Tamiya F4F-4 and ended up ruining them. I didn't touch them on this build for that reason.
Joel_W
Staff MemberAssociate Editor
AUTOMODELER
_VISITCOMMUNITY
New York, United States
Joined: December 04, 2010
KitMaker: 11,666 posts
AeroScale: 7,410 posts
Posted: Tuesday, February 04, 2014 - 06:13 AM UTC
Paul,
Drilling out gun barrels gets proportionally harder as the dia. of the barrel decreases. That explains my zillions of screw ups.

The only method that works for me is to tape the gun to a stick so that I can firmly hold it at a 90 degree angle where I can see the front of the barrel. If it's just a barrel, then you can put it in a chuck/vise deal. I use a medium size sewing needle in a pin vise and very gently poke a very shallow hole where I think the center of the barrel is. If I miss, a few light passes with a piece of #320 paper removes the indentation, and I try again. Once I get it, I make the hole deeper. Then I use a #70-72 drill and start to drill a pilot hole. If satisfied with the pilot hole, I go deeper, then I use a larger dia. drill bit and re-drill the hole. I work my way up till I've got as close to the barrel wall as I dare. Usually it takes 2 or 3 drill bit sizes to accomplish it.

The Trick is centering the pilot hole. Like I said, I always have to redue it once or twice.

Joel
AussieReg
Staff MemberAssociate Editor
AUTOMODELER
#007
_VISITCOMMUNITY
Victoria, Australia
Joined: June 09, 2009
KitMaker: 8,156 posts
AeroScale: 3,756 posts
Posted: Tuesday, February 04, 2014 - 07:54 AM UTC
You can save yourself a lot of grief and just remove the kit barrels and replace them with some fine brass tube, or hypodermic needles if you can source them.

Cheers, D
SuperSandaas
_VISITCOMMUNITY
Sør-Trøndelag, Norway
Joined: October 23, 2012
KitMaker: 189 posts
AeroScale: 142 posts
Posted: Saturday, February 15, 2014 - 10:31 AM UTC
Great looking cockpit, but is the harness singel-stich? I though they harnesses had a double stitching. (Then again I've only seen a P-51 cockpit up close on a restored warbird, where the safety-equipment undoubtably must have been upgraded over the years.)
JPTRR
Staff MemberManaging Editor
RAILROAD MODELING
#051
_VISITCOMMUNITY
Tennessee, United States
Joined: December 21, 2002
KitMaker: 7,772 posts
AeroScale: 3,175 posts
Posted: Saturday, February 15, 2014 - 12:57 PM UTC
Paul,

Expert work! I like the subtle weathering.
 _GOTOTOP