

World War II
Discuss WWII and the era directly before and after the war from 1935-1949.
Discuss WWII and the era directly before and after the war from 1935-1949.
Hosted by Rowan Baylis
HBM nacelles for FROG (UPC) Beaufort

Bessarion

Joined: January 12, 2014
KitMaker: 7 posts
AeroScale: 7 posts
Posted: Saturday, January 11, 2014 - 01:02 PM UTC
Please HELP! I have never seen nacelles cast that way. The engine pistons are cast 3/4 of the way back (is that correct? based on the photos, I'm not sure). Also, the back side (the one to be attached to the wing) is one solid piece after the engines and is shape in such a way, that if I attach it straight on, it will look worse than the original nacelles (conical as they are). What do i do? do I scoop up (with what???) the resin from the inside? Do I chuck it and try reshape the original nacelles with a putty? Did anybody else had this problem???

Jessie_C


Joined: September 03, 2009
KitMaker: 6,965 posts
AeroScale: 6,247 posts

Posted: Saturday, January 11, 2014 - 01:20 PM UTC
Hi Pitor,
Welcome to Aeroscale. I hope you enjoy your time here. Now getting to your problem, can you post a picture for us? I'm having a hard time visualising the situation from your description.
Welcome to Aeroscale. I hope you enjoy your time here. Now getting to your problem, can you post a picture for us? I'm having a hard time visualising the situation from your description.
Bessarion
Joined: January 12, 2014
KitMaker: 7 posts
AeroScale: 7 posts
Posted: Saturday, January 11, 2014 - 02:35 PM UTC
I'll do my best.I'm putting the wings together to better illustrate the problem, and then I'll post the pics. BTW, how do I do that on this site? 
Jessie_C
Joined: September 03, 2009
KitMaker: 6,965 posts
AeroScale: 6,247 posts
Posted: Saturday, January 11, 2014 - 02:53 PM UTC
Here's a copy of the instructions I just gave another new person yesterday. (I really ought to keep a copy of this handy since I give this answer so often)
You don't need to buy any special software to post pictures here. If you want to resize your pictures there are several different freeware programs you can get such as Ifranview, Gimp or Paint.net. As a member of Aeroscale you have a space in the image gallery (look at the black bar on the top of the page. The Gallery is found between "Events" and "Links" on the right hand side of the screen. Follow this tutorial to use it.)
The only problem with the gallery is because we have so many members it can't hold many pictures so many of us use another photo hosting site like Photobucket, Imageshack or Flickr to host our pictures.
Regardless where you host your pictures, the way to insert an image is pretty simple. Whenever you're writing a post, you'll see 7 little white buttons just below the area you type in. the far right-hand button says {img} (except that the brackets are square). Click that button whenever you want to insert a picture and you'll see this appear:
{img}http://put.url.here/image.file{/img}
(once again, the brackets will be square in real life)
Go to your image hosting site, select your picture, and copy its URL. The fastest way to do that is to hover your mouse pointer over the picture, click the right mouse button and select "copy image location" from the little menu which pops up.
Come back to Aeroscale, and replace the text which says "http://put.url.here/image.file" with the URL that you just copied. I like to use browser tabs which let me easily switch between Aeroscale and my hosting site as many times as I like. This is useful for inserting multiple pictures in one post.
Enjoy your stay in Aeroscale. If you have any questions at all, all of us will be happy to answer them. Happy building!
Bessarion
Joined: January 12, 2014
KitMaker: 7 posts
AeroScale: 7 posts
Posted: Saturday, January 11, 2014 - 06:21 PM UTC
OK, I posted the photo under the members galleries/Bessarion. Please let me know if that works.
Jessie_C
Joined: September 03, 2009
KitMaker: 6,965 posts
AeroScale: 6,247 posts
Posted: Saturday, January 11, 2014 - 06:39 PM UTC
That would be this picture?
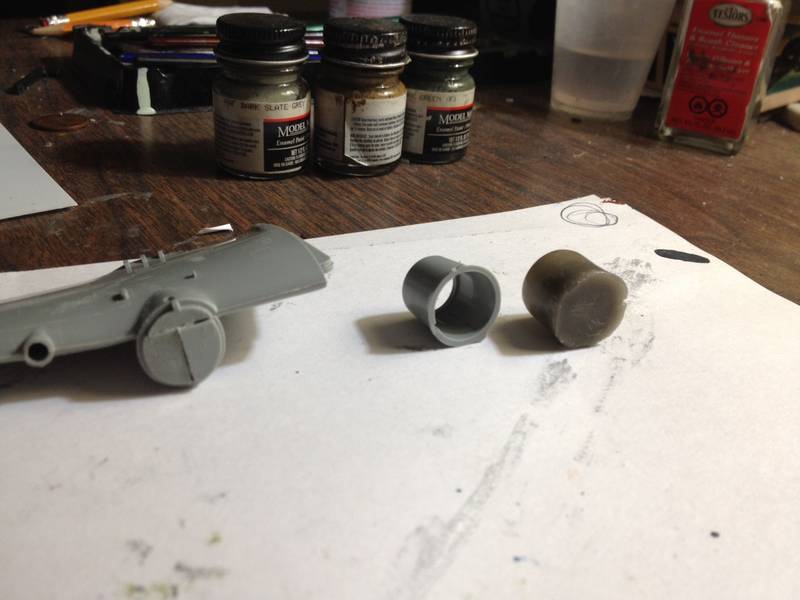
Okay, I see part of your problem. The rear of the nacelle is filled in flush while the wing has a plastic mounting for the plastic cowling moulded onto it. You could file/saw off that mounting and test fit until the nacelle looks right. Or if you have a Dremel tool you could carefully rout out the rear of the resin nacelle until the mounting fits in. You may need to do a bit of both.
Before you remove the mounting, test fit the kit cowling and see how it looks. You want your replacement cowling attached so that it's at the same orientation to keep the exhaust pipes pointing the way they should.
Bessarion
Joined: January 12, 2014
KitMaker: 7 posts
AeroScale: 7 posts
Posted: Sunday, January 12, 2014 - 02:26 AM UTC
Unfortunately, I do not have a dremel tool. I may have to use normal power drill. Removing the mounting is not a problem, but if I do that without hollowing out the base of the nacelle, the seam will look very bad - like a piece of wood tacked on to the wing. I'm really flabbergasted. I'm actually considering cutting the resin nacelle above the filled in part and fitting it into the base of the kit's nacelle and then using the kit's engine. . I'll lose any detail of the nacelle cooling flaps, but the whole thing will fit better. 
Bessarion
Joined: January 12, 2014
KitMaker: 7 posts
AeroScale: 7 posts
Posted: Sunday, January 12, 2014 - 02:30 AM UTC
The whole thing (if I just file and cut) would look like this
http://i768.photobucket.com/albums/xx323/Learstang/PortWing2.jpg
http://i768.photobucket.com/albums/xx323/Learstang/PortWing2.jpg
Jessie_C
Joined: September 03, 2009
KitMaker: 6,965 posts
AeroScale: 6,247 posts
Posted: Sunday, January 12, 2014 - 05:07 AM UTC
Maybe it would be easier this time to bulk up the kit cowlings with epoxy putty.
Bessarion
Joined: January 12, 2014
KitMaker: 7 posts
AeroScale: 7 posts
Posted: Monday, January 13, 2014 - 02:58 PM UTC
Success!!  I drilled out propeller shaft hole and used it as a guide. Then, I hollowed out the solid base using a conical grinder attachment. After that, the nacelles look great! I'll post pics in my gallery! Thanks for your help.
I drilled out propeller shaft hole and used it as a guide. Then, I hollowed out the solid base using a conical grinder attachment. After that, the nacelles look great! I'll post pics in my gallery! Thanks for your help. Jessie_C
Joined: September 03, 2009
KitMaker: 6,965 posts
AeroScale: 6,247 posts
Posted: Monday, January 13, 2014 - 03:17 PM UTC
And now you have an extra trick up your sleeve 
Bessarion
Joined: January 12, 2014
KitMaker: 7 posts
AeroScale: 7 posts
Posted: Monday, January 13, 2014 - 04:16 PM UTC
LOL. Thanks for holding my hand. 
 |

WEB HOSTING BY


Copyright ©2021 AeroScale and Kitmaker Network, a subsidiary of Silver Star Enterprises
All Rights Reserved. Please read our Conditions of Use and Privacy Policy.
All Rights Reserved. Please read our Conditions of Use and Privacy Policy.