

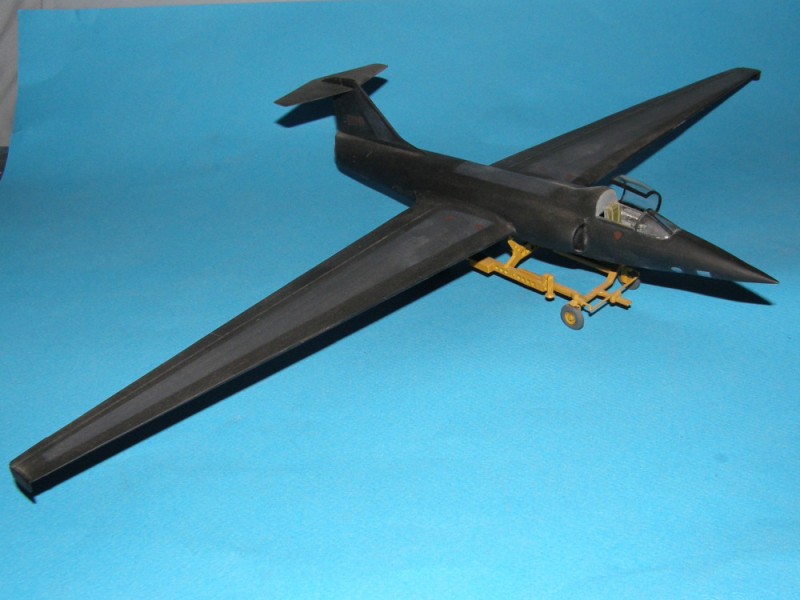
My second completed model (also got a Tu-22m but it isn't finished yet). Anyway, completed this today and it seems to have turned out well.
It's a Tamiya 1/72 scale model. Was fairly simple to build and quite a detailed cockpit. This was my first attempt at doing minute cockpit detail like buttons, seat belts etc.
The photos have showed up a bit of a mistake where the glue is visible on plastic neat the front (but isn't visible to the naked eye, the flash bought it to detail) so I'm going to look at ways online on how to remove the excess glue.
But other than that, it's completed. I think it's turned out better than the Jaguar. The tips I've read on here (sanding the edges before gluing, cleaning the plastic before applying paint etc) were a big help so thanks to everyone for their advice.
Anyway, here are the pics.
Top view
http://postimg.org/image/s6s1groin/
Front view (where you can see the glue mishap)
http://postimg.org/image/mf4a56rjx/
Cockpit view
http://postimg.org/image/gjzt11zhd/
Pre-Flight Check
Constructive critique of your finished or in-progress photos.
Constructive critique of your finished or in-progress photos.
Hosted by Jim Starkweather
Second model! Tamiya F-117 "Nighthawk"

Toad-In-The-Hole

Joined: February 23, 2014
KitMaker: 44 posts
AeroScale: 38 posts
Posted: Thursday, February 27, 2014 - 11:10 PM UTC
Joel_W

Joined: December 04, 2010
KitMaker: 11,666 posts
AeroScale: 7,410 posts
Posted: Friday, February 28, 2014 - 06:50 AM UTC
Congratulations on completing your 2nd model. A few general suggestions will help members to view your pictures.
Rather then links to each picture that one has to click on, then exit, and repeat, why not use the photo posting procedure we have here by just pasting the Image location. It also makes for a better overall presentation of your work.
You'll find that photographing your finished models with a plain white or blue background enhances the model, and makes is that much easier for the viewer to focus on it, rather then competing with a cluttered background.
From your pictures, one technique you should try is to paint the canopy frame. A painted frame is a great step in achieving a realistic looking model, and helps the canopy blend into the overall air frame.
Joel

Toad-In-The-Hole
Joined: February 23, 2014
KitMaker: 44 posts
AeroScale: 38 posts
Posted: Friday, February 28, 2014 - 04:55 PM UTC
Quoted Text
Congratulations on completing your 2nd model. A few general suggestions will help members to view your pictures.
Rather then links to each picture that one has to click on, then exit, and repeat, why not use the photo posting procedure we have here by just pasting the Image location. It also makes for a better overall presentation of your work.
You'll find that photographing your finished models with a plain white or blue background enhances the model, and makes is that much easier for the viewer to focus on it, rather then competing with a cluttered background.
From your pictures, one technique you should try is to paint the canopy frame. A painted frame is a great step in achieving a realistic looking model, and helps the canopy blend into the overall air frame.
Joel
I feel silly... completely didn't notice until now that there's a image hosting button


I'll take the photos of the next model on my work area which is a plain white area then rather than the cabinet where I'm keeping my models.
I never thought to paint the canopy frame but looking at photos of the Nighthawk the canopy frame is black. I'll give it a coat of paint later today, hope it goes well since that sounds like something very easy to mess up
Thanks for the help!


Jessie_C


Joined: September 03, 2009
KitMaker: 6,965 posts
AeroScale: 6,247 posts

Posted: Friday, February 28, 2014 - 07:52 PM UTC
I'll do the honours for your first 3


Here's my boilerplate image posting tutorial:
You don't need to buy any special software to post pictures here. If you want to resize your pictures there are several different freeware programs you can get such as Ifranview, Gimp or Paint.net. As a member of Aeroscale you have a space in the image gallery (look at the black bar on the top of the page. The Gallery is found between "Events" and "Links" on the right hand side of the screen. Follow this tutorial to use it.)
The only problem with the gallery is because we have so many members it can't hold many pictures so many of us use another photo hosting site like Photobucket, Imageshack or Flickr to host our pictures.
Regardless where you host your pictures, the way to insert an image is pretty simple. Whenever you're writing a post, you'll see 7 little white buttons just below the area you type in. The far right-hand button says {img} (except that the brackets are square). Click that button whenever you want to insert a picture and you'll see this appear:
{img}http://put.url.here/image.file{/img}
(once again, the brackets will be square in real life)
Go to your image hosting site, select your picture, and copy its URL. The fastest way to do that is to hover your mouse pointer over the picture, click the right mouse button and select "copy image location" from the little menu which pops up.
Come back to Aeroscale, and replace the text which says "http://put.url.here/image.file" with the URL that you just copied. I like to use browser tabs which let me easily switch between Aeroscale and my hosting site as many times as I like. This is useful for inserting multiple pictures in one post.
Now on to the model. I'm guessing that you left it unpainted, which is why you have a visible glue blemish. This is easily cured by painting
For the F-117, it's simplicity enough to spray it overall flat black using a spray can. Flat black looks a little too uniform and it really ought to be different shades of very dark grey rather than black. Since mixing and airbrushing paints is a rather advanced technique to aspire to, here's a simpler way you can get shading on black: Use chalk dust. Get some plain white blackboard chalk and grind a little bit on a piece of sandpaper. Now dip a Q-tip or dry paintbrush into the chalk dust and rub it into selected panels. You can even mask around the panel outlines with masking tape to keep the edges straight if you wish. The more chalk dust you rub into the paint, the lighter the panel will end up. Once you're done, brush off the excess dust and remove the masking. Spray on clear flat to seal the dust to the model's surface. If you don't do that, your fingers will remove it unevenly each time you handle the model. I used this technique for my Lockheed CL-282 "paper airplane" model:
Toad-In-The-Hole
Joined: February 23, 2014
KitMaker: 44 posts
AeroScale: 38 posts
Posted: Friday, March 07, 2014 - 05:26 PM UTC
Thanks,
I tried using the {img} thing with the Nighthawk but the only picture that showed up was a tiny white box with a cross in it? Maybe I'll a different image hoster next time
Yup, I left it unpainted since it was black. Love the chalk dust tip, definitely going to give that a try once I get some. See how it turns out
Would never occurred to me at all that grounded up chalk dust could be used to lighten black penels
Thanks for your help!
Jessie_C
Joined: September 03, 2009
KitMaker: 6,965 posts
AeroScale: 6,247 posts
Posted: Friday, March 07, 2014 - 06:58 PM UTC
The little white box usually means that the link is broken somehow. Perhaps you used the page URL instead of the actual picture's URL? For example, http://postimg.org/image/s6s1groin/ takes you to the page the picture is hosted on, but the actual picture lives at http://s27.postimg.org/55bgb0ov7/DSCN2599.jpg
If you used http://postimg.org/image/s6s1groin/ in the IMG tags you'd get the little box, like this:

If you used http://postimg.org/image/s6s1groin/ in the IMG tags you'd get the little box, like this:
Toad-In-The-Hole
Joined: February 23, 2014
KitMaker: 44 posts
AeroScale: 38 posts
Posted: Monday, March 10, 2014 - 04:24 AM UTC
Quoted Text
The little white box usually means that the link is broken somehow. Perhaps you used the page URL instead of the actual picture's URL? For example, http://postimg.org/image/s6s1groin/ takes you to the page the picture is hosted on, but the actual picture lives at http://s27.postimg.org/55bgb0ov7/DSCN2599.jpg
If you used http://postimg.org/image/s6s1groin/ in the IMG tags you'd get the little box, like this:
Ah! I think that is what I did. No wonder it messed up

lodni_k
Joined: October 09, 2004
KitMaker: 65 posts
AeroScale: 45 posts
Posted: Friday, April 18, 2014 - 07:10 PM UTC
Congratulations and nice job, Jack! 
 |

WEB HOSTING BY


Copyright ©2021 AeroScale and Kitmaker Network, a subsidiary of Silver Star Enterprises
All Rights Reserved. Please read our Conditions of Use and Privacy Policy.
All Rights Reserved. Please read our Conditions of Use and Privacy Policy.