_GOTOBOTTOM
Modern (1975-today)
Discuss the modern aircraft age from 1975 thru today.
1/32 Revell Red Arrow
SiStorey
_VISITCOMMUNITY
England - North East, United Kingdom
Joined: March 14, 2014
KitMaker: 242 posts
AeroScale: 65 posts
Posted: Friday, March 14, 2014 - 02:13 AM UTC
Hi all, well after completing my Dorchester command vehicle I decided to have a shot at making an aircraft. So I have decided to crack on with a Red Arrow. As with the Dorchester I didn't take many photos because I didn't think it would work but hey, this is what I got so far. Hope you enjoy

So this is the cockpit, the decals that came with it where pretty bad as they where far to big to fit in on the instrument panel so I just tried my best at painting them on, not totally happy but it'll have to do.


This one is off the cockpit fitted into the aircraft shell. Revell have actually done good here as there was no tinkering required, just place in and glue.


Now one thing I would like is to have the pilot for it but I cant seem to find one around. if anyone has any idea where I can find one please share the love.

As with the Dorchester I'm open for ideas on how to make the cockpit look even better.

Cheers Si
Joel_W
Staff MemberAssociate Editor
AUTOMODELER
_VISITCOMMUNITY
New York, United States
Joined: December 04, 2010
KitMaker: 11,666 posts
AeroScale: 7,410 posts
Posted: Friday, March 14, 2014 - 04:31 AM UTC
Si,
From what I can see of your IPs, the look pretty good. As for a pilot figure, sorry but I can't help as I never add them to my aircraft models. Just not skilled enough at painting figures.
Joel
SiStorey
_VISITCOMMUNITY
England - North East, United Kingdom
Joined: March 14, 2014
KitMaker: 242 posts
AeroScale: 65 posts
Posted: Friday, March 14, 2014 - 05:46 AM UTC
Thank you Joel_W, yeah I'm starting to get back to painting figures again like and was just thinking a pilot in the famous red flying suit would have looked nice in it. Don't suppose you would know where to get hold of some harnesses for the seats as they came with decals that looked pretty poor.
Jessie_C
_VISITCOMMUNITY
British Columbia, Canada
Joined: September 03, 2009
KitMaker: 6,965 posts
AeroScale: 6,247 posts
Posted: Friday, March 14, 2014 - 06:27 AM UTC
The Eduard seat belt set is exactly what you're looking for. And if you haven't got too far along with the cockpit, perhaps the interior details set of two frets might interest you?
SiStorey
_VISITCOMMUNITY
England - North East, United Kingdom
Joined: March 14, 2014
KitMaker: 242 posts
AeroScale: 65 posts
Posted: Friday, March 14, 2014 - 06:52 AM UTC
That is absolutely perfect for what I'm after, that is going to complete the cockpit off nicely. Thanks!!!!
RedwingNev
_VISITCOMMUNITY
England - East Midlands, United Kingdom
Joined: February 07, 2004
KitMaker: 911 posts
AeroScale: 415 posts
Posted: Friday, March 14, 2014 - 09:57 PM UTC
I have this kit - great kit at an unbelievable price. What markings are you planning on doing it in?
SiStorey
_VISITCOMMUNITY
England - North East, United Kingdom
Joined: March 14, 2014
KitMaker: 242 posts
AeroScale: 65 posts
Posted: Tuesday, March 18, 2014 - 07:49 AM UTC
Yeah I know, it's one of the reasons I got it Redwingnev. I went for XX322. However where I'm based I don't have Wi-Fi so I can't upload photos as my phone doesn't play fair. But I'll have some more pics up this Friday evening if I get home
SiStorey
_VISITCOMMUNITY
England - North East, United Kingdom
Joined: March 14, 2014
KitMaker: 242 posts
AeroScale: 65 posts
Posted: Friday, March 21, 2014 - 06:18 AM UTC
Right, so I've made it home and have some WiFi so this is the progress so far.

I've added those harnesses on the seats that you suggested Jessie_C. They were exactly what I was after so cheers


Im absolutely loving the seat now, few little touch up on the paint where the glue messed it up but that shouldn't take me to long.

And here's the seat stuck in the plane.


Here's the cockpit all painted and assembled.


For the first time that I've tried it im really happy with the pre shading on the wing, hope the image shows it off.


And finally this is where I am at the now. Just got to finish making the undercarage and wheels, with a few little bits to add on here and there then it'll be on to filling all the panel lines with a dark colour to make them stand out.


Now as I'm talking about doing the panel lines, can anyone suggest the best way to do it so I don't mess it up.

Cheers
Jessie_C
_VISITCOMMUNITY
British Columbia, Canada
Joined: September 03, 2009
KitMaker: 6,965 posts
AeroScale: 6,247 posts
Posted: Friday, March 21, 2014 - 06:52 AM UTC
You don't want anything too dark because it'll look stark and unrealistic. Look at photos of the real thing to see the effect you're trying to duplicate.

A pin wash of Paynes Grey oil paint would probably work. You want to put a barrier coat of acryllic between your paint and the wash to prevent the thinner from attacking it. Using an extremely fine brush, run the wash into the panel lines, let it dry for 30 minutes or so, then gently wipe the excess off with a Q-tip or soft cloth.
SiStorey
_VISITCOMMUNITY
England - North East, United Kingdom
Joined: March 14, 2014
KitMaker: 242 posts
AeroScale: 65 posts
Posted: Friday, March 21, 2014 - 09:10 AM UTC
Yeah I'm going to give it a total new layer of acrylic gloss on it to get it as shiny as possible like the aircraft itself. But I'll do me homework and hopefully I'll do it justice.
RedwingNev
_VISITCOMMUNITY
England - East Midlands, United Kingdom
Joined: February 07, 2004
KitMaker: 911 posts
AeroScale: 415 posts
Posted: Friday, March 21, 2014 - 09:01 PM UTC
Seats look great. As for the panel lines, I'd leave them. The Reds keep their aircraft spotlessly clean. Any weathering would look u realistic.
SiStorey
_VISITCOMMUNITY
England - North East, United Kingdom
Joined: March 14, 2014
KitMaker: 242 posts
AeroScale: 65 posts
Posted: Friday, March 21, 2014 - 09:48 PM UTC
Well I've been looking at some images of the hawks and I'm thinking in going to try the red I've used on the plane with a touch of black so it's stands out but not to much, and a slight of white on the stripes but nothing to bold, just enough to be able to pick them up when you close
SiStorey
_VISITCOMMUNITY
England - North East, United Kingdom
Joined: March 14, 2014
KitMaker: 242 posts
AeroScale: 65 posts
Posted: Thursday, April 10, 2014 - 11:21 PM UTC
Well I've eventually finished the Revell Red Arrow. Decided to just leave the panel lines as they where as i wasnt happy when i did some tester lines.

So with all the harnesses added and the seats fitted back in and painted the cockpit is finally complete.


Having issues with the last couple of photos, trying to reduce the size of them as they are to big to upload.

SiStorey
_VISITCOMMUNITY
England - North East, United Kingdom
Joined: March 14, 2014
KitMaker: 242 posts
AeroScale: 65 posts
Posted: Thursday, April 10, 2014 - 11:29 PM UTC
And here is the Red Arrow complete


wampablo
_VISITCOMMUNITY
United Kingdom
Joined: January 20, 2012
KitMaker: 31 posts
AeroScale: 22 posts
Posted: Friday, April 11, 2014 - 08:14 AM UTC
im liking that. i like the way the preshade gives it that used look.
SiStorey
_VISITCOMMUNITY
England - North East, United Kingdom
Joined: March 14, 2014
KitMaker: 242 posts
AeroScale: 65 posts
Posted: Friday, April 11, 2014 - 08:34 AM UTC
I know, amazing what a little black primer can do.
Cheers Paul though
Joel_W
Staff MemberAssociate Editor
AUTOMODELER
_VISITCOMMUNITY
New York, United States
Joined: December 04, 2010
KitMaker: 11,666 posts
AeroScale: 7,410 posts
Posted: Monday, April 14, 2014 - 07:55 AM UTC
Si,
An excellent build. Very nicely done. Those Eduard PE seatbelts look great.

I've been experimenting with panel pin washes as I'm not very happy with how many of my aircraft looks with either black or dark gray. Those colors are fine for flying surfaces, but I'm finding that using the base color and adding some black just gives those panel lines a nice shadow effect. You had the right idea of adding a touch of black to the red.

Joel
SiStorey
_VISITCOMMUNITY
England - North East, United Kingdom
Joined: March 14, 2014
KitMaker: 242 posts
AeroScale: 65 posts
Posted: Monday, April 14, 2014 - 10:42 AM UTC
I tried different variations but just couldn't find the right tone, maybe in the future I might go back to it and try again. But for the time being it's now in my glass cabinet for all to see.

However your black red mix, what measures did you use, more black to red or red to black??
Joel_W
Staff MemberAssociate Editor
AUTOMODELER
_VISITCOMMUNITY
New York, United States
Joined: December 04, 2010
KitMaker: 11,666 posts
AeroScale: 7,410 posts
Posted: Monday, April 14, 2014 - 01:27 PM UTC

Quoted Text

I tried different variations but just couldn't find the right tone, maybe in the future I might go back to it and try again. But for the time being it's now in my glass cabinet for all to see.

However your black red mix, what measures did you use, more black to red or red to black??


Si,
Sorry if I miss led you, but I didn't make a Red panel line mix. Basically I've been trying out the various base colors for WW11 US Naval aircraft with a few drops of Black, then thinned as I always do to the consistency of tea. What I'm looking for is a shade or two darker. For the separation of flying surfaces I still use black.

I originally got this idea when I was trying to come up with a easy technique for fading the upper surfaces of naval aircraft. I would use the base color then add several drops of white to lighten it, then airbrush the center of the panels. Some panels that weren't in the direct sunlight I did the opposite by adding a few drops of black or a much darker shade of the base color and airbrushed around the panel lines.
Joel
SiStorey
_VISITCOMMUNITY
England - North East, United Kingdom
Joined: March 14, 2014
KitMaker: 242 posts
AeroScale: 65 posts
Posted: Monday, April 14, 2014 - 09:10 PM UTC
Ahhh right with you Joel lol sorry about that. Have you managed to have much success with the fading abd shading of panels?? Might be something I can look into for future builds
Joel_W
Staff MemberAssociate Editor
AUTOMODELER
_VISITCOMMUNITY
New York, United States
Joined: December 04, 2010
KitMaker: 11,666 posts
AeroScale: 7,410 posts
Posted: Tuesday, April 15, 2014 - 02:35 AM UTC
Si,
Yes, I've had some good results, and some not so good ones. Many of my later build blogs show how I handled paint fading. The issue is that it doesn't always translate well to uploading, then posting, then to so many different monitors/graphic card combinations. What looks good up close and personal often isn't near what I see online. I guess it's just the nature of the beast.

Here's a few pictures to illustrate my technique.


And here's a less effective application on my F4B build.


Joel

SiStorey
_VISITCOMMUNITY
England - North East, United Kingdom
Joined: March 14, 2014
KitMaker: 242 posts
AeroScale: 65 posts
Posted: Tuesday, April 15, 2014 - 04:06 AM UTC
That is a very good effect, specially on the dauntless. I've got an1/48 F14 in the pipe line to build so I'll be defiantly experiment with your idea. So it was just a simple case of a couple of darker or lighter drops of paint to the bar coat then sprayed on top of the base coat??
Si
Joel_W
Staff MemberAssociate Editor
AUTOMODELER
_VISITCOMMUNITY
New York, United States
Joined: December 04, 2010
KitMaker: 11,666 posts
AeroScale: 7,410 posts
Posted: Wednesday, April 16, 2014 - 01:15 AM UTC

Quoted Text

That is a very good effect, specially on the dauntless. I've got an1/48 F14 in the pipe line to build so I'll be defiantly experiment with your idea. So it was just a simple case of a couple of darker or lighter drops of paint to the bar coat then sprayed on top of the base coat??
Si


Si,
The actual base color varies the amount of white, gray, darker shade, or even black you add. You need to test till you're satisfied with the color. You can also increase the fading or dirt effect by making several different shades.

I don't just over spray the model. I apply scattered blotchy patches. Panel lines, flying surfaces, panels, radar, hatches, all receive some form of fading or dirt build up. This is for the top side surfaces. The bottom usually received just a sludge wash.

The center of panels are usually lighter, around the panel lines (post shading), are darker, and the panel lines even darker. Paints fades differently depending on all sorts of criteria. Maintenance crews will paint areas that are in need of some paint protection.

As with my F4B, I did the basic fading (not real happy with it), now I'm decaling and adding a million little stencils, when done and sealed, I'll continue the fading and dirty up process right over them. But like I said, I'm not going very heavy with the weathering on the F4B.

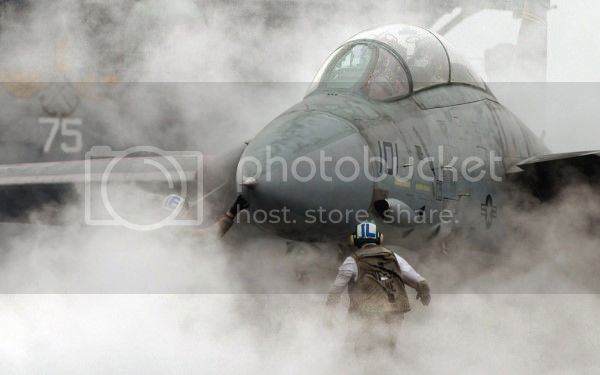
I was amazed when I started to compare pictures of Naval jets on a carrier compared to land based aircraft, and then to aircraft that isn't in field operations. Here's a picture of a F14 during carrier ops. It's not pretty, it's not beaten up, but it's what it is. I haven't come close to duplicating that type of look on my F4B, but my F14A build will be much closer.
Joel


 _GOTOTOP