So with one Spit nearly done, it was time to grab another from the stash. And I love the Mk.IX in all it's forms, so I grabbed this one:
The contents:
The chosen scheme I'm doing:
And the extras:
Hosted by Rowan Baylis
Eduard Spitfire Mk.IXc late version
Posted: Thursday, May 08, 2014 - 06:48 AM UTC
EdgarBrooks
England - South East, United Kingdom
Joined: June 03, 2006
KitMaker: 397 posts
AeroScale: 384 posts
Joined: June 03, 2006
KitMaker: 397 posts
AeroScale: 384 posts
Posted: Thursday, May 08, 2014 - 06:56 AM UTC
As MJ250 was built in late 1943, it wouldn't have had the bulged upper cowling, but retained the early, slightly smoother-topped (can't call it "flatter") version.
Edgar
Edgar
Posted: Thursday, May 08, 2014 - 12:13 PM UTC
Thank you for that Edgar.
Posted: Friday, May 09, 2014 - 09:26 PM UTC
berndm
Niedersachsen, Germany
Joined: March 26, 2014
KitMaker: 844 posts
AeroScale: 630 posts
Joined: March 26, 2014
KitMaker: 844 posts
AeroScale: 630 posts
Posted: Saturday, May 10, 2014 - 01:37 AM UTC
Hi Darren
Good start, it is time to get a spit for me !
Is this a silver doped plane or bare metal ???
Good start, it is time to get a spit for me !
Is this a silver doped plane or bare metal ???
Antoni
England - East Midlands, United Kingdom
Joined: June 03, 2006
KitMaker: 574 posts
AeroScale: 573 posts
Joined: June 03, 2006
KitMaker: 574 posts
AeroScale: 573 posts
Posted: Saturday, May 10, 2014 - 02:26 AM UTC
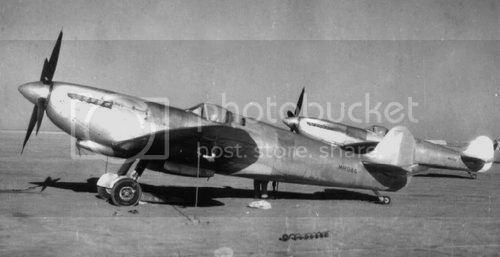
It is bare metal (stripped of paint). Edward have not got it right. There were no camouflage areas. The armour plate in front of the cockpit is a darker coloured alloy. For a while the BoBMF's Spitfire MK356 carried this scheme, but it was painted silver.
There is a photograph of MJ250 complete with 500 lb bomb here:
http://www.raf.mod.uk/bbmf/theaircraft/silverspitfire.cfm
Go to the bottom and click on larger image to see it properly.
It looked very similar to these Spitfires.
BTW. There is uncertainty as to the colour of the codes, red or black. IIRC Edward have both choices on their decal sheet.
berndm
Niedersachsen, Germany
Joined: March 26, 2014
KitMaker: 844 posts
AeroScale: 630 posts
Joined: March 26, 2014
KitMaker: 844 posts
AeroScale: 630 posts
Posted: Saturday, May 10, 2014 - 02:37 AM UTC
Hi Antoni
.......good to know !
Posted: Saturday, May 10, 2014 - 06:26 AM UTC
Posted: Saturday, May 10, 2014 - 12:27 PM UTC
Posted: Monday, May 12, 2014 - 11:13 PM UTC
Joel_W
Associate Editor
New York, United States
Joined: December 04, 2010
KitMaker: 11,666 posts
AeroScale: 7,410 posts
Joined: December 04, 2010
KitMaker: 11,666 posts
AeroScale: 7,410 posts
Posted: Tuesday, May 13, 2014 - 03:38 AM UTC
Darren,
There seems to be an issue as to what the color should be if any, of the armor plate on the top of the engine compartment. I looked at Antoni's referred to site, and those pictures certainly look that of a restored aircraft. Restorations have a nasty habit of being wrong, as they're all to often based on inconsistent data, incorrect interpretations of B&W/Sepia photographs, and old war memories.
There is one picture of a completely stripped Spitfire, but that doesn't mean that it went back into service that way, as it still needed to have all its markings painted on, so they could have painted that anti glare panel then. There is also a picture showing that panel to be quite a bit darker, and very close to the panel color of the camo painted Spitfire in the foreground of that photograph.
You should also take into consideration that the purpose of painting that area from the nose to the windscreen a dark color, was to help kill the glare from the sun that the pilot had to deal with. I find it hard to believe that they wouldn't have addressed that issue, as the pilot or pilots would have certainly addressed it.
Your build is coming along quite well. Nice job on the cockpit. From what I see on my monitor, the interior Green could be a little more blue, but that doesn't mean that your actual color isn't correct. Once the fuselage is closed up, one sees very little of the cockpit, and it's always in a shadow. Looking forward to seeing your Mk 1Xc with some paint on it.
Joel
Posted: Tuesday, May 13, 2014 - 05:22 AM UTC
EdgarBrooks
England - South East, United Kingdom
Joined: June 03, 2006
KitMaker: 397 posts
AeroScale: 384 posts
Joined: June 03, 2006
KitMaker: 397 posts
AeroScale: 384 posts
Posted: Tuesday, May 13, 2014 - 06:18 AM UTC
The "armour plate" was not armour, in the true sense of the word, but "deflection armour" consisting of a thicker grade of alclad, which was rolled round the curvature of the fuselage, and held in place by Oddie fasteners and countersunk screws.
It was simply designed to deflect away angled fire from ahead or behind, but was little use against direct hits. Being alclad, it would have been anodised, then grey undercoated before camouflage paint went on top, so it's anyone's guess as to what "colour" is visible in photos.
With MJ250, it's entirely possible that the armour and cowling were removed before the paint was stripped off, so they could easily have remained in their camouflage colours, and simply fitted back into place, which makes comments, about Eduard getting it wrong, just a little simplistic.
Edgar
Posted: Saturday, May 17, 2014 - 12:01 AM UTC
Posted: Sunday, May 18, 2014 - 02:04 AM UTC
I've been thinking I might forego the centreline bomb rack and bomb. And go with the humped fuel tank instead hmmmmm decisions, decisions.
thegirl
Alberta, Canada
Joined: January 19, 2008
KitMaker: 6,743 posts
AeroScale: 6,151 posts
Joined: January 19, 2008
KitMaker: 6,743 posts
AeroScale: 6,151 posts
Posted: Sunday, May 18, 2014 - 02:07 AM UTC
Looking good so far
Terri
Terri
Posted: Sunday, May 18, 2014 - 02:23 AM UTC
Thank you Terri!
Joel_W
Associate Editor
New York, United States
Joined: December 04, 2010
KitMaker: 11,666 posts
AeroScale: 7,410 posts
Joined: December 04, 2010
KitMaker: 11,666 posts
AeroScale: 7,410 posts
Posted: Sunday, May 18, 2014 - 03:44 AM UTC
Darren,
You're making excellent progress on your 2nd Spit. For what's it's worth, I vote for the centerline fuel tank.
Joel
You're making excellent progress on your 2nd Spit. For what's it's worth, I vote for the centerline fuel tank.
Joel
Posted: Sunday, May 18, 2014 - 07:23 AM UTC
Posted: Tuesday, May 20, 2014 - 12:56 AM UTC
And she's done.
Kit manufacturer: Eduard
Scale: 1/48
Type: Supermarine Spitfire Mk.IXc Late version
Extras used: Eduard Brassin 5-spoke wheels treadedED648098 and Belly tank from the spares box.
Paints and colours used: Humbrol, Revell and Xtracrylics
So here she is in all her shiny glory. In the markings of an aircraft operated by 601 Sqdn in Italy in the Summer of 1944: