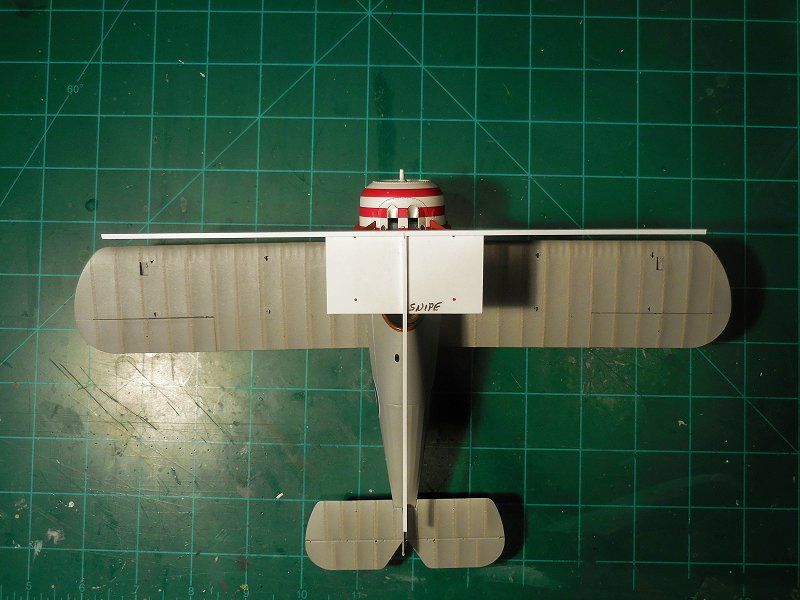
Been trying to find a jig for putting those oh so troublesome top wings on without making a mess and wonky wingy.
Does anybody have recommendations for a currently available, reasonably cheap jig (or design for building your own). I have looked around and the Aeroclub one dosen't seem to be available and there is tough competition when they come up secondhand and the SRAM one seem to be out of stock everywhere too.
If any kind person out there has one going spare I'd love to hear from them
Early Aviation
Discuss World War I and the early years of aviation thru 1934.
Hosted by Jim Starkweather
Wingumy Jigs
highlandflinger
Scotland, United Kingdom
Joined: September 04, 2014
KitMaker: 53 posts
AeroScale: 53 posts
Joined: September 04, 2014
KitMaker: 53 posts
AeroScale: 53 posts
Posted: Monday, September 08, 2014 - 11:20 AM UTC
maxmwill
Alabama, United States
Joined: August 24, 2011
KitMaker: 334 posts
AeroScale: 291 posts
Joined: August 24, 2011
KitMaker: 334 posts
AeroScale: 291 posts
Posted: Monday, September 08, 2014 - 12:48 PM UTC
This may sound dumb or otherwise stupid, but couldn't you make a jig out of foam core(the foam sheets that come faced with paper), or similar?
I mean, if you want to wait until you find a produced jig, either assembled or in kit form, and you can afford it, then fine, but if you want to just get it done, then wouldn't a jig that it home made do the trick?
It's just a question and a quiet suggestion, is all.
I mean, if you want to wait until you find a produced jig, either assembled or in kit form, and you can afford it, then fine, but if you want to just get it done, then wouldn't a jig that it home made do the trick?
It's just a question and a quiet suggestion, is all.
highlandflinger
Scotland, United Kingdom
Joined: September 04, 2014
KitMaker: 53 posts
AeroScale: 53 posts
Joined: September 04, 2014
KitMaker: 53 posts
AeroScale: 53 posts
Posted: Monday, September 08, 2014 - 01:15 PM UTC
I have had various thoughts along these lines but the problem is that this would mean a new jig for each different model type.
I have been puzzling over different ways of making it easier and cleaner to get that darned top wing on.
Another idea I had which I have yet to try is to drill a tiny hole in the top of each strut and superglue a piece of invisible thread into it then drill a matching hole through the top wing and then I could feed the thread through so that the struts could be pulled into the correct position and then lower the wing down into place. Possibly this would work best with the top wing supported upside down on a trestle arrangement and, with the struts freshly glued into the bottom wings, slowly lower the fuselage/lower wing assembly down while gently pulling on the threads to take up the slack until the struts slot into the top wing mounting points.
If I carry on thinking about this too long I could end up with some crazy , Heath Robinson style, wing mounting machine
The biggest problem I have had with biplanes is the messy and fiddly process of getting all those struts to fit neatly where they are meant to go without getting glue all over the place.
I would be very happy to hear the techniques that others use to achieve a nice clean fit.
Jessie_C
British Columbia, Canada
Joined: September 03, 2009
KitMaker: 6,965 posts
AeroScale: 6,247 posts
Joined: September 03, 2009
KitMaker: 6,965 posts
AeroScale: 6,247 posts
Posted: Monday, September 08, 2014 - 03:03 PM UTC
A lot of people have great success using various size Lego bricks.
wing_nut
New Jersey, United States
Joined: June 02, 2006
KitMaker: 1,212 posts
AeroScale: 468 posts
Joined: June 02, 2006
KitMaker: 1,212 posts
AeroScale: 468 posts
Posted: Tuesday, September 09, 2014 - 01:39 AM UTC
I made this simply jig for all the biplanes I've done so far. And it so far it has worked perfectly every time.
Once the cabanes are set and aligned and very securely glued in place, the top wing is glued in place and it too it is perfect alignment. There is enough flex in the wings to get the interplane struts into the holes. The 1st 3 were German aircraft with just 1 set of interplane struts. Very easy. The last 2 were Snipes with 2 sets on each side. Di the inner set 1st and let the glue get well cured. There was still enough flex to get the outer set in place. Just before setting each end of the strut I put a tiny drop of gel CA in the hole with a thin wire.
There is an SBS for the jig in the Snipe thread about half way down the page.
http://aeroscale.kitmaker.net/forums/223226&page=1
Posted: Tuesday, September 09, 2014 - 03:59 AM UTC
Lego is definitely something to consider. I tried but it didn't work too well although that was mostly due to me not building it properly. I had too much movement in the support arms and they were tricky to get level. I might just have to get my old box out the loft and have another go.
Marc, I do like your idea for a jig. I assume you measure the cabane location holes on the upper wing and then transfer those to a piece of plasticard? I might just have to have a go at using this method.
highlandflinger
Scotland, United Kingdom
Joined: September 04, 2014
KitMaker: 53 posts
AeroScale: 53 posts
Joined: September 04, 2014
KitMaker: 53 posts
AeroScale: 53 posts
Posted: Tuesday, September 09, 2014 - 04:13 AM UTC
I like the idea of the template to set the cabanes myself, I may well give it a shot. I have a fortune in Lego in my house but I couldn't go near it without my stepson freaking out as he is obsessed with the stuff. I hate it myself too many painful memories of standing on it when I was a kid (Boy does it hurt!)
highlandflinger
Scotland, United Kingdom
Joined: September 04, 2014
KitMaker: 53 posts
AeroScale: 53 posts
Joined: September 04, 2014
KitMaker: 53 posts
AeroScale: 53 posts
Posted: Saturday, September 13, 2014 - 10:58 AM UTC
HI all I wonder if I might ask for a little help. I just threw together a jig for putting wings on bypes and was wanting to share a pic of it with y'all thought it might be useful to others or that mods might be suggested to make it better but I can't seem to upload the pic.
Am I doing something wrong or is there a trick to it. When I hit the upload photos button it says "
The category you chose for this photo can't contain photos." any help much appreaciated
Am I doing something wrong or is there a trick to it. When I hit the upload photos button it says "
The category you chose for this photo can't contain photos." any help much appreaciated
Jessie_C
British Columbia, Canada
Joined: September 03, 2009
KitMaker: 6,965 posts
AeroScale: 6,247 posts
Joined: September 03, 2009
KitMaker: 6,965 posts
AeroScale: 6,247 posts
Posted: Saturday, September 13, 2014 - 02:06 PM UTC
Are you trying to post to the gallery? You need to be sure that you're in your own personal gallery space rather than an index page. Make certain that you're logged in (look for your name in the upper left of the page, then just above that there's a link to "My Photos". Follow that link to your gallery space where you can upload your photos.
Here's a little photo tutorial I've put together:
You don't need to buy any special software to post pictures here. If you want to resize your pictures there are several different freeware programs you can get such as Ifranview, Gimp or Paint.net. As a member of Aeroscale you have a space in the image gallery (look at the black bar on the top of the page. The Gallery is found between "Events" and "Links" on the right hand side of the screen. Follow this tutorial to use it.)
The only problem with the gallery is because we have so many members it can't hold many pictures so many of us use another photo hosting site like Photobucket, Imageshack or Flickr to host our pictures.
Regardless where you host your pictures, the way to insert an image is pretty simple. Whenever you're writing a post, you'll see 7 little white buttons just below the area you type in. the far right-hand button says {img} (except that the brackets are square). Click that button whenever you want to insert a picture and you'll see this appear:
{img}http://put.url.here/image.file{/img}
(once again, the brackets will be square in real life)
Go to your image hosting site, select your picture, and copy its URL. The fastest way to do that is to hover your mouse pointer over the picture, click the right mouse button and select "copy image location" from the little menu which pops up.
Come back to Aeroscale, and replace the text which says "http://put.url.here/image.file" with the URL that you just copied. I like to use browser tabs which let me easily switch between Aeroscale and my hosting site as many times as I like. This is useful for inserting multiple pictures in one post.
Enjoy your stay in Aeroscale. If you have any questions at all, all of us will be happy to answer them. Happy building!
highlandflinger
Scotland, United Kingdom
Joined: September 04, 2014
KitMaker: 53 posts
AeroScale: 53 posts
Joined: September 04, 2014
KitMaker: 53 posts
AeroScale: 53 posts
Posted: Sunday, September 14, 2014 - 03:54 AM UTC
Ah I will need to see about getting some image hosting,in the meantime I have uploaded an image of my jig to my account here so if anyone wants to have a look just hit the photo button on my profile.
The jig is very simple.
It is a wooden box with a sliding cover such as you get dominoes etc in (This particular one held pichup sticks which will come in handy for stirrers and other things made of round wooden stuff. The box cost £1.99 from a discount shop. I superglued two tongue depressor sticks in the end of the box as uprights to hold the fuselage/lower wing assembly in a vertical position (I decided that the horizontal position was obstructive and awkward visually when putting the struts in place. Of course the fuselage/wing can be facing up or down depending on preference. Next I glued a block of wood with shims made of cut up tongue depressors to the end of the sliding cover for stability and a bit of weight to steady the top wing and to this was superglued another tongue depressor vertically and centred. elastic bands are used to hold the top wing to the sliding part and the fuselage to the two uprights. The toothpick in the picture is to correct the tendency of the upper wing to sit with the trailing edge pulled against the upright by the tension of the elastic band (I will probably use a wedge of dense foam or some such in future. With the wing and fuselage assembly held in place by the bands the upper wing can then be slide along util it is at the desired distance from the lower wing and the struts then slotted home to their desired position. The rake of the wings and their alignment can be easily adjusted by tweaking the elastic bands up and down on the uprights.
At the moment the main mod I am considering at the moment is to the upright for the top wing which I might change to a square section hardwood with a narrower face/or possibly a broader one (the reason for this is one of stability and also to keep rubber bands clear of mounting points for cabane struts.
The rubber bands are sacrificial (I have hundreds of these approximately 2 inches diameter and they are cut off once the wing has set properly.
I have so far only done one model with this jig, a 1/48 scale roden SE.5a and it worked perfectly.
Overall build time for making this jig was around 40 minutes (would have been faster but I was making it up as I went along so a good chunk of the time was taken up thinking about options) and total costs were £1.99 plus a bit of superglue.
Any comments are most welcome thanks
Jessie_C
British Columbia, Canada
Joined: September 03, 2009
KitMaker: 6,965 posts
AeroScale: 6,247 posts
Joined: September 03, 2009
KitMaker: 6,965 posts
AeroScale: 6,247 posts
Posted: Sunday, September 14, 2014 - 04:14 AM UTC
So now all you need to do is copy the picture's location, come back here, press the IMG button, and paste. Like this: