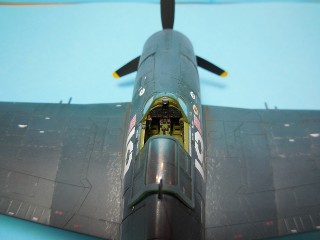
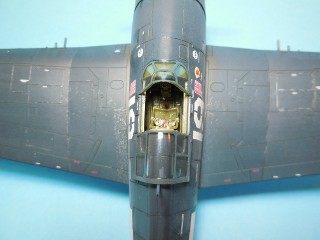
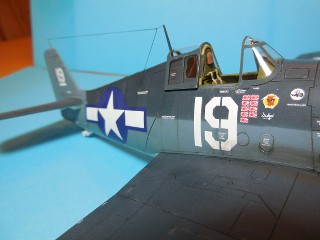
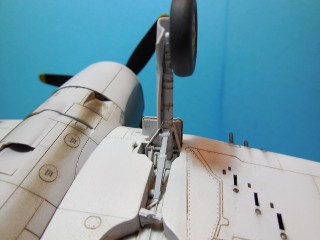
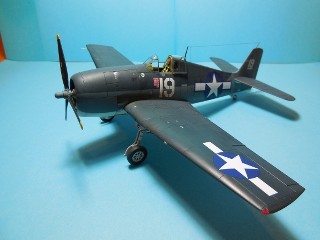
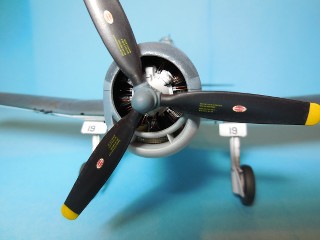
Hello all, I wanted to share a few photos of my second build of, what for me, is the building season. The model is Eduard's 1/48th scale Profipack F6F-3 Hellcat. I built it straight from the box with no AM stuff. The only three modifications I made were to scratch build a wiring harness out of copper wire and evergreen rod; unfortunately you can't see much of it, two throttle handles and the antenna wire made from magic line. I airbrushed the kit with a combination of Tamiya, Vallejo and Lifecolor paints. Weathering was done via a combo of AK Interactive weathering agent, Tamiya weathering pastels and a silver pen. Overall, I am fairly pleased with the results. Comments and criticisms are welcome.
Ernest
World War II
Discuss WWII and the era directly before and after the war from 1935-1949.
Hosted by Rowan Baylis
Eduard F6F-3 Hellcat
greif8
Bayern, Germany
Joined: January 17, 2006
KitMaker: 673 posts
AeroScale: 492 posts
Joined: January 17, 2006
KitMaker: 673 posts
AeroScale: 492 posts
Posted: Thursday, November 27, 2014 - 05:08 PM UTC
Joel_W
Associate Editor
New York, United States
Joined: December 04, 2010
KitMaker: 11,666 posts
AeroScale: 7,410 posts
Joined: December 04, 2010
KitMaker: 11,666 posts
AeroScale: 7,410 posts
Posted: Thursday, November 27, 2014 - 07:16 PM UTC
Ernest,
A very well done OOB build. Excellent camo paint scheme with a very tight soft edged demarcation line. In the few pictures that I could see of the engine, the ignition wiring looks quite nice, and really adds to the overall look of the double WR2800 engine.
I really like your overall weathering effect, as it has a well used but certainly not abused USN look to it. Could you be a little more specific on just how you achieved it.
My only issue isn't with your build, but with Eduard's decals. The National insignias should be a darker shade of Blue as seen on the over lay of the Dark Sea Blue, rather then lighter. Not much you could have done about that, and it is a small issue at that.
Over all, as I said, I love and appreciate all things Grumman's.
Joel
Posted: Thursday, November 27, 2014 - 07:35 PM UTC
[quote] Comments and criticisms are welcome.
Nothing to criticize here! Beautiful job. On a lark I checked and the pilot, Alex Vraicu is still alive at age 96. Amazing.
Where are you from in Bayern? Ich habe in München von 1967 bis 1969 gewohnt.
Nothing to criticize here! Beautiful job. On a lark I checked and the pilot, Alex Vraicu is still alive at age 96. Amazing.
Where are you from in Bayern? Ich habe in München von 1967 bis 1969 gewohnt.
greif8
Bayern, Germany
Joined: January 17, 2006
KitMaker: 673 posts
AeroScale: 492 posts
Joined: January 17, 2006
KitMaker: 673 posts
AeroScale: 492 posts
Posted: Thursday, November 27, 2014 - 10:47 PM UTC
Hi Joel, thank you the kind words. To answer your questions about the weathering, here is how I did it:
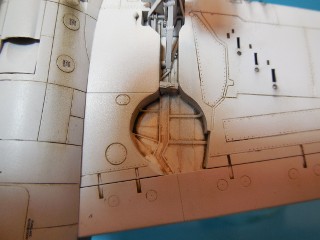
Panel Lines: I used a thinned AK Interactive brown wash to highlight the panel lines. You might remember the 1/32 Eduard Bf-109E, representing Helmut Wick's mount circa late 1940, that I posted here in January; I used the same technique as one that build.
General Grim: Again, I used the AK brown wash, very sparingly to dirty up the wheel wells and other areas. You have to use a very small amount of the wash as a little goes a very long way.
Oil and Fuel Stains: Here I used a combination of AK Interactive "Fuel Stain" and an old bottle of "oil stain" that I mixed up several years ago.
Exhaust and gun stains: I used Tamiya weathering pastels to simulate this type of weathering. For the gun stains I used the "soot" stain, putting it on with an old small paint brush. The exhaust staining was done by putting "soot" down first using both the old brush and a mascara sponge. This was followed by the "rust" color until I was satisfied with the blending.
Paint Fading: I do this by airbrushing Vallejo's Flat on the model. I don't thin the mix as much and lay down very light coats, blow drying the model between them, until I get the faded look I want. I mix about 10% of Vallejo's flat with distilled water for this. It is important to make sure you spray close enough that the mix goes on moist - not too dry and not running - for optimal results. Takes some practice, but I like this technique better than salt fading as I have more control.
Sincerely,
Ernest
greif8
Bayern, Germany
Joined: January 17, 2006
KitMaker: 673 posts
AeroScale: 492 posts
Joined: January 17, 2006
KitMaker: 673 posts
AeroScale: 492 posts
Posted: Thursday, November 27, 2014 - 10:53 PM UTC
Hi Brian, thank you for the compliment! That it amazing that Alex Vraicu is still alive, one of the few veterans of WWII left I'm afraid.
I live in the Oberpfalz District of Bavaria near the small town of Hahnbach. It is slightly less then 200 kms from Munich. Munich is a great city to visit; and I usually get there 3-4 times a year.
Sincerely,
Ernest
[quote]
I live in the Oberpfalz District of Bavaria near the small town of Hahnbach. It is slightly less then 200 kms from Munich. Munich is a great city to visit; and I usually get there 3-4 times a year.
Sincerely,
Ernest
[quote]
Quoted Text
Comments and criticisms are welcome.
Nothing to criticize here! Beautiful job. On a lark I checked and the pilot, Alex Vraicu is still alive at age 96. Amazing.
Where are you from in Bayern? Ich habe in München von 1967 bis 1969 gewohnt.