OFFICIAL: Tiger Meet Campaign
MichaelSatin
 Campaigns Administrator
Colorado, United States
Joined: January 19, 2008
KitMaker: 3,909 posts
AeroScale: 2,904 posts
Posted: Tuesday, December 30, 2014 - 07:45 PM UTC
Welcome to the Tiger Meet Campaign!
The campaign will run from January 1, 2015 through July 1, 2015.
If you haven't signed up yet, or want to see the rules, go
here.
Please post your initial and in-progress photos as well as campaign discussion in this thread. Please post your finished build photos in the
campaign gallery.
Looking forward to some great Tiger Meet markings!
Michael

On the bench:
Sorta depends on your definition of "on the bench"...
England - South East, United Kingdom
Joined: August 15, 2012
KitMaker: 408 posts
AeroScale: 365 posts
Posted: Tuesday, December 30, 2014 - 08:32 PM UTC
Thanks Michael! I'd like to welcome everyone to my first ever campaign, and also welcome to 2015

! (ok ok in my part of the world, there are still 9 hours to go, but what the heck!)

Here's looking forward to a really good campaign, and lots of colourful entries in the gallery - Cheers everyone!

On the workbench
National Pride - 1/72 BAe Nimrod MR2.P
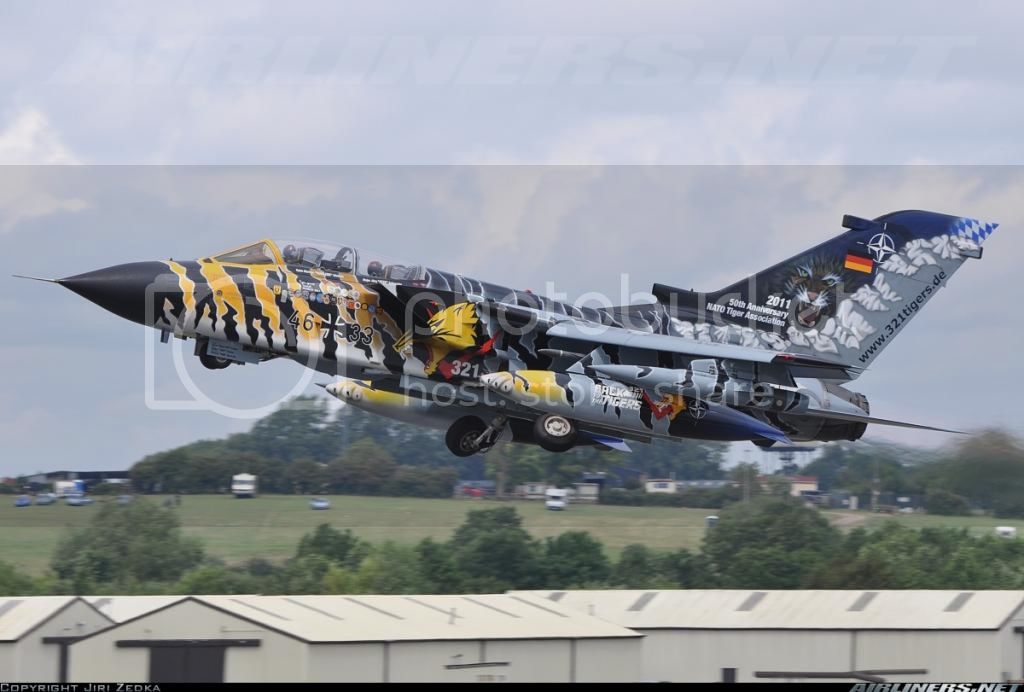
Tiger Meet! - 1/72 Panavia Tornado ECR (Luftwaffe)
Airfix III - 1/72 Hawker Hunter FGA.9
Hairy Brush - 1/72 P-51D Mustang
Mustang 75 - 1/72 P-51D "Ferocious Frankie"
United States
Joined: December 26, 2008
KitMaker: 288 posts
AeroScale: 195 posts
Posted: Tuesday, December 30, 2014 - 08:42 PM UTC
Thanks Michael! This should be a fun build. Tiger schemes have to be some of the most colorful markings applied to an aircraft.
I am planning on building a 1/72 Swiss F-18C using the Hasegawa kit along with some aftermarket PE, ejection seat and canopy masks. The markings will be for J-5011 during the 2007 NATO Tiger Meet. Here's my starting point:

Best wishes for a great New Year and have fun modeling!
Mike

Alberta, Canada
Joined: April 07, 2010
KitMaker: 1,028 posts
AeroScale: 939 posts
Posted: Tuesday, December 30, 2014 - 10:22 PM UTC
To prevent being called an 'expert', screw something up good every now and again.
England - South East, United Kingdom
Joined: August 15, 2012
KitMaker: 408 posts
AeroScale: 365 posts
Posted: Wednesday, December 31, 2014 - 02:28 PM UTC
On the workbench
National Pride - 1/72 BAe Nimrod MR2.P
Tiger Meet! - 1/72 Panavia Tornado ECR (Luftwaffe)
Airfix III - 1/72 Hawker Hunter FGA.9
Hairy Brush - 1/72 P-51D Mustang
Mustang 75 - 1/72 P-51D "Ferocious Frankie"
United States
Joined: December 26, 2008
KitMaker: 288 posts
AeroScale: 195 posts
Posted: Wednesday, December 31, 2014 - 09:16 PM UTC
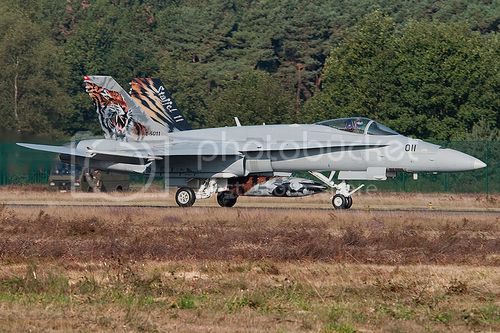
Oops! In my haste to get my first post in this GB, I also forgot to post photos of the Tiger aircraft in its natural setting! Here are some photos that I found on the web of the F-18C Swiss Hornet in the 2007 Tiger Meet markings:


Have fun modeling!
Mike

Ontario, Canada
Joined: February 04, 2008
KitMaker: 2,507 posts
AeroScale: 1,814 posts
Posted: Thursday, January 01, 2015 - 12:27 AM UTC
Hi!
My entry:-
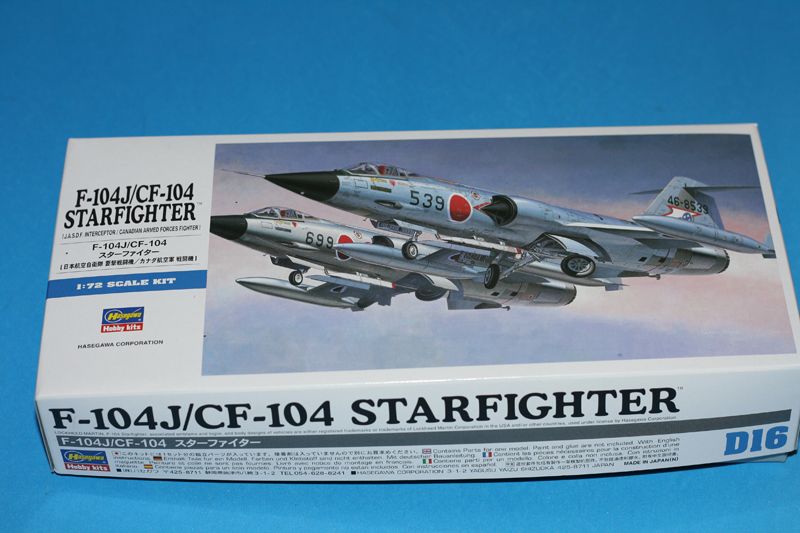

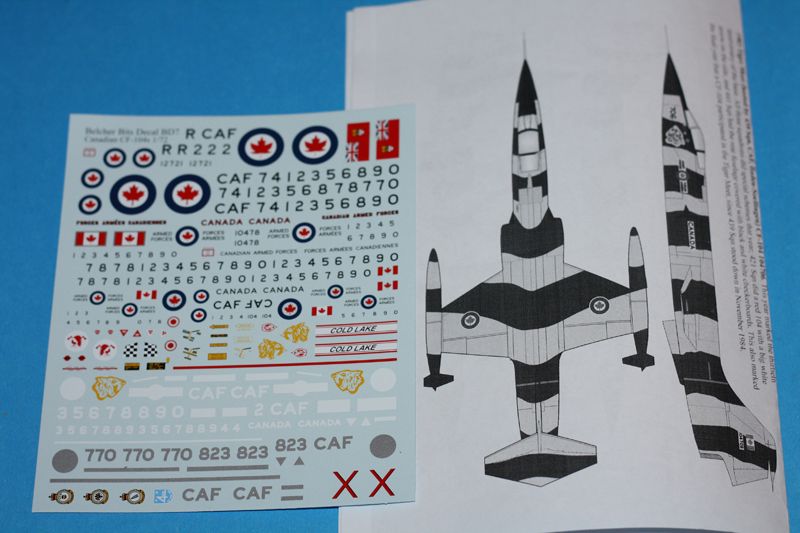
I am using Belcher Decals and I will be building CAF-104 104796 which was Canadas entry into the 1982 Tiger Meet hosted by 230 Sqn,RAF Gutesloh

" The Die Hards"
43rd MIDDLESEX REGIMENT
MACHINE GUN CORPS
XXX CORP
The most effective way to do it, is to do it.
- Amelia Earhart
England - South East, United Kingdom
Joined: August 15, 2012
KitMaker: 408 posts
AeroScale: 365 posts
Posted: Tuesday, January 06, 2015 - 10:31 PM UTC
Good to see a few early starters!
Ok, down to business - the first bit of progress to report. Another campaign, another Tornado. This is the second Revell Tornado I have built for this forum ( the first was a Gulf War GR1 - Stay Tooned campaign!), and I have to say, these kits are an absolute joy - as good as Hasegawa, for a quarter of the price. As this Luftwaffe Tornado is an ECR variant, there is an additional sprue, featuring different instrument panels, and a pair of HARM missiles. I have used the instrument panel decals here, and they are the equal of colour printed photo etch:
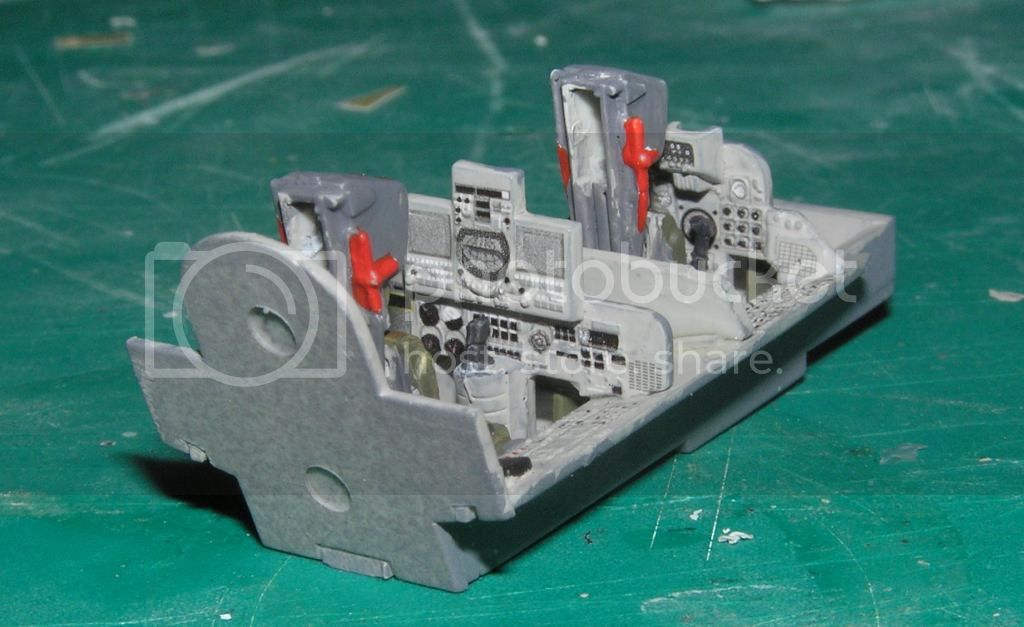

That's all for now - cheers everyone!

On the workbench
National Pride - 1/72 BAe Nimrod MR2.P
Tiger Meet! - 1/72 Panavia Tornado ECR (Luftwaffe)
Airfix III - 1/72 Hawker Hunter FGA.9
Hairy Brush - 1/72 P-51D Mustang
Mustang 75 - 1/72 P-51D "Ferocious Frankie"
Saskatchewan, Canada
Joined: April 23, 2006
KitMaker: 140 posts
AeroScale: 89 posts
Posted: Saturday, January 17, 2015 - 11:13 AM UTC
I'll have a go at this Italeri Mirage 2000C and a Two Bobs 2001 Tiger Meet sheet. It will be an out of the box build with the exception of a Heller seat.

England - South East, United Kingdom
Joined: August 15, 2012
KitMaker: 408 posts
AeroScale: 365 posts
Posted: Saturday, January 17, 2015 - 01:52 PM UTC
Welcome Ryan - good choice!

On the workbench
National Pride - 1/72 BAe Nimrod MR2.P
Tiger Meet! - 1/72 Panavia Tornado ECR (Luftwaffe)
Airfix III - 1/72 Hawker Hunter FGA.9
Hairy Brush - 1/72 P-51D Mustang
Mustang 75 - 1/72 P-51D "Ferocious Frankie"
United States
Joined: December 26, 2008
KitMaker: 288 posts
AeroScale: 195 posts
Posted: Saturday, January 24, 2015 - 09:23 PM UTC
I am off to a sloooow start on this build, but at least it is a start! Having several other GBs in the mix can do that to you.

While I am working on the F/A-18 cockpit, I thought that the 1/72 Hasegawa Hornet would likely need some nose weight. I took care of this issue by epoxying a fishing weight to the area in front of where the cockpit will sit.

I should have something a bit more interesting to post in the near future.
Have fun modeling!
Mike

England - South East, United Kingdom
Joined: August 15, 2012
KitMaker: 408 posts
AeroScale: 365 posts
Posted: Saturday, January 24, 2015 - 10:37 PM UTC
Now I have something that looks like a Tornado. The primer is on, the next job is to mask and spray appropriate shades of undercoat. This is crucial, as there is a lot of variation in the shades on the very large sections of decal, so there will be patches of white, yellow, orange, black and blue.

Cheers Everybody!

On the workbench
National Pride - 1/72 BAe Nimrod MR2.P
Tiger Meet! - 1/72 Panavia Tornado ECR (Luftwaffe)
Airfix III - 1/72 Hawker Hunter FGA.9
Hairy Brush - 1/72 P-51D Mustang
Mustang 75 - 1/72 P-51D "Ferocious Frankie"
United States
Joined: December 26, 2008
KitMaker: 288 posts
AeroScale: 195 posts
Posted: Friday, January 30, 2015 - 08:51 PM UTC
One of the visible differences between a Swiss F/A-18C Hornet and its American brethren is the searchlight that the Swiss added below the cockpit. The Hasegawa kit does not come with this feature, so I added it before I got too far into the build. Here's the location for the searchlight marked in pencil. My original intention was to use the clear plastic from a set of old airliner windows for the glass.

As I was drilling out the hole, I realized that the clear windows were a bit too big. I lucked out as I had the hole drilled about half the size that I need, so I searched again through my parts boxes and found the perfect solution. It was a clear dome that had a round attachment piece that was the correct size. I just inserted the clear piece with the dome part in the interior of the fuselage and epoxied the part. Voila!


Next step is to cut the clear plastic rod flush with the outside of the fuselage and polish the surface.
Have fun modeling
Mike

Alberta, Canada
Joined: April 07, 2010
KitMaker: 1,028 posts
AeroScale: 939 posts
Posted: Friday, February 06, 2015 - 09:21 AM UTC
To prevent being called an 'expert', screw something up good every now and again.

#392
Hessen, Germany
Joined: January 09, 2013
KitMaker: 696 posts
AeroScale: 608 posts
Posted: Saturday, February 07, 2015 - 04:46 PM UTC
Hi fellows, count me in with this one:


On the bench:
EE(BAC) Lightning F.2A (Airfix 1:72)

#392
Hessen, Germany
Joined: January 09, 2013
KitMaker: 696 posts
AeroScale: 608 posts
Posted: Saturday, February 07, 2015 - 04:50 PM UTC
I'm really looking forward to this build as it is of high quality, especially the decals by Cartograf.


Happy campaigning!

On the bench:
EE(BAC) Lightning F.2A (Airfix 1:72)
England - South East, United Kingdom
Joined: August 15, 2012
KitMaker: 408 posts
AeroScale: 365 posts
Posted: Saturday, February 07, 2015 - 05:22 PM UTC
Welcome Peter - good to have you on board! Interesting choice of kit too, I'm sure no one else will be doing a Tiger Meet tanker!

On the workbench
National Pride - 1/72 BAe Nimrod MR2.P
Tiger Meet! - 1/72 Panavia Tornado ECR (Luftwaffe)
Airfix III - 1/72 Hawker Hunter FGA.9
Hairy Brush - 1/72 P-51D Mustang
Mustang 75 - 1/72 P-51D "Ferocious Frankie"
United States
Joined: December 26, 2008
KitMaker: 288 posts
AeroScale: 195 posts
Posted: Saturday, February 07, 2015 - 09:22 PM UTC
Peter
This is a great choice for a Tiger aircraft! In addition to being originally from New Jersey, the home of this tanker and a fan of Tiger Meet aircraft, I have another reason from following your build closely. I am about to start a 1/144 vacuform KC-135A build in another campaign here on Aeroscale, so your build will be very useful!
Have fun modeling
Mike

United States
Joined: December 26, 2008
KitMaker: 288 posts
AeroScale: 195 posts
Posted: Saturday, February 07, 2015 - 09:24 PM UTC
Here is a quick update on the progress of my build. I have cut and polished the clear plastic part for the searchlight and here is how it looks:


I have some other progress to report on the build, but I need to take some photos first!
Have fun modeling!
Mike

England - South East, United Kingdom
Joined: August 15, 2012
KitMaker: 408 posts
AeroScale: 365 posts
Posted: Tuesday, February 10, 2015 - 10:24 PM UTC
Phew - that's the undercoats for the decals done - lots of masking and spraying!
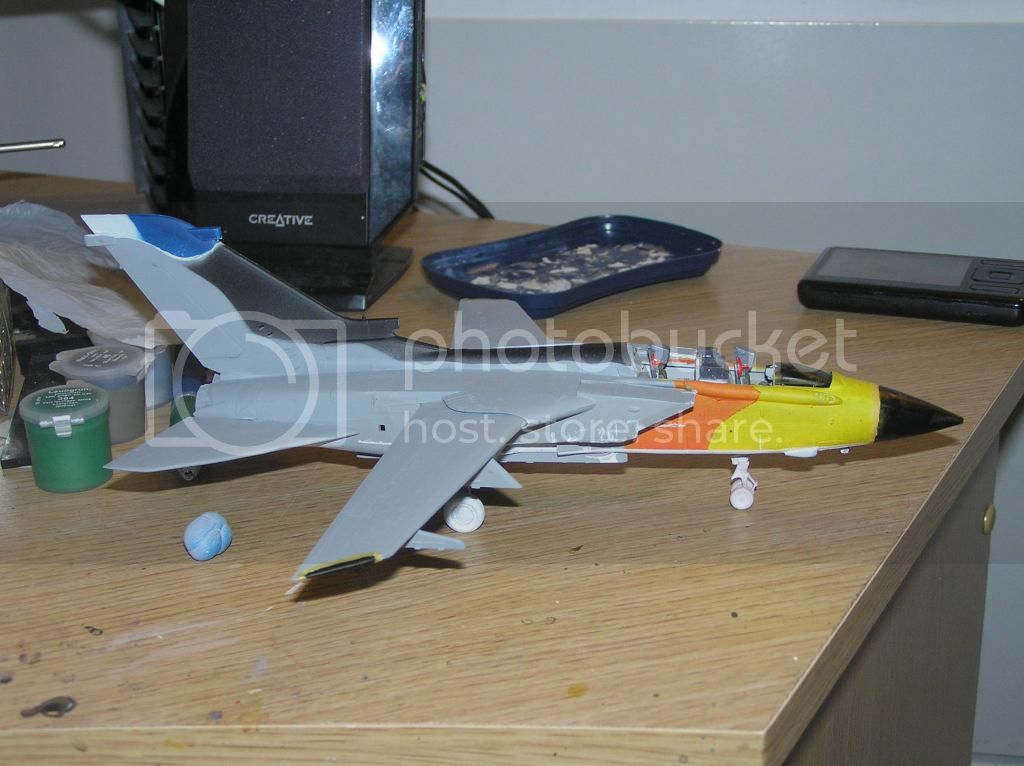
Engines to paint tomorrow, then I'll be sealing the whole thing, ready for the decals.
Cheers Everybody!

On the workbench
National Pride - 1/72 BAe Nimrod MR2.P
Tiger Meet! - 1/72 Panavia Tornado ECR (Luftwaffe)
Airfix III - 1/72 Hawker Hunter FGA.9
Hairy Brush - 1/72 P-51D Mustang
Mustang 75 - 1/72 P-51D "Ferocious Frankie"
United States
Joined: December 26, 2008
KitMaker: 288 posts
AeroScale: 195 posts
Posted: Friday, February 13, 2015 - 09:41 PM UTC
Hi fellow modelers
I started the long slow process of getting the bits and pieces to look like a Hornet. One of the many tricky parts of a 1/72 Hasegawa Hornet is getting the different bits of the fuselage together and trying to minimize the certain high level of putty and sanding that is required. I have the bits that form the sides of the fuselage and intakes together and sanded and it looks like this:


When I dryfit the fuselage top, the sides are a bit out of alignment, so I helped this along with a spacer made from one of the sprue runners in the kit:

Have fun modeling!
Mike

England - South East, United Kingdom
Joined: August 15, 2012
KitMaker: 408 posts
AeroScale: 365 posts
Posted: Sunday, February 22, 2015 - 04:21 PM UTC
....and the decalling begins! I think I'm going to need more micro sol and set at this rate.

Cheers Everyone!

On the workbench
National Pride - 1/72 BAe Nimrod MR2.P
Tiger Meet! - 1/72 Panavia Tornado ECR (Luftwaffe)
Airfix III - 1/72 Hawker Hunter FGA.9
Hairy Brush - 1/72 P-51D Mustang
Mustang 75 - 1/72 P-51D "Ferocious Frankie"
England - South East, United Kingdom
Joined: August 15, 2012
KitMaker: 408 posts
AeroScale: 365 posts
Posted: Sunday, March 01, 2015 - 10:15 PM UTC
Phew! - That's about halfway through the decalling!

Cheers Y'all!

On the workbench
National Pride - 1/72 BAe Nimrod MR2.P
Tiger Meet! - 1/72 Panavia Tornado ECR (Luftwaffe)
Airfix III - 1/72 Hawker Hunter FGA.9
Hairy Brush - 1/72 P-51D Mustang
Mustang 75 - 1/72 P-51D "Ferocious Frankie"
United States
Joined: December 26, 2008
KitMaker: 288 posts
AeroScale: 195 posts
Posted: Friday, March 27, 2015 - 07:44 PM UTC
It has been some time since I posted any progress on my Hornet build, mainly because I had little progress to show! I have been able to get a bit done in the past month due to a heavy travel schedule. However, I do have something to show! The main parts of the Swiss Hornet are now together and I am filling in the seams at this stage. Here's how the model looks on my bench:


Have fun modeling!
Mike

United States
Joined: December 26, 2008
KitMaker: 288 posts
AeroScale: 195 posts
Posted: Saturday, April 04, 2015 - 08:08 PM UTC
Let me continue with my modeling momentum and give an update on my Hornet build. I added a few key pieces such as the airbrake and air ramps in front of the air inlets. I then shot another coat of Mr Surfacer primer. Here's how it looks at this stage:


A close inspection shows various seems and panel lines that could use a touch up with filler or scribing. It is back to the bench for the Hornet followed by another coat of primer.
Have fun modeling!
Mike


