

So I recently picked up the Revell 1/48 Stearman PT-17. At first glance, it looks like a realy nice kit; but we'll see how it goes once I start assembly. Does anyone have any tips on detailing the Continental R-670 engine? It's just sitting right there out in the open so I want to detail it.
Also, what the heck is "Interior Green"?
Jim
Early Aviation
Discuss World War I and the early years of aviation thru 1934.
Discuss World War I and the early years of aviation thru 1934.
Hosted by Jim Starkweather
Stearman PT-17

jimb

Joined: August 25, 2006
KitMaker: 2,539 posts
AeroScale: 231 posts
Posted: Monday, February 23, 2015 - 01:44 AM UTC


Jessie_C


Joined: September 03, 2009
KitMaker: 6,965 posts
AeroScale: 6,247 posts

Posted: Monday, February 23, 2015 - 03:22 AM UTC
US interior green is FS 34151:

It's that characteristic green which is very difficult to describe.
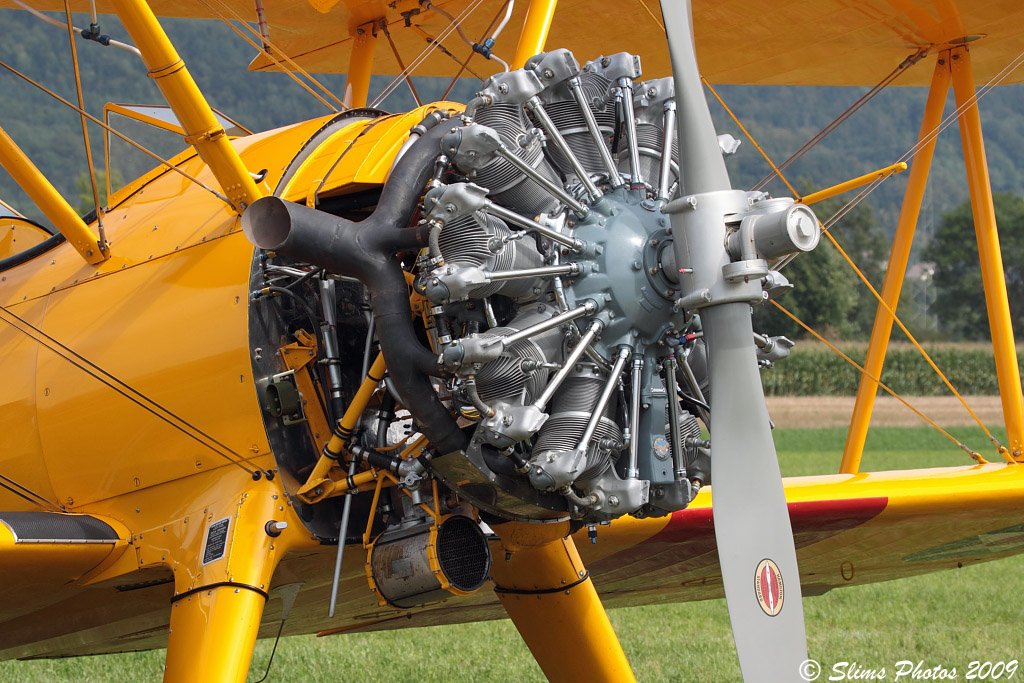
Here's the pointy end of a Stearman. The kit engine replicates this fairly well. All you'd need is the spark plug wires and the oil lines running between the cylinder heads.
It's that characteristic green which is very difficult to describe.
Here's the pointy end of a Stearman. The kit engine replicates this fairly well. All you'd need is the spark plug wires and the oil lines running between the cylinder heads.

PeeJay74

#363
Joined: January 08, 2014
KitMaker: 425 posts
AeroScale: 401 posts

Posted: Monday, February 23, 2015 - 04:12 AM UTC
I'm looking forward to see what you do with her James. I have one sitting in the stash, she looks like a real gem in the box.
jimb
Joined: August 25, 2006
KitMaker: 2,539 posts
AeroScale: 231 posts
Posted: Monday, February 23, 2015 - 08:31 AM UTC
Jessica, thanks for the help. I'll have to pick some of that MM Interior Green up at my LHS. Now, if I understand this aircraft, it is a fabric skinned fuselage, so would the interior of the fuselage be Interior Green or the same color as the exterior? The instructions have the interior framework Interior Green.
I might be able to figure out something for the engine. Doesn't look too difficult. Yea, I say that now!
Paul, thanks for the vote of confidence. I'll probably start assembly once I finish up my 1974 Kenworth W900L:
http://automodeler.kitmaker.net/forums/179374&page=1
But before the IVECO ladder truck (long way to go):
http://automodeler.kitmaker.net/forums/217825&page=1
Jim
Jessie_C
Joined: September 03, 2009
KitMaker: 6,965 posts
AeroScale: 6,247 posts
Posted: Monday, February 23, 2015 - 09:11 AM UTC
The metal framework would be interior green, but the inside of the fabric would not. Photos of restored aircraft show that the inside of the fabric is an off-white or light grey

I'm pretty certain that the seat cushions (if present) would not have been red in the original aircraft.
I'm pretty certain that the seat cushions (if present) would not have been red in the original aircraft.
jimb
Joined: August 25, 2006
KitMaker: 2,539 posts
AeroScale: 231 posts
Posted: Monday, February 23, 2015 - 06:08 PM UTC
That's a great shot. Thanks, Jessica.
Jim
Jim

CaptnTommy
Joined: October 26, 2009
KitMaker: 424 posts
AeroScale: 389 posts
Posted: Monday, March 02, 2015 - 09:15 PM UTC
JimB
Depending on where you live. Rhinebeck aerodrome has a Stearman. (at least the last time I was there) If you have an airport near you Call up the flight service or Fixed Base Operator (FBO) and ask if there is a Stearman in the area.
New England Air Museum has a Stearman. And if you ask they will let you take pictures up close and personal. Windsor Locks, CT. March 15 2015 they have an Open Cockpit Day
Enjoy
Captn Tommy
jimb
Joined: August 25, 2006
KitMaker: 2,539 posts
AeroScale: 231 posts
Posted: Sunday, March 08, 2015 - 03:45 AM UTC
Thanks, Tommy. I'm in Syracuse, NY, so those are kind of far from me. Good information if I'm ever in those areas. I've heard of Old Rhinebeck Aerodrome, but I've never been there.
Jim
Jim
CaptnTommy
Joined: October 26, 2009
KitMaker: 424 posts
AeroScale: 389 posts
Posted: Tuesday, March 10, 2015 - 01:51 AM UTC
The Glen Curtiss Museum is at the South end of one of the Finger Lakes. Nice Museum. May not have Stearman ...But.....
jimb
Joined: August 25, 2006
KitMaker: 2,539 posts
AeroScale: 231 posts
Posted: Tuesday, March 10, 2015 - 02:15 AM UTC
It's in Hammondsport, NY, on Keuka Lake. It's about 90 miles from Syracuse. That's definitely closer.
Jim
Jim

bdanie6
Joined: November 09, 2008
KitMaker: 615 posts
AeroScale: 459 posts

Posted: Wednesday, March 11, 2015 - 07:52 AM UTC
James,
Just saw this thread. I've just finished up building my second Stearman. I wish I had taken pictures of it now.
This is a really, really excellent kit. The fuselage halves go together seamlessly. The interior ribbing is interior green, which I see Jessie has already told you about. The fabric on the inside was doped, but not painted, so this could be either white or off white. I went with white, didn't even paint it at all
The small instrument box in the rear cockpit is painted flat black on the side and aluminum on the top. Decal # 3 & 4 go on it. The instructions do have the number there, but the don't tell you they are decals.
The only other thing to watch out for is the rigging instructions. They could use a little more clarification. Use them, but also the box top art work give you a better idea on how the rigging goes.
Lastly, if you look REAL close to the tail and the landing gear struts you will see very small diamond shapes. Drill there for the rigging. And take it from me, before you do anything with our Stearman, drill out those holes
Ask me how I found that out
I used floral wire on the first one I did and the plane came out great...but the rigging killed it. The second one I used EZ Line and it looks very good...if I do say so myself
Later
jimb
Joined: August 25, 2006
KitMaker: 2,539 posts
AeroScale: 231 posts
Posted: Wednesday, March 11, 2015 - 05:30 PM UTC
Thanks for the tips, Bruce. I appreciate it. What's EZ Line? I've never heard of it.
Jim
Jim

lone-ronin
Joined: January 31, 2006
KitMaker: 147 posts
AeroScale: 13 posts

Posted: Wednesday, March 11, 2015 - 06:21 PM UTC
It's GOT to be better than the Lindberg kit. Talk about a dog!
Jessie_C
Joined: September 03, 2009
KitMaker: 6,965 posts
AeroScale: 6,247 posts
Posted: Wednesday, March 11, 2015 - 06:26 PM UTC
Judge for yourself. Most people agree that it's pretty much the best available.
jimb
Joined: August 25, 2006
KitMaker: 2,539 posts
AeroScale: 231 posts
Posted: Saturday, May 09, 2015 - 08:11 PM UTC
I don't really know if this belongs here in "Early Aviation" or "WWII", but I finally managed to get some work done on my 1/48 Stearman PT-17! I finished the cockpit, and am now working on the engine & fuselage. Things are progressing well (despite help from the cats ), and I've only managed to break the tail-wheel off once . Quite an achievement for me.
Here are some pics of the cockpit assembly:


I still have no idea how I'm going to rig the wings, or what I'm going to use. Maybe I'll head to the LHS today to see if they have some of that EZ-Line.
Jim
), and I've only managed to break the tail-wheel off once . Quite an achievement for me.Here are some pics of the cockpit assembly:


I still have no idea how I'm going to rig the wings, or what I'm going to use. Maybe I'll head to the LHS today to see if they have some of that EZ-Line.
Jim
jimb
Joined: August 25, 2006
KitMaker: 2,539 posts
AeroScale: 231 posts
Posted: Sunday, June 28, 2015 - 06:09 AM UTC
Got some more work done on the Stearman today. I have been stressing over what to use for rigging, and I think I've found a solution: 0.005" steel surgical suture. I did a couple of tests, and it really looks good. Spent some of today drilling holes in the tail, horizontal stabilizer, & fuselage for the rigging connection points. That might have been a complete waste of time as those tiny holes will probably get filled with paint. We'll just have to wait & see.
Also got the fuselage assembled. There is some seam work to do on the front cowling, but it shouldn't be all that difficult. Here is the fuselage as it stands right now:

Here's an overhead view:

I did place the wings & engine on so I could get a better idea of how big the finished model will be. Hey! It's starting to look like an airplane! (And I still haven't broken the tail wheel off again. )

Jim
Also got the fuselage assembled. There is some seam work to do on the front cowling, but it shouldn't be all that difficult. Here is the fuselage as it stands right now:

Here's an overhead view:

I did place the wings & engine on so I could get a better idea of how big the finished model will be. Hey! It's starting to look like an airplane! (And I still haven't broken the tail wheel off again.
)
Jim
jimb
Joined: August 25, 2006
KitMaker: 2,539 posts
AeroScale: 231 posts
Posted: Saturday, August 15, 2015 - 06:07 AM UTC
Making some headway on the Stearman. Still really have no idea how I'm going to rig the aircraft. I have some ideas, but more trepidation that solutions. I guess I'm just going to have to bite the bullet & rig it.
Here is where it stands right now:

WIP on the prop. I tried to used the Revell supplied decals, and that was a disaster. I'm going to go with paint & hope for the best. I'm hoping that the Hamilton Standard logos are salvageable so I can put them on the prop.

Looking more & more like an airplane!

Jim
bdanie6
Joined: November 09, 2008
KitMaker: 615 posts
AeroScale: 459 posts
Posted: Saturday, August 15, 2015 - 06:20 PM UTC
Hi Jim, sorry it has taken me so long to get back to you. Your Steerman is coming along great
EZ Line is a polymer strand thread that can stretch up to 6 times it length. Its available from Berkshire Junction only. I don't believe he sells to LHS's That said, here is his website.
http://www.berkshirejunction.com/
Have fun and keep us posted
Later
EZ Line is a polymer strand thread that can stretch up to 6 times it length. Its available from Berkshire Junction only. I don't believe he sells to LHS's That said, here is his website.
http://www.berkshirejunction.com/
Have fun and keep us posted
Later
jimb
Joined: August 25, 2006
KitMaker: 2,539 posts
AeroScale: 231 posts
Posted: Sunday, August 16, 2015 - 03:17 AM UTC
Thanks for the info, Bruce. I appreciate it. It's not so much what I'm going to use, it's where the rigging goes. The instructions are vague at best, and there are no mounting points on the aircraft.
Jim
Jim
Jessie_C
Joined: September 03, 2009
KitMaker: 6,965 posts
AeroScale: 6,247 posts
Posted: Sunday, August 16, 2015 - 04:41 AM UTC
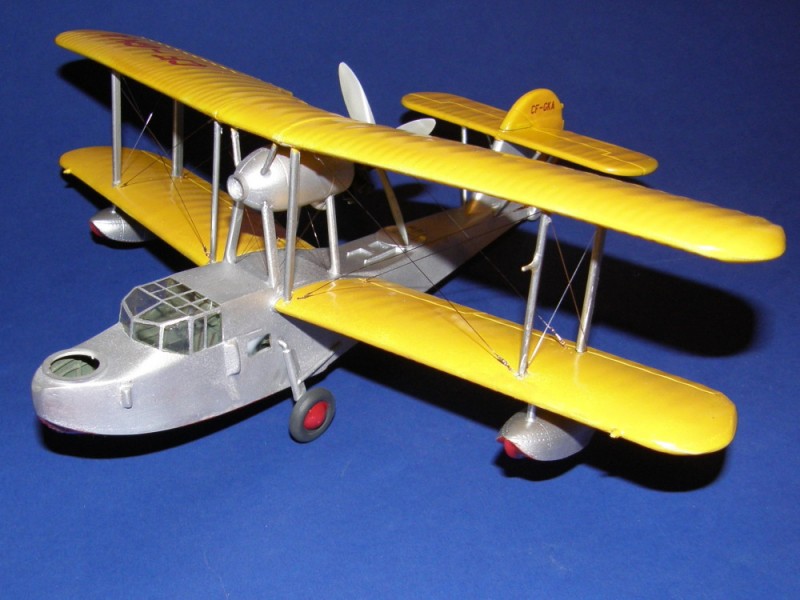
The kit has little dimples moulded where the rigging is supposed to attach. You could try my wire loops method, or you could try drilling right through the parts, supergluing the rigging lines and then cleaning up the opposite surfaces.
I did my Walrus with the wire loops
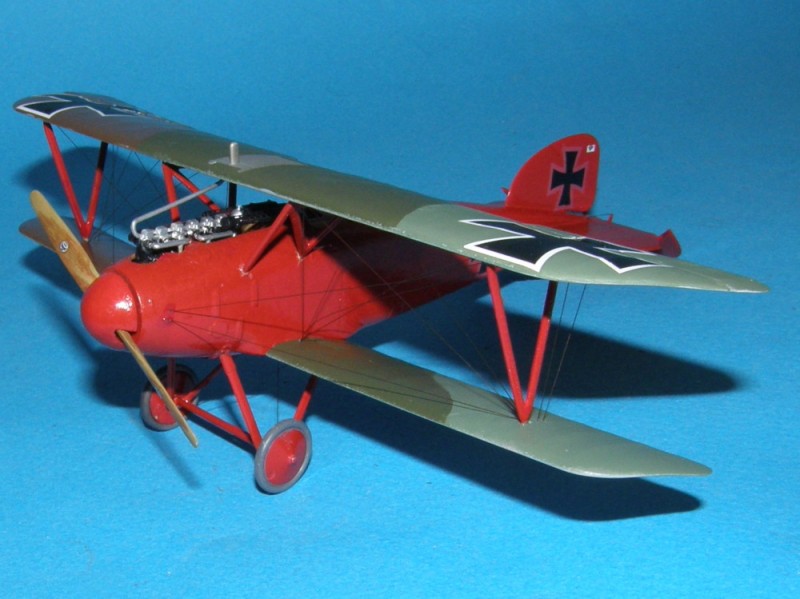
And my Albatros with the "drill right through" method.
I did my Walrus with the wire loops
And my Albatros with the "drill right through" method.
jimb
Joined: August 25, 2006
KitMaker: 2,539 posts
AeroScale: 231 posts
Posted: Sunday, August 16, 2015 - 05:10 AM UTC
The kit has little diamonds on the tail & horizontal stabilizer where the rigging goes. Other than that, it's sort of up in the air.
For the tail section I an using the drill through method. Well, not all the way through.
Those are really nice airplanes, Jessica. What scale are they? I really like the Albatros.
Jim
For the tail section I an using the drill through method. Well, not all the way through.
Those are really nice airplanes, Jessica. What scale are they? I really like the Albatros.
Jim
Jessie_C
Joined: September 03, 2009
KitMaker: 6,965 posts
AeroScale: 6,247 posts
Posted: Sunday, August 16, 2015 - 05:57 AM UTC
They're the "1/48" SMER Walrus and the 1/48 Eduard Albatros D.III
Take a look for the embossed circles on the bottom of the upper wing and the top of the lower wing near the strut mounts. Those are where the flying and landing wires mount to. The upper end of the landing wires attach right beside the cabane strut mounts. The lower ends of the flying wires mount on the lower fuselage, one pair to the top of the main landing gear strut and the other pair just above the leading edge of the wing. Page 13 of the instructions (yes, I know, who reads instructions?) shows the mounting points pretty plainly. They're also clearly shown on the box art.
Take a look for the embossed circles on the bottom of the upper wing and the top of the lower wing near the strut mounts. Those are where the flying and landing wires mount to. The upper end of the landing wires attach right beside the cabane strut mounts. The lower ends of the flying wires mount on the lower fuselage, one pair to the top of the main landing gear strut and the other pair just above the leading edge of the wing. Page 13 of the instructions (yes, I know, who reads instructions?) shows the mounting points pretty plainly. They're also clearly shown on the box art.

North4003

Joined: August 01, 2012
KitMaker: 960 posts
AeroScale: 391 posts
Posted: Sunday, August 16, 2015 - 10:44 AM UTC
I'm building the SMER CR32 now, I'm quite impressed with how the Walrus turned out. The CR32 is a real flash monster.
Quoted Text
They're the "1/48" SMER Walrus and the 1/48 Eduard Albatros D.III
Take a look for the embossed circles on the bottom of the upper wing and the top of the lower wing near the strut mounts. Those are where the flying and landing wires mount to. The upper end of the landing wires attach right beside the cabane strut mounts. The lower ends of the flying wires mount on the lower fuselage, one pair to the top of the main landing gear strut and the other pair just above the leading edge of the wing. Page 13 of the instructions (yes, I know, who reads instructions?) shows the mounting points pretty plainly. They're also clearly shown on the box art.
Jessie_C
Joined: September 03, 2009
KitMaker: 6,965 posts
AeroScale: 6,247 posts
Posted: Sunday, August 16, 2015 - 11:32 AM UTC
Quoted Text
I'm building the SMER CR32 now, I'm quite impressed with how the Walrus turned out. The CR32 is a real flash monster.
I had to use my big industrial strength file on it. Here's the build thread which took place elseforum.
jimb
Joined: August 25, 2006
KitMaker: 2,539 posts
AeroScale: 231 posts
Posted: Wednesday, September 02, 2015 - 01:37 AM UTC
So, got the decals on the Stearman the other day, and they look pretty good. Managed to break the tail wheel off (again) Now, I have to finish the horizontal stabilizer & the rigging.


Jim
Now, I have to finish the horizontal stabilizer & the rigging.


Jim
 |

WEB HOSTING BY


Copyright ©2021 AeroScale and Kitmaker Network, a subsidiary of Silver Star Enterprises
All Rights Reserved. Please read our Conditions of Use and Privacy Policy.
All Rights Reserved. Please read our Conditions of Use and Privacy Policy.