


General Aircraft
This forum is for general aircraft modelling discussions.
This forum is for general aircraft modelling discussions.
Hosted by Jim Starkweather
BoB Spit Mk.1 build

The4thHorseman

Joined: February 08, 2002
KitMaker: 74 posts
AeroScale: 0 posts
Posted: Wednesday, January 14, 2004 - 12:00 AM UTC
I am going to attempt to build the Tamy 1/48 Supermarine Spit MK.1. Since I want this to be the best build possible I am asking for help in construction. Especially filling and sanding. How do you folks fill and sand the wings leading edges and also how do you mask it for painting??? Thanks for the assistance.

brandydoguk

Joined: October 04, 2002
KitMaker: 1,495 posts
AeroScale: 643 posts

Posted: Wednesday, January 14, 2004 - 05:18 AM UTC
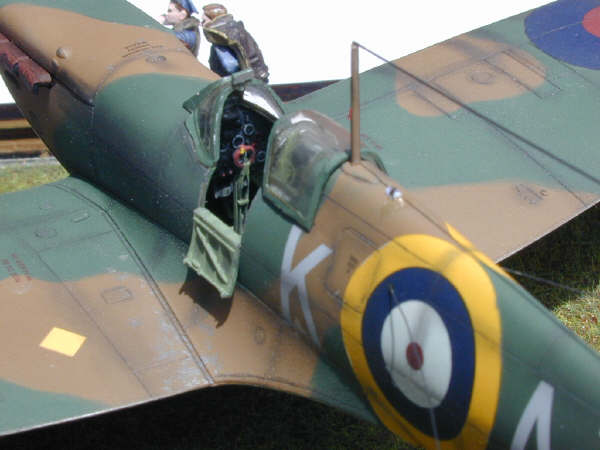
Hi The4thHorseman, I built one of these last year for the Battle for Britain campaign here. It is a really good kit with very few fit problems, I used the tinyest amount of filler on it. The first thing I did with the wing leading edges was to remove the gun barrels which stick out. These were the gun flash suppressors and were omitted on most production spitfires, the holes in the wing could then be covered with doped fabric to prevent icing in the guns. The leading edges were sanded with wet and dry to get them smooth, first 400 grit and then 1200 grit.
For masking I used masking tape and blue tac [I'm not sure of the name for it in the U.S. It is the putty that is used for putting wall posters up.] First I painted the undersides wth duck egg blue. Then I used tape to mask it off and painted the upper surfaces and fuselage top and sides earth brown. I rolled the blue tac out into long thin sausages and laid them out to outline the camo patern and filled in with tape, then painted the dark green. The beauty of using the blue tac to do the edges of the masking is it gives a slightly soft edge to the patern if using an airbrush.
For masking I used masking tape and blue tac [I'm not sure of the name for it in the U.S. It is the putty that is used for putting wall posters up.] First I painted the undersides wth duck egg blue. Then I used tape to mask it off and painted the upper surfaces and fuselage top and sides earth brown. I rolled the blue tac out into long thin sausages and laid them out to outline the camo patern and filled in with tape, then painted the dark green. The beauty of using the blue tac to do the edges of the masking is it gives a slightly soft edge to the patern if using an airbrush.
Holdfast

#056

Joined: September 30, 2002
KitMaker: 8,581 posts
AeroScale: 4,913 posts

Posted: Wednesday, January 14, 2004 - 09:07 AM UTC
:-) Great stuff The4thHorseman, because as we all know "you just can't have to many Spitfires" I've built a couple of these, a very nice kit. A couple of things to look out for, first of all the voltage regulator, part B8, be careful to get it the right way up, otherwise it will foul the fixed canopy. Also be very careful when handling the fixed canopy, part C4, it is very easy to snap it, if you hold it across the two sides. Very little, if any filler is required. Test fit the wings to the fuselage, I found that a small piece of sprue, inserted at about the position where the main spar would be, to gently force the wing halves apart (by about 0.5mm) gave a perfect fit.
For wing leading edges, and most seams I use liquid cement. Use a paintbrush to flow the cement into the seam, capillary action will pull it along. Then gently squeeze the mating surfaces together, this will force a bead of melted plastic, out of the seam. Tape the seam together and leave overnight. The now dry plastic will sand like the rest of the kit and in most cases will have illiminated the seam :-) Be careful when squeezing the halves together, so you don't get glue on your fingers, which will leave fingerprints. If you have to fill any seams ( you will need to fill the rear part of the wing to fuselage joint) lay masking tape either side of the joint, apply your filler, remove the tape (this will remove the surplus filler) then sand. Or, as I do lay down more tape, either side of the filler ( this is to protect any surface detail) then sand.
Martin is correct about the guns. The undersurface colours, of Battle of Britain Spitfires, can be a minefield. If you are doing either of the kit schemes, then XF 21 refers to "Sky" (what paints do you use, knowing this someone can point you to the correct colour) Paint this first and let it dry thoroughly. Mask the division between the upper and lower camouflage. I use Tamiya masking tape, it is expensive but very good. Any masking tape will do, but there can be a danger of lifting the paint, if it has to strong adhesive, or paint creeping under it if the adhesive is to week. Next paint the Dark Earth uppersurface colour then mask this. Spitfire camouflage was hard edged, I use White (Blue) Tack similar to Martin. For hard edge Camo I roll out thin sausages, flatten them, cut them lengthways and use the cut edge as the masking edge. I fill in with masking tape. I have some pics, if I can free up some space in my folder I'll post some here in the next few days.
I hope we get to see some pics of your Spitfire. If you need any help do not hesitate to ask
Mal

The4thHorseman
Joined: February 08, 2002
KitMaker: 74 posts
AeroScale: 0 posts
Posted: Wednesday, January 14, 2004 - 02:44 PM UTC
Thank for pointing me in the right direction guys..Holdfast..I primarily use Model Master enamels...dont know if I missed it but how do you mask the leading wing edges in order to paint the underside then the top???
The4thHorseman
Joined: February 08, 2002
KitMaker: 74 posts
AeroScale: 0 posts
Posted: Wednesday, January 14, 2004 - 02:47 PM UTC
I also wanted feedback on updates for this kit...I am thinking about getting the full cockpit update and also use some of the Eduaurd P/E..when completed I am visualizing putting it on a plain static grass dio base (cuz they did take off from grass fields right???) with the pilot on a bicycle or laying down...any comments/opinions???
Holdfast
#056
Joined: September 30, 2002
KitMaker: 8,581 posts
AeroScale: 4,913 posts
Posted: Thursday, January 15, 2004 - 09:51 AM UTC
Sorry didn't make it clear, I use an airbrush. Paint the underside colour (Sky, I don't know the MM paint number for this, [anybody]) paint up to and slightly over where the upper and lower camo colours meet, on both fuselage and wings. When dry mask off, you need to use a masking tape that is sticky enough so that the next coat of paint wont bleed under it, but not so sticky that it pulls off the first coat of paint. Tamiya masking tape is ideal, but I have used 3-M low tack in the past, with good results. To ensure a straight edge, lay the masking tape on a piece of glass (or other hard surface) and, using a steel ruler cut the tape lengthways. Use this cut edge as your masking edge. Doing this also illiminates the "fuzz" that always builds up on the edge of a roll of tape. The fuselage is quite straight forward, just take your time to lay the tape in the correct place. When doing the wings mask of the main surface area with tape, for the wing trailing edge, just make sure that the tape extends past it. The leading edge is a little more tricky, but only because there is less surface area for the tape to contact. Cut the tape as before and lay the cut edge along the center of the leading edge of the wing, wrapping it around the wing tip, to the trailing edge. This is not as difficult as it sounds, first off just lay the tape on the leading edge, not worrying to much if it's in the right place. Then using a pair of fine pointed tweezers (this is so the tape dosen't stick to them, because of the small surface area) adjust the position, firstly at the fuselage end. When this is in the correct position, hold it there, with your thumb or finger, then lift the tape, with the tweezers, off the leading edge (the rest of the tape will be out of line to the end you are holding) then re-position it, by eye, down the center of the leading edge. As you get to the wing tip you will begin to run out of surface, but you can run it around the tip, then lay it flat at the trailing edge. I usually leave the tape hanging, off the edge, because some tape, will detach from the leading edge if you stick it under the wing. Tamiya tape seems not to have this problem, but 3-M tends to. I hope that all makes sense, you will appreciate that this is something that needs to be shown ( maybe another article :-) ) rather than written. Any problems don't hesitate to ask.
I'm not sure about updates, for this kit. I'm currently putting a Cooper set into a Tamiya Mk V, but this is OOP, I believe. I'm sure there will be a set for this model though, somewhere.
Mal
I'm not sure about updates, for this kit. I'm currently putting a Cooper set into a Tamiya Mk V, but this is OOP, I believe. I'm sure there will be a set for this model though, somewhere.
Mal
The4thHorseman
Joined: February 08, 2002
KitMaker: 74 posts
AeroScale: 0 posts
Posted: Thursday, January 15, 2004 - 06:56 PM UTC
Yeah Holdfast..in words it sounds a bit rocket sciency...but i will read it step by step..over and over and I will make it work!! Thanks for the help!!!
Holdfast
#056
Joined: September 30, 2002
KitMaker: 8,581 posts
AeroScale: 4,913 posts
Posted: Friday, January 16, 2004 - 08:42 AM UTC
:-) It really isn't as difficult as trying to put it into words makes it sound, 'onest guv 
Mal
Mal
Holdfast
#056
Joined: September 30, 2002
KitMaker: 8,581 posts
AeroScale: 4,913 posts
Posted: Saturday, January 17, 2004 - 10:16 AM UTC
:-) Here's the pic I promised showing the use of White Tack to mask, filled in with 3-M low tack tape.
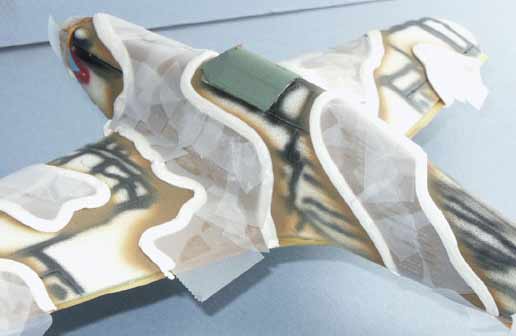
Mal
Mal
 |

WEB HOSTING BY


Copyright ©2021 AeroScale and Kitmaker Network, a subsidiary of Silver Star Enterprises
All Rights Reserved. Please read our Conditions of Use and Privacy Policy.
All Rights Reserved. Please read our Conditions of Use and Privacy Policy.