

So in past builds that I've done, like my Huey, I was able to highlight panel lines before painting with preshading, either with paint or sharpies. But, now, trying to build my all dark navy Hellcat, I don't feel like the technique will work. Same with oil washes, I just feel like it won't have as much effect.
Am I wrong, or is there another technique to use for panel line highlights on dark aircraft?
Start Here (for Beginners)
This forum is for younger modelers or people just starting out in the hobby.
This forum is for younger modelers or people just starting out in the hobby.
Hosted by Jim Starkweather
Dark Aircraft Panel Highlighting
lfetz145

Joined: May 18, 2014
KitMaker: 69 posts
AeroScale: 67 posts
Posted: Monday, July 06, 2015 - 06:48 AM UTC

Jessie_C


Joined: September 03, 2009
KitMaker: 6,965 posts
AeroScale: 6,247 posts

Posted: Monday, July 06, 2015 - 07:26 AM UTC
Try a light wash instead. There's also a technique called "filtering" which uses drops of oil paint and loads of thinner. Our resident Wizard Chuk W explains both of these techniques to perfection in this thread staring on page 8. Read the whole thing while you're at it, it's very much worth the time.

Antilles

Joined: March 22, 2015
KitMaker: 671 posts
AeroScale: 614 posts
Posted: Monday, July 06, 2015 - 09:53 PM UTC
Hallo Logan,
on dark panels, like navy blue, I use a method called post-shading or post-it-shading. Here, a thin dilluted black is sprayed over a mask, that is applied exactley along the panels. Spray, slightly towards the aft direction.
Hence, there will be a thicker blackened area near the panel, that will disappear towards the area not masked.
Some pics of my panther might help, sorry for having no how-to-do pictures.

 .
.
Oliver
on dark panels, like navy blue, I use a method called post-shading or post-it-shading. Here, a thin dilluted black is sprayed over a mask, that is applied exactley along the panels. Spray, slightly towards the aft direction.
Hence, there will be a thicker blackened area near the panel, that will disappear towards the area not masked.
Some pics of my panther might help, sorry for having no how-to-do pictures.
.Oliver
eclarson
Joined: February 22, 2010
KitMaker: 171 posts
AeroScale: 166 posts
Posted: Monday, July 06, 2015 - 10:42 PM UTC
I second Jessie's suggestion regarding light washes. As with dark lines on light aircraft, the trick is not to overdo the effect and detract from the overall appearance. I have a fondness for pastel/pigment washes, and have recently been making my own, but on a Night intruder Hurricane built a couple years ago I used Flory Models Light Dirt and Sand weathering washes.

Easy to apply, easy to remove, and provided the desired subtle contrast.
HTH,
Eric

Easy to apply, easy to remove, and provided the desired subtle contrast.
HTH,
Eric
Joel_W
Joined: December 04, 2010
KitMaker: 11,666 posts
AeroScale: 7,410 posts
Posted: Tuesday, July 07, 2015 - 08:10 PM UTC
Logan,
As others have said, going lighter is the answer. How light is the big question. Surprisingly, real black or dark aircraft often have their panel lines showing up as a lighter color. This usually for the exact opposite reason that we normally see panel lines as being darker; the absence of direct light, causing shadows. In this case it's usually light reflecting off of the lip of the recess.
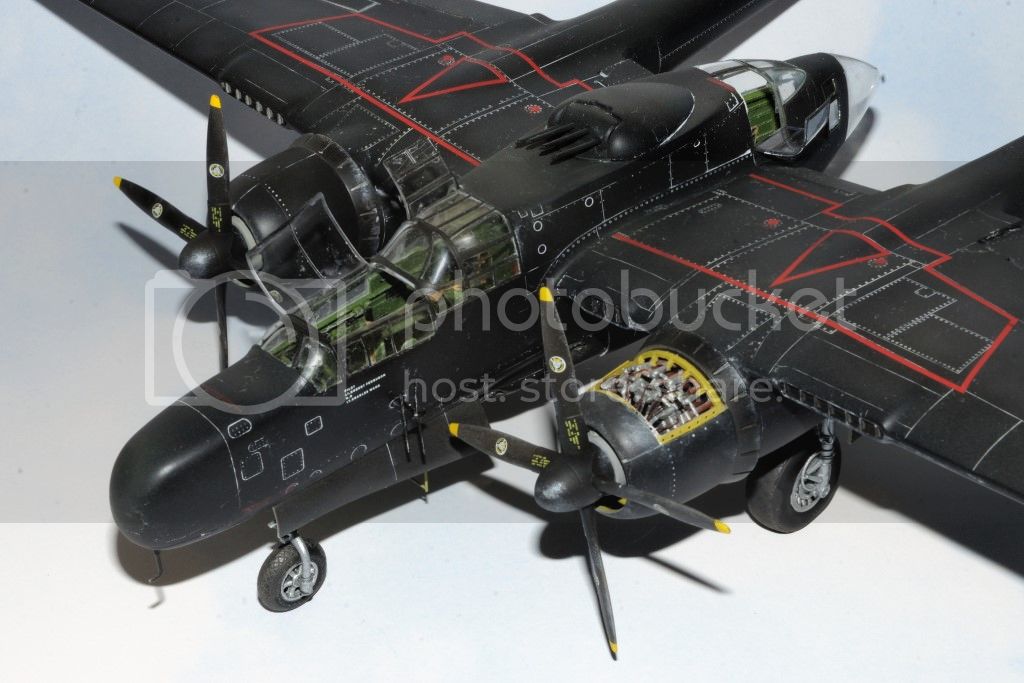
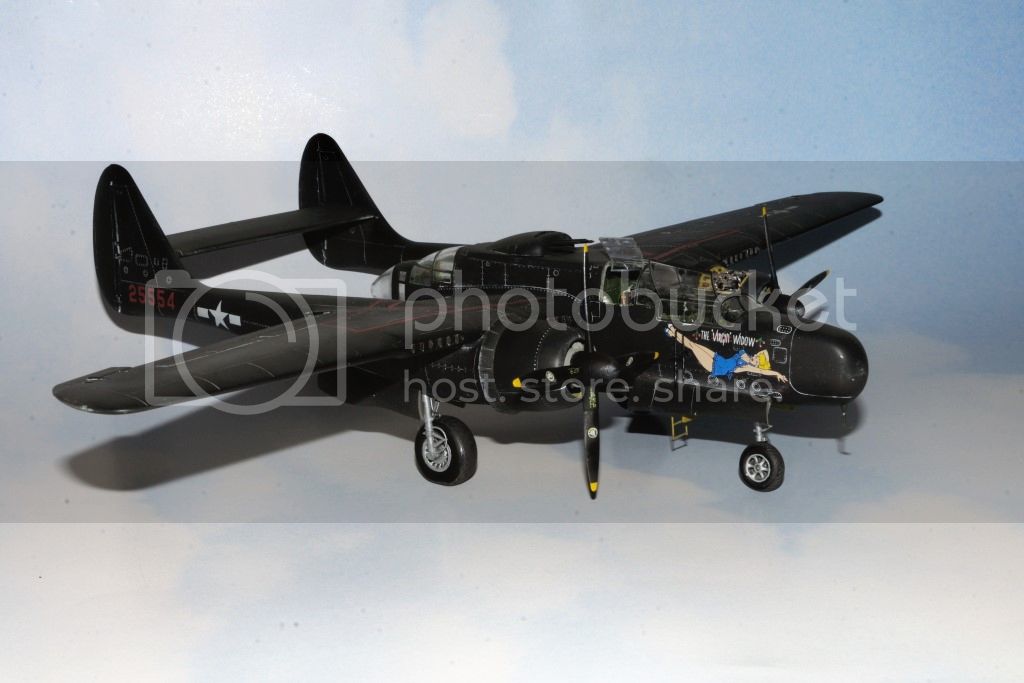
I did my All black P-61 with Flory Light washes, but I think that the overall effect is too stark, and a darker grayish shade would have been a better option.
Joel
As others have said, going lighter is the answer. How light is the big question. Surprisingly, real black or dark aircraft often have their panel lines showing up as a lighter color. This usually for the exact opposite reason that we normally see panel lines as being darker; the absence of direct light, causing shadows. In this case it's usually light reflecting off of the lip of the recess.
I did my All black P-61 with Flory Light washes, but I think that the overall effect is too stark, and a darker grayish shade would have been a better option.
Joel


drabslab

Joined: September 28, 2004
KitMaker: 2,186 posts
AeroScale: 1,587 posts

Posted: Tuesday, July 07, 2015 - 10:06 PM UTC
Panel lines are darker or lighter than the actual panels but are still basically the same color, I would think.
I would therefore start with the same color as the panels but add some white to that to make it lighter
I would therefore start with the same color as the panels but add some white to that to make it lighter


goodn8
Joined: October 12, 2008
KitMaker: 709 posts
AeroScale: 651 posts
Posted: Tuesday, July 07, 2015 - 11:33 PM UTC
Quoted Text
Panel lines are darker or lighter than the actual panels but are still basically the same color, I would think.
I would therefore start with the same color as the panels but add some white to that to make it lighter
Thanks for that post! I thought I'm the only one who see it exactly that way you mentioned as I always recognize mainly overdone pre- and post-shaded very dark and/or too bright lines.
Thomas

drabslab
Joined: September 28, 2004
KitMaker: 2,186 posts
AeroScale: 1,587 posts
Posted: Wednesday, July 08, 2015 - 12:51 AM UTC
Quoted Text
Quoted TextPanel lines are darker or lighter than the actual panels but are still basically the same color, I would think.
I would therefore start with the same color as the panels but add some white to that to make it lighter
Thanks for that post! I thought I'm the only one who see it exactly that way you mentioned as I always recognize mainly overdone pre- and post-shaded very dark and/or too bright lines.
Thomas
Thanks,
I agree and in all modesty without intending to criticise anyone (I am not an expert modeller) I find many models more looking like impressionistic pieces of art than models representing the real thing.
For instance, rivets are sometimes portaieyed so prominent in 1/48 scale or smaller that in real like they should be huge M32 bolts (as used in large boats) instead of tiny aircraft models.
Of course, this comes largely down to taste and style (and in my case lack of skill) but where it comes to weathering and panelling it is often true that less is more.
drabslab
Joined: September 28, 2004
KitMaker: 2,186 posts
AeroScale: 1,587 posts
Posted: Wednesday, July 08, 2015 - 01:03 AM UTC
I know an expert in my local hobby club. He only makes 1/32 fighter planes (and my god, what quality).
His theory is that airplanes leaving the factory have not been "pre-shaded" but airbrushed as beautifully as possible. So that is what he is doing as well.
Once used, color fades by impact of the sun and sun does not care about panels so he airbrushes the part of the plane most affected by sun unevenly with the base coat with some light grey added (misting he calls that)
airplanes get dirty from oil stains ...
.. and so on.
With other words he is building a kind of theory about what happened to the plane, and what the consequences are to its appearance.
Unfortunately, even after having watched him do it, I am just too clumsey to repeat it
eclarson
Joined: February 22, 2010
KitMaker: 171 posts
AeroScale: 166 posts
Posted: Wednesday, July 08, 2015 - 06:36 PM UTC
It's good to see an interesting discussion on this often controversial topic that isn't deteriorating into a flame war. As is often pointed out, there is no right or wrong way to finish a model and it is a matter of personal preferences.
To carry Drabslab's observation a bit further, most models are an attempt to give the impression of a real object. To accomplish this the mind must be tricked into thinking one is viewing a full-sized vehicle from a distance. If one were able to shrink a real aircraft down to the size of a scale model, I think we would find it quite dull. I've stood at a distance from real aircraft in a museum and seen that many surface details, such as rivets, simply aren't noticeable.
So, to liven up our models, we overemphasize details such as rivets, panel lines, etc. so that when seen from normal viewing distances, taken as a whole, they work together to make one think one is viewing an actual vehicle.
As great as being able to take and share photos of our models is, the camera can be our enemy. Bright flash lighting and extreme closeups give views not possible with the naked eye and can give the wrong impression of the model's actual appearance. Joel, you may think the panel lines on your P-61 look stark in the closeup photo but in the one taken further back it looks much better. I bet when viewed in person, in normal lighting, it looks superb.
OK, those are my rambling thoughts for the day.
Cheers,
Eric
drabslab
Joined: September 28, 2004
KitMaker: 2,186 posts
AeroScale: 1,587 posts
Posted: Thursday, July 09, 2015 - 12:23 AM UTC
@ eclarson: please ramble on, these are good comments.
You touch upon a very interesting point: distance and photography. For some time now I try to make realistic photo's of my models. A guy owning a photography shop told me last week that I did it all wrong, instead of using a lens for close-ups, that make every error larger, I should use a telelens instead.
I haven't tried that yet, but soon will
eclarson
Joined: February 22, 2010
KitMaker: 171 posts
AeroScale: 166 posts
Posted: Thursday, July 09, 2015 - 01:36 AM UTC
Quoted Text
@ eclarson: please ramble on, these are good comments.
You touch upon a very interesting point: distance and photography. For some time now I try to make realistic photo's of my models. A guy owning a photography shop told me last week that I did it all wrong, instead of using a lens for close-ups, that make every error larger, I should use a telelens instead.
I haven't tried that yet, but soon will
Hehe...thanks. OK, you asked for it. More ramblings.
In thinking further on the subject, a good analogy came to mind. Have you ever seen an actor in stage makeup? Closeup, they look overdone and almost freakish. Viewed from the audience though they look natural.
Your friend is correct. Closeups are great for showing a specific detail or how some technique is performed but to show off a finished model put some distance between yourself and the subject and use a longer focal length lens.
I'm far from a photography expert but having been a regular contributor to Airfix Model World magazine for several year, I've gained some experience in at least photographing models for publication. I often use a dedicated macro lens for close-up work-in-process photos but for shots of the finished model, I usually use a small zoom lens (18-55mm) which also has decent closeup capability. Lighting is crucial too. A harsh direct light (such as a flash) will result in extreme contrasts between surfaces or colors of varying reflectance. Softer indirect lighting from several sources are best for a more realistic appearance. For my magazine photos of a completed model, I surround the subject with as many as seven 100-watt equivalent CFL lamps. It's also important to have all the bulbs be the same "temperature" so as not to confuse the camera's white-balance sensors. In my case I use 6500K "daylight" bulbs.
Though not practical for what I do, I've seen spectacular model photos taken outdoors, where you have the benefit of natural sunlight and background scenery. Here again, the proper lenses and understanding the effects of varying focal length and depth-of-field are most important.
Thus ends my photography dissertation for the day.
Eric
Antilles
Joined: March 22, 2015
KitMaker: 671 posts
AeroScale: 614 posts
Posted: Thursday, July 09, 2015 - 01:41 AM UTC
Drabslab: Photographing models with a telelense truly sounds interesting. Please share some photos with us, when You have done a shot!
Oliver
Oliver
eclarson
Joined: February 22, 2010
KitMaker: 171 posts
AeroScale: 166 posts
Posted: Thursday, July 09, 2015 - 01:55 AM UTC
Quoted Text
Drabslab: Photographing models with a telelense truly sounds interesting. Please share some photos with us, when You have done a shot!
Oliver
I'm not Drabslab, but I can provide an example. Unless one is outdoors, it's not practical to use too powerful a lens since indoors you can only get so far away from your subject.
I mentioned in my previous post that I often use an 18-55mm zoom for full view shots but I also have a longer range lens that allows me to get back a little further if need be.
Here's one of the photos used in my AMW article on the 1/48 Academy F-4B. The background is merely a large sheet of white paper. Note that the model is evenly illuminated with very few shadows - the result of the multiple indirect light sources. This shot was probably taken with the small zoom set to 50-55mm.

Eric
Antilles
Joined: March 22, 2015
KitMaker: 671 posts
AeroScale: 614 posts
Posted: Thursday, July 09, 2015 - 10:18 AM UTC
Quoted Text
Quoted TextDrabslab: Photographing models with a telelense truly sounds interesting. Please share some photos with us, when You have done a shot!
Oliver
I'm not Drabslab, but I can provide an example. Unless one is outdoors, it's not practical to use too powerful a lens since indoors you can only get so far away from your subject.
I mentioned in my previous post that I often use an 18-55mm zoom for full view shots but I also have a longer range lens that allows me to get back a little further if need be.
Here's one of the photos used in my AMW article on the 1/48 Academy F-4B. The background is merely a large sheet of white paper. Note that the model is evenly illuminated with very few shadows - the result of the multiple indirect light sources. This shot was probably taken with the small zoom set to 50-55mm.
Eric
Hallo Eric, sorry for misadressing! It seems You answered drabslab just a bit sooner.
Thank You very much for Your post. Great photograph of an impressive modelled bird. I definetely have to loot my wife's camera equipment
 , as she is the photographer!
Oliver
eclarson
Joined: February 22, 2010
KitMaker: 171 posts
AeroScale: 166 posts
Posted: Thursday, July 09, 2015 - 06:53 PM UTC
Quoted Text
Hallo Eric, sorry for misadressing! It seems You answered drabslab just a bit sooner.
Thank You very much for Your post. Great photograph of an impressive modelled bird. I definetely have to loot my wife's camera equipment
Oliver
Hi Oliver,
No need to apologize as you didn't misaddress your post. It was indeed Drabslab who mentioned using a telelens for taking photos. I just thought I'd add my 2-cents worth since it might be a while before he has a chance to try it.
You're welcome and thank you for those kind words.
Oh yes, not only borrow her photography equipment but ask for her advice!
Cheers,
Eric

Scrodes
Joined: July 22, 2012
KitMaker: 771 posts
AeroScale: 763 posts
Posted: Thursday, July 09, 2015 - 10:36 PM UTC
Don't forget that the more reference photos of Hellcats that you look at, you'll notice that very very few show any sign of paint fading.
The best technique I have found is to spray as if you were doing post-shading (spotty, random) but alternating between a clear flat coat and a clear semi-gloss. for the semi gloss, use Testor's Dullcote - it fades the paint a bit as well as dulling the gloss.
The best technique I have found is to spray as if you were doing post-shading (spotty, random) but alternating between a clear flat coat and a clear semi-gloss. for the semi gloss, use Testor's Dullcote - it fades the paint a bit as well as dulling the gloss.
Joel_W
Joined: December 04, 2010
KitMaker: 11,666 posts
AeroScale: 7,410 posts
Posted: Sunday, July 12, 2015 - 09:11 PM UTC
Using any zoom or macro lens at close to the 50-55mm setting is actually what is referred to as a Normal focal length lens. It's ability to focus closer, still offers what the eye would see moving closer to the subject. As you move closer, you start to distort the lines of the image. Moving further back from the subject does the exact opposite.
A telephoto lens offers you the ability to move further away from your subject, and also control the lighting and shadows. The issue with any telephoto lens is its min focus point. Often the room you're trying to photograph your model in isn't long enough to use a telephoto lens.
I take a lot of my build pictures with a 55-200 Nikkor zoom lens, using the appropriate focal length as required. In order to use that lens within a few feet of the subject I use a set of extension tubes. Most of the time I use a 12mm tube, but for closer work I switch to a 20mm tube.
Joel

plastickjunkie
Joined: December 31, 2009
KitMaker: 399 posts
AeroScale: 132 posts
Posted: Monday, July 20, 2015 - 04:45 PM UTC
Quoted Text
I was able to highlight panel lines before painting with preshading, either with paint or sharpies.
To add to something not covered, the standard ink Sharpie will bleed thru enamels over time. It may take weeks or months but will eventually bleed thru and ruin the paint. I believe it will not bleed thru acrylics but to be safe use the oil based Sharpie ones.
 |

WEB HOSTING BY


Copyright ©2021 AeroScale and Kitmaker Network, a subsidiary of Silver Star Enterprises
All Rights Reserved. Please read our Conditions of Use and Privacy Policy.
All Rights Reserved. Please read our Conditions of Use and Privacy Policy.