This build is going to be an attempt to convert a basic 1/72nd scale motherless (it came in a clear plastic bag sans instructions or decals from Squadron Shop) C-130 kit into a MC-130E Combat Talon. This is a project that has been percolating on the back burner for decades, the 1970's specifically. This is the look I'm shooting for:
Actually this beast in particular:
Ole "0561" I was the Crew Chief on this particular porker for a good portion of the time I was stationed at Rhein-Main AB from 1975 to 1978. For the purists out there I realize this is now a Combat Talon I, but when I was working on these things we weren't numbering them yet. This is what I'll be starting with:
I've thrown in the date/time 'cause I'll try to do this with the current Lockheed Campaign, if I can figure out how to tie it in.
By the look of it this 130 will have more brass in it than a Philip Sousa band, or the floor of a B-17 on the way back from Schweinfurt. I'm hoping as I gather research material that it'll help resuscitate some long drowned brain cells or neural pathways as to what things actually looked like. For an aircraft that is the modern equivalent of the eternal DC-3/C-47 not many good pictures seem to exist on this variant. Of course some of that might have something to do with the fact that much of what they did was classified at the time. I do remember that just walking around taking pictures of the aircraft was not really rewarded behavior at that point. I encourage you to come along for the journey, if nothing else you'll see what not to do.
Carry on
Modern (1975-today)
Discuss the modern aircraft age from 1975 thru today.
Hosted by Jim Starkweather
Combating the Talon - an MC-130E Conversion
Thearmorer
Alabama, United States
Joined: June 17, 2014
KitMaker: 121 posts
AeroScale: 118 posts
Joined: June 17, 2014
KitMaker: 121 posts
AeroScale: 118 posts
Posted: Thursday, August 06, 2015 - 08:23 AM UTC
Posted: Thursday, August 06, 2015 - 03:46 PM UTC
Looking forward to the build, good luck!
Joel_W
Associate Editor
New York, United States
Joined: December 04, 2010
KitMaker: 11,666 posts
AeroScale: 7,410 posts
Joined: December 04, 2010
KitMaker: 11,666 posts
AeroScale: 7,410 posts
Posted: Friday, August 07, 2015 - 01:40 AM UTC
rest assured that I'll be following along every step of the way. These are the type of builds that just fascinate me from a modeler's perspective.
Joel
Joel
Thearmorer
Alabama, United States
Joined: June 17, 2014
KitMaker: 121 posts
AeroScale: 118 posts
Joined: June 17, 2014
KitMaker: 121 posts
AeroScale: 118 posts
Posted: Wednesday, August 12, 2015 - 06:31 AM UTC
Well gentle readers now it begins. It's time to start hacking and slashing to see if I can pummel this beast into some sort of MC shape. First a little background info for those not steeped in the knowledge of some of Uncle Sam's more arcane aircraft types. The MC-130's are standard C-130 airframes that are modified to accept additional sensors and electronics, plus in the case of the earlier models, the Fulton recovery system. This last item is the most noticeable feature on the MC's, the hydraulically actuated fork mounted above the modified nose, was used to snag a tethered balloon to lift people and things from the ground without having to bother to land. The primary purpose of this model of C-130 is to support special operations units. Most of you can surmise from the paint scheme on these birds that most operationss were night ops. This is going to play hob with a lot of my reference photos, a black airplane viewed from a distance especially against a light sky is almost impossible to deduce any details from. So your going to see a lot of dark shapes and just take my word for it, that what I'm doing reflects the real thing. (this may work in my favor) So let's get started. Since the Flightpath brass sheet has parts to cover the flap well I decided to cut the molded in flaps from the bottom wings. The 130's have a Fowler type flap which extends on rails to significantly increase the wing area during take off and landing, which also significantly increases the amount of work/detail I've got to add to make this look believable.
Looks easy enough at this stage, the fun is yet to come. Also visible in this shot is what will be one of my biggest hurdles, those hideous Arfix/Italeri engine exhausts. They would have you put on exhausts that would only look proper on a Harrier. These things are totally wrong. More on this as the build develops. My next surgery was to replicate these little black rectangles aft of the wheel wells:
These are the openings for the chaff dispensers. After a little thought I figured my best approach was to WAG (Wild Assed Guess) some dimensions based on the panel size represented on the kit. I drew out my dimensions on some masking tape and placed them over the panel.
I figured it would be best if I placed the tape on as a solid piece to reduce the chance of distortion while applying. I then cut out the areas that would represent the chutes.
Next step was to drill pilot holes so I wouldn't chew up my tape guide when I enlarged the hole a bit with a dental bit. When I had a hole big enough to get a square jewelers file in, I went to work squaring off the holes.
The next agenda item is a little rhinoplasty on the kit nose. The distinguishing feature of the MC-130:
Flightpath was good enough to include a resin version of the modified nose radome which more or less fits along the kit's raised nose panel line. When the cuttin was done:
Not perfect, but well within allowable limits by my standards. That should be most of the heavy hacking on the fuselage, next step will be to mosey inside and have a look in there.
Carry on
Joel_W
Associate Editor
New York, United States
Joined: December 04, 2010
KitMaker: 11,666 posts
AeroScale: 7,410 posts
Joined: December 04, 2010
KitMaker: 11,666 posts
AeroScale: 7,410 posts
Posted: Wednesday, August 12, 2015 - 08:01 PM UTC
DM,
Thanks for all the background information, as it really helps someone like me to understand what your modeling. My main interest is as a modeler, not a aircraft enthusiast.
Excellent job on the start of the nose modification. Those Chaff dispenser cutouts are very nicely done. Are you going to put some kind of facsimile dispensers behind them, or just a flat black backing plate? And I'm really interested in seeing how you handle those flaps modifications. Every time I've run into the extended type, I just leave them as is in my build.
Joel
Posted: Wednesday, August 12, 2015 - 08:47 PM UTC
That's a very cool project! I will be following.
Go ahead and enlist in the Lockheed campaign. Would be great to have you there.
Thearmorer
Alabama, United States
Joined: June 17, 2014
KitMaker: 121 posts
AeroScale: 118 posts
Joined: June 17, 2014
KitMaker: 121 posts
AeroScale: 118 posts
Posted: Tuesday, September 08, 2015 - 07:20 AM UTC
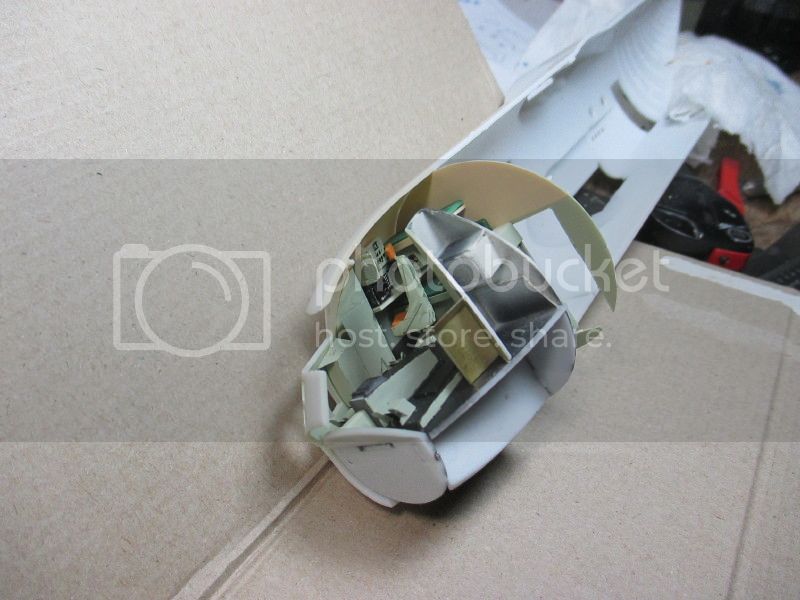
After much work and little progress, I figure it's about time to post a little update. With the major outside cutting done it's time to head inside. I no sooner get through the crew entrance door (the small one, lower left side) than there's a problem.
Crew entrance door is on the bottom, and what is that opening going back to the cargo compartment, a pet door?
A close-up of the same area:
This is what it's suppose to look like.
And with people to give it some scale.
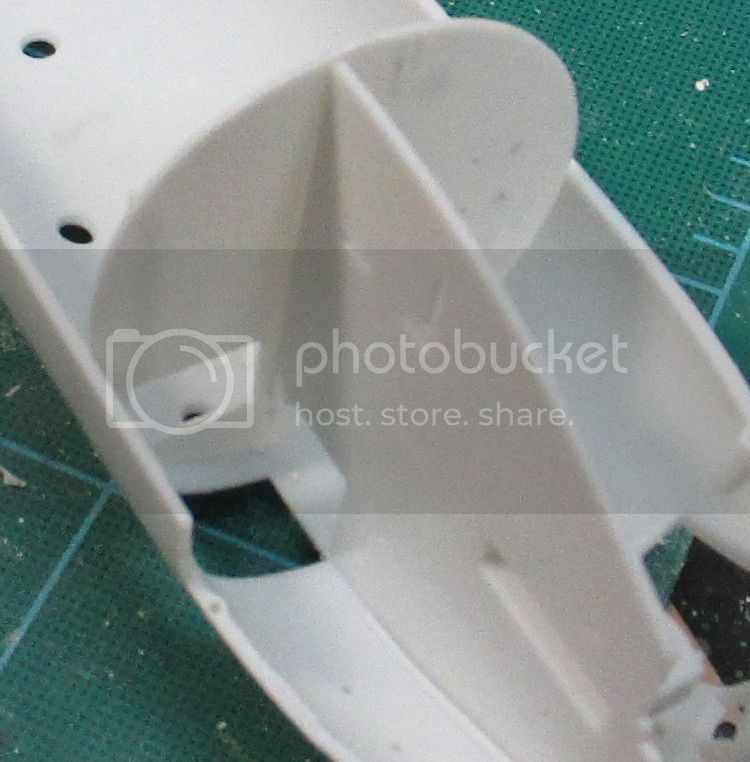
This is my first attempt at adjusting the size. Note the flight deck floor spans the opening about 1/3 the way down. This situation pretty much explains my difficulties, there isn't much detail inside (relative to what's actually there) and what is there is grossly inaccurate. Hence the floor in the doorway.
Another angle.
The bulkhead on the left is what you get, the one on the right is what you need. (after a couple of more cuts on the opening) The Hasagawa figure is there for scale.
And some do-it-yourself detail, which under some paint, (and it'll be at the end of a long dark tube) should do ok.
The reason the flight deck floor sits in the middle of the doorway is that the size of the opening to the flight deck is also way undersized. Again on the left is as the kit would have it, on the right is fairly close to what it should look like.
The fabrication sticking up just forward of the opening is the crew galley on the "E" models. The galley construction foreshadows a lot of the problems to come on the flight deck, first there is the problem of compound curves in the nose area, compounded further by kit supplied part not being where they should be, and the size of everything seems to be dependent on what is next to it.
This is the galley area with the completely erroneous bulkhead under the flight deck at this location.
And the placement of the cargo compartment forward bulkhead.
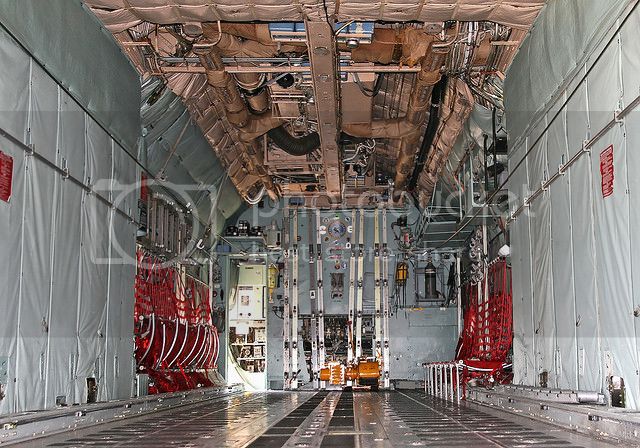
This is a shot looking forward showing the avionics equipment racks where the kit has that bulkhead. Also of note in this shot is the small round hole just above the cargo floor, that is an inspection port for the nose wheel well (more on that in a bit) and I have no idea how they managed to get that much light into the nose wheel well. This shot is from an "A" or "B" model 130 which did not have the galley or the door between the flight deck and the cargo compartment.
This is looking up towards the flight deck from the crew entrance door. The angled object behind the ladder is the aft portion of the nose wheel well, with the inspection port barely visible between the first and second steps. The cover on the equipment racks under the galley was not normally installed on any "E" models I worked on. The bulkhead that Italeri put under the galley is actually about 2-3 feet (0.6-0.9 meters) forward of where they placed it. The book/storage rack is a standard feature on the E's (however that hideous paint is NOT).
I pondered long and hard on what to do about the under deck bulkhead. My initial reaction was to cut down the aft portion of the nose wheel well and extend in back slightly and place the sides of the bulkhead further forward. As you can see in this shot the front, back and sides of the nose wheel well (which in reality doesn't look even remotely like this) all interlock with the flight deck floor. Naturally all of the tabs are in the wrong place to make any adjustment. As you see here.
Since the Eduard C-130 interior set provides some rendition of what's under the flight deck, I finally decided to cut my losses and try and work with the wheel well (which can't really be seen once everything is together anyway) and the bulkhead as depicted on the kit.
This is how Eduard depicted the aft portion of the nose wheel well. Not really correct, but their heart was in the right place. There are no holes on the side of the cover (the cabin is pressurized, the wheel well is not) and the inspection port is missing, but it won't be "that" noticeable in any event.
And the equipment rack.
Enough for now so I don't time myself out and have to do this all over again.
Carry on
Thearmorer
Alabama, United States
Joined: June 17, 2014
KitMaker: 121 posts
AeroScale: 118 posts
Joined: June 17, 2014
KitMaker: 121 posts
AeroScale: 118 posts
Posted: Wednesday, September 09, 2015 - 01:09 AM UTC
Now to press on to get caught up to date with the build progress (the term "progress" is used quite loosely in this instance). The final version of the nose wheel well:
All of the C-130 wheel wells during this time period (mid 1970's) that I had contact with were painted a flat silver, main gear and nose. This is Tamiya flat aluminum with a liberal wash of enamel flat black & burnt umber and then drybrushed again with aluminum. The black junction boxes are .04 sheet styrene glued on top of the corresponding box shapes of the kit wheel well roof just to give it some more depth (not that anyone will ever see it once it's together, but it's the thought that counts). The nose gear mounts (those stubs on each side) are molded as "O" shaped sockets on the original kit parts, I ground out the bottoms of each to make a "U" shaped bracket so I could insert the nose gear after assembly. With all the weight that will be needed to get this beast to sit right, having the nose gear fall out the bottom is not a problem.
This is a good shot of the forward cargo compartment bulkhead, and is approximately what I'm going for. I will probably keep the cover for the lower center access panel on to keep the area under the flight deck darkish so as not to emphasize the problems in that area. In reality on the MC-130's there is a squareish cover over the FLIR (Forward Looking Infra-Red) turret which was mounted just aft of the nose gear, and could be deployed (lowered) during flight. I will make up a cover (based on a foggy memory) to place in there, but I may not want to draw over-much attention to it.
It's now back up to the flight deck and start dealing with some detail there. The kit gives you five seats, Pilot and Copilot, flight engineer and two at the navigator's position. This setup is not correct for any of the E models I encountered. There was only one navigator's seat with a crew bunk arrangement between that seat and the rear bulkhead. The kit provided seats are a reasonable shape for the pilots and engineer positions sort of, but the navigator position needs major work. They are a mix of the correct (for this model) triangular shaped backs and a more square backed version which I never saw.
In this shot only the flight engineer's seat is the correct type for the E's. Since I need to do quite a bit of mix and match on seat backs and mounts I decided to make silicone molds of the kit provided seat parts so I could hack and slash to my heart's content to get what I needed and not have to worry about screwing something up. Plus there is a DC-130 conversion in the stash which is awaiting the outcome of this kit. (I crewed those too, before being sent to Germany) These had additional seats for the drone launch and control officers, so I'll need extra parts down the line anyway. The resin parts:
Next, on the right is a copy of the kit navigator's seat with a copy of the back for the pilot/engineer seats in the center. The left item is the pilot back and the navigator seat with some styrene sheet to blend in the sides.
What I'm shooting for:
You'll note in one of the preceding picts that the engineers seat mounts on a pyramidal base like the navigator's seat, not the fixed base of the pilot's seats, which is not what the kit version (and Eduard) would have you do.
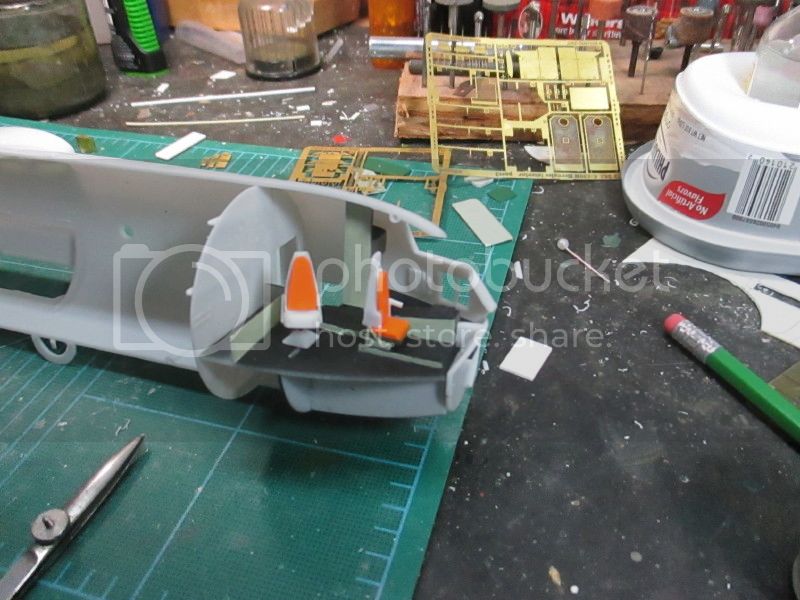
This is the flight deck with the Eduard pilots/engineer station added and styrene crew bunks for the aft bulkhead. The bunks are .03 styrene frames and .04 bunk pads. The edging is .005 strip.
And the kit seatbacks stuck on the Eduart bases to see how it looks.
This shot is good because it gives an idea of the layout of the flight deck without the furniture.
Of note is how the raised flooring for the flight engineer is slanted to the left on the real thing to give extra clearance with the navigator's seat. Neither Italeri (originally Airfix I think) nor Eduard picked up on this. My guess is ease of manufacture in the first part, and not worth fixing on the second part. It's not like the kit is lacking for space in this area (a dig on the lack of detail in the original). During this time period the "sea foam green" (lower) and buff (upper) interior colors were typical for E models, with black anti-skid on the flooring. The anti-skid was either a emery-cloth (think heavy duty cloth sandpaper)like sheet for large areas or a black paint with sand mixed in for things like steps. This was pretty tough stuff because I don't recall ever seeing any that was ever warn through.
This is the rear bulkhead and crew bunk area. A dark picture but you get the idea.
This is the storage case by the crew entryway just positioned to make sure I've got enough clearance for the steps up to the flight deck.
These shots are thrown in show some extra detail and to highlight some of the frustration in doing research on this stuff. I suppose all of these gentlemen are nice people, and the folks back home would love to have their pictures over the mantle, but jeeze - I'm trying to get some detail and dimensions here, get your fat a** outa the way!
Behind the co-pilot (right-side):
Behind the pilot (left-side):
Flight engineer and navigator's position:
I did finally manage to get a good shot of the circuit breaker panel arrangement behind the pilot which I will not share here, because the reason for the photo was the aftermath of a bald eagle birdstrike (yes, the remains were IN the flight deck) and not everyone is good with body-bits.
The navigator's and engineer's seats in-place and prior to floor touch up.
Navigator's and co-pilot's seats with seat cushions added to check fit.
I see I'll have to revisit the seat cushions on the pilot's and co-pilot's seats. On the real thing they are quite thick which was my original choice of .04 styrene, but when added to the Eduard seats, are way to thick. I'll probably go back to .01 styrene for a better appearance. The cushions were most generally an orange color as shown here. Olive drab was encountered occasionally, both would be correct, but orange was much more common at the time. I've got to work up a suitable wash/drybrush to tone down the dense orange effect you see here, I'll have to experiment to see what works.
This shot is to see how the flight deck fits with the nose gear well glued in-place and rear bulkhead attached. Of note here is where the deck meets the fuselage. On the real aircraft the flight deck comes up to the bottom of the vertical windows by the pilot and co-pilot positions. As you can see on the kit it falls close to a scale foot (30 cm) below. So either the floor is too low or the windows are too short, or a combination of both. We'll see how it plays out in the finished product.
The next hurdle is to flesh out the navigator's position and tie-in the side circuit-breaker panels. Eduard provides brass for the panels so I'll have to see how they fit.
Carry on
chris1
Auckland, New Zealand
Joined: October 25, 2005
KitMaker: 949 posts
AeroScale: 493 posts
Joined: October 25, 2005
KitMaker: 949 posts
AeroScale: 493 posts
Posted: Wednesday, September 09, 2015 - 02:32 AM UTC
Hi DM,
I'm following along,for no other reason,but that I can.
She is looking good so far,wish I had the time, energy and skill.
Looking forward to more updates.
Chris
I'm following along,for no other reason,but that I can.
She is looking good so far,wish I had the time, energy and skill.
Looking forward to more updates.
Chris
Joel_W
Associate Editor
New York, United States
Joined: December 04, 2010
KitMaker: 11,666 posts
AeroScale: 7,410 posts
Joined: December 04, 2010
KitMaker: 11,666 posts
AeroScale: 7,410 posts
Posted: Wednesday, September 09, 2015 - 08:55 PM UTC
DM,
A most unusual subject for sure. Your attention to detail, and your research material is exceptional. The cockpit and it's associated detailing is some of the best I've ever seen.
Joel
A most unusual subject for sure. Your attention to detail, and your research material is exceptional. The cockpit and it's associated detailing is some of the best I've ever seen.
Joel
Thearmorer
Alabama, United States
Joined: June 17, 2014
KitMaker: 121 posts
AeroScale: 118 posts
Joined: June 17, 2014
KitMaker: 121 posts
AeroScale: 118 posts
Posted: Thursday, September 17, 2015 - 08:44 AM UTC
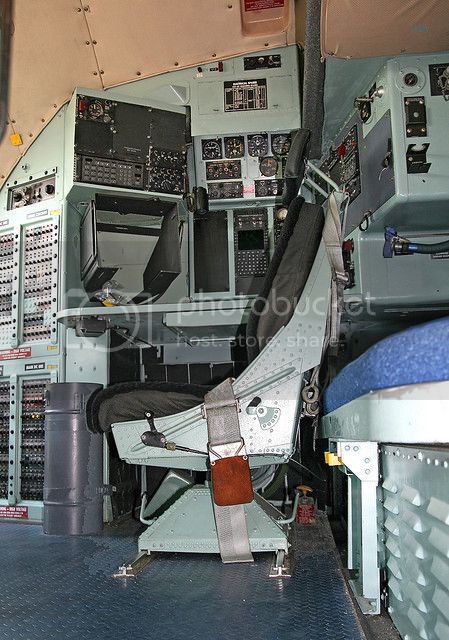
Time again for an update. I'd planned on doing this yesterday since good progress was made on the navigator's station but I hit the wall late in the day trying to tie in the circuit breaker panel just forward of the nav's station and aft of the main wind screen. The multiple curves on the fuselage weren't cooperating at all with the funny shaped bits of styrene I was using to try and fill in the area in question. I'd get a shape I thought wasn't bad only to have the Eduard photo etch not even come close to fitting in. After about half a dozen different approaches of which none worked to my satisfaction. I finally admitted being stumped, signed an armistice with the offending bits, had a large Scotch Ale, and pondered my dilemma. This is the look I'm going for:
The last shot is an "H" model and the instrumentation is quite a bit different than what we used (way back when) but the basic layout remained the same.
This is what the kit gives you to work with:
Awe inspiring. heh? Definitely leaves room for improvement and personal initiative.
I found these tools absolutely essential for a build of this nature. The Murphey's rule is in 1/72 & 1/48 scales (make sure you keep track of which one you're using, disaster can follow the unwary) Without plans or measurements, and working strictly from unscaled photos, you can make educated guesses on the size of parts relative to other objects and people in the shot, but you've got to have a way to put that info into context. That's where the scale scale comes in. I suppose you could take your guess and convert it by math into mm or 64th's of an inch or what-ever, but I figure this is a hobby, not a math problem. The small scale see-through protractor definitely helps keeping those small bits of plastic shapes in the ballpark and saves quite a bit of trial and error (it certainly doesn't eliminate it though). On something like the C-130 with a lot of odd curved shape the wire shape-shifter thing-a-ma-jig (I have no clue what-so-ever of the technical name for this thing), but again it goes a long way towards getting the shapes close to what you need. I did almost all of the scribing with the No. 16 X-acto blade you see here. I use the blade portion to start my cut and then reverse it to use the backside to scour through most of the plastic. The blade angle is less pronounced than a No. 11 blade and thus is more rigid. It also has the advantage of being much thinner than other scribing tools which helps on some of the thicker sheets of styrene.
This is the beginning of the Nav's radar scope. The center is a 1/8 inch balsa square to keep my styrene bits somewhat to shape, any by overlapping the bits in this fashion, I don't have to be exact in my width, since I can trim to shape after the glue has set up a bit. The balsa is left in the center to help hold the styrene tube I'll use for the scope screen. A little superglue was applied after the tube was inserted to give the balsa a better texture to paint over.
This is the bracket and scope arrangement I'm going for:
(Well it shows the mount good)
These are the bits I cooked up to flesh out the nav station.
The bracket for the nav scope started life as a wine bottle cork seal, I'm more of a beer and scotch guy myself, but I can't recommend wine highly enough as a good source of modelling supplies. The curved shapes are what I'm going to use to try and fair all this into the fuselage with and the odd shapes are the instrument panels. I decided to go with decals for the instruments since all this is going to be practically invisible once everything is together so it should work. The decals are a couple of old B-17 instrument panels from a microscale and Academy sheets, plus some odd shapes from a phantom data sheet.
This is the general layout of all the plastic bits for the panels and the scope, plus the seats after a coat of paint and some of the cushions put in to check for size.
Preliminary test fit after decals:
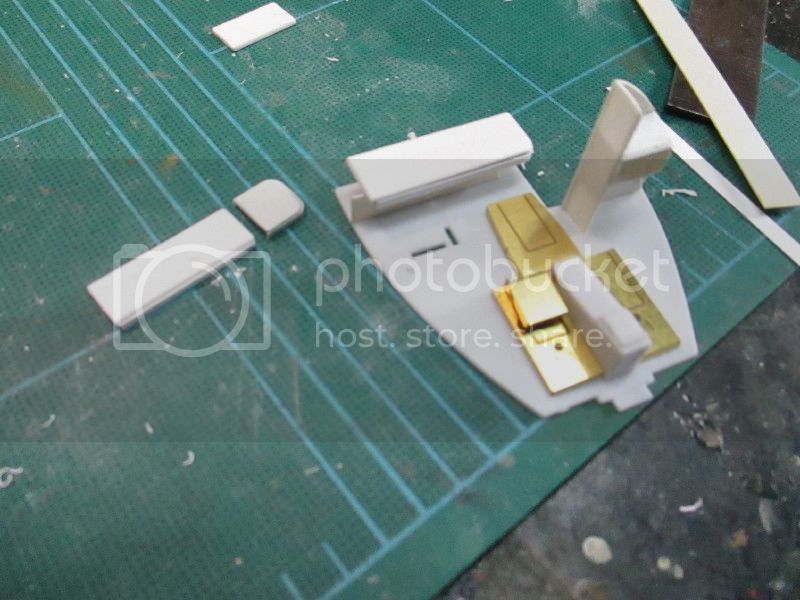
The seats after the addition of the Eduard brass, and on the right those pesky brass circuit breaker panels.
A good portion of by problem getting all this to go together was the space all of this had to go was several sizes smaller than my meat-hooks could adequately handle, and with the curved sides nothing would stay where it was placed. All this made making fine adjustments to the parts a massive exercise in guesswork. This shot also shows the final compromise on the problematic right side circuit breaker panel.
This is with the flight deck in place and the nav's seat installed to check for clearances.
And about all you'll be able to see up through the crew entrance door once this is buttoned up.
The next step is adding all those sub-atomic Eduard detail bits and the seats without breaking anything off.(or not much anyway)
Carry on.
Posted: Thursday, September 17, 2015 - 05:30 PM UTC
Very ambitious build. I love it
Looking forward to see more!
Joel_W
Associate Editor
New York, United States
Joined: December 04, 2010
KitMaker: 11,666 posts
AeroScale: 7,410 posts
Joined: December 04, 2010
KitMaker: 11,666 posts
AeroScale: 7,410 posts
Posted: Thursday, September 17, 2015 - 09:35 PM UTC
DM,
Now that's scratch building at a high level. The amount of visible detail should really fool the viewers eye, as they only have access to the compartment from the front cockpit glass and bulkhead.
Like you, I'm an occasional beer man, having given up imported Scotch years ago. My wife drinks wine, but now her wine comes in cardboard boxes.
In any event, I'm glad to see that you're making headway with this most unusual build.
Joel
windysean
Wisconsin, United States
Joined: September 11, 2009
KitMaker: 1,917 posts
AeroScale: 563 posts
Joined: September 11, 2009
KitMaker: 1,917 posts
AeroScale: 563 posts
Posted: Thursday, September 17, 2015 - 10:56 PM UTC
Holy Schnitzel! That cockpit detail pulled me right in. Fantastic!
-Sean H.
-Sean H.
Thearmorer
Alabama, United States
Joined: June 17, 2014
KitMaker: 121 posts
AeroScale: 118 posts
Joined: June 17, 2014
KitMaker: 121 posts
AeroScale: 118 posts
Posted: Thursday, October 01, 2015 - 06:13 AM UTC
Ah yes, the Hurky Turkey klunks along ever so glacially. Actually quite a bit of work has gone on, it just seems like very little of it was camera worthy. An inordinate amount of work went into stuff like this:
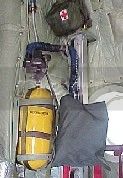
I really should have put something in the view to show some indication of the scale. The largest item on the sheet of styrene is the Eduard instrument panel, which is a whooping 2.5 cm wide. The O2 walk around bottles are from the Quickboost 1/72 B-24 oxygen bottle set which also includes the large installed bottles used on most WWII U.S. bombers. The regulators (the black round things) on the end of the bottles are disks punched from a 30 thousandths sheet of styrene with one of those rotary leather punches. Each one is drilled (No.70 drill) as much as possible to fit over a small stud on the end of each bottle. These things sit next to the large lower cockpit windows by the pilot's and co-pilot's feet, and being yellow, stick out like a sore thumb, so they really oughta be there. Plus there's a couple more back in the cargo compartment (actually more than a couple) but only a couple where they'll be obvious. The first aid kits are sheet styrene laminated (40, 30 and 5 thou.) The pouch itself is 9 scale inches square with the backing sheet 9x12. The pouch part is sanded on the edges and corners to give it less of a box shape. The red crosses come from a 1/35 medic's armband decal on an old Scalemaster sheet and punched out with one of those nifty pinpunch sets. Getting the decal from the sheet onto the pouch was a cross between a sharp-stick-in-the-eye and watching paint dry. It took forever for the decal to loosen up and then get it off the backing which was exactly the same size as the decal. The fire extinguisher is a styrene tube with some craft wire orgamy for a handle and a small (next to impossible to see against the background) 10 thou. disk for a pressure gage. The black item next to the bottle is an emergency light that was next to the escape hatches that would light if power was cut off. (we would use them on occasion if they were handy and a flashlight wasn't) The white rectangle is the future cover for the FLIR (Forward Looking Infra-Red) camera that was mounted just aft of the nose landing gear. The other black items are a couple of bits of equipment that will be mounted on the FLIR cover (busy things up a bit)
A closer shot of the O2 bottle and First Aid kit:
The flight deck seats, with the cushions, Eduard seatbelts and bits added to dress things up. The seats will be about the last things added to the flight deck to keep from breaking something off.
Up to this point I've been hammering away at the fiddly bits in the nose and trying to make sure I don't install something that is going to be in the way of some later piece that needs to go in behind it. Since I'm making most of this up as I go along, the "Master Plan" gets a little fuzzy on occasion. I also noticed that sometimes the photo-etch does what it's suppose to do, other times it goes everywhere except where I want it. In those cases I've found it best to just let it be, and come back later a try again (this usually works) but it is time consuming on an already long project. In order to speed things up a bit, I decided to get a little more eclectic on by approach and move around to whatever needed doing and wouldn't blow a circuit breaker. In that vein, at one point I decided to tackle the main wheel wells. I decided to throw in a little extra detail than would be needed, you can't see much in a C-130 wheel well unless you dismantle the aircraft, and this kit takes that aspect to heart. After some digging to refresh the memory I came up with these:
The aircraft jacked and the struts fully extended. (right main gear) Of note in the shot, the right taxi light mounted to the gear door.
A good detail shot with the wheels removed. Note, there are no torque links on the main gear of C-130s as depicted on the MLG (Main Landing Gear) of the Italeri kit. There is a scissor bracket mounted just aft of the forward strut (seen on this shot) to keep the wires for the anti-lock breaks from getting pinched when the strut is compressed, which kinda looks like a torque link. The actual torque link is the large cross member connecting the forwar and aft struts. (left main gear)
Just another shot of the taxi light.
I decided to add the "U" beams forward and aft of each strut that the struts ride up and down in (there's a story behind that, but I won't bore you with it here) and I added some vertical strips just for effect. There actually is a panel above the gear with cut-outs for the struts as you see here, which I added. You'll have to trust me on this, there's more reliable pictures of the Loch Ness Monster and Bigfoot than there is of the top portion of a C-130 wheel well. Actually a few styrene strips for reinforcement on those and I'd be spot-on. (even my anal-retentiveness has limits)
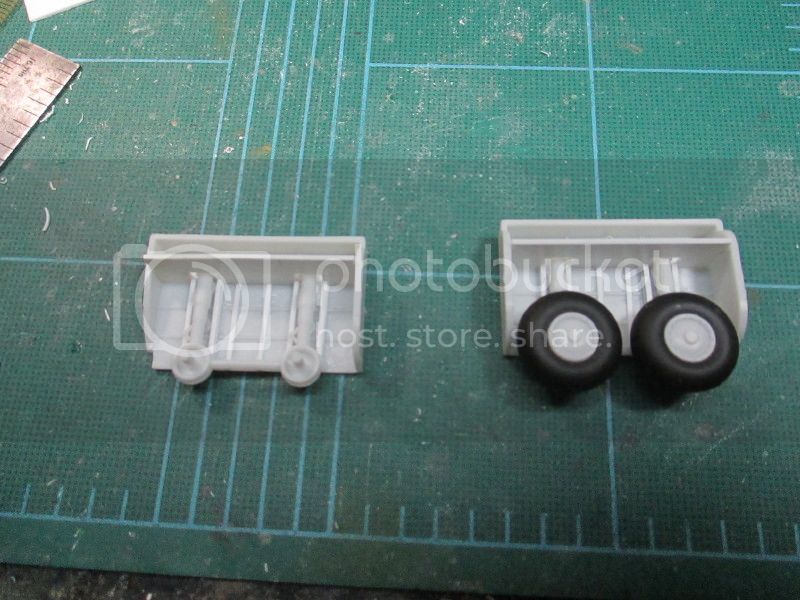
Eduard's addition to the MLG doors, (the body of the taxi light is styrene rod, mine)
A good portion of this whole "you'll never see it again" exercise is to practice scratching up detail just based on un-scaled photos and to try some new (for me) techniques. In this case I wanted to try using washes made with powdered pastel chalks. I first tried the chalk with water mixed with detergent and a little alcohol to cut the surface tension. I was not impressed, it still tended to bead-up and not flow well. This time I went with straight 70% alcohol and had much better results. I don't think it flows quite as well as solvent based washes, but it works pretty well on enamel paint.
The wells were base panted with Model Master non-buffing Aluminum and then dry-brushed after the wash with Floquil Old Silver. The body of the struts were painted Model Master Aircraft Gray (gloss)
The Model Master air brushing metalizer paints look real good on the Eduard brass parts.
The end result:
I also found that the wheels will have to be attached before the wheel wells are installed in the fuselage halfves, which is going to complicate my exterior masking down the road.
And this pretty much shows why all the above is an exercise in futility:
Just the main gear.
With wheel well doors:
What wheel wells?
The nose gear.
And the aft nose gear door:
The kit part isn't bad, but the Eduard brass does a good job of sprucing it up.
A good diagram of the nose gear structure (for those who are interested):
And the real thing.
Now the kit part plus Eduard and some sheet styrene:
The brass parts sticking out the back in reality should be tubes (they're the hydraulic steering actuators) but for what will be seen after the wheel well is closed up, (the forward nose gear door is closed on the ground) what's there will do.
This is Eduard's answer to the electronics racks under the flight deck, plus some donations from my trusty B-17 instrument panel decals for a little added interest. Try as I might with different paint, the black I chose for the "black boxes" still pretty well blended in with the black that is suppose to be empty space.
Oh well, Eduard has an answer for that as well:
The screen thingy! I don't know if I ever saw one of these things but for these purposes it'll do. The galley above the equipment racks turned out pretty well, The oven (the box with the two black knobs, on the left) and the cooler (on the right) were painted with Floquil Old Silver, and in most light look slightly different than the Model Master Aluminum that makes up the rest of the galley. The latches on the various doors are Model Master Magnesium just to try and get a different hue.
Now a few shots showing the current state of the flight deck.
The circuit breaker panels added.
The busy work on the aft bulkhead:
The escape rope is a piece of darning thread run through a candle flame to get all those little fuzzy things that won't show until your done. It's probably a little long but after I got it all tied up I was damned if I'd redo it. (just remind the crew it's better too long than too short!) I really like how the crash light and 1st Aid kits turned out, I wish I could get a better shot.
I almost forgot again. The interior colors are Model Master Radome Tan for the buff flight deck overhead, and Model Master Sky Type "S" which is a good match for the Sea Foam green color that makes up most of the rest of the interior. More later.
Carry on.
I really should have put something in the view to show some indication of the scale. The largest item on the sheet of styrene is the Eduard instrument panel, which is a whooping 2.5 cm wide. The O2 walk around bottles are from the Quickboost 1/72 B-24 oxygen bottle set which also includes the large installed bottles used on most WWII U.S. bombers. The regulators (the black round things) on the end of the bottles are disks punched from a 30 thousandths sheet of styrene with one of those rotary leather punches. Each one is drilled (No.70 drill) as much as possible to fit over a small stud on the end of each bottle. These things sit next to the large lower cockpit windows by the pilot's and co-pilot's feet, and being yellow, stick out like a sore thumb, so they really oughta be there. Plus there's a couple more back in the cargo compartment (actually more than a couple) but only a couple where they'll be obvious. The first aid kits are sheet styrene laminated (40, 30 and 5 thou.) The pouch itself is 9 scale inches square with the backing sheet 9x12. The pouch part is sanded on the edges and corners to give it less of a box shape. The red crosses come from a 1/35 medic's armband decal on an old Scalemaster sheet and punched out with one of those nifty pinpunch sets. Getting the decal from the sheet onto the pouch was a cross between a sharp-stick-in-the-eye and watching paint dry. It took forever for the decal to loosen up and then get it off the backing which was exactly the same size as the decal. The fire extinguisher is a styrene tube with some craft wire orgamy for a handle and a small (next to impossible to see against the background) 10 thou. disk for a pressure gage. The black item next to the bottle is an emergency light that was next to the escape hatches that would light if power was cut off. (we would use them on occasion if they were handy and a flashlight wasn't) The white rectangle is the future cover for the FLIR (Forward Looking Infra-Red) camera that was mounted just aft of the nose landing gear. The other black items are a couple of bits of equipment that will be mounted on the FLIR cover (busy things up a bit)
A closer shot of the O2 bottle and First Aid kit:
The flight deck seats, with the cushions, Eduard seatbelts and bits added to dress things up. The seats will be about the last things added to the flight deck to keep from breaking something off.
Up to this point I've been hammering away at the fiddly bits in the nose and trying to make sure I don't install something that is going to be in the way of some later piece that needs to go in behind it. Since I'm making most of this up as I go along, the "Master Plan" gets a little fuzzy on occasion. I also noticed that sometimes the photo-etch does what it's suppose to do, other times it goes everywhere except where I want it. In those cases I've found it best to just let it be, and come back later a try again (this usually works) but it is time consuming on an already long project. In order to speed things up a bit, I decided to get a little more eclectic on by approach and move around to whatever needed doing and wouldn't blow a circuit breaker. In that vein, at one point I decided to tackle the main wheel wells. I decided to throw in a little extra detail than would be needed, you can't see much in a C-130 wheel well unless you dismantle the aircraft, and this kit takes that aspect to heart. After some digging to refresh the memory I came up with these:
The aircraft jacked and the struts fully extended. (right main gear) Of note in the shot, the right taxi light mounted to the gear door.
A good detail shot with the wheels removed. Note, there are no torque links on the main gear of C-130s as depicted on the MLG (Main Landing Gear) of the Italeri kit. There is a scissor bracket mounted just aft of the forward strut (seen on this shot) to keep the wires for the anti-lock breaks from getting pinched when the strut is compressed, which kinda looks like a torque link. The actual torque link is the large cross member connecting the forwar and aft struts. (left main gear)
Just another shot of the taxi light.
I decided to add the "U" beams forward and aft of each strut that the struts ride up and down in (there's a story behind that, but I won't bore you with it here) and I added some vertical strips just for effect. There actually is a panel above the gear with cut-outs for the struts as you see here, which I added. You'll have to trust me on this, there's more reliable pictures of the Loch Ness Monster and Bigfoot than there is of the top portion of a C-130 wheel well. Actually a few styrene strips for reinforcement on those and I'd be spot-on. (even my anal-retentiveness has limits)
Eduard's addition to the MLG doors, (the body of the taxi light is styrene rod, mine)
A good portion of this whole "you'll never see it again" exercise is to practice scratching up detail just based on un-scaled photos and to try some new (for me) techniques. In this case I wanted to try using washes made with powdered pastel chalks. I first tried the chalk with water mixed with detergent and a little alcohol to cut the surface tension. I was not impressed, it still tended to bead-up and not flow well. This time I went with straight 70% alcohol and had much better results. I don't think it flows quite as well as solvent based washes, but it works pretty well on enamel paint.
The wells were base panted with Model Master non-buffing Aluminum and then dry-brushed after the wash with Floquil Old Silver. The body of the struts were painted Model Master Aircraft Gray (gloss)
The Model Master air brushing metalizer paints look real good on the Eduard brass parts.
The end result:
I also found that the wheels will have to be attached before the wheel wells are installed in the fuselage halfves, which is going to complicate my exterior masking down the road.
And this pretty much shows why all the above is an exercise in futility:
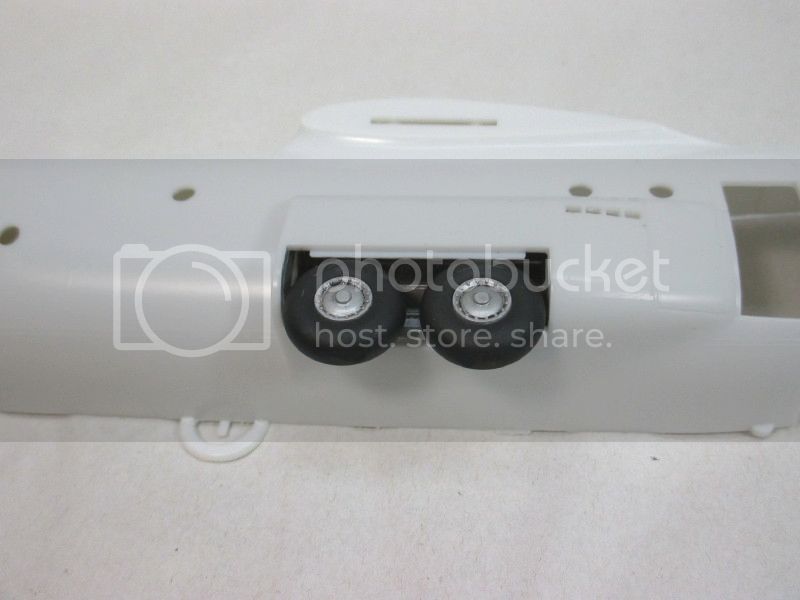
Just the main gear.
With wheel well doors:
What wheel wells?
The nose gear.
And the aft nose gear door:
The kit part isn't bad, but the Eduard brass does a good job of sprucing it up.
A good diagram of the nose gear structure (for those who are interested):
And the real thing.
Now the kit part plus Eduard and some sheet styrene:
The brass parts sticking out the back in reality should be tubes (they're the hydraulic steering actuators) but for what will be seen after the wheel well is closed up, (the forward nose gear door is closed on the ground) what's there will do.
This is Eduard's answer to the electronics racks under the flight deck, plus some donations from my trusty B-17 instrument panel decals for a little added interest. Try as I might with different paint, the black I chose for the "black boxes" still pretty well blended in with the black that is suppose to be empty space.
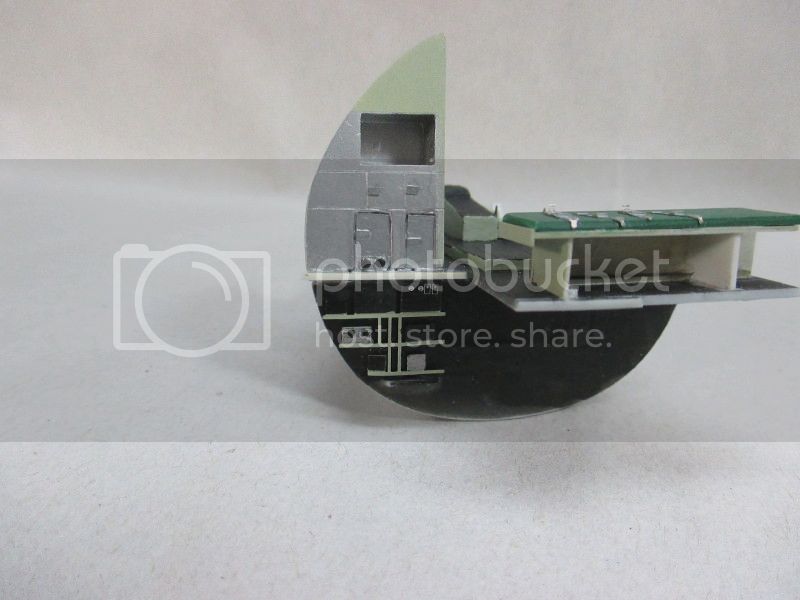
Oh well, Eduard has an answer for that as well:
The screen thingy! I don't know if I ever saw one of these things but for these purposes it'll do. The galley above the equipment racks turned out pretty well, The oven (the box with the two black knobs, on the left) and the cooler (on the right) were painted with Floquil Old Silver, and in most light look slightly different than the Model Master Aluminum that makes up the rest of the galley. The latches on the various doors are Model Master Magnesium just to try and get a different hue.
Now a few shots showing the current state of the flight deck.
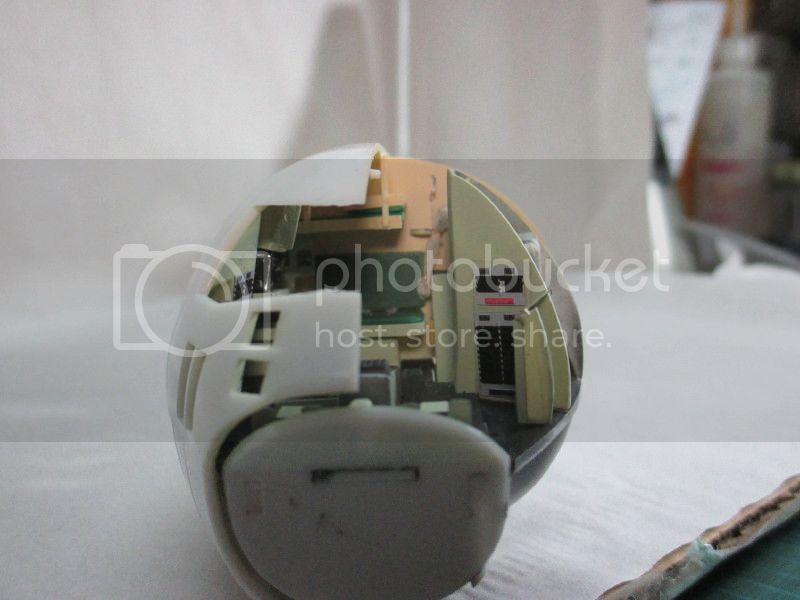
The circuit breaker panels added.
The busy work on the aft bulkhead:
The escape rope is a piece of darning thread run through a candle flame to get all those little fuzzy things that won't show until your done. It's probably a little long but after I got it all tied up I was damned if I'd redo it. (just remind the crew it's better too long than too short!) I really like how the crash light and 1st Aid kits turned out, I wish I could get a better shot.
I almost forgot again. The interior colors are Model Master Radome Tan for the buff flight deck overhead, and Model Master Sky Type "S" which is a good match for the Sea Foam green color that makes up most of the rest of the interior. More later.
Carry on.
Joel_W
Associate Editor
New York, United States
Joined: December 04, 2010
KitMaker: 11,666 posts
AeroScale: 7,410 posts
Joined: December 04, 2010
KitMaker: 11,666 posts
AeroScale: 7,410 posts
Posted: Friday, October 02, 2015 - 03:31 AM UTC
DM,
Most impressive to say the least. It's obvious that you spent quite a lot of quality time in and on one of these MC-130Es, as your detail photos are certainly carefully taken from a modelers point of view.
This is certainly one massive update that covers a ton of detailing and progress. I'm most impressed with how the overall cockpit and Navigator compartments turned out. The level of detail is just stunning.
As for those main wheel wells, you're right, once the wheels and tires are in place, you can't see much of anything else. The nose strut assembly with your detailing looks exactly like the real deal. Another one of your 1st hand photos no doubt.
Looking forward to your next update, and the adventures that will have gone along with it.
Joel
thewizardofaz
United States
Joined: March 12, 2016
KitMaker: 4 posts
AeroScale: 1 posts
Joined: March 12, 2016
KitMaker: 4 posts
AeroScale: 1 posts
Posted: Friday, June 29, 2018 - 12:39 PM UTC
I've been going thru your post in detail. It will help me quite a bit as I work to build a USMC KC-130J Harvest Hawk. Some areas are very differently located from yours, others are spot on. Harvest Hawks are tanks (hence the KC) with a kick. They also carry a 4 pack of Hellfire missiles on the left outboard pylon, a sensor for targeting built into the left fuel tank, and an IR sensor to the left of the former jump door. The jump door has been replaced with a "derringer door" which has a much larger, squared window and two missile launch tubes which allow two of the aircraft's Griffin missiles to be fired without opening the ramp door and depressurizing the aircraft. The ramp also has a 10 missile Griffin launcher, which shoots missiles out of the opened ramp instead of from the Derringer door. This is my second Herk, the first was an EC-130H Compass Call combat jammer in which I participated as a cryptologic linguist. The CC had a crew of around 12, including the front end and backend mission crew.
There is a page I built on Facebook to show what the HH is and how I will proceed as I get it sorted out. The link, If I may post it is: https://www.facebook.com/groups/2016008418651861/ or you can just type in the search box, "KC-130 Harvest Hawk - Gas giver and missile shooter"