Scotland, United Kingdom
Joined: May 05, 2015
KitMaker: 37 posts
AeroScale: 35 posts
Posted: Tuesday, September 22, 2015 - 12:13 AM UTC
Florida, United States
Joined: May 16, 2002
KitMaker: 17,694 posts
AeroScale: 1,728 posts
Posted: Tuesday, September 22, 2015 - 01:52 AM UTC
Looking good so far. Floyd's pieces are awesome. They fit really well and are well detailed. Keep up the good work.
Field Artillery --- The KING of BATTLE!!!
"People sleep peaceably in their beds at night only because rough men stand ready to do violence on their behalf." -- George Orwell
Showcase
Scotland, United Kingdom
Joined: May 05, 2015
KitMaker: 37 posts
AeroScale: 35 posts
Posted: Friday, October 02, 2015 - 04:44 PM UTC
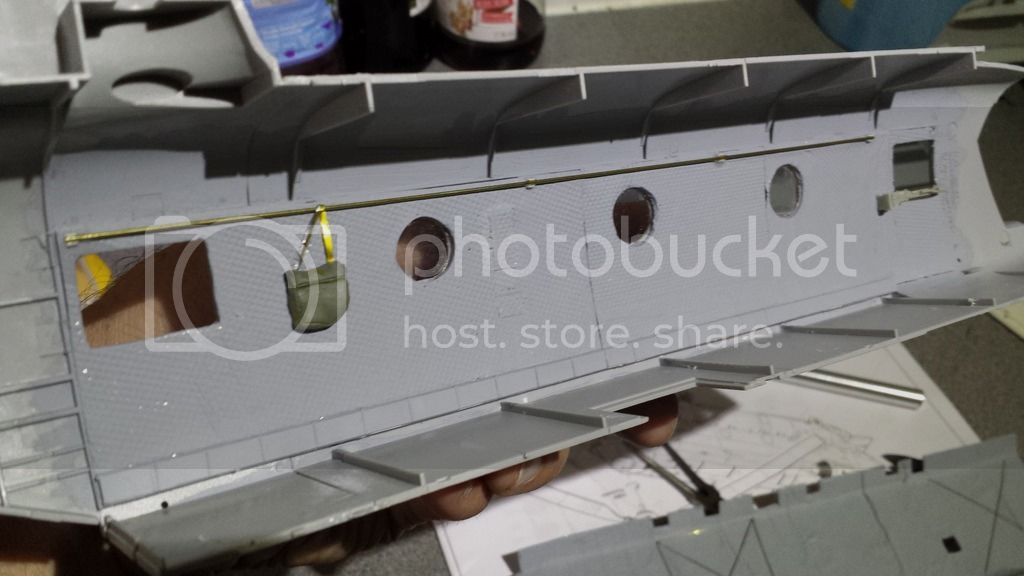
I have glued pieces of plasticard along the bottom of the cabin walls to replicate the box like panels seen under the seats.
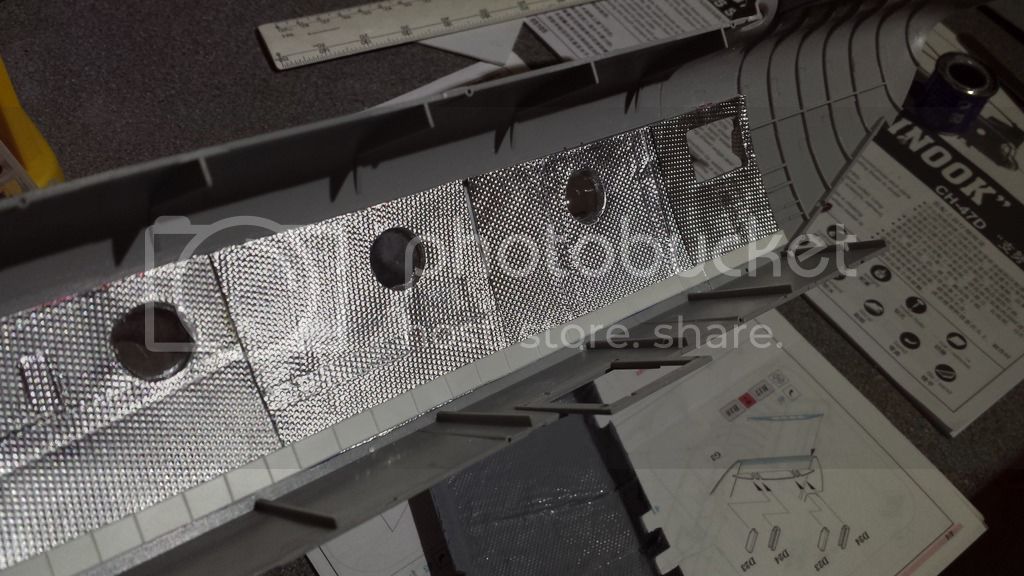
On with a lick of paint and its starting to come together.
Scotland, United Kingdom
Joined: May 11, 2015
KitMaker: 768 posts
AeroScale: 656 posts
Posted: Friday, October 02, 2015 - 05:20 PM UTC
This is looking really interesting so far.

What kind of size are we talking about when complete?
Pax & Pallets: Revell 1/48 Dakota
Terrible Teens : Revell 1/48 F15E Strike Eagle
Airfix IV : Airfix 1.72 Vulcan
Scotland, United Kingdom
Joined: May 05, 2015
KitMaker: 37 posts
AeroScale: 35 posts
Posted: Friday, October 02, 2015 - 05:29 PM UTC
The fuselage on its own will be around 45cm. Add in the rotors beings it to around 70cm.
Scotland, United Kingdom
Joined: May 05, 2015
KitMaker: 37 posts
AeroScale: 35 posts
Posted: Saturday, October 03, 2015 - 05:38 PM UTC
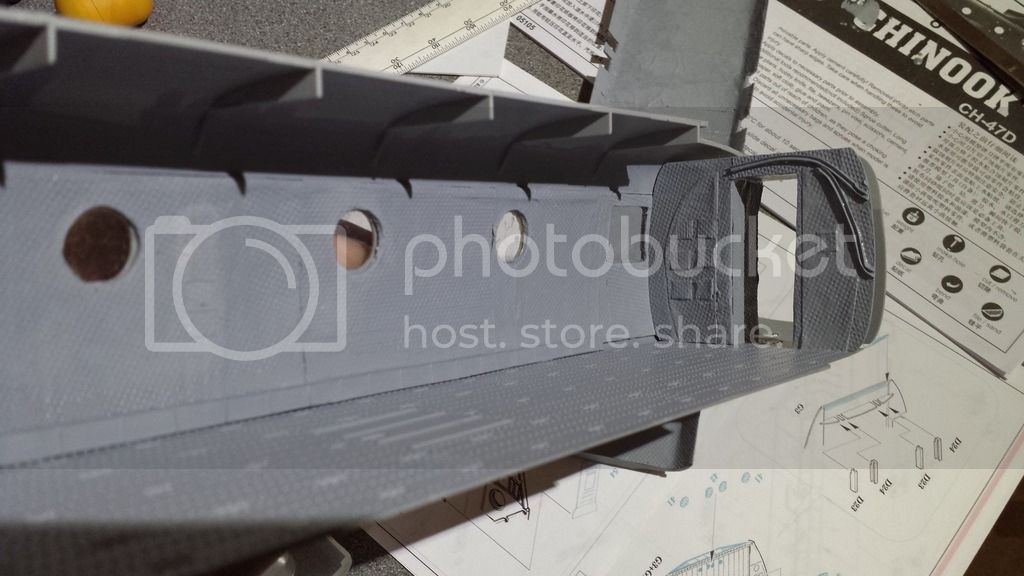
Bit more painting done in the cabin.
Florida, United States
Joined: May 16, 2002
KitMaker: 17,694 posts
AeroScale: 1,728 posts
Posted: Sunday, October 04, 2015 - 09:03 PM UTC
Nice. Keep up the good work.
Field Artillery --- The KING of BATTLE!!!
"People sleep peaceably in their beds at night only because rough men stand ready to do violence on their behalf." -- George Orwell
Showcase
Scotland, United Kingdom
Joined: May 05, 2015
KitMaker: 37 posts
AeroScale: 35 posts
Posted: Wednesday, October 07, 2015 - 03:06 PM UTC
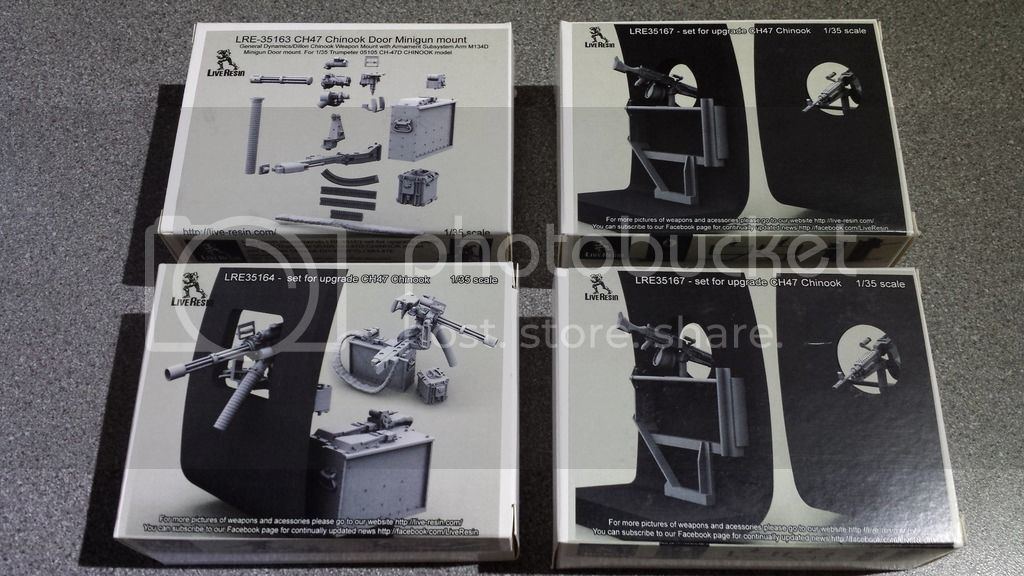
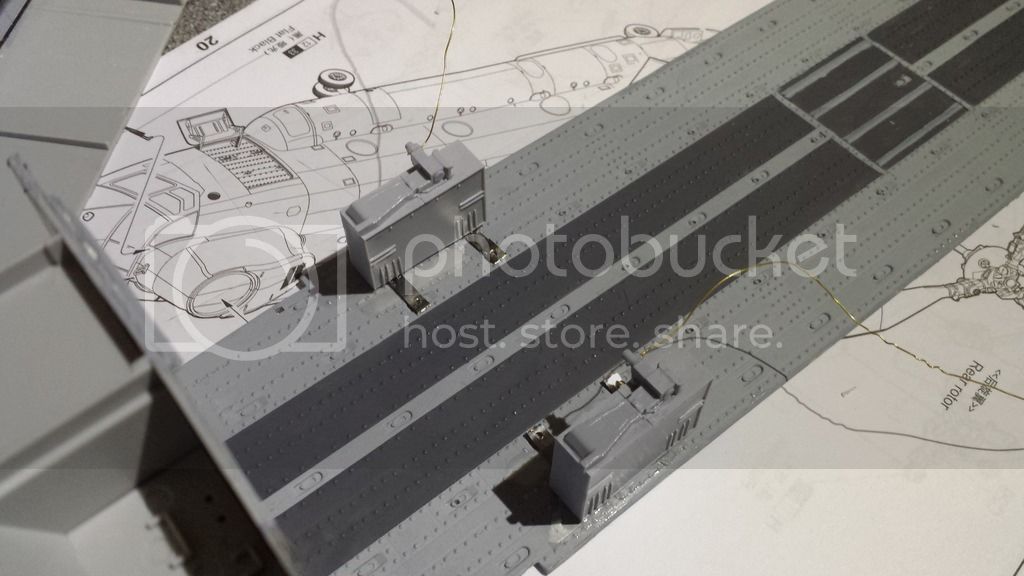
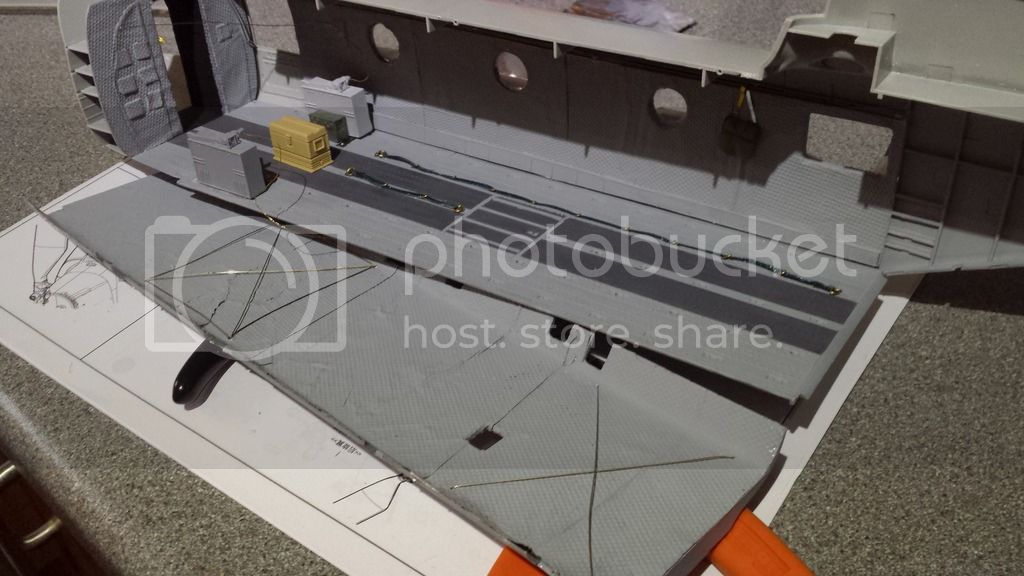
Another piece of the AM jigsaw has arrived. This was bought off Ebay for the seats.
Time to start installing the Live Resin guns.
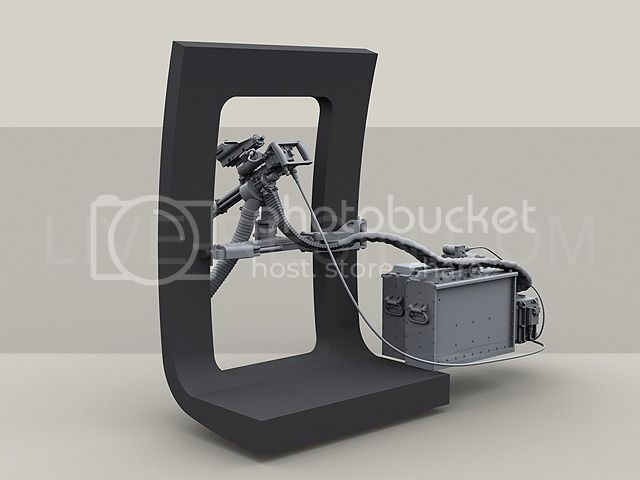
Holes drilled in the battery boxes (I think ) and wires glued in to replicate the cables.
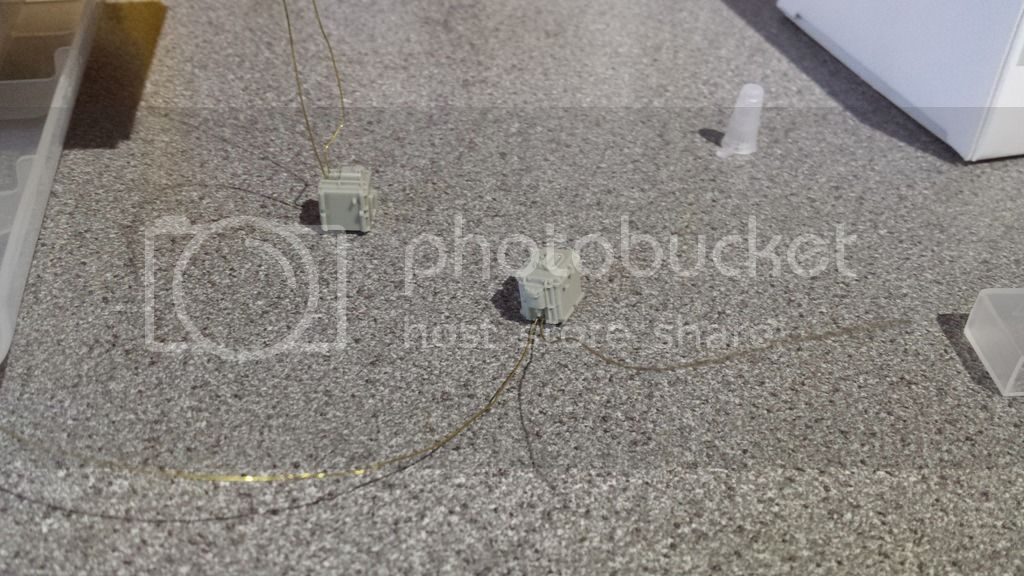
Here they are installed next to the ammo boxes.
The mounting arm for the port forward M134D minigun.
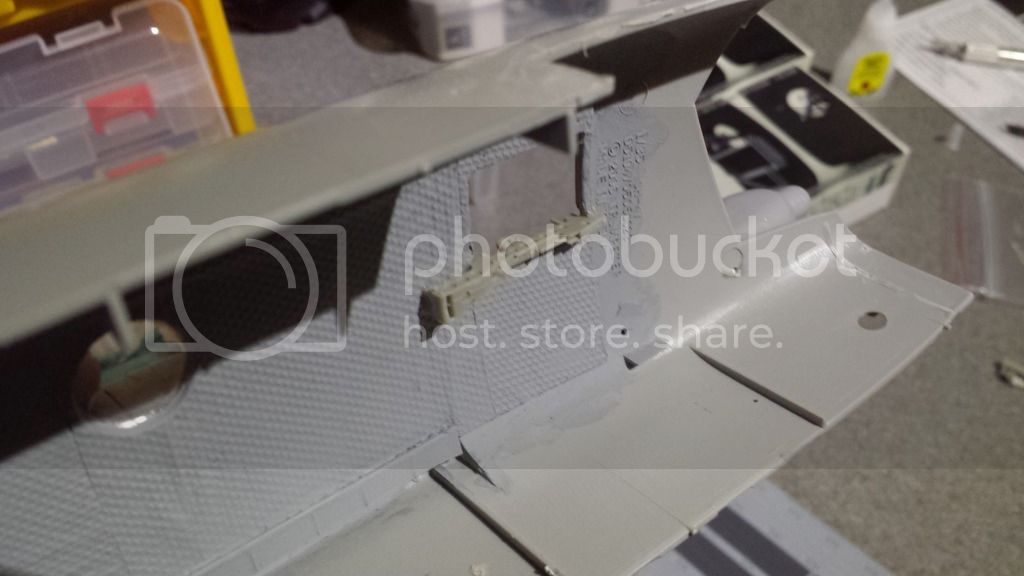
Should look better once its all painted.
Florida, United States
Joined: May 16, 2002
KitMaker: 17,694 posts
AeroScale: 1,728 posts
Posted: Wednesday, October 07, 2015 - 04:44 PM UTC
Looking good. The Live-Resin pieces are really nice. I don't believe the MH-47s need/use the battery boxes for the drive motors though. I believe they are hard-wired into the aircraft electrical system. All MH-60L/Ms are hard-wired, I am sure of that. I would assume the MH-47s are as well. If you look at Floyd's build, he didn't use them either.
Field Artillery --- The KING of BATTLE!!!
"People sleep peaceably in their beds at night only because rough men stand ready to do violence on their behalf." -- George Orwell
Showcase
Scotland, United Kingdom
Joined: May 05, 2015
KitMaker: 37 posts
AeroScale: 35 posts
Posted: Wednesday, October 07, 2015 - 04:57 PM UTC
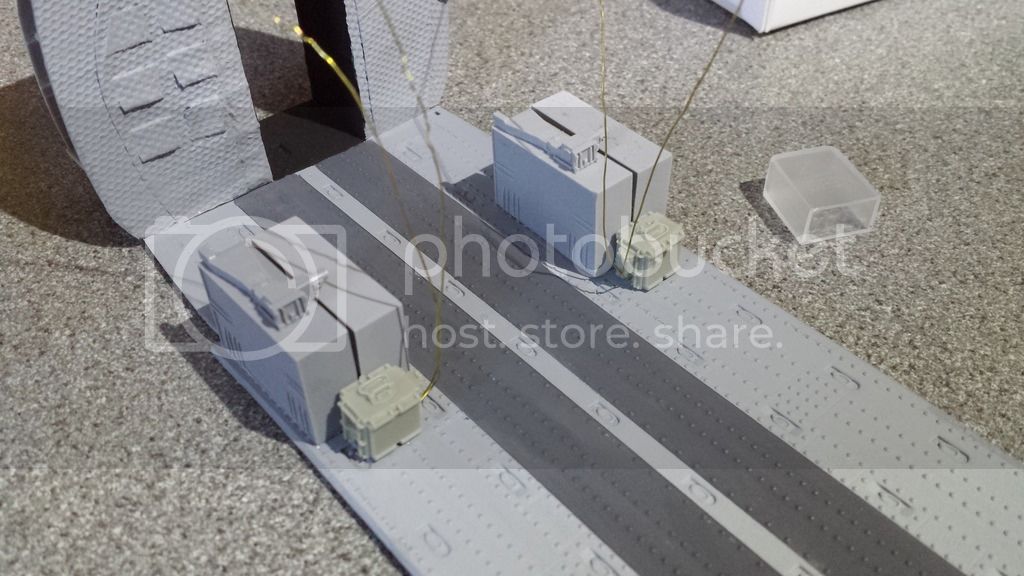
Gino, I have just been informed that as well as not needing the battery boxes MH-47G's only use one ammo box.
I am in the proccess of making adjustments.
I just need to find out where the power cable goes now. I assume the two coming out of the gun, one goes to the ammo box the other to the power supply.
Florida, United States
Joined: May 16, 2002
KitMaker: 17,694 posts
AeroScale: 1,728 posts
Posted: Wednesday, October 07, 2015 - 07:19 PM UTC
You are correct on the two wires coming out the bottom of the control box. One wire goes to the power supply and the other to the ammo drive motor on the ammo box. There are also two wires that come out of the control box and go to the gun. A larger one on the left that goes to the gun drive motor and a smaller one on the right that goes to the barrel clutch. You can see them and read all about them
here.
Field Artillery --- The KING of BATTLE!!!
"People sleep peaceably in their beds at night only because rough men stand ready to do violence on their behalf." -- George Orwell
Showcase
Scotland, United Kingdom
Joined: May 05, 2015
KitMaker: 37 posts
AeroScale: 35 posts
Posted: Wednesday, October 07, 2015 - 08:22 PM UTC
Many thanks for the link Gino.
Set up has been reconfigured.

Removed by original poster on 10/09/15 - 03:54:04 (GMT).
Removed by original poster on 10/09/15 - 03:53:42 (GMT).
Scotland, United Kingdom
Joined: May 05, 2015
KitMaker: 37 posts
AeroScale: 35 posts
Posted: Friday, October 09, 2015 - 04:10 PM UTC
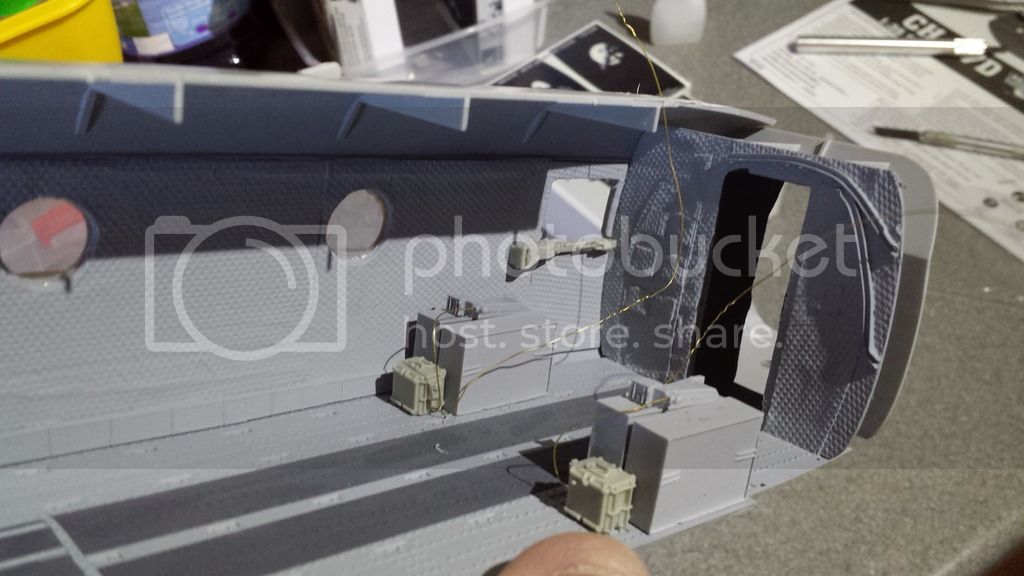
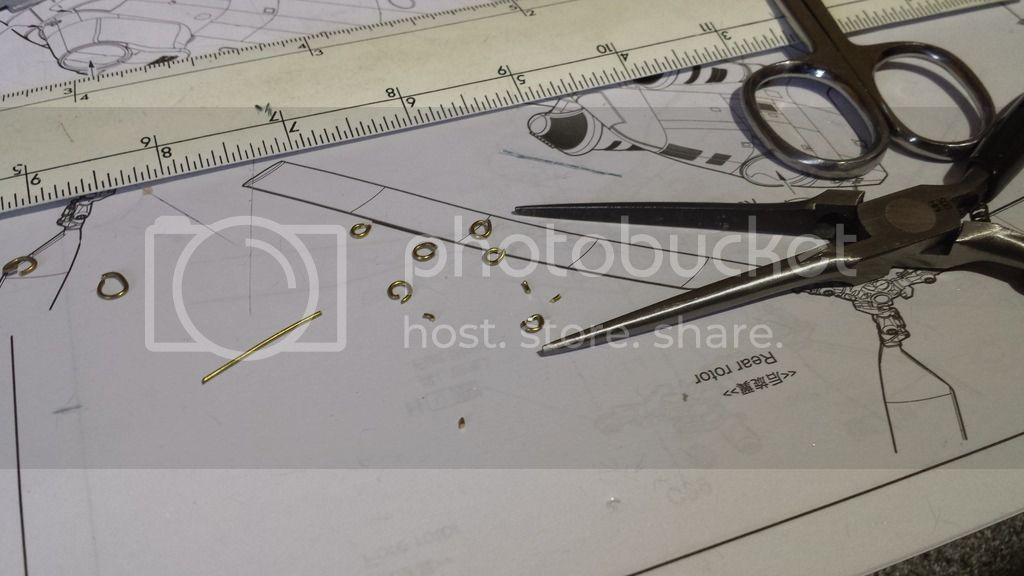
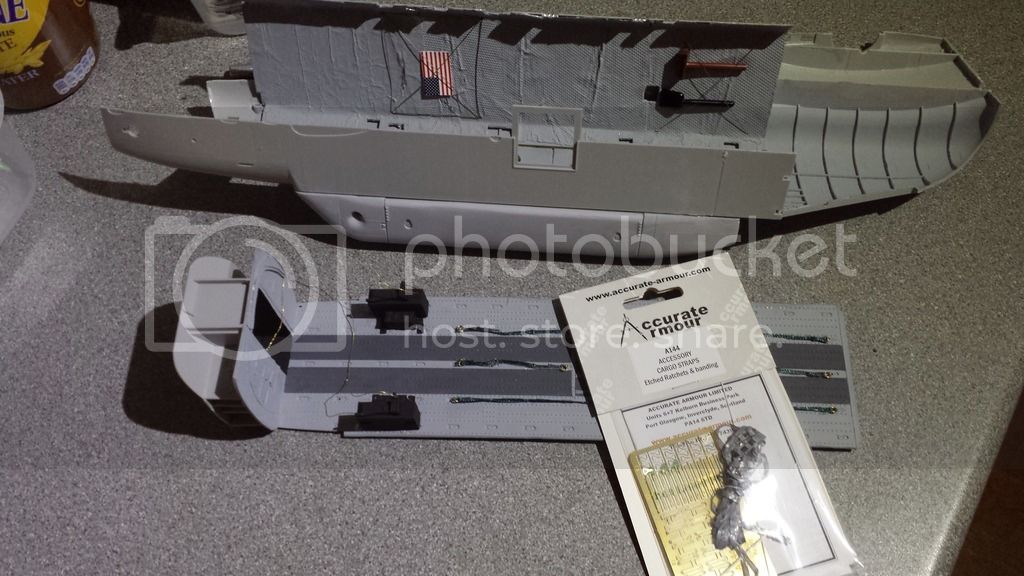
Having recieved some further information on the correct interior set up I have re-done the ammo bins.
First up was drilling holes in the cabin floor in preperation for making cargo loops.

Using some scrap etch fret to make the mounting plates.

Ammo bins re-attached.
Using wire to represent carabiners.
Cargo straps made using the loops and some cut down fabric ribbon.
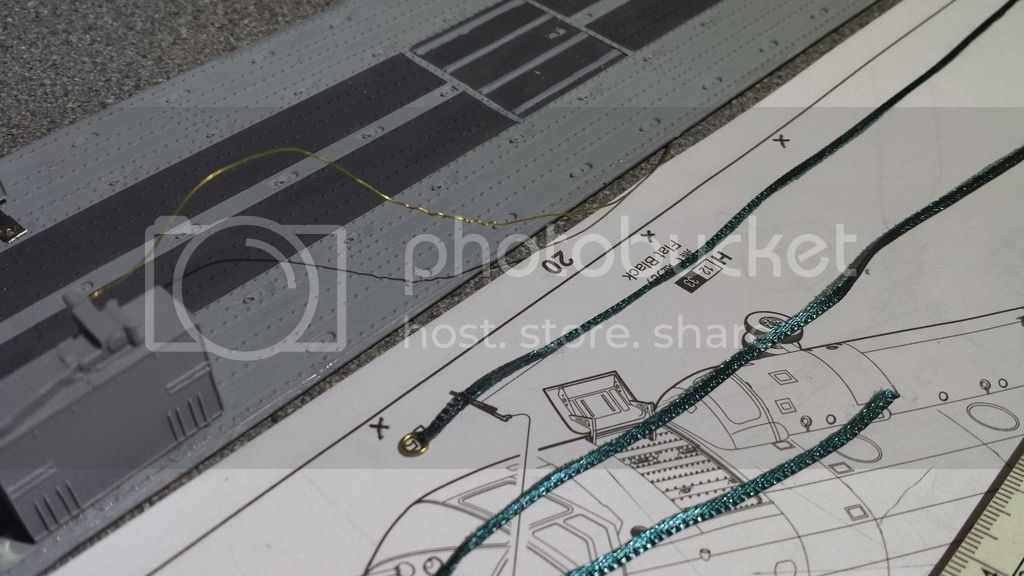
All four done.

Using thinner wire to make the cargo floor loops the first strap is attached.
Noord-Holland, Netherlands
Joined: January 28, 2007
KitMaker: 1,945 posts
AeroScale: 388 posts
Posted: Friday, October 09, 2015 - 11:49 PM UTC
A very interesting build Steve. I like the amount of detail and effort you put in this build. The Live Resin pieces look great!

Jelger
On the workbench:
- Tamiya P-47D 1/48
- Eduard Mig21 1/144
Scotland, United Kingdom
Joined: May 05, 2015
KitMaker: 37 posts
AeroScale: 35 posts
Posted: Saturday, October 10, 2015 - 02:32 PM UTC
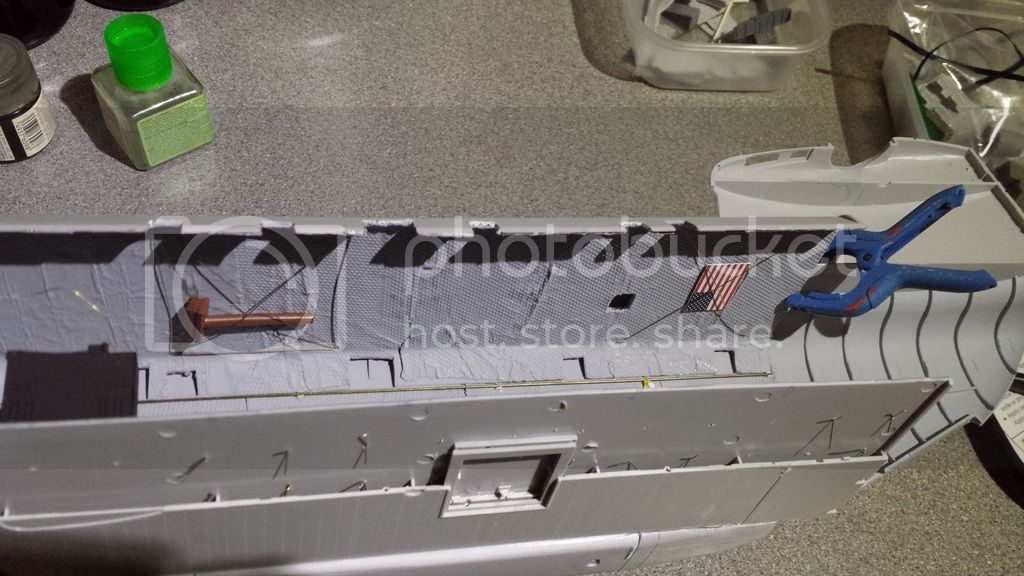
Little bit more done this morning.
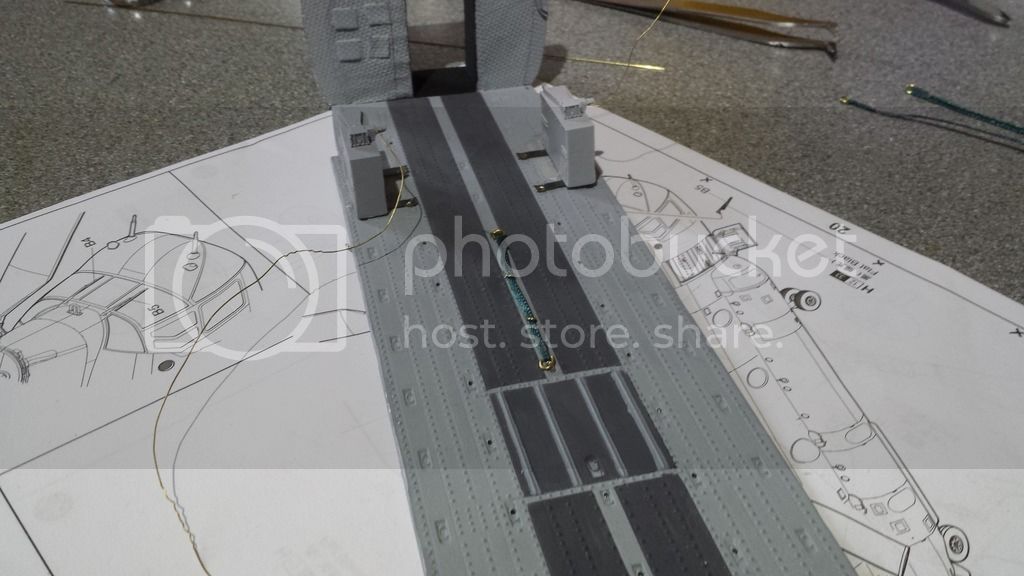
Using plastic C channel and some thick wire I made the rail to which the cargo seat backs are normally attached.
One more cargo strap has been attached along with thin wire to represent the bungees on the ceiling. The rear one will have a flag later.
The cool box will be strapped down later.
Maryland, United States
Joined: February 19, 2006
KitMaker: 144 posts
AeroScale: 141 posts
Posted: Sunday, October 11, 2015 - 06:37 PM UTC
It is looking great. Impressive build
Floyd
Scotland, United Kingdom
Joined: May 05, 2015
KitMaker: 37 posts
AeroScale: 35 posts
Posted: Monday, November 09, 2015 - 02:57 PM UTC
Apologies for the interuption as I was finishing of a Little Bird kit.
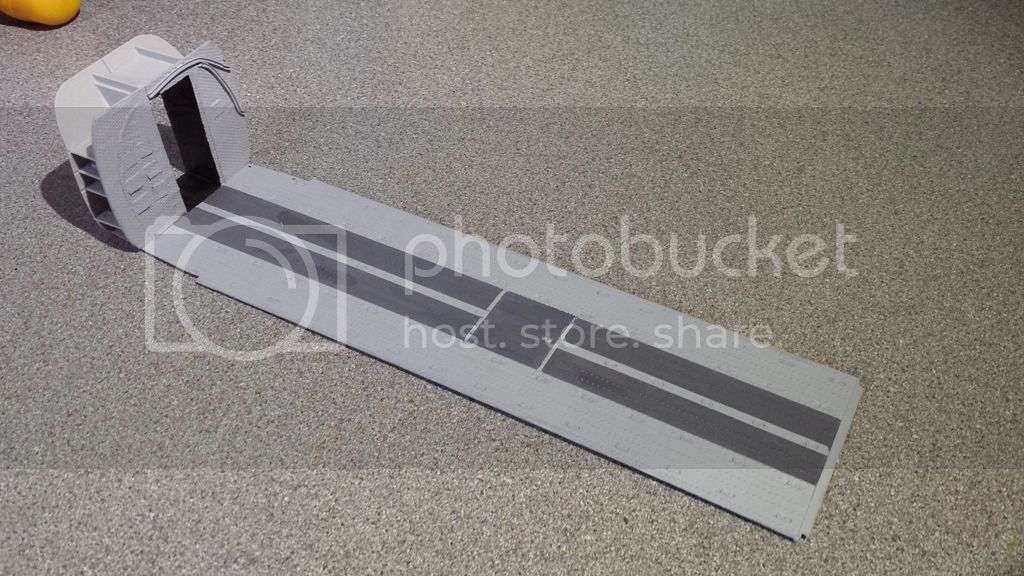
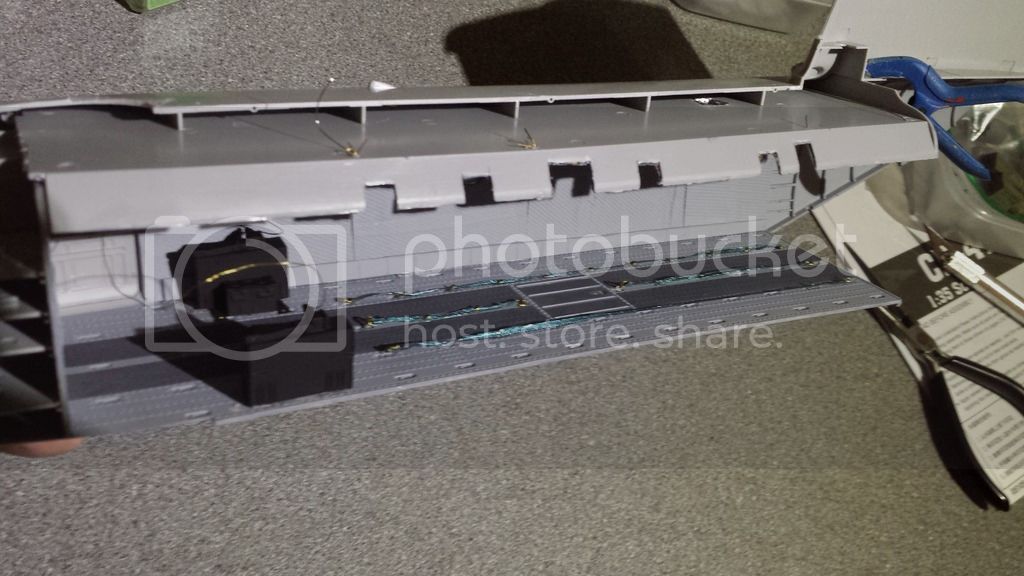
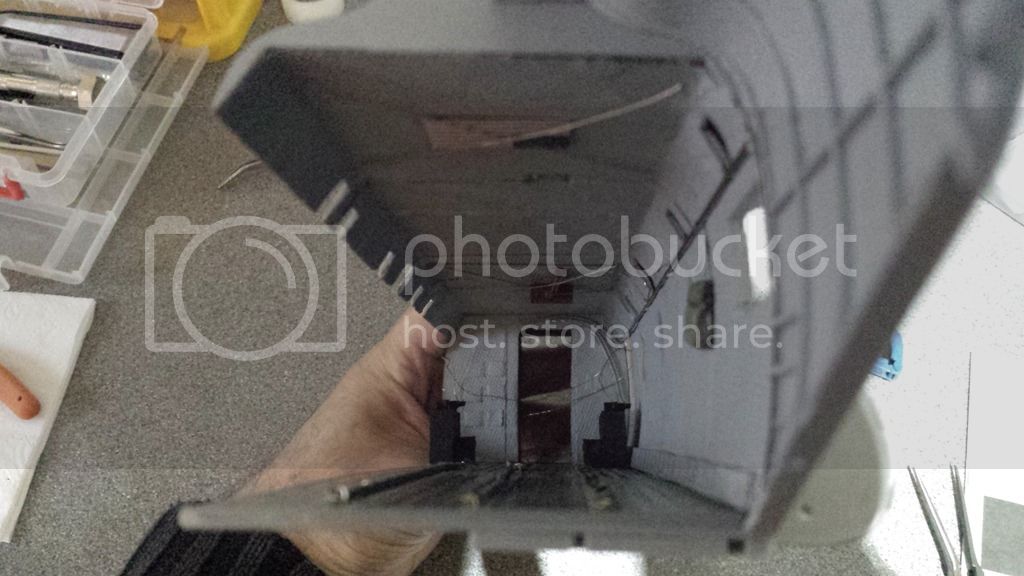
Anyhoo, back on with the show. I have now attached the ceiling and floor to the starboard fuselage.
Note the flag and broom which are secured by cord on the real thing.
England - South West, United Kingdom
Joined: March 13, 2015
KitMaker: 418 posts
AeroScale: 114 posts
Posted: Monday, November 09, 2015 - 06:56 PM UTC
That's amazing work and amazing detail done to the interior. I've never seen someone using a Lego broom or any Lego item on a kit before. I can't wait to see this Chinook when it's finished.
Scotland, United Kingdom
Joined: May 05, 2015
KitMaker: 37 posts
AeroScale: 35 posts
Posted: Monday, November 09, 2015 - 09:28 PM UTC
Quoted Text
I've never seen someone using a Lego broom or any Lego item on a kit before.
It was the closest I could find and is actually a good scale size when put next to a figure.
Steve
Maryland, United States
Joined: February 19, 2006
KitMaker: 144 posts
AeroScale: 141 posts
Posted: Wednesday, November 11, 2015 - 09:58 PM UTC
This is looking awesome. Great work. Can't wait to see this completed
Floyd
Ps I think the roof is on backwards. The flag is normally up front and the broom in the back
Scotland, United Kingdom
Joined: May 05, 2015
KitMaker: 37 posts
AeroScale: 35 posts
Posted: Wednesday, November 11, 2015 - 10:21 PM UTC
Quoted Text
Ps I think the roof is on backwards. The flag is normally up front and the broom in the back
Easily fixed. The flag is on with tape and the broom is just shoved under the wire/cord.
Thanks for spotting Floyd.
California, United States
Joined: May 14, 2008
KitMaker: 534 posts
AeroScale: 47 posts
Posted: Sunday, November 15, 2015 - 12:04 PM UTC
Just saw this thread, and I just hd to stop and said....awesome! I need to get cracking with the similar project but I'm bit behind in my AM goodies. I still need to grab those Live Resin guns

Scotland, United Kingdom
Joined: May 05, 2015
KitMaker: 37 posts
AeroScale: 35 posts
Posted: Wednesday, November 25, 2015 - 01:56 PM UTC
Time to get back onto the MH. I had to prise the floor back off as I realised I still had to attach the ratchets and this would be much easier with the floor seperate.
I plan to get all the boxes, seats e.t.c. on ovee the next couple of days.


