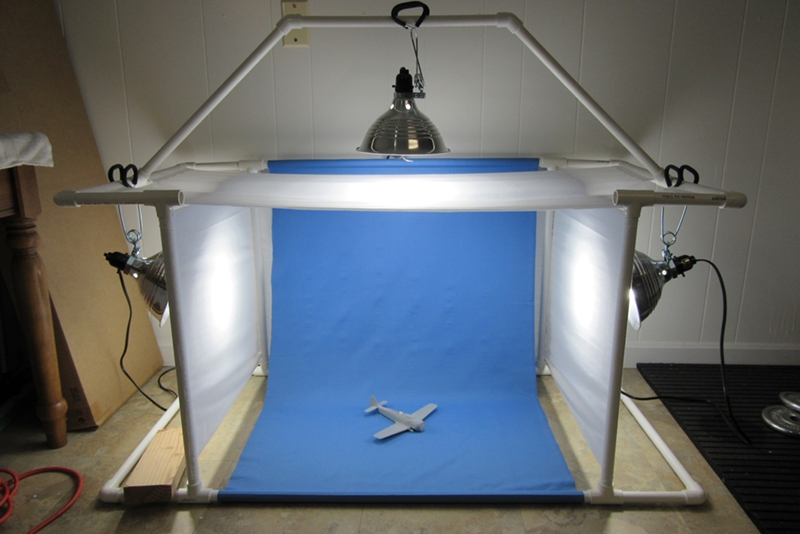
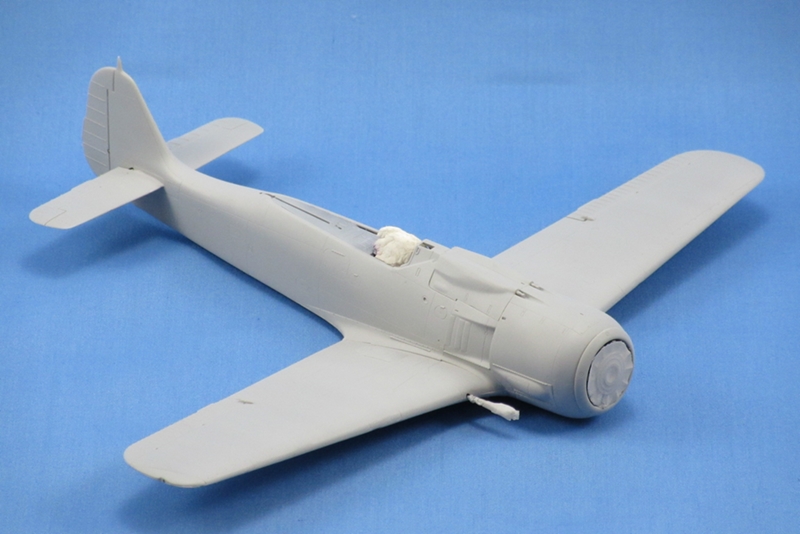
I got tired of working around my cardboard box light box for taking pics so I made a quick run to the hardware store and craft shop. Less than $50 later I have a nice new light box for photographing builds.
Not too shabby.
My old box was only 18" wide and I wanted something big enough for some of the bombers I have in the stash. The backdrop on this one is 28" across, it should fit a 1:48 B-17.
General Aircraft
This forum is for general aircraft modelling discussions.
Hosted by Jim Starkweather
Building a better mouse trap...
Posted: Thursday, September 24, 2015 - 06:54 AM UTC
spaarndammer
Noord-Holland, Netherlands
Joined: January 28, 2007
KitMaker: 1,945 posts
AeroScale: 388 posts
Joined: January 28, 2007
KitMaker: 1,945 posts
AeroScale: 388 posts
Posted: Thursday, September 24, 2015 - 11:58 AM UTC
That looks very nice and not too difficult to make. How did you attach the cloth to the tubing?
Jelger
Jelger
Posted: Thursday, September 24, 2015 - 12:09 PM UTC
Nice one Paul
That would make a great Feature article.
All the best
Rowan
That would make a great Feature article.
All the best
Rowan
Posted: Thursday, September 24, 2015 - 04:40 PM UTC
Quoted Text
That looks very nice and not too difficult to make. How did you attach the cloth to the tubing?
Jelger
I used "Stitch Witchery", a brand of hemming tape. Its an inch wide, plastic tape. You roll the cloth back over itself to form a loop and place the tape between the two layers this forms, then melt it with a hot iron. It bonds the two layers of cloth together. Much easier than trying to sew them.
I press fit all of the tubing together so I can disassemble it for moving/storage, change the background color if I wanted to, or adjust the size of the box if I decided to make something massive like a B-29 one day.
Joel_W
Associate Editor
New York, United States
Joined: December 04, 2010
KitMaker: 11,666 posts
AeroScale: 7,410 posts
Joined: December 04, 2010
KitMaker: 11,666 posts
AeroScale: 7,410 posts
Posted: Thursday, September 24, 2015 - 10:37 PM UTC
Paul,
Outstanding So outstanding that I'm going to copy your idea to the Tee. I really like the idea of making it tear down for storage, which has been a major issue for me. The 3 light diffused setup is perfect, and it should be perfect for secondary fill lighting, when I finally get a macro ring light for my Nikon setup, (photography is my other hobby).
Joel
Posted: Friday, September 25, 2015 - 12:07 AM UTC
Quoted Text
Paul,
So outstanding that I'm going to copy your idea to the Tee.
Joel
Joel,
Here's a helpful list of materials:
40' of 1/2" schedule 40 PVC pipe
10 x Tee fittings
8 x 90* elbows
2 x 45* elbows
3 x 100watt "daylight" CFLs w/ reflectors
You won't use that much pipe but it helps to have extra in case you mess up or decide to change something.
Mine is 44" wide x 24" high x 24" deep. The center box is 30x24x24. The angled arch sits about 12" above the box, each 45* arm was 18" long.
For the cloth, I measured distances and added 4" to each end to form the loop plus overlapping hem (3" external circumference of 1/2" pipe plus the 1" hem tape).
Joel_W
Associate Editor
New York, United States
Joined: December 04, 2010
KitMaker: 11,666 posts
AeroScale: 7,410 posts
Joined: December 04, 2010
KitMaker: 11,666 posts
AeroScale: 7,410 posts
Posted: Friday, September 25, 2015 - 01:35 AM UTC
Quoted Text
Quoted TextPaul,
So outstanding that I'm going to copy your idea to the Tee.
Joel
Joel,
Here's a helpful list of materials:
40' of 1/2" schedule 40 PVC pipe
10 x Tee fittings
8 x 90* elbows
2 x 45* elbows
3 x 100watt "daylight" CFLs w/ reflectors
You won't use that much pipe but it helps to have extra in case you mess up or decide to change something.
Mine is 44" wide x 24" high x 24" deep. The center box is 30x24x24. The angled arch sits about 12" above the box, each 45* arm was 18" long.
For the cloth, I measured distances and added 4" to each end to form the loop plus overlapping hem (3" external circumference of 1/2" pipe plus the 1" hem tape).
Paul,
Thanks for the list of Materials needed. I would have had to make multiple trips to the big box hardware store.
Joel
Jessie_C
British Columbia, Canada
Joined: September 03, 2009
KitMaker: 6,965 posts
AeroScale: 6,247 posts
Joined: September 03, 2009
KitMaker: 6,965 posts
AeroScale: 6,247 posts
Posted: Friday, September 25, 2015 - 06:11 AM UTC
I smell the beginnings of a "How To" article brewing. Paul, would you be willing to write out the assembly sequence and take appropriate photos?
Posted: Friday, September 25, 2015 - 07:09 AM UTC
Quoted Text
I smell the beginnings of a "How To" article brewing. Paul, would you be willing to write out the assembly sequence and take appropriate photos?
Sure. I'll spend some time on it over the weekend.
Posted: Friday, September 25, 2015 - 11:14 PM UTC
Great work Paul!
I have been thinking about improving my photo table and will follow you lead and build one for my self!
Thanks for posting.
I have been thinking about improving my photo table and will follow you lead and build one for my self!
Thanks for posting.
Posted: Friday, October 02, 2015 - 03:53 AM UTC
Hi Paul.
I have picked up the materials on you list except for the lamps and look forward to building it soon.
Posted: Friday, October 02, 2015 - 04:49 PM UTC
Nice! I wrote up a feature for Jessica, so there should be something coming out soon with assembly tips. I'm glad you liked the idea.
Joel_W
Associate Editor
New York, United States
Joined: December 04, 2010
KitMaker: 11,666 posts
AeroScale: 7,410 posts
Joined: December 04, 2010
KitMaker: 11,666 posts
AeroScale: 7,410 posts
Posted: Saturday, October 03, 2015 - 02:40 AM UTC
Quoted Text
Nice! I wrote up a feature for Jessica, so there should be something coming out soon with assembly tips. I'm glad you liked the idea.
Paul,
I was just going to go out on Monday and buy all the parts and materials. As long as your article doesn't change the parts list, I'm all set to go. Looking forward to your article with building tips. As far as I can see, this is a win/win deal for me.
JOel