_GOTOBOTTOM
World War II
Discuss WWII and the era directly before and after the war from 1935-1949.
Hosted by Rowan Baylis
1/144 Eduard Avia B.534
magnusf
_VISITCOMMUNITY
Stockholm, Sweden
Joined: May 02, 2006
KitMaker: 1,953 posts
AeroScale: 1,902 posts
Posted: Thursday, December 24, 2015 - 11:36 PM UTC
OK, I know I've written this many times before as en excuse for not finishing what I'm currently doing but here we go again: every now and then something especially interesting turns up blablablabla... In this case it is however undoubtedly true!

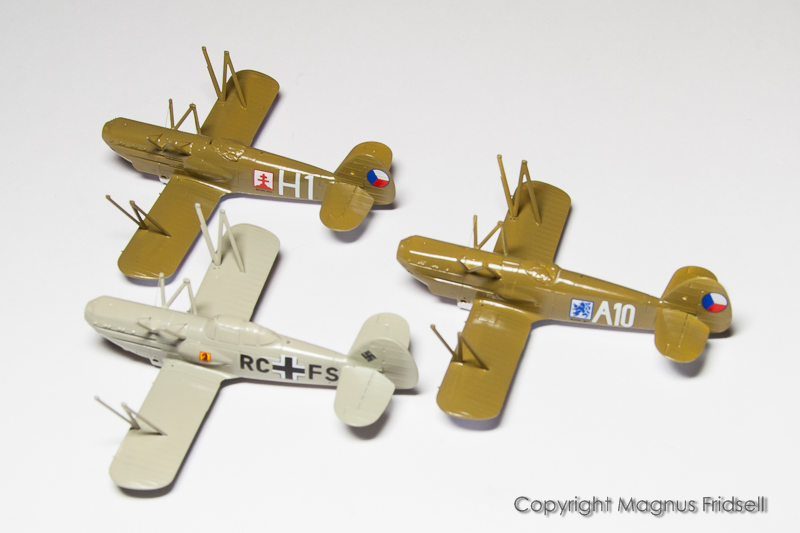
When speaking about "the last of the biplanes" I think most people come up with the Gloster Gladiator and possibly the Fiat CR.42 but there was one further, one that I think also was more successful than both of the others when it comes to results in combat: the Avia B.534!

Normally it would probably have been a rather obscure aircraft but for us who grew up in the 70s, KP made a nice 1/72 kit of it making it generally known in modelling circles at least. And now Eduard are making the most out of their Czechoslovakian aviation heritage, releasing state-of-the-art kits in 1/48, 1/72 and now also in 1/144!

I saw this one in the Hannant's newsletter a few weeks ago and it was only minutes before I had clicked the button, sending one box and two sets of etch (there is no etch included with the kits) flying for Sweden.


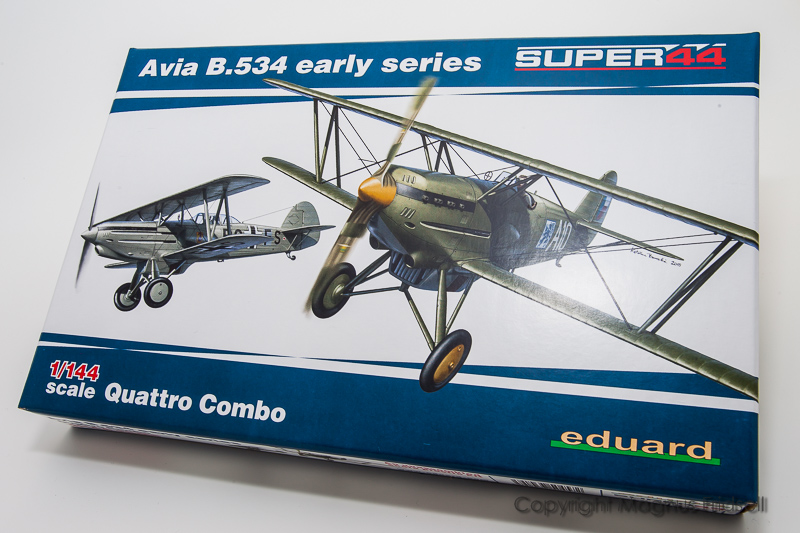
Eduard artwork. You know what I think about it... Delicious...


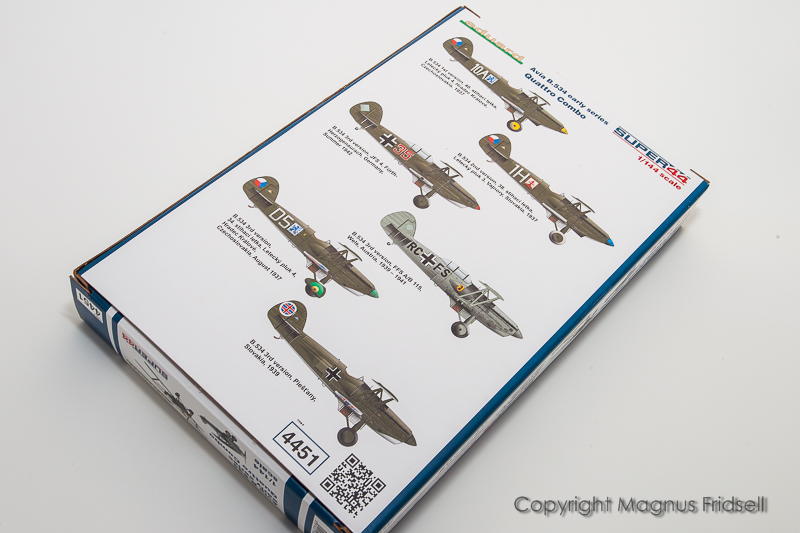
Six decal options for the four (yes, four!) kits there are in the box.


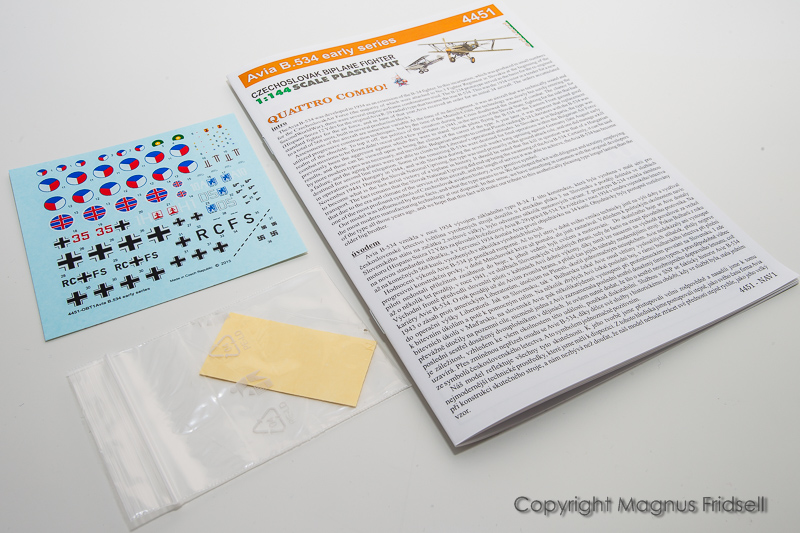
Decals, masks and our usual Eduard instruction booklet!


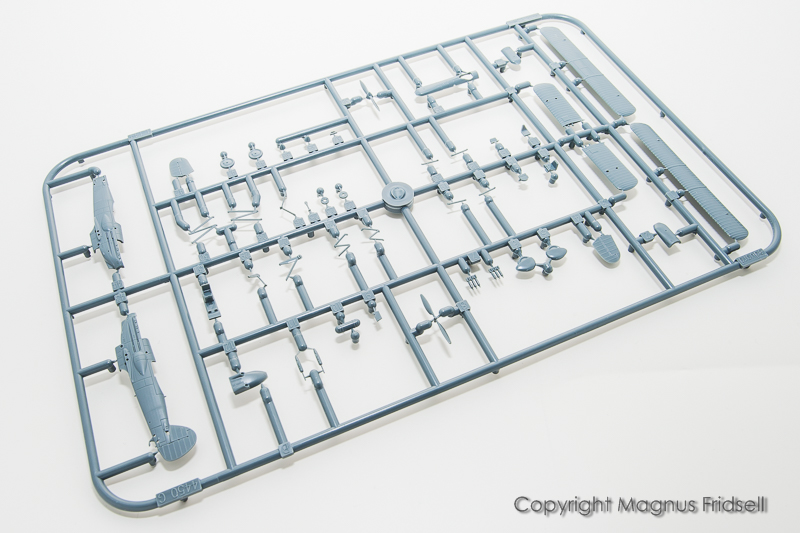
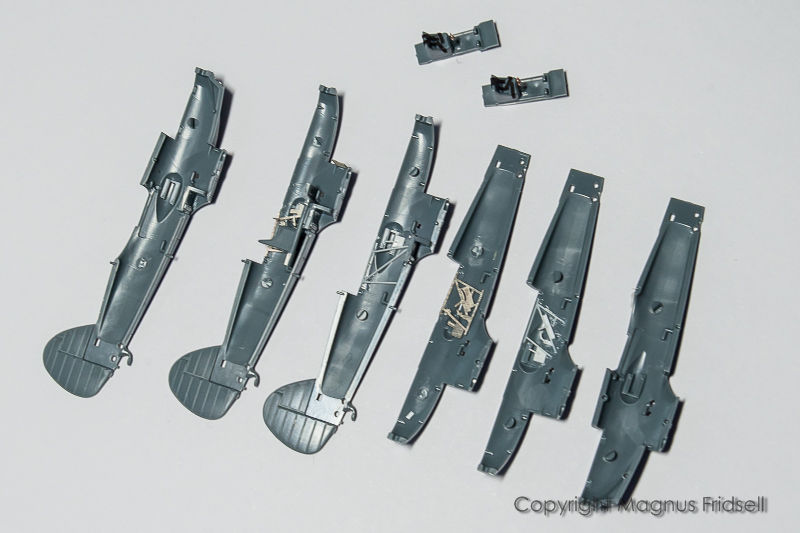
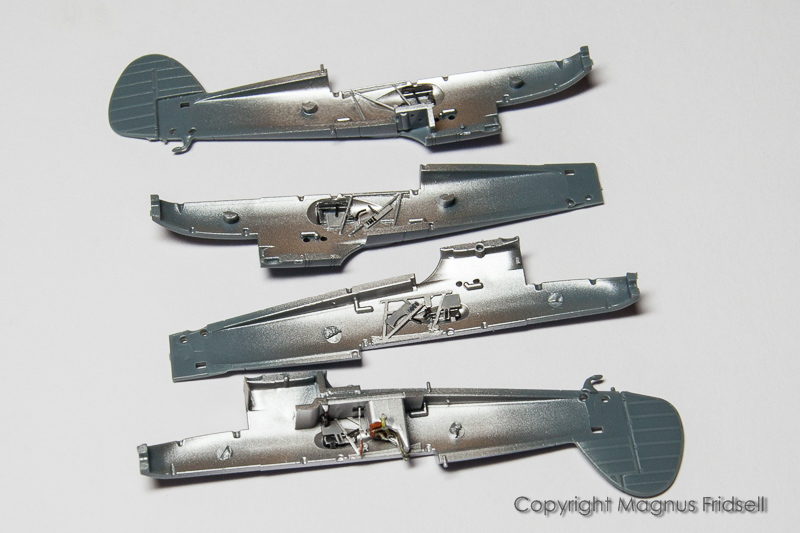
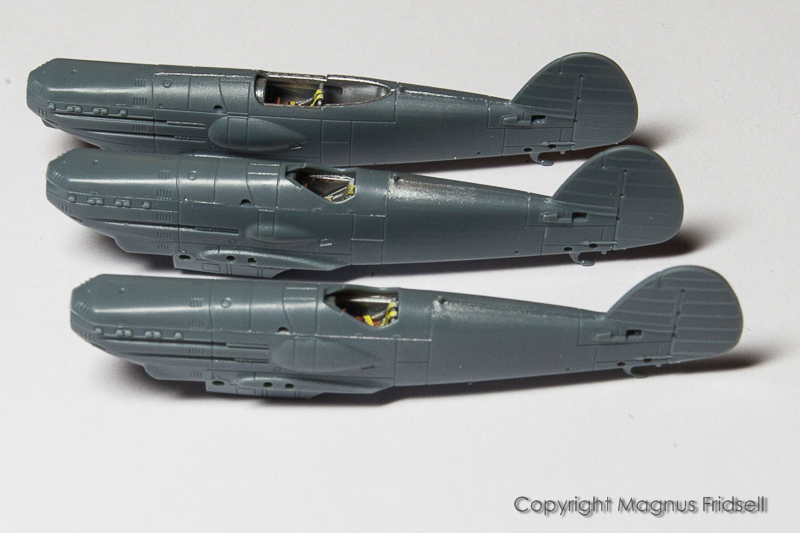
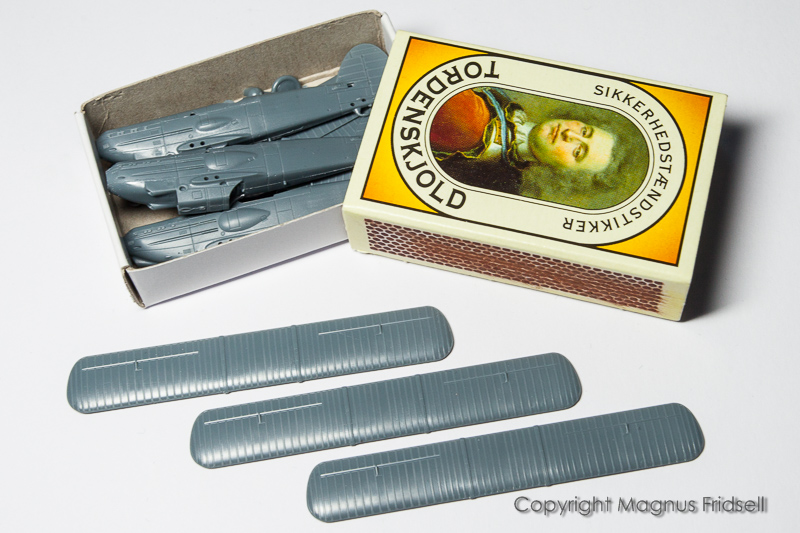
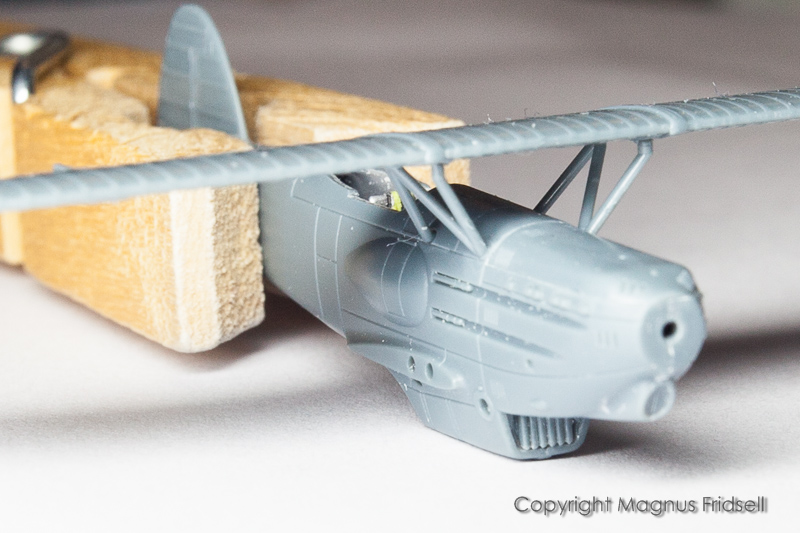
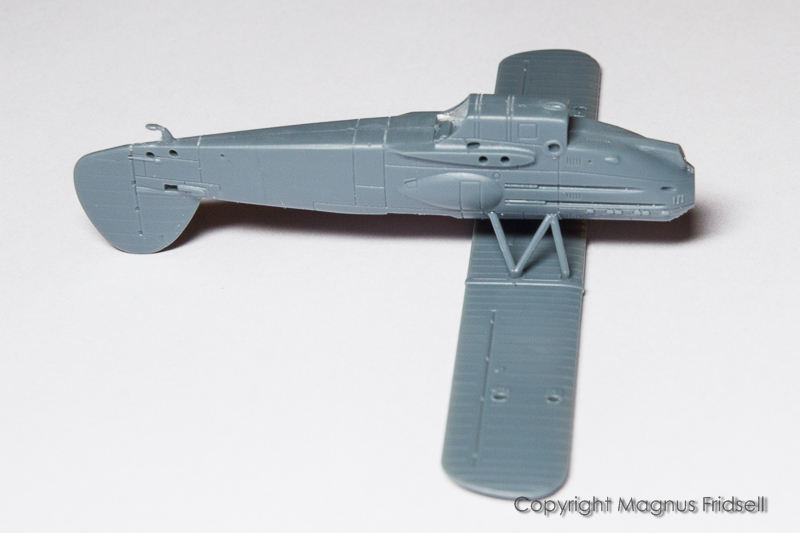
Plastic, there are four of these sprues...


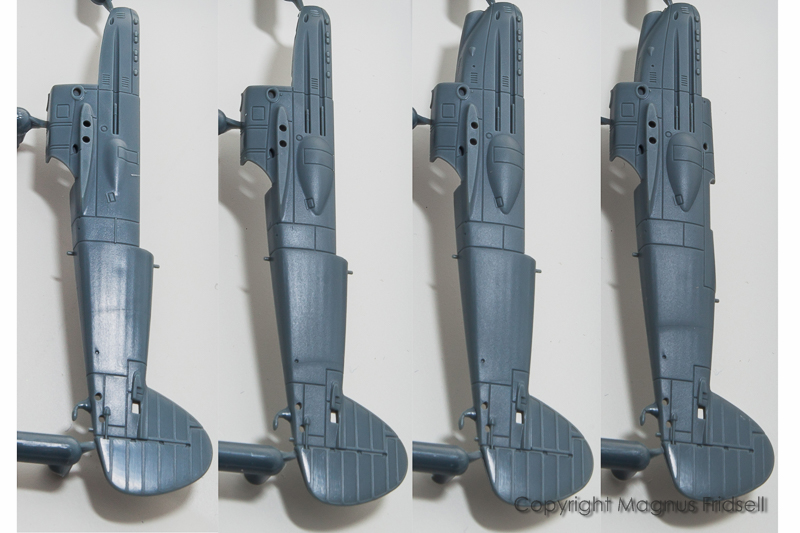
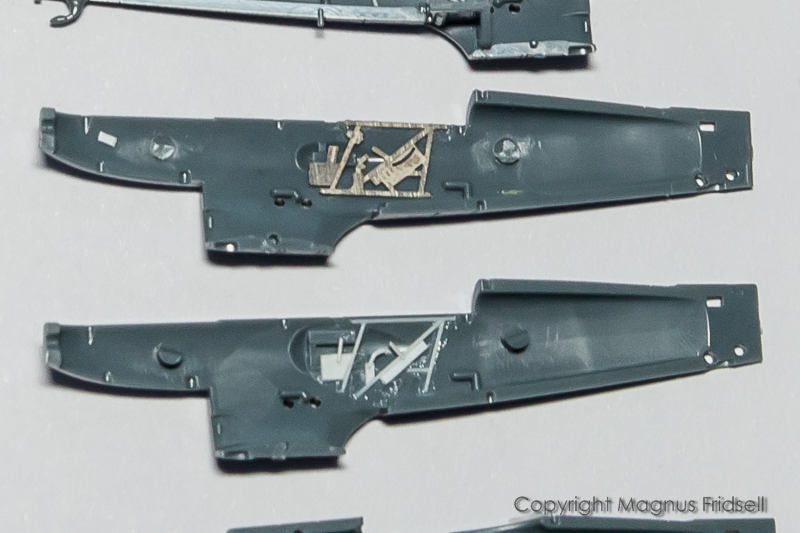
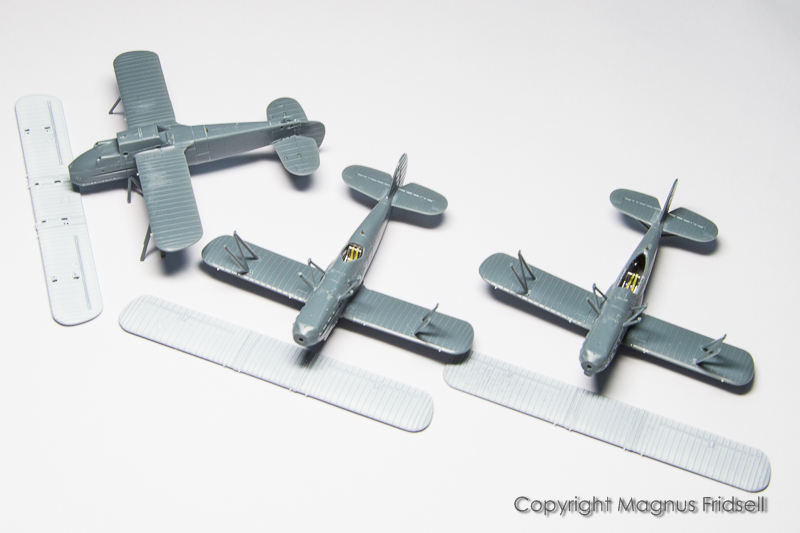
...but they aren't identical! All differs when it comes to the fuselage parts so you'll get one kit each of four sub-variants!


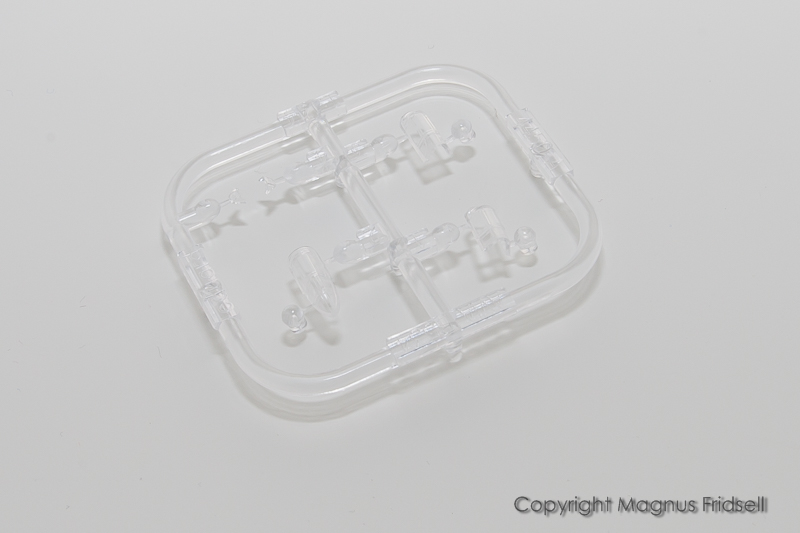
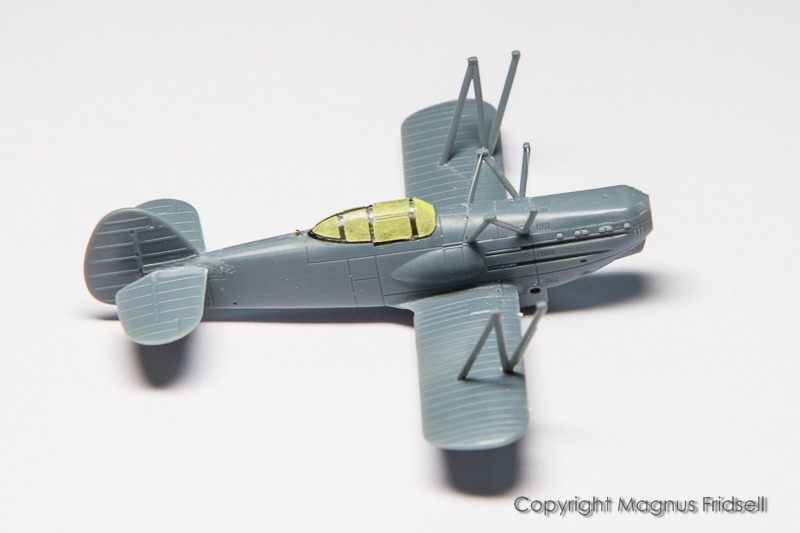
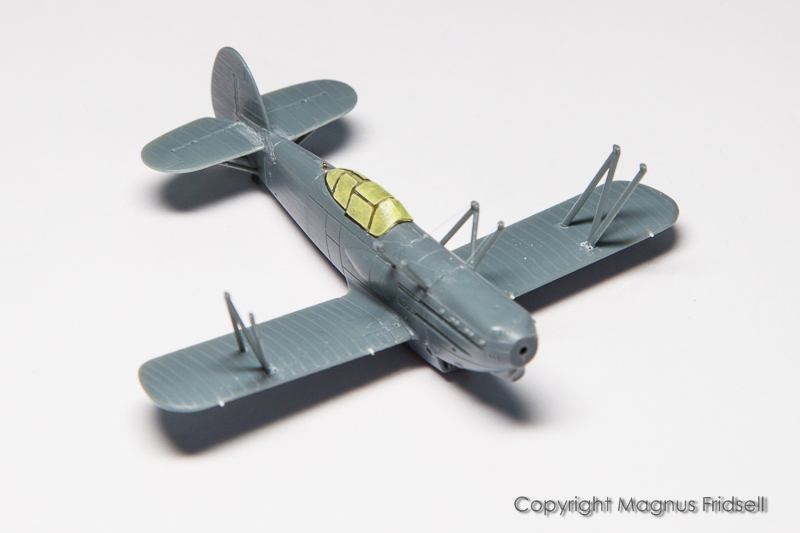
Clear parts. Note that the canopy for the "high-back"-version isn't used, giving a clear indication what's next from Eduard!


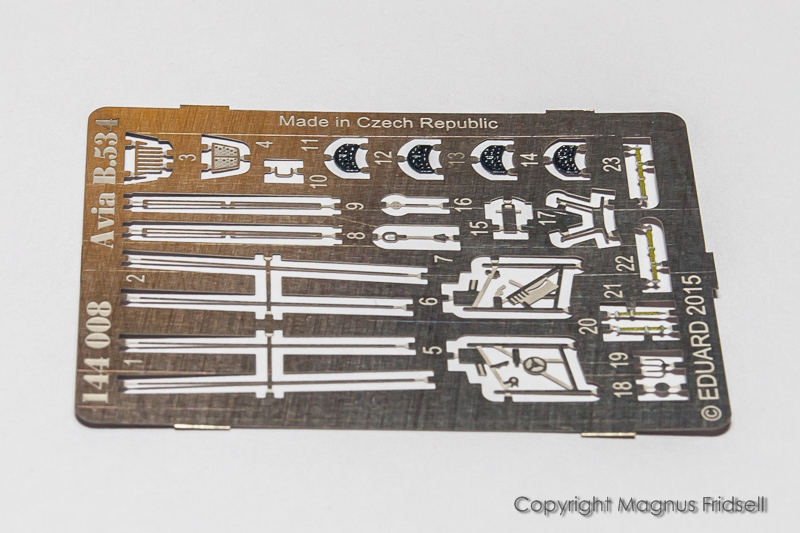
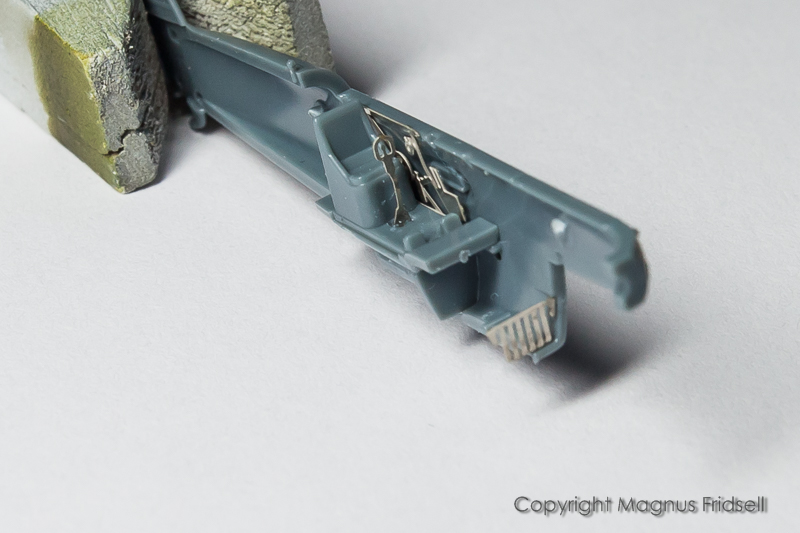
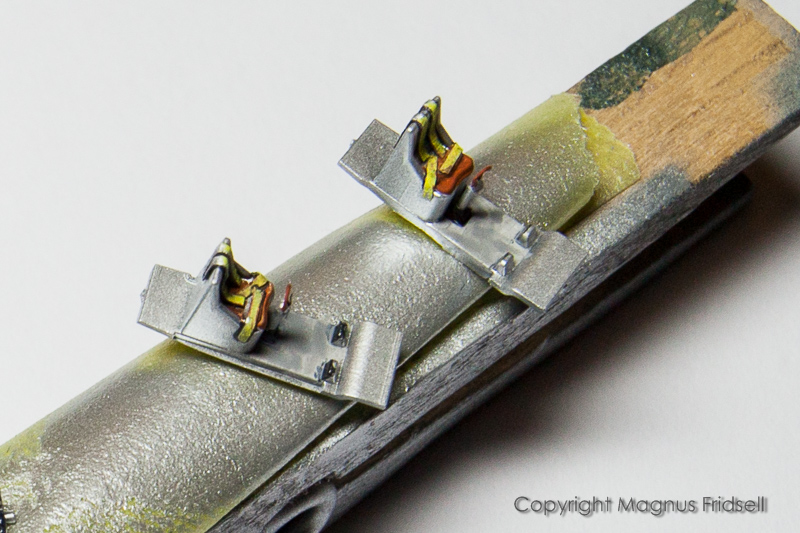
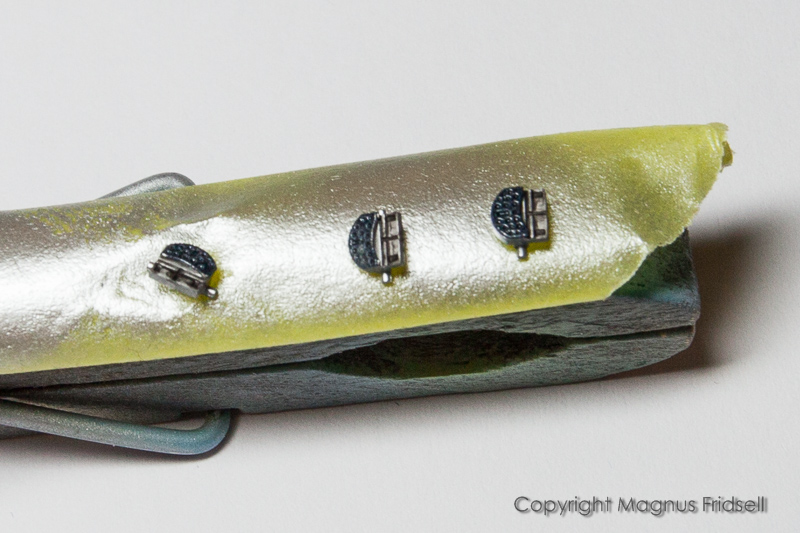
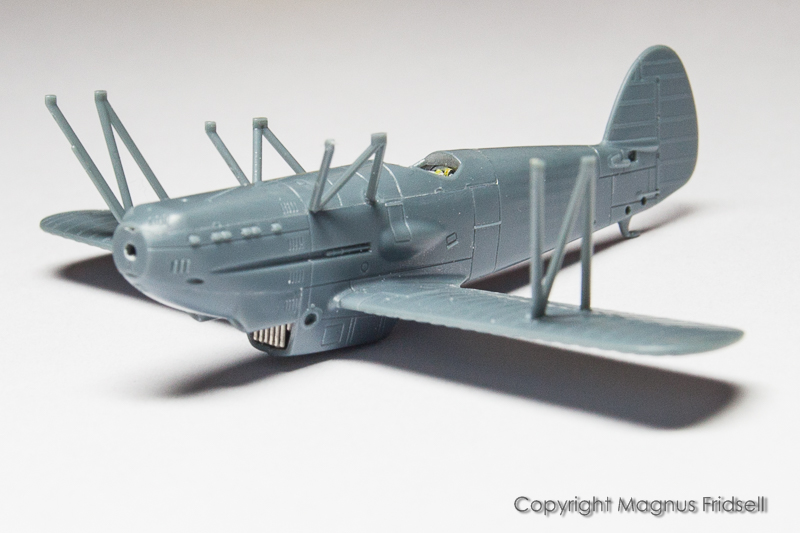
Etch. One nice touch is that there are four instrument panels, enough for all Avias you get in the box. The rigging doesn't look very convincing but might be an alternative if you don't feel like tackling the problem using hair-thin thread of some kind!

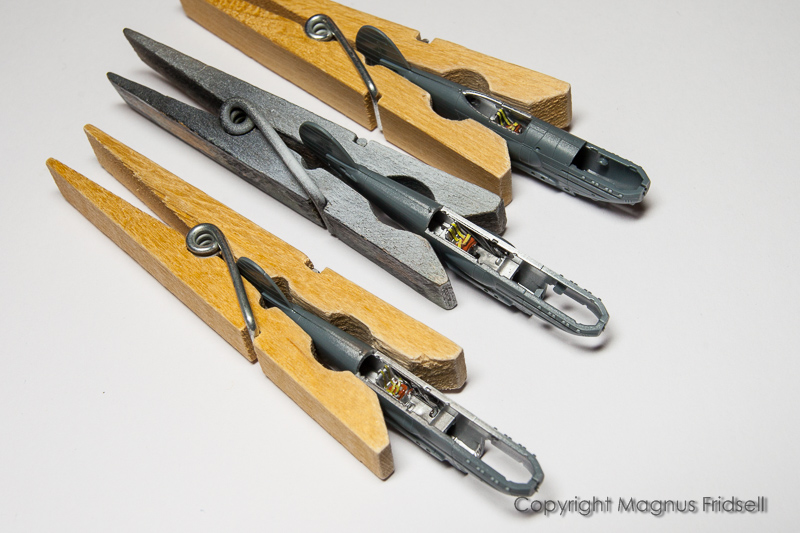
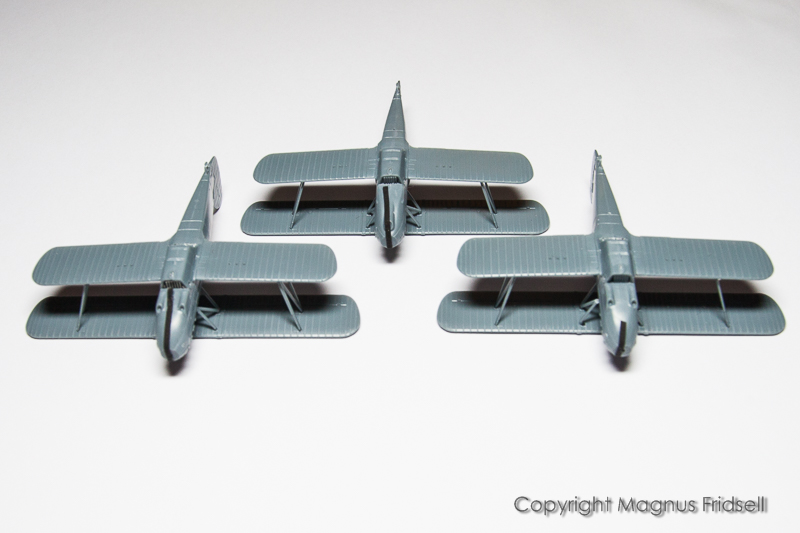
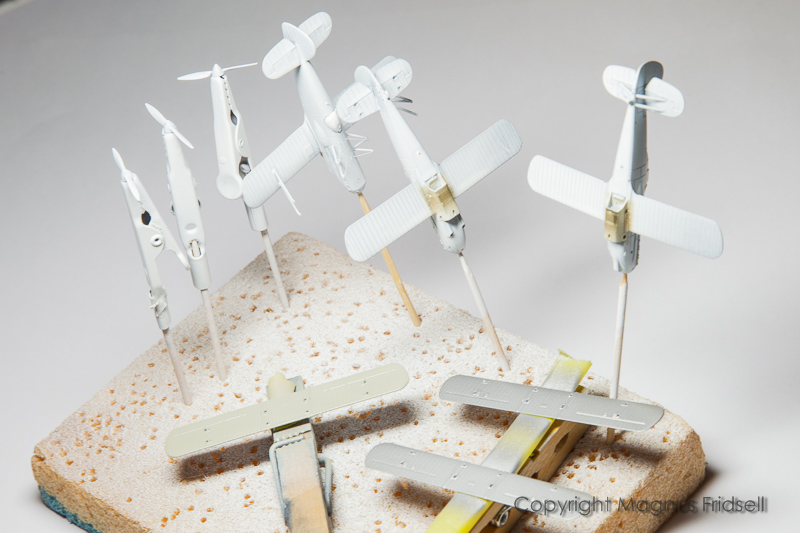
I'll build three of these, one is leaving for my friend Rickard together with one of the etch sets.


Magnus
magnusf
_VISITCOMMUNITY
Stockholm, Sweden
Joined: May 02, 2006
KitMaker: 1,953 posts
AeroScale: 1,902 posts
Posted: Saturday, December 26, 2015 - 03:11 PM UTC
Up and running now!


As I wrote earlier, I'll keep three of the four for myself. I only bought one set of PE for my builds (counted per model the rather minuscule etch fret is actually slightly more expensive than the models). For the bubbletop machine with the full canopy I won't spend any extra work in the cockpit...


...but for the open cockpit one I did my own detail using 0,3 mm plastic stock and the PE as a pattern.


I modified the stick with a home-made spade handle from 0,15 mm copper wire and a brake handle from 0,05 mm copper wire. It was cast as a flat surface only and an easy modification!


And this is where the PE ended up!


Magnus
Jessie_C
_VISITCOMMUNITY
British Columbia, Canada
Joined: September 03, 2009
KitMaker: 6,965 posts
AeroScale: 6,247 posts
Posted: Sunday, December 27, 2015 - 05:43 AM UTC
Wow! If your MiGs were micro, these must be nano!
GazzaS
#424
_VISITCOMMUNITY
Queensland, Australia
Joined: April 23, 2015
KitMaker: 4,648 posts
AeroScale: 1,938 posts
Posted: Sunday, December 27, 2015 - 07:15 AM UTC
Once I'm amazed at what micro work you are capable of, Magnus.
Joel_W
Staff MemberAssociate Editor
AUTOMODELER
_VISITCOMMUNITY
New York, United States
Joined: December 04, 2010
KitMaker: 11,666 posts
AeroScale: 7,410 posts
Posted: Tuesday, December 29, 2015 - 05:45 AM UTC
Magnus,
Your quickly becoming the king of the 1/144 Aeroscale gang. And now 3 of a kind. Well, almost. Can't wait to see how you rig these. Even with the PE is can't be that easy.

Those cockpits are looking really quite good.

Joel

Rotebaron
_VISITCOMMUNITY
Jalisco, Mexico
Joined: August 10, 2010
KitMaker: 182 posts
AeroScale: 179 posts
Posted: Tuesday, December 29, 2015 - 05:56 AM UTC
I only going to say... Amazing!!!
JClapp
#259
_VISITCOMMUNITY
Massachusetts, United States
Joined: October 23, 2011
KitMaker: 2,265 posts
AeroScale: 1,715 posts
Posted: Tuesday, December 29, 2015 - 06:07 AM UTC
That's a wonderful kit! I will be very interested to see you build them. and - oh my, all those wires - best luck!
magnusf
_VISITCOMMUNITY
Stockholm, Sweden
Joined: May 02, 2006
KitMaker: 1,953 posts
AeroScale: 1,902 posts
Posted: Wednesday, December 30, 2015 - 02:30 PM UTC
Jessica and Gary! Yep, they are small :-) ! I do however have something even smaller in the stash: a 144-scale Sopwith Triplane! A resin kit but a kit nevertheless. Bought when I hurried by Hannant's in Colindale (when it was in the Colindale railway station) while on a business trip and couldn't figure out what to buy. Since there are strict rules against leaving such a place empty-handed I went for the smallest complete kit I could find :-) !

Joel! Thanks for the title, there are however other worthy bearers of that crown around here and plenty of space on the throne for more people as well ! As for doing the three of them: if I do two I doubt I would go back to build the third one sometime soon so better get them done at the same time all of them!

Jonathan and Joel! Rigging... There isn't that much of it so I am not really that worried about it. I'll prepare pre-drilled holes for it while those areas are still accessible. As for the PE, I think I'll leave that alone. Even if Eduard has tried to do it thin I think it'll look overscale.

Alfredo! I've barely just started so I've had few chances to mess things up yet !


After a bit of painting... Vallejos new formula acrylic metal colour sprayed on following detail painting with a paintbrush...


...interior units...


...kit instrument panels with etched part added...


...historical photo from Avia factory showing three fuselages in production jigs (I recommend you to save this for future reference, Avia production photos are rare...)...


...and finally the three fuselages set aside for drying! I'll leave them like this for a few days to let the glue vapour off, hopefullt avoiding "ghost seams". I'll do my best to avoid putty!

I wish you all a happy, prosperous and modelling-wise very productive 2016!


Magnus
magnusf
_VISITCOMMUNITY
Stockholm, Sweden
Joined: May 02, 2006
KitMaker: 1,953 posts
AeroScale: 1,902 posts
Posted: Saturday, January 02, 2016 - 03:44 PM UTC
Three days into 2016!

Will be away for a few days but I've promised some size comparisons...


The kits will (except for the wings) easily fit into a standard-size (Danish...) matchbox...


...and here's a photo together with my earlier completed MiG-21. It's a bit smaller than that one.


Magnus
Joel_W
Staff MemberAssociate Editor
AUTOMODELER
_VISITCOMMUNITY
New York, United States
Joined: December 04, 2010
KitMaker: 11,666 posts
AeroScale: 7,410 posts
Posted: Saturday, January 02, 2016 - 10:34 PM UTC
Magnus,
Now that's small by anyone's standards.

Joel
magnusf
_VISITCOMMUNITY
Stockholm, Sweden
Joined: May 02, 2006
KitMaker: 1,953 posts
AeroScale: 1,902 posts
Posted: Sunday, January 10, 2016 - 01:43 AM UTC
Continuing on the theme of tininess, now with some added complexity due to the fact that these are biplanes!


After having done a minimum of sanding and filling (it fits well and there is a huge payback if being careful when building!) I've come to the tricky part: the wings...


With two separate lower wings I decided upon using the upper wing as a jig to get the fuselage struts mounted correctly resulting in a fun-looking parasol monoplane for a while...


...letting the struts dry overnight (upper wing wasn't glued, just used as a fixture for the struts).


After this, I glued the outer struts to the lower wings, then attaching the wings to the fuselage and finally adjusting the struts for fit against the upper wing. Now I had three very aerobatic-looking aircraft laid out to dry...


...finally being able to remove the upper wing and ending up with something looking very non-flyable...


...but possibly being easier to both paint and put together for final assembly!

There are many things on the "I wish Eduard had done this or that"-list but the two main points are:

1) The lower wings could have been cast as one piece, avoiding potential problems with dihedral and fit of struts.
2) The fuselage struts could have been cast as one piece, giving the correct angles out of the box.

Following the assembly sequence could potentially land you in a lot of trouble with the struts if you don't get the dihedral perfectly right.


Magnus
AussieReg
Staff MemberAssociate Editor
AUTOMODELER
#007
_VISITCOMMUNITY
Victoria, Australia
Joined: June 09, 2009
KitMaker: 8,156 posts
AeroScale: 3,756 posts
Posted: Sunday, January 10, 2016 - 03:26 AM UTC
Magnus, how have I missed this thread? Amazing mini-micro work my friend, and a new favourite. Parts-in-PEGS!

My eyes are aching from just looking at the images here, there is no way I could manage working in this scale. Huge kudos to you, keep the updates coming.

Cheers, D
Antilles
_VISITCOMMUNITY
Nordrhein-Westfalen, Germany
Joined: March 22, 2015
KitMaker: 671 posts
AeroScale: 614 posts
Posted: Sunday, January 10, 2016 - 07:11 PM UTC
Magnus,
many thanks for the size comparison to Your MiG. Never thought a matchbox could be used as a hangar .

Oliver
Joel_W
Staff MemberAssociate Editor
AUTOMODELER
_VISITCOMMUNITY
New York, United States
Joined: December 04, 2010
KitMaker: 11,666 posts
AeroScale: 7,410 posts
Posted: Sunday, January 10, 2016 - 07:52 PM UTC
Magnus,
Just amazing work getting all those struts glued into the correct position, not once but 3 times. I'm more then just impressed at your skills and your eyesight. I'm half blind (literally) and just can't imagine how you can see those tiny pieces, let alone work with them.

Joel
spaarndammer
_VISITCOMMUNITY
Noord-Holland, Netherlands
Joined: January 28, 2007
KitMaker: 1,945 posts
AeroScale: 388 posts
Posted: Wednesday, January 13, 2016 - 02:28 AM UTC
Another Big effort on a very small scale Magnus. I am curious how you will do the rigging. So far, it looks great.

Are all the PE instrument panels the same or do they differ (for different versions)?


Jelger
magnusf
_VISITCOMMUNITY
Stockholm, Sweden
Joined: May 02, 2006
KitMaker: 1,953 posts
AeroScale: 1,902 posts
Posted: Tuesday, January 19, 2016 - 04:20 PM UTC
Damian! Long time no see ! And thanks!

Oliver! Matchbox hangars: cheap, recyclable - really in accord with our times!

Joel! This is just about my size limit. The fact that these are biplanes add a lot to the fiddlines-factor!

Jelger! Those instrument panels do actually differ, even if I can't tell exactly how ! I think this is due to those kits being real labours of love for Eduard.

Even if it was some time since last update I haven't been idle: I've been drilling a myriad of terribly tiny holes in preparation for the rigging, using up a score of 0,2 mm drills (generally speaking: 0,3 mm drills are some kind of smallest level when it comes to using them by hand, smaller than that are too easy to break off).

I've also done the rigging between the inner struts that will be impossible to access when the upper wing is in place. For this I used fly fishing line, for the main rigging I'll probably use stretched sprue instead since this can easily be tightened by heat. One alternative had been drilling through-holes so that one could loop the line through and stretch it but I don't dare to do that in this small size. I've got a Gloster Gladiator in the much more manageable scale of 1/72 that I can try out that method on some time in the future !


The trio with a set of primed wings...


...props-on-sticks (mandatory...).


And finally the masks from the kit applied to the only one with a closed cockpit!


Magnus
magnusf
_VISITCOMMUNITY
Stockholm, Sweden
Joined: May 02, 2006
KitMaker: 1,953 posts
AeroScale: 1,902 posts
Posted: Wednesday, January 20, 2016 - 02:02 AM UTC
A second update for today: aircraft primed and I've started painting the upper wings and the coolers in the fuselages.


Magnus
eseperic
_VISITCOMMUNITY
Croatia Hrvatska
Joined: November 06, 2009
KitMaker: 624 posts
AeroScale: 609 posts
Posted: Wednesday, January 20, 2016 - 02:33 AM UTC
Magnus, very nice and intricate detailing! Amazing work! Will follow your next moves...! Simply nice!

All the best,
Entoni
goodn8
_VISITCOMMUNITY
Berlin, Germany
Joined: October 12, 2008
KitMaker: 709 posts
AeroScale: 651 posts
Posted: Thursday, January 21, 2016 - 03:21 PM UTC
Awesome "Nano-Work", very impressive!
Thank's for sharing your progress

Thomas
Joel_W
Staff MemberAssociate Editor
AUTOMODELER
_VISITCOMMUNITY
New York, United States
Joined: December 04, 2010
KitMaker: 11,666 posts
AeroScale: 7,410 posts
Posted: Friday, January 22, 2016 - 01:12 AM UTC
Magnus,
Just amazing progress. You're certainly flying through these builds. Can't wait to see you actually rig them.
Joel
spaarndammer
_VISITCOMMUNITY
Noord-Holland, Netherlands
Joined: January 28, 2007
KitMaker: 1,945 posts
AeroScale: 388 posts
Posted: Friday, January 22, 2016 - 01:52 AM UTC
Nice!!! Birds on a stick .
magnusf
_VISITCOMMUNITY
Stockholm, Sweden
Joined: May 02, 2006
KitMaker: 1,953 posts
AeroScale: 1,902 posts
Posted: Friday, January 22, 2016 - 08:19 PM UTC
Friends! Rigging is my main worry. It'll have to be done as almost the last part of these builds.

We had some friends over last night for dinner meaning that the family slept late this morning, or rather everyone but me! I got some modelling time instead !


I had no idea that I would stumble over my pet annoyance on a 1930s biplane: wrap-around camo! The green actually goes over the leading edge... I hate masking it! In this case there was however a fairly easy solution in the form of a spare upper wing that I could use as a template for cutting out a mask from masking film! Splitting it down the middle I could then adjust it to get a reasonably even green border to the silver lower surface. And I think I'll be able to recycle the masks for the lower wings !


Finished wings!


And fuselages in the process of painting, the RLM 02 one can even be considered as ready for decals!

As you might have noticed, there is no landing gear on any of them and tailplane struts only on the grey machine: I came to the conclusion that it will probably be easier to pre-paint the landing gear parts and mount them right at the finishing stages instead of trying to paint them while they are in place and then do some fiddly masking.


Magnus
GazzaS
#424
_VISITCOMMUNITY
Queensland, Australia
Joined: April 23, 2015
KitMaker: 4,648 posts
AeroScale: 1,938 posts
Posted: Saturday, January 23, 2016 - 01:28 AM UTC
Hi Magnus,
Looking good! I can't imagine finding rigging that could be to-scale for a/c so tiny.

Gary
magnusf
_VISITCOMMUNITY
Stockholm, Sweden
Joined: May 02, 2006
KitMaker: 1,953 posts
AeroScale: 1,902 posts
Posted: Sunday, January 31, 2016 - 08:50 PM UTC
Gary! I'm betting on stretched sprue. Since I've got rather long arms, the resulting plastic thread will be rather thin !


Decals are on. Another rather fiddly affair is over... They worked very well by the way!


Magnus
GazzaS
#424
_VISITCOMMUNITY
Queensland, Australia
Joined: April 23, 2015
KitMaker: 4,648 posts
AeroScale: 1,938 posts
Posted: Sunday, January 31, 2016 - 11:05 PM UTC
Lol....at this scale Magnus, what isn't fiddly.
 _GOTOTOP