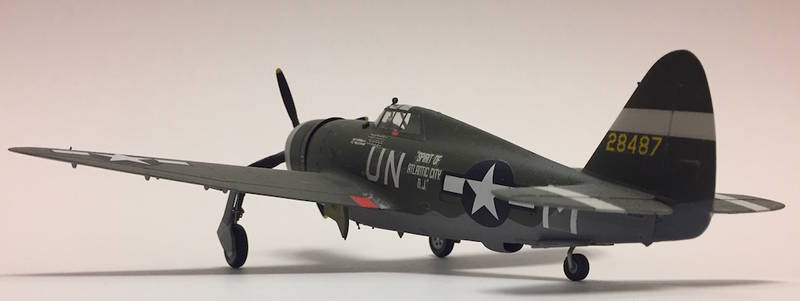
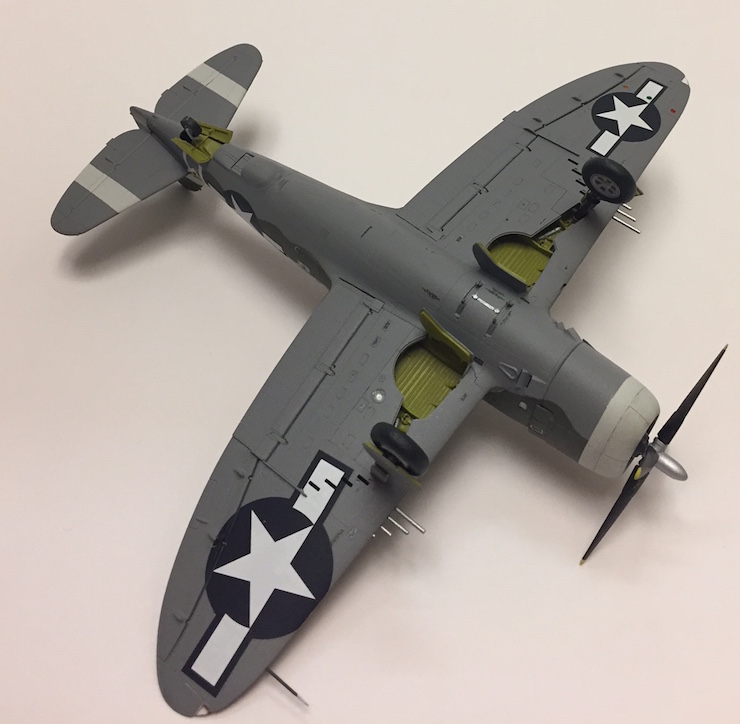
After attaching the landing gear, I completed some mild paint chipping around access panel lines, all while having a near-disaster that turned into something quite interesting:
As I was weathering the white parts of the cowling panels, the chipping in contrast with the white cowling in my opinion became much too garish and dark, and I accidentally tapped the nose (*gasp*) against the lip of the open container of XF-56 metallic gray.
Since I initially decided I was going to respray the nose no matter what, I performed a little experiment after hearing that Tamiya acrylic thinner doesn't affect the cellulose-based lacquer sprays.
The metallic gray chipping on the nose had been drying for maybe ~10 minutes at this point. I am not sure how well this method works with acrylic that has dried overnight. I also figure it would look better with brown or black paint
Taking a soft paintbrush, I dabbed the acrylic thinner in the areas that I wanted (the cowling panel lines), and after waiting for about 15 seconds, I wiped away the thinner with a paper towel. I repeated this until I got the effect I wanted, with the paint staying in the panel lines.
No respraying necessary!
I unfortunately missed Damian's post about the wheel hub decorations; using the photos I had, I misinterpreted the points of the star to be the six holes on the hub of the wheel with the cover removed, and the white part of the star to be the raised area of the hub...but then again the covers could have been dented or ripped up and left flapping around by debris on the runway or in combat and temporarily taken off to be replaced. No biggie. I figure Mahurin would want to keep his decoration and so would have procured another set of wheel hub covers.
Pre-Flight Check
Constructive critique of your finished or in-progress photos.
Hosted by Jim Starkweather
56th FG P-47 Operation - n_tuma749
n_tuma749
Nebraska, United States
Joined: October 05, 2014
KitMaker: 45 posts
AeroScale: 31 posts
Joined: October 05, 2014
KitMaker: 45 posts
AeroScale: 31 posts
Posted: Friday, March 04, 2016 - 03:13 AM UTC
n_tuma749
Nebraska, United States
Joined: October 05, 2014
KitMaker: 45 posts
AeroScale: 31 posts
Joined: October 05, 2014
KitMaker: 45 posts
AeroScale: 31 posts
Posted: Sunday, June 26, 2016 - 02:37 AM UTC
Due to a pretty hectic work schedule over the last couple months, I've only had time to work here and there, but the model is essentially completed. I'll post these photos of the finished model here, and then some proper ones of the model against a white background in the campaign thread later.
n_tuma749
Nebraska, United States
Joined: October 05, 2014
KitMaker: 45 posts
AeroScale: 31 posts
Joined: October 05, 2014
KitMaker: 45 posts
AeroScale: 31 posts
Posted: Sunday, June 26, 2016 - 02:38 AM UTC
n_tuma749
Nebraska, United States
Joined: October 05, 2014
KitMaker: 45 posts
AeroScale: 31 posts
Joined: October 05, 2014
KitMaker: 45 posts
AeroScale: 31 posts
Posted: Sunday, June 26, 2016 - 02:40 AM UTC
n_tuma749
Nebraska, United States
Joined: October 05, 2014
KitMaker: 45 posts
AeroScale: 31 posts
Joined: October 05, 2014
KitMaker: 45 posts
AeroScale: 31 posts
Posted: Sunday, June 26, 2016 - 02:40 AM UTC
Posted: Monday, June 27, 2016 - 08:55 AM UTC
Lovely build Nicholas, it looks great. Congratulations on getting finished, and you still have 6 months to build another one now!
I am looking forward to some more photos, the weathering and chipping look good even in these photos.
Have you clear-coated this one yet? There is a very slight silvering around the top of the national insignia in the last photo that should disappear with a flat clear finish.
Thanks for taking part and sharing this build with us, job very well done.
Cheers, D
julionav
Florida, United States
Joined: September 01, 2016
KitMaker: 75 posts
AeroScale: 69 posts
Joined: September 01, 2016
KitMaker: 75 posts
AeroScale: 69 posts
Posted: Wednesday, September 07, 2016 - 09:01 AM UTC
This is fascinating. YOur attention to detail is inspiring. Well done. I will soon be doing one of those. I want to model a 'Jug' with the red tail markings. I will be using he after market upgrades you are using thanks.
n_tuma749
Nebraska, United States
Joined: October 05, 2014
KitMaker: 45 posts
AeroScale: 31 posts
Joined: October 05, 2014
KitMaker: 45 posts
AeroScale: 31 posts
Posted: Tuesday, November 29, 2016 - 07:10 PM UTC
I've been terribly swamped with school and a rather abrupt move over the past few months, so modeling been's kind of swept by the wayside. I had to pack the old Jug away due to the move (don't worry, no damage!) but I'm hoping to get her back out to get some proper pictures (on a white background) to put here and in the campaign thread by the end of this week.
n_tuma749
Nebraska, United States
Joined: October 05, 2014
KitMaker: 45 posts
AeroScale: 31 posts
Joined: October 05, 2014
KitMaker: 45 posts
AeroScale: 31 posts
Posted: Sunday, December 04, 2016 - 07:32 AM UTC
P-47D-5-RE 42-8487 "Spirit of Atlantic City, N.J." (UN-M)
Captain Walker M. "Bud" Mahurin
63rd Fighter Squadron, 56th Fighter Group
November-December 1943
Captain Walker M. "Bud" Mahurin
63rd Fighter Squadron, 56th Fighter Group
November-December 1943
wing_nut
New Jersey, United States
Joined: June 02, 2006
KitMaker: 1,212 posts
AeroScale: 468 posts
Joined: June 02, 2006
KitMaker: 1,212 posts
AeroScale: 468 posts
Posted: Tuesday, December 13, 2016 - 06:03 PM UTC
Good looking jug.