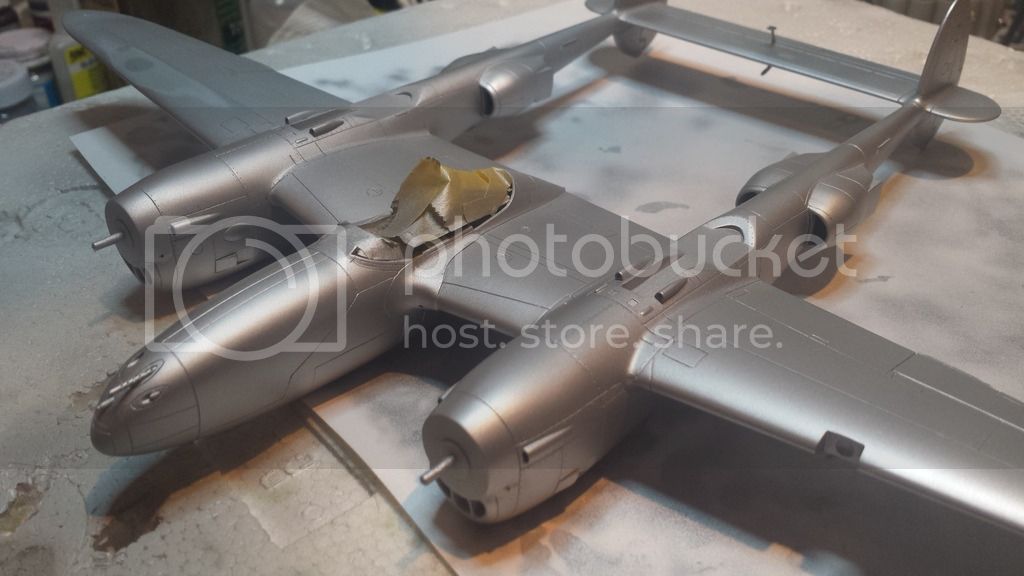
Hello everyone, I am in the midst of my first ever NMF build using alclad IIs. This is some truly amazing stuff and I think I finally grasp the requirements of what is needed in the surface preparation. I've primed my Academy 1/48 P-38L with a combo of Tamiya fine primer and Mr Surfacer 1200. Sanded all smooth to about 1200 grit. I got a few recommendations from my lhs to go with the basic alclad 101 aluminum so that's what I went with. After having it on I now feel it is too matte and has almost no reflectivity. The surface itself if rather rough to the touch. I realize a fighter in the European theater seeing action isn't going to be chrome shiny but I would expect a bit more of a smooth and shinier finish. Can anyone judge from my pictures if I've chosen the proper base coat or even sprayed it on correctly?
This is mostly subjective so I'd be interested to hear what everyone else thinks the finish level should be on a plane such as this and how I could modify my base coat to accomodate. Thanks, All!!
Steve
World War II
Discuss WWII and the era directly before and after the war from 1935-1949.
Hosted by Rowan Baylis
P-38 NMF Opinions needed!
smeosky
Texas, United States
Joined: November 22, 2010
KitMaker: 33 posts
AeroScale: 12 posts
Joined: November 22, 2010
KitMaker: 33 posts
AeroScale: 12 posts
Posted: Monday, May 02, 2016 - 01:34 AM UTC
Joel_W
Associate Editor
New York, United States
Joined: December 04, 2010
KitMaker: 11,666 posts
AeroScale: 7,410 posts
Joined: December 04, 2010
KitMaker: 11,666 posts
AeroScale: 7,410 posts
Posted: Monday, May 02, 2016 - 01:53 AM UTC
Steve,
Unfortunately, you've applied the wrong base and color for a shiny Aluminum surface using Alcad II 101 Flat Aluminum. A glossy base coat is needed for a mirror type reflection. Black gives you the highest and deepest shine. I've used other gloss colors to vary the panel color and the amount of reflectivity.
I always prime because it's necessary to seal all putty work so that the surface is uniform and there are no porous areas if you didn't seal the putty with CCA. Then you polish out the primer as you have done.
The usual gloss color for max shine is Black, but I've used grays as well to pre-color various panels, and to lessen the reflective shine.
My go to Black Base is Alcad's Gloss Black which is a Mineral Spirit base, not lacquer, which is part of the companies name. Tamiya Acrylic Gloss highly thinned works well, as I've also gotten good results from it.
At this point your best options are to apply a few coats of Alcad Clear Gloss, then decal. One issue to be aware of if that the decals end up being glossy if you overcoat them with gloss. So if you want them in a matt finish, then seal with Alcad Clear, or with Testors Metalizer Sealer.
Joel
smeosky
Texas, United States
Joined: November 22, 2010
KitMaker: 33 posts
AeroScale: 12 posts
Joined: November 22, 2010
KitMaker: 33 posts
AeroScale: 12 posts
Posted: Monday, May 02, 2016 - 02:17 AM UTC
Thanks for your insight, Joel. Much appreciated. A number of people told me 'you dont need a black base coat if your doing plain aluminium'. The more i'm researching the more im finding otherwise, UGH! I intended for the panel on the nose aft of the gun openings (where the artwork typically goes) to be a higher shine so I based that with Model master gloss black enamels. Let dry for days then wet sanded that to 2000 grit. When spraying I had a hard time of it, constantly having the tip dry on my Paasche H (#3 needle). I was constantly having to wet and clean the tip down. After a few coats it just devoured the black panel and blended it in to everything else. At this point I cant determine if I was improperly spraying the stuff or just not putting that black base coat down. Im not after a high shine but would like it shinier than what you see. Thinking weathered down NMF. Do you think I would have any luck polishing this aluminum base down w micromesh pads and then going back over it w another coat or 2 of Alclad polished or aircraft aluminum?
Joel_W
Associate Editor
New York, United States
Joined: December 04, 2010
KitMaker: 11,666 posts
AeroScale: 7,410 posts
Joined: December 04, 2010
KitMaker: 11,666 posts
AeroScale: 7,410 posts
Posted: Monday, May 02, 2016 - 02:44 AM UTC
Quoted Text
Thanks for your insight, Joel. Much appreciated. A number of people told me 'you dont need a black base coat if your doing plain aluminium'. The more i'm researching the more im finding otherwise, UGH! I intended for the panel on the nose aft of the gun openings (where the artwork typically goes) to be a higher shine so I based that with Model master gloss black enamels. Let dry for days then wet sanded that to 2000 grit. When spraying I had a hard time of it, constantly having the tip dry on my Paasche H (#3 needle). I was constantly having to wet and clean the tip down. After a few coats it just devoured the black panel and blended it in to everything else. At this point I cant determine if I was improperly spraying the stuff or just not putting that black base coat down. Im not after a high shine but would like it shinier than what you see. Thinking weathered down NMF. Do you think I would have any luck polishing this aluminum base down w micromesh pads and then going back over it w another coat or 2 of Alclad polished or aircraft aluminum?
I've never tried re-spraying the whole aircraft but the few times I have spray areas a 2nd time, they weren't any shinier. You could try a different Aluminum finish like Airframe Aluminum which is a shinier finish to start with.
I'm confused as to when your tip was clogging? I would checkout the Alcad site as they have some excellent tutorials and videos that was a great help to me.
Joel
Posted: Monday, May 02, 2016 - 02:48 AM UTC
Hi Steve.
I'm with Joel on this one, a black base coat definitely gives you the best result on the top coat. My go-to combination is Tamiya Semi-Gloss Black acrylic as a base and Alclad Airframe Aluminium for the top coat. You can then mask and overspray various panels with other Alclad shades for panel variations.
Here is a pic of an old Monogram 1/48 P-47 I did a few years back.
And a Tamiya 1/48 P-47 done the same way, masked and sprayed over with Tamiya Acrylics.
Hope this helps.
Cheers, D
drabslab
European Union
Joined: September 28, 2004
KitMaker: 2,186 posts
AeroScale: 1,587 posts
Joined: September 28, 2004
KitMaker: 2,186 posts
AeroScale: 1,587 posts
Posted: Monday, May 02, 2016 - 02:58 AM UTC
I copy the comments made by Joel and Damian but I think that your P-38 looks fairly well and is sufficient for starting a weathering job.
You are right stating that these planes suffered a lot, and weren't always maintained properly. I would try applying a gloss varnish and then do some weathering, oil stains ...
When it now looks fairly boring, it will gain a lot of umpfh with some dcalling, details ...
You are right stating that these planes suffered a lot, and weren't always maintained properly. I would try applying a gloss varnish and then do some weathering, oil stains ...
When it now looks fairly boring, it will gain a lot of umpfh with some dcalling, details ...
smeosky
Texas, United States
Joined: November 22, 2010
KitMaker: 33 posts
AeroScale: 12 posts
Joined: November 22, 2010
KitMaker: 33 posts
AeroScale: 12 posts
Posted: Monday, May 02, 2016 - 03:21 AM UTC
Thanks, Drab. I was telling myself the same thing. Looks bland now but will get better. Im just worried that the finish isn't where it 'should' be. In the end I just don't have the experience of observing and executing NMF. Not nearly as much as I do in luftwaffe RLM colors
The look I am going for is almost exactly what you have on your P-47, Damien.
Joel, the tip just kept clogging from almost the beginning of spraying. If I had the nozzle dialed into less than 50% it eventually dries in the tip and i have to clean. Only if I really opened it up and got a huge amount of paint coming out would it be sprayable, but then your out of paint before you know it and you risk runs. Insanely irritating. This seems to be an ongoing issue w this brush of mine anyway. Same with my Iwata HP CS, actually. Maybe I should start a thread on that next
Thanks for all your tips so far, guys!
Joel_W
Associate Editor
New York, United States
Joined: December 04, 2010
KitMaker: 11,666 posts
AeroScale: 7,410 posts
Joined: December 04, 2010
KitMaker: 11,666 posts
AeroScale: 7,410 posts
Posted: Monday, May 02, 2016 - 06:02 AM UTC
Steve,
Like I said, go to the Alcad site and watch their video on air brushing. It will give you a decent starting point.
Joel
Like I said, go to the Alcad site and watch their video on air brushing. It will give you a decent starting point.
Joel
Posted: Monday, May 02, 2016 - 06:21 AM UTC
Hi Steve,
NMF: most excellent when it turns out yet so challenging to create.
First, in the days before Alcad, I would spray NMF with Floquil silvers and then buff them with clean tee-shirts and even a little polishing toothpaste. Keep in mind that while attrition kept a lot of airplanes from getting old enough to tarnish, those reflective "air show" gleaming finishes didn't last long, anyway.
They are not P-38s but there are two period- photos of NMF planes: http://rwebs.net/avhistory/notsofam/little.htm
Posted: Monday, May 02, 2016 - 06:29 AM UTC
This P-38 is not particularly gleaming: http://www.ww2color.com/search/webapps/slides/slides.php?action=update&primary_key=00008
Nor this one: http://www.ww2color.com/search/webapps/slides/slides.php?action=update&primary_key=00146
An awesome site: http://www.ww2color.com/search/webapps/slides/slides.php
Nor this one: http://www.ww2color.com/search/webapps/slides/slides.php?action=update&primary_key=00146
An awesome site: http://www.ww2color.com/search/webapps/slides/slides.php
Posted: Monday, May 02, 2016 - 05:12 PM UTC
If you check out the Alclad website as Joel recommended, you will find that the question is far more complicated than just use black or grey as a base. The only hard and fast rule is if you want to get the most out of the truly high shine finishes like chrome, black chrome, and polished aluminum lacquers then you need to go black gloss as a base. The others are all over the map for base options. Check the Alclad site and save it, you will want to refer back to it often.
Personally I think you will be fine with what you have after you add some weathering process to it. You can also add some interesting effects to break the tone up by highlighting panel lines with Tamiya Smoke or really thinned brown to seperate panels of the same shade of aluminum. My P-51D here was done in this manner, Alclad aluminum over Tamiya Fine Grey Primer in a solid shade with only a couple of specific panels oversprayed in steel, duraluminum, or white aluminum, then broken up using Tamiya Smoke on panel lines with Tamiya Brown Panel Liner wash. I picked out various areas with Micro Gloss, Satin, or Flat at the end to get my final result. On my latest NMF bird, I tried pre-shading panels in various tones of greyscale from white to black and then thinly misting on Alclad's Airframe Aluminum to get the finish I was after. I was very happy with that effect for a base to start decals and weathering. It is even more varied than the P-51D.
I think you will be surprised how much different the P-38 will look after you start adding decals and effects to break up the monotone finish. You have a good starting point.
Joel_W
Associate Editor
New York, United States
Joined: December 04, 2010
KitMaker: 11,666 posts
AeroScale: 7,410 posts
Joined: December 04, 2010
KitMaker: 11,666 posts
AeroScale: 7,410 posts
Posted: Monday, May 02, 2016 - 08:56 PM UTC
smeosky
Texas, United States
Joined: November 22, 2010
KitMaker: 33 posts
AeroScale: 12 posts
Joined: November 22, 2010
KitMaker: 33 posts
AeroScale: 12 posts
Posted: Monday, May 02, 2016 - 11:55 PM UTC
Joel, you have all provided some solid advice and examples and for that I thank you. What did you base your P-38 there with? Paul, your P-51 looks awesome and I guess that proves a finish with the base 101 aluminum totally works. Starting anew on NMF its just hard to know where to start with the base finish. Some go with the alclad airframe aluminum, some the polished, some even start w chrome and dull it down. Add to the confusion when you go to museums and see P-38s, Mustangs etc they're all shiny and perfect looking so that further distorts your view of what the historical subject should look like.
After trying to polish the 101 aluminum on a test piece last night i decided it was way too much work to sand everything down so Im going to shoot for a strategy like Jeff's. Vary the shades on panels and they locally add weathering w gloss, satin etc. I will follow up later here with the results and hopefully bring this bird to life! Thanks again, everyone!
Steve
Joel_W
Associate Editor
New York, United States
Joined: December 04, 2010
KitMaker: 11,666 posts
AeroScale: 7,410 posts
Joined: December 04, 2010
KitMaker: 11,666 posts
AeroScale: 7,410 posts
Posted: Tuesday, May 03, 2016 - 12:29 AM UTC
Steve,
My P-38 consumed quite a fair amount of putty, so I sealed the putty with CCA. Then to make sure that I had a monotone surface, I primed it with Tamiya Gray primer. I polished that out, then used a base coat of Alcad's Gloss Black Base coat, applied over a few mist coats, then a few wet coats.
Since I was going for a more operational aircraft, I really didn't polish out the Gloss base to mirror like shine. Just enough to have some reflectivity.
The entire aircraft was airbrushed with Alcad II #101 Aluminum. The major panels on the wings were masked out and air brushed with White Aluminum as best as I can recall.
I decaled directly over the Alcad finish, then sealed with Testors Metalizer sealer which is about as neutral as you can get.
Joel
Posted: Tuesday, May 03, 2016 - 01:41 AM UTC
Joel,
Your " Little Buckaroo " is exceptional!
A few issues ago, Flight Journal has a photo of the flightline of all of 8th A.F. fighter group's COs (8 or 9) who had flown in for a pre-D-Day conference. Several of the planes were shined up for the event, a few looked like well-worn hacks.
Your " Little Buckaroo " is exceptional!
A few issues ago, Flight Journal has a photo of the flightline of all of 8th A.F. fighter group's COs (8 or 9) who had flown in for a pre-D-Day conference. Several of the planes were shined up for the event, a few looked like well-worn hacks.
smeosky
Texas, United States
Joined: November 22, 2010
KitMaker: 33 posts
AeroScale: 12 posts
Joined: November 22, 2010
KitMaker: 33 posts
AeroScale: 12 posts
Posted: Tuesday, May 03, 2016 - 07:49 AM UTC
Joel, I just now realize that your P38 was in a build log thread here in the forums. I used it as a guide for alot of your scratch built details and colors. Very nice finish using aluminum alclad! This academy kit makes me yearn for the tamiya kits again. Alot of puttying and a LOT of sanding!
Joel_W
Associate Editor
New York, United States
Joined: December 04, 2010
KitMaker: 11,666 posts
AeroScale: 7,410 posts
Joined: December 04, 2010
KitMaker: 11,666 posts
AeroScale: 7,410 posts
Posted: Tuesday, May 03, 2016 - 10:34 PM UTC
Quoted Text
Joel, I just now realize that your P38 was in a build log thread here in the forums. I used it as a guide for alot of your scratch built details and colors. Very nice finish using aluminum alclad! This academy kit makes me yearn for the tamiya kits again. Alot of puttying and a LOT of sanding!
Steve,
yep, one in the same. And thanks Fred for the Kudos.
With all the putty work needed, I sealed with CCA, then a primed with Tamiya Gray primer. Polished to a point, the Alcad Gloss Black Base.
Take Paul's suggestion and mask out the major panels, then AB a different shade of Alcad, or a tint with Tamiya smoke heavily thinned. You'll get the look you're after.
Joel