After finally finishing the 1/48 scale B-25B Mitchell, which followed right on the heels of the 1/48 scale PV-1 Ventura, I really wanted a break. Something easy, and something quick. Between the last two builds I invested nearly a full year. So when the opportunity came to build the new Academy 1/72 scale F-4J Phantom, I took the plunge. Considering I haven't built a 1/72 scale aircraft in more then 35 years, I didn't really know what to expect, or even if these old tired eyes were up to the task.
I've already blogged my build of the 1/48 scale Academy F-4B, and I've heard that the 1/72 F-4s are more like little brothers then just a completely new kit from scratch. So I was more then just curious to what I was in store for when I opened the box up.
The 1st thing that I noticed was that the kit was in three colors, so painting wasn't necessary, but recommended. And that the kit itself is basically a snap-tite kit. In the past that meant a very simple, basic kit with a minimum of details. But after a close inspection of the trees, the scribed detail looked just like the scaled down version of it's big brother.
The one page decal sheet was once again printed by Cartograf which includs the stencils, rather then a separate page printed by Academy as was the case with the 1/48 scale version.
I started off with the cockpit, and there was a totat of just 11 pieces, plus 6 pcs for the two bang seats.
I opted to paint the cockpit and interior walls of the fuselage Tamiya XF-66 light Gray, but it looks close enough to FS 36231 as called out for the cockpit in the kit instructions. I left the two IPs in the raw black plastic color, but hand painted the gray panels sections. Then using a drop of Pledge to simulate lenses in the larger instruments.
Using Life Color Matt Black I also hand painted all the side panels, & when dry I drybrushed them to bring out the details. To my surprise, the panels really do look quite detailed.
I then airbrushed the side cockpit sills flat Matt Black, and test fitted the cockpit.
So far the fit has been exceptional.
Joel
Cold War (1950-1974)
Discuss the aircraft modeling subjects during the Cold War period.
Hosted by Tim Hatton
1/72 scale Academy F-4J Phantom
Joel_W
Associate Editor
New York, United States
Joined: December 04, 2010
KitMaker: 11,666 posts
AeroScale: 7,410 posts
Joined: December 04, 2010
KitMaker: 11,666 posts
AeroScale: 7,410 posts
Posted: Saturday, May 28, 2016 - 09:36 PM UTC
Posted: Saturday, May 28, 2016 - 10:55 PM UTC
Hi Joel,
That's a pretty detailed little pit for 1/72 scale. Hurts my eyes imagining how to work on something that small again...lol
Gaz
That's a pretty detailed little pit for 1/72 scale. Hurts my eyes imagining how to work on something that small again...lol
Gaz
Joel_W
Associate Editor
New York, United States
Joined: December 04, 2010
KitMaker: 11,666 posts
AeroScale: 7,410 posts
Joined: December 04, 2010
KitMaker: 11,666 posts
AeroScale: 7,410 posts
Posted: Sunday, May 29, 2016 - 01:33 AM UTC
Quoted Text
Hi Joel,
That's a pretty detailed little pit for 1/72 scale. Hurts my eyes imagining how to work on something that small again...lol
Gaz
Gary,
Thanks. I've got the same issue. I keep my #5 Optivisor on all the time.
I also noticed that from force of habit, I have the build in the wrong forum. I'll have to reach out to the mods and have it moved.
Joel
Joel_W
Associate Editor
New York, United States
Joined: December 04, 2010
KitMaker: 11,666 posts
AeroScale: 7,410 posts
Joined: December 04, 2010
KitMaker: 11,666 posts
AeroScale: 7,410 posts
Posted: Tuesday, May 31, 2016 - 09:51 PM UTC
Well, progress is creeping right along at my usual warm weather pace.
I've glued up the lower fuselage/wing to the one piece upper fuselage, and then glued on both top wings. The wing to fuselage seams did need a little putty and blending, but nothing major by any means. I 1st applied a coat of Bondo #3 Glazing and Surface putty, then after sanding and polishing, a fill and final blend coat of Vallejo's Acrylic White putty.
the topside
the Bottom
The intakes, which always seem to be a issue with alignment to the fuselage were a pleasant surprise. The 4 piece intake sub-assembly goes together perfectly. I had to hand paint the interior gloss white, which I did with Life Color paints. I still need one final coat, and it does look good.
Checkout the intake alignment. All they needed was a little sanding and polishing.
The vertical tail fit was pretty good, but it also needed a little putty to blend it in. I opted to use Vallejo's White Acrylic putty so no sanding was needed. I also glued on the lower exhaust can section. Once again the fit was very good, but it did need some sanding to even out the joint lines as there was a step on each side.
Joel
Posted: Tuesday, May 31, 2016 - 11:04 PM UTC
Joel,
Looking sweet! I'm glad you are having relatively few issues. I definitely think I want my next few builds to have very minimal need for sandpaper and putty.
Gaz
Looking sweet! I'm glad you are having relatively few issues. I definitely think I want my next few builds to have very minimal need for sandpaper and putty.
Gaz
KelticKnot
Scotland, United Kingdom
Joined: May 11, 2015
KitMaker: 768 posts
AeroScale: 656 posts
Joined: May 11, 2015
KitMaker: 768 posts
AeroScale: 656 posts
Posted: Wednesday, June 01, 2016 - 12:29 PM UTC
Hey Joel, great to see such quick progress on the Phantom. The quality of the kit seems to be shining through so far.
Posted: Wednesday, June 01, 2016 - 02:18 PM UTC
Looking good Joel. I think I might have to get myself a couple of these.
How do you use the Vallejo acrylic putty? I have a bottle but I've not had much luck with it. I think I'm using it wrong.
Joel_W
Associate Editor
New York, United States
Joined: December 04, 2010
KitMaker: 11,666 posts
AeroScale: 7,410 posts
Joined: December 04, 2010
KitMaker: 11,666 posts
AeroScale: 7,410 posts
Posted: Saturday, June 04, 2016 - 06:53 PM UTC
Quoted Text
Joel,
Looking sweet! I'm glad you are having relatively few issues. I definitely think I want my next few builds to have very minimal need for sandpaper and putty.
Gaz
Gary,
Me too. I just needed a easy and fun build to wind down, and recharge my Mojo. So far this kit has succeeded in those depts. with solid As
Joel
Joel_W
Associate Editor
New York, United States
Joined: December 04, 2010
KitMaker: 11,666 posts
AeroScale: 7,410 posts
Joined: December 04, 2010
KitMaker: 11,666 posts
AeroScale: 7,410 posts
Posted: Saturday, June 04, 2016 - 06:55 PM UTC
Quoted Text
Hey Joel, great to see such quick progress on the Phantom. The quality of the kit seems to be shining through so far.
Paul,
The quality is amazing. For me to be at this stage so soon is a testimonial to just how excellent this kit is, not to my modeling abilities.
Joel
Joel_W
Associate Editor
New York, United States
Joined: December 04, 2010
KitMaker: 11,666 posts
AeroScale: 7,410 posts
Joined: December 04, 2010
KitMaker: 11,666 posts
AeroScale: 7,410 posts
Posted: Saturday, June 04, 2016 - 07:04 PM UTC
Quoted Text
Looking good Joel. I think I might have to get myself a couple of these.
How do you use the Vallejo acrylic putty? I have a bottle but I've not had much luck with it. I think I'm using it wrong.
Stephen,
Glad you like my most modest effects to date.
The Vallejo White Acrylic putty comes in a small tube. I just lightly hold the tip pointed down into the seam so that the putty is forced into it, and not just on top of it. I apply the putty as I drag the tip down the seam. By the time I clean the tip and replace the top, the putty has just setup a little. I take a damp Q-tip and gently wipe down down seam. I also clean any residue up the same way. I let it dry 24 hrs then check to see if I need a 2nd application, which is usually the case as it really shrinks. the advantage is absolutely no sanding or polishing is needed.
Joel
Posted: Sunday, June 05, 2016 - 07:49 PM UTC
Thanks for the advice. I'd been using it like a conventional putty and sanded it. Of course it doesn't sand very well does it!
I have some minor gaps to fill at the wing roots of a Whitley bombers that I will try to deal with using your method.
litespeed
News Reporter
England - North West, United Kingdom
Joined: October 15, 2009
KitMaker: 1,976 posts
AeroScale: 1,789 posts
Joined: October 15, 2009
KitMaker: 1,976 posts
AeroScale: 1,789 posts
Posted: Sunday, June 05, 2016 - 09:59 PM UTC
Hi Joel. I agree with the others, you are moving quickly and smoothly with this build. Looking forward to your build log. Do you want to move this build log to the Modern Aircraft section Joel? I thought the Cold War section would be more suitable. But it's up to you.
tim
tim
Joel_W
Associate Editor
New York, United States
Joined: December 04, 2010
KitMaker: 11,666 posts
AeroScale: 7,410 posts
Joined: December 04, 2010
KitMaker: 11,666 posts
AeroScale: 7,410 posts
Posted: Sunday, June 05, 2016 - 11:48 PM UTC
Tim,
Thanks for those most supportive words. As for the proper forum, this is really the correct one. The J production ran from 1966 to 1972. An upgrade program in 1977 had the J's renamed F-4S. Most F-4Js were retired as the F-14A come on line mid 1970s with the last being in early 1982.
Joel
Thanks for those most supportive words. As for the proper forum, this is really the correct one. The J production ran from 1966 to 1972. An upgrade program in 1977 had the J's renamed F-4S. Most F-4Js were retired as the F-14A come on line mid 1970s with the last being in early 1982.
Joel
Joel_W
Associate Editor
New York, United States
Joined: December 04, 2010
KitMaker: 11,666 posts
AeroScale: 7,410 posts
Joined: December 04, 2010
KitMaker: 11,666 posts
AeroScale: 7,410 posts
Posted: Sunday, June 12, 2016 - 06:49 AM UTC
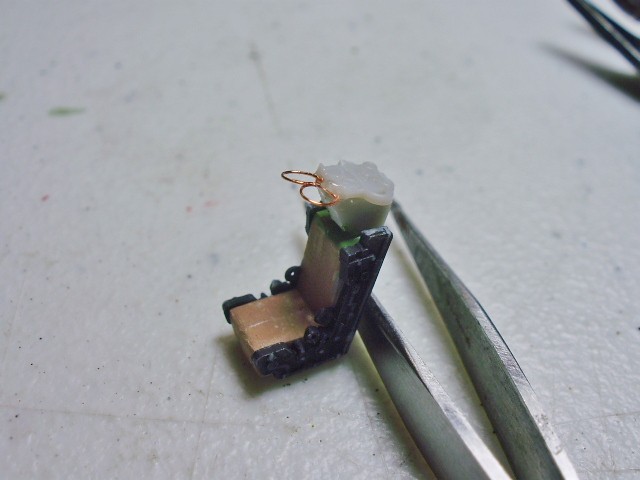
Well another week has passed, and all I've managed to accomplish is almost completing both ejection seats. The kit frame parts are molded in that rubber vinyl like plastic. I decided not to bother to prime and paint them flat black, as the canopies are closed by default, and in 1/72 scale, they're rather tiny to start with. The seat cushion, back cushion, and headrest are a one piece mold. I primed them with Tamiya lacquer gray primer, then painted them Life Color Olive Drab FS 34088.
Then I made the canopy ejection handles for one seat out of stretched sprue, and had quite a lot of trouble getting both loops equal in size. Never did get them right. So for the 2nd seat I went with some Brass wire. The results were quite a bit better.
Then using quite a bit of modelers license, I created six point harnesses for both seats.
I've tried repeatedly to add the black stripes to the ejection pull handles, but in 1/72 scale even using a fine felt tip marker, the result were rather poor. So I'm kind of stuck with coming up with a satisfactory answer. Maybe I'll go to Michael's, a national art supply chain and see if they have a better extra fine tip marker.
I still need to paint the harness assembly as well. I've dry fitted the seats just to get an idea of how the duel pit will look.
Joel
Posted: Sunday, June 12, 2016 - 07:30 AM UTC
Joel,
Doing those ejection handles would be a bear. A pitfall of small scale, I guess.
Here is my craziest, yet semi-succesful fine line maker: I actually picked up a hair left in the carpet by one of my rotties. I painted it with black paint then dragged it over the spot where I wanted the fine mark.
I'd already gone to look at an office supply and art stores for a fine pen and found nothing fine enough.
All that being said, those stripes in real life are only a finger wide. Trying to get it right might be more headache than it's worth.
Cockpit detail and seats look great! Glad to see that those intakes went together so well.
Gaz
jonvan
Florida, United States
Joined: August 23, 2015
KitMaker: 170 posts
AeroScale: 109 posts
Joined: August 23, 2015
KitMaker: 170 posts
AeroScale: 109 posts
Posted: Wednesday, June 22, 2016 - 01:18 AM UTC
magnusf
Stockholm, Sweden
Joined: May 02, 2006
KitMaker: 1,953 posts
AeroScale: 1,902 posts
Joined: May 02, 2006
KitMaker: 1,953 posts
AeroScale: 1,902 posts
Posted: Thursday, August 18, 2016 - 01:42 AM UTC
Joel! I realise this one is probably on the back burner for the time being but if you ever re-start it I can at least give you my advice for painting the bang seat handles: I would try using a very thin brush and thinned Vallejo acrylic black. Using steady (= well supported!) hands (and some magnification if needed) it is possible to paint very thin lines. The best thing is that those lines don't have to go around the handles, you just need to stripe the top of them since nobody will be able to view them from below!
Another trick I've used once or twice is painting two very thin metal wires (typically from a broken mobile phone handsfree or something like that), one black and one yellow, and then twisting them together. That takes a bit more time and work but it is really a bit easier than painting the stripes. You'll of course get perfectly even divisions of yellow and black which I suspect isn't 100% accurate (I think in reality most of the handles are yellow with thin black stripes, actually showing more yellow than black!).
Magnus
goodn8
Berlin, Germany
Joined: October 12, 2008
KitMaker: 709 posts
AeroScale: 651 posts
Joined: October 12, 2008
KitMaker: 709 posts
AeroScale: 651 posts
Posted: Thursday, August 18, 2016 - 10:13 AM UTC
Great work Joel, I really like those Phantoms of any type!
As I did some kits in the past when I was a teenager I now have again some kits to do. One in 1/72 I will build for the "Sign of 4"-Cpgn.
So some Jears ago I had the oppurtunity to visit the Jagdgeschwader in Wittmund/Germany to take some walk-arounds and try also the simulator.
The pictures I took shows the black/yellow handles with a very accurate division (sorry Magnus )
But in this scale it won`t be very visible. And it's maybe also not regularly done.
Thomas
magnusf
Stockholm, Sweden
Joined: May 02, 2006
KitMaker: 1,953 posts
AeroScale: 1,902 posts
Joined: May 02, 2006
KitMaker: 1,953 posts
AeroScale: 1,902 posts
Posted: Thursday, August 18, 2016 - 10:36 AM UTC
Thanks Thomas!
It's never too late to learn something new !
Looks like a nice visit, it's not that easy to get to try a real simulator! Congrats!
Magnus
It's never too late to learn something new !
Looks like a nice visit, it's not that easy to get to try a real simulator! Congrats!
Magnus