

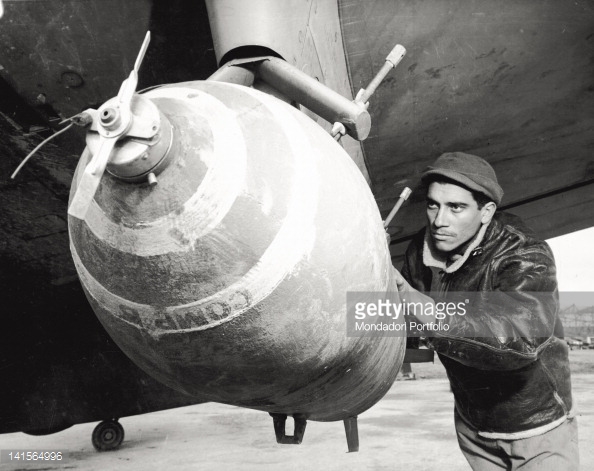
A lot of ordnance (bombs) have yellow lines at the top. Sometimes the kit contains decals for this that are curved correctly for the conical surface they need to be applied to.
Most often, this is not the case and it is very difficult to mask this.
Anybody having a bright solution?
Start Here (for Beginners)
This forum is for younger modelers or people just starting out in the hobby.
This forum is for younger modelers or people just starting out in the hobby.
Hosted by Jim Starkweather
yellow lines

drabslab

Joined: September 28, 2004
KitMaker: 2,186 posts
AeroScale: 1,587 posts

Posted: Tuesday, June 07, 2016 - 12:19 AM UTC


bomber14

Joined: February 02, 2015
KitMaker: 330 posts
AeroScale: 286 posts
Posted: Tuesday, June 07, 2016 - 12:35 AM UTC
i don't know of any except maybe adapting some spirals from a german fighter decal sheet.
i always wondered why the yellow lines were on there in the first place'
joe
i always wondered why the yellow lines were on there in the first place'
joe

Kevlar06
Joined: March 15, 2009
KitMaker: 3,670 posts
AeroScale: 833 posts
Posted: Tuesday, June 07, 2016 - 01:32 AM UTC
The simple explanation is the yellow lines indicate the bomb is filled with HE (High Explosive) content (usually Tetrol, Nitrocellulose, Gelignite, etc, or other types of explosive). The number of lines indicates the purpose. It was a visual way to identify types of munitions quickly and was also used on artillery shells. The idea was to keep from mixing up bombs or shells of varying purposes. Try this-- paint up a section of clear decal paper with yellow paint, then you can cut the lines from the decal paper in any length or width you need, and apply accordingly.
VR, Russ
VR, Russ

AussieReg

#007

Joined: June 09, 2009
KitMaker: 8,156 posts
AeroScale: 3,756 posts
Posted: Tuesday, June 07, 2016 - 02:50 AM UTC
2006 thread , this seems to be an age old problem.
I use a fine brush and put the bomb on the Dremel on very slow speed. you need a steady hand but just touch the brush on the bomb tip as it spins and you get a very neat line. Photos I have seen show the line hand painted and not perfect on the 1:1 item.
Cheers, D
I use a fine brush and put the bomb on the Dremel on very slow speed. you need a steady hand but just touch the brush on the bomb tip as it spins and you get a very neat line. Photos I have seen show the line hand painted and not perfect on the 1:1 item.
Cheers, D


phantom_phanatic309

#372

Joined: March 10, 2010
KitMaker: 2,568 posts
AeroScale: 1,619 posts

Posted: Tuesday, June 07, 2016 - 03:45 AM UTC
Yellow stripe - HE
Red - Incendiary/napalm
Blue - inert training round. In the case of post-war to current RAF, usually the entire body of the bomb except the tail is painted blue.
It's applicable to any ordnance really. Bombs, rockets, missiles, shells and grenades.
Red - Incendiary/napalm
Blue - inert training round. In the case of post-war to current RAF, usually the entire body of the bomb except the tail is painted blue.
It's applicable to any ordnance really. Bombs, rockets, missiles, shells and grenades.


Namabiiru
#399
Joined: March 05, 2014
KitMaker: 2,888 posts
AeroScale: 307 posts

Posted: Tuesday, June 07, 2016 - 04:40 AM UTC
Quoted Text
A lot of ordnance (bombs) have yellow lines at the top. Sometimes the kit contains decals for this that are curved correctly for the conical surface they need to be applied to.
Most often, this is not the case and it is very difficult to mask this.
Anybody having a bright solution?
Actually, there is a rather elegant solution to this problem--can't remember from whom I got it.
First get yourself some material--wood, plastic, heavy cardboard, etc.--doesn't really matter what it is, but the thickness should be about the same as the width of the stripe you want to make. Now drill a hole through it just a bit bigger than the end of your ordnance (trial and error will help you figure out exactly what diameter the whole will need to be). Paint the nose of your ordnance whatever color you want the stripe to be, then stick it in the hole in your chosen material and spray it the final color (spray on both sides of the material in order to ensure you get a stripe instead of a solid color nose). With some care and practice, when you pull your bomb out of the "template" you should have a nice, perfectly circular stripe around the nose.


JClapp
#259
Joined: October 23, 2011
KitMaker: 2,265 posts
AeroScale: 1,715 posts
Posted: Tuesday, June 07, 2016 - 04:51 AM UTC
Quoted Text
Quoted TextA lot of ordnance (bombs) have yellow lines at the top. Sometimes the kit contains decals for this that are curved correctly for the conical surface they need to be applied to.
Most often, this is not the case and it is very difficult to mask this.
Anybody having a bright solution?
Actually, there is a rather elegant solution to this problem--can't remember from whom I got it.
First get yourself some material--wood, plastic, heavy cardboard, etc.--doesn't really matter what it is, but the thickness should be about the same as the width of the stripe you want to make. Now drill a hole through it just a bit bigger than the end of your ordnance (trial and error will help you figure out exactly what diameter the whole will need to be). Paint the nose of your ordnance whatever color you want the stripe to be, then stick it in the hole in your chosen material and spray it the final color (spray on both sides of the material in order to ensure you get a stripe instead of a solid color nose). With some care and practice, when you pull your bomb out of the "template" you should have a nice, perfectly circular stripe around the nose.
Haha! Thats a keeper!


AussieReg
#007
Joined: June 09, 2009
KitMaker: 8,156 posts
AeroScale: 3,756 posts
Posted: Tuesday, June 07, 2016 - 05:02 AM UTC
Quoted Text
Actually, there is a rather elegant solution to this problem--can't remember from whom I got it.
Mark, I'd be claiming this one if was you mate, it's beautiful! I will be using this for sure. The only modification I would make is to taper the hole in the cardstock to approximate the nose of the ordnance, but a quick round with the Xacto would sort that.
Why do we look past the simplest solutions sometimes?
Cheers, D
Namabiiru
#399
Joined: March 05, 2014
KitMaker: 2,888 posts
AeroScale: 307 posts
Posted: Tuesday, June 07, 2016 - 05:09 PM UTC
Quoted Text
Quoted TextActually, there is a rather elegant solution to this problem--can't remember from whom I got it.
Mark, I'd be claiming this one if was you mate, it's beautiful! I will be using this for sure. The only modification I would make is to taper the hole in the cardstock to approximate the nose of the ordnance, but a quick round with the Xacto would sort that.
Why do we look past the simplest solutions sometimes?
Cheers, D
While it is said plagiarism is the sincerest form of flattery, I can't accept credit for that idea. After wracking my brain I recalled that I saw it in one of the Build-A-Tool campaigns, and found that it was Jan Janssen (EHAM0624) that originally posted that idea. Here's the link.
BTW, if you've not perused the various Build-A-Tool campaign threads, I highly recommend it--lots of innovative ideas to be found there.
phantom_phanatic309
#372
Joined: March 10, 2010
KitMaker: 2,568 posts
AeroScale: 1,619 posts
Posted: Tuesday, June 07, 2016 - 08:51 PM UTC
I think I might have to try that method. It's not something I had ever thought of either.
I've also remembered that there is also a white stripe to indicate a smoke or white phosphorus round.
I think there is a green and black too but can't remember what they might indicate. Armour piercing maybe?
I've also remembered that there is also a white stripe to indicate a smoke or white phosphorus round.
I think there is a green and black too but can't remember what they might indicate. Armour piercing maybe?
Joel_W
Joined: December 04, 2010
KitMaker: 11,666 posts
AeroScale: 7,410 posts
Posted: Saturday, June 11, 2016 - 07:53 PM UTC
I 1st read of this masking technique from Mal. His take was to use two masks, one for each side of the stripe using just plain sheet plastic. Cardboard will absorb the paint and become a wavy line after a few uses. Also finding some solid material to make that mask the proper thickness is a lot harder then it sounds, and then you need to drill a whole series of holes till you get the right one. There is also the issue of the mask only being a tight fit at one end of the bomb or missile, so the other side will not be as sharp of a line. Using Mal's methods eliminates all of these issues.
I used his technique on a few bomb loads and it worked perfectly.
Joel
I used his technique on a few bomb loads and it worked perfectly.
Joel


Merlin
#017

Joined: June 11, 2003
KitMaker: 17,582 posts
AeroScale: 12,795 posts

Posted: Friday, July 01, 2016 - 01:57 AM UTC
Hi Drabslab
Another option is our indispensable friend, kabuki tape. Either cut a thin straight strip (it's so flexible, it'll follow the contour of the curved surface) or, better still, cut a curved strip - it'll help eliminate wrinkles.
All the best
Rowan
Another option is our indispensable friend, kabuki tape. Either cut a thin straight strip (it's so flexible, it'll follow the contour of the curved surface) or, better still, cut a curved strip - it'll help eliminate wrinkles.
All the best
Rowan


GazzaS
#424
Joined: April 23, 2015
KitMaker: 4,648 posts
AeroScale: 1,938 posts
Posted: Friday, July 01, 2016 - 02:08 AM UTC
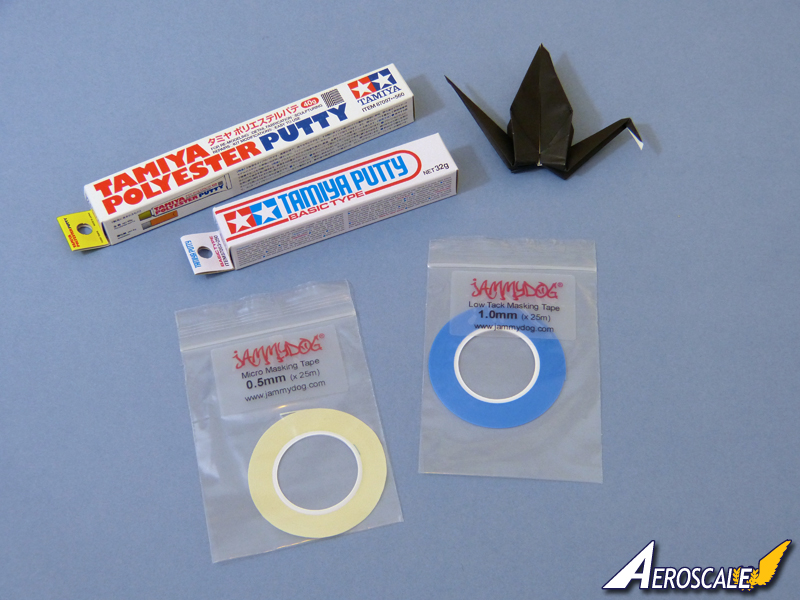
Our good friends at Tamiya make a masking tape for curves. It comes in a few narrow sizes and works fantastically.
I've used it to make a spiral on a 1/48 Bf109, around various details on numerous kits, and I consider it an indispensable part of my gear.
The 3mm wide variety only starts showing difficulty in stretching and contracting when your circle gets under 4mm across.
Gaz
I've used it to make a spiral on a 1/48 Bf109, around various details on numerous kits, and I consider it an indispensable part of my gear.
The 3mm wide variety only starts showing difficulty in stretching and contracting when your circle gets under 4mm across.
Gaz
Merlin
#017
Joined: June 11, 2003
KitMaker: 17,582 posts
AeroScale: 12,795 posts
Posted: Friday, July 01, 2016 - 02:15 AM UTC
Hi Gary
Tamiya tape (great stuff ) is kabuki tape.  You can find cheaper sources and, of course, cut to whatever size you need.
All the best
Rowan
Tamiya tape (great stuff
) is kabuki tape. You can find cheaper sources and, of course, cut to whatever size you need.All the best
Rowan
GazzaS
#424
Joined: April 23, 2015
KitMaker: 4,648 posts
AeroScale: 1,938 posts
Posted: Friday, July 01, 2016 - 03:09 AM UTC
Rowan,
Not to be argumentative, but I believe we are talking about two different things. Kabuki is a paper tape, so maybe you are thinking that I am talking about yellow Tamiya masking tape.
Tamiya Tape for Curves is white and may be vinyl or some other rubbery-ish material that can be stretched and then allowed to contract as you lay it leaving a perfect curve.
I just put in the effort to Google kabuki tape and found a Mal Mayfield review on some. The two are nothing alike.
Cheers,
Gaz

tatbaqui
#040

Joined: May 06, 2007
KitMaker: 2,713 posts
AeroScale: 65 posts

Posted: Friday, July 01, 2016 - 04:11 AM UTC
Here's how it looks:

A bit thicker than their yellow masking tape. Comes in 2, 3, and 5mm widths.
At first I thought they were bogus products, as the packaging's Tamiya logo was not the familiar 3-color scheme. It seems to be used more by folks modelling autos for their pin-stripes and lines.
Cheers,
Tat
A bit thicker than their yellow masking tape. Comes in 2, 3, and 5mm widths.
At first I thought they were bogus products, as the packaging's Tamiya logo was not the familiar 3-color scheme. It seems to be used more by folks modelling autos for their pin-stripes and lines.
Cheers,
Tat
Merlin
#017
Joined: June 11, 2003
KitMaker: 17,582 posts
AeroScale: 12,795 posts
Posted: Friday, July 01, 2016 - 11:58 AM UTC
Hi Gary
You're right - I thought you were referring to standard Tamiya tape. Your description of the new stuff reminds me of some tape I got about 15 years ago (maybe Testors?).
I'd also completely forgotten the ultra-fine kabuki tape I bought a while back:
All the best
Rowan
You're right - I thought you were referring to standard Tamiya tape. Your description of the new stuff reminds me of some tape I got about 15 years ago (maybe Testors?).
I'd also completely forgotten the ultra-fine kabuki tape I bought a while back:
All the best
Rowan
Joel_W
Joined: December 04, 2010
KitMaker: 11,666 posts
AeroScale: 7,410 posts
Posted: Saturday, July 02, 2016 - 03:17 AM UTC
Has anyone actually used the curable Tamiya tape? I've read a lot of mixed reviews on it.
Joel
Joel
Merlin
#017
Joined: June 11, 2003
KitMaker: 17,582 posts
AeroScale: 12,795 posts
Posted: Sunday, July 10, 2016 - 01:55 AM UTC
Hi Joel
I've just ordered some as I'm always a sucker for new masking options and am keen to give it an outing. I'll let you all know how I get on.
All the best
Rowan
I've just ordered some as I'm always a sucker for new masking options and am keen to give it an outing. I'll let you all know how I get on.
All the best
Rowan
phantom_phanatic309
#372
Joined: March 10, 2010
KitMaker: 2,568 posts
AeroScale: 1,619 posts
Posted: Sunday, July 10, 2016 - 04:24 AM UTC
I picked up a roll last week but have yet to try it. If I can find a suitable guinea pig in the stash, I'll experiment with it.
Antoni

Joined: June 03, 2006
KitMaker: 574 posts
AeroScale: 573 posts
Posted: Tuesday, July 19, 2016 - 02:07 AM UTC
Aizu Micron masking tape. Kabuki paper tape in widths from 0.4 mm to 2.5 mm. You can lay down the smaller width in curves so goo for outlining camouflage. 2.0 mm and 2.5 mm good for masking wing leading edges. Could not do without it now. At first you could only get it from Hobbylink Japan but now there are more stockists.
http://www.scalemodelshop.co.uk/aizu.html
http://www.valiant-wings.co.uk/valiant-model-wings-2-c.asp
http://www.jadarhobby.pl/advanced_search_result.php?search_in_description=1&inc_subcat=1&keywords=aizu+micron&pfrom=&pto=&x=75&y=15
http://www.scalemodelshop.co.uk/aizu.html
http://www.valiant-wings.co.uk/valiant-model-wings-2-c.asp
http://www.jadarhobby.pl/advanced_search_result.php?search_in_description=1&inc_subcat=1&keywords=aizu+micron&pfrom=&pto=&x=75&y=15

PeeJay74
#363
Joined: January 08, 2014
KitMaker: 425 posts
AeroScale: 401 posts

Posted: Tuesday, July 19, 2016 - 04:52 PM UTC
Heat shrink tubing from your local hardware supplier works wonders as well for masking prop spinners, nose cones on missiles, bombs, etc., etc. Paint the tip whatever color it needs to be, find a piece of appropriate diameter to mask this painted area, and insert the part. Safely spray the remainder whatever color you need.
I use it on HVARs, bombs and the like, and find it super simple to use. I picked up a variety pack at Home Depot that had around 300 x 4" long pieces in 6 different diameters plus came in a nice hard plastic storage case, all for about $14. It should last me forever for models. You can buy smaller packs for as little as $2.
I use it on HVARs, bombs and the like, and find it super simple to use. I picked up a variety pack at Home Depot that had around 300 x 4" long pieces in 6 different diameters plus came in a nice hard plastic storage case, all for about $14. It should last me forever for models. You can buy smaller packs for as little as $2.

TimReynaga
Joined: May 03, 2006
KitMaker: 2,500 posts
AeroScale: 318 posts
Posted: Tuesday, July 19, 2016 - 09:17 PM UTC
The new (at least to me) Tamiya contour tape is fantastic!

 |

WEB HOSTING BY


Copyright ©2021 AeroScale and Kitmaker Network, a subsidiary of Silver Star Enterprises
All Rights Reserved. Please read our Conditions of Use and Privacy Policy.
All Rights Reserved. Please read our Conditions of Use and Privacy Policy.