hobbyboss 1/48 me 262 a-2a
England - South West, United Kingdom
Joined: January 06, 2007
KitMaker: 3,661 posts
AeroScale: 369 posts
Posted: Saturday, June 11, 2016 - 04:47 PM UTC
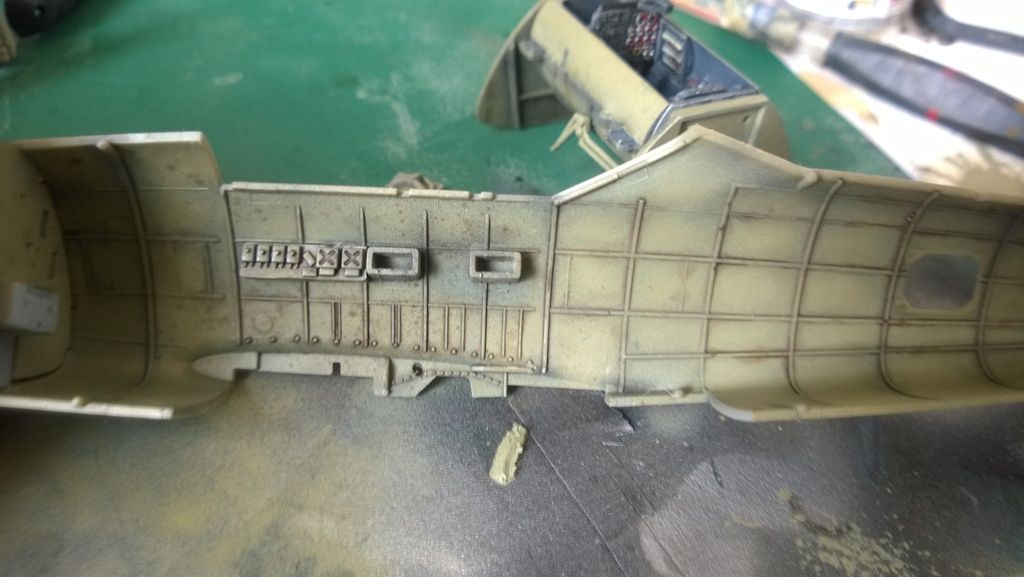
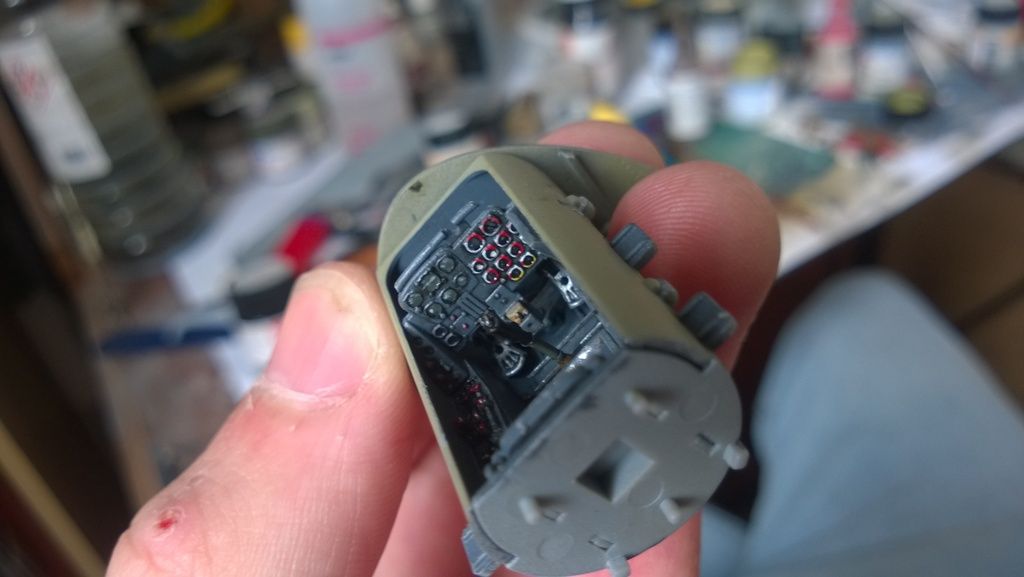
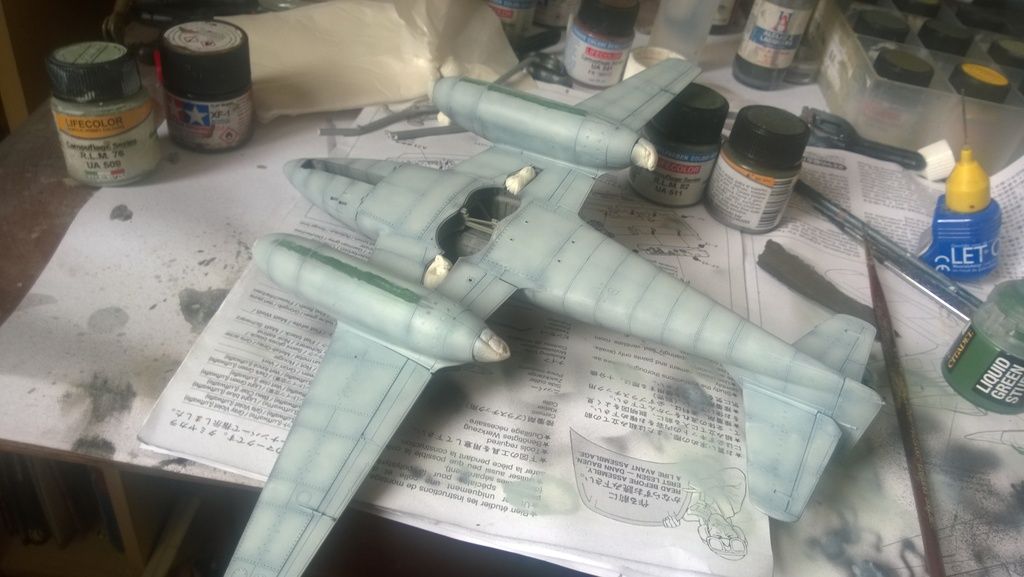
hey all, straight out of the ashes of the last build and onto the new one.
the detail on this kit is fantastic and its gonna be a pleasure to build.
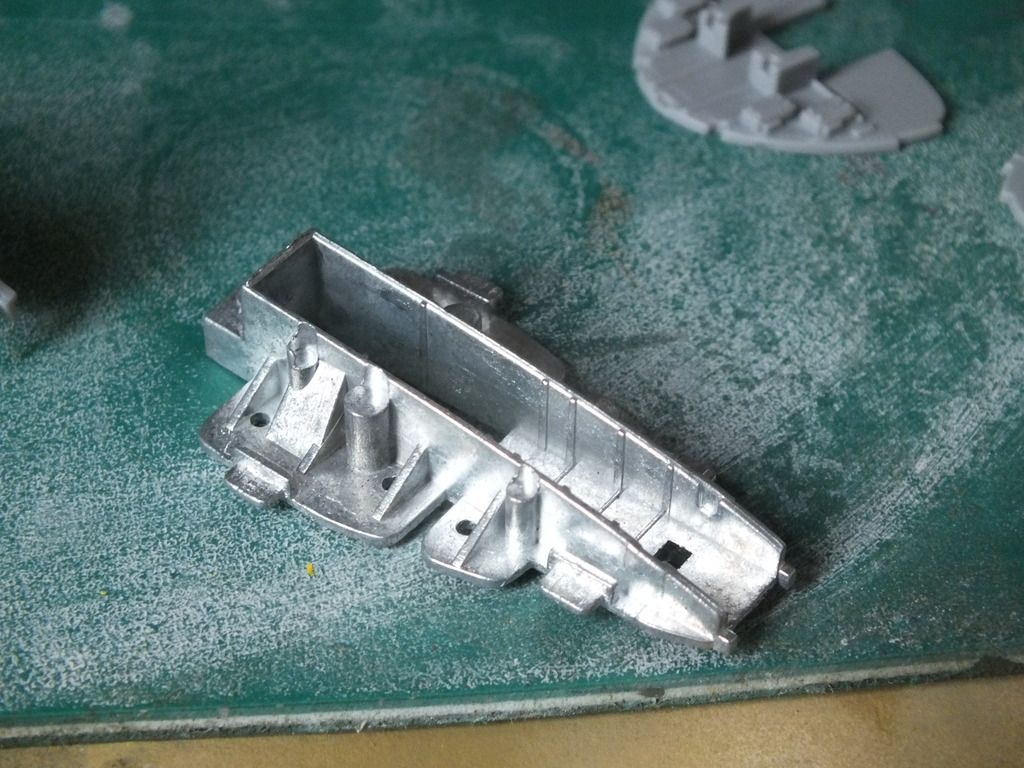
Progress shots so far
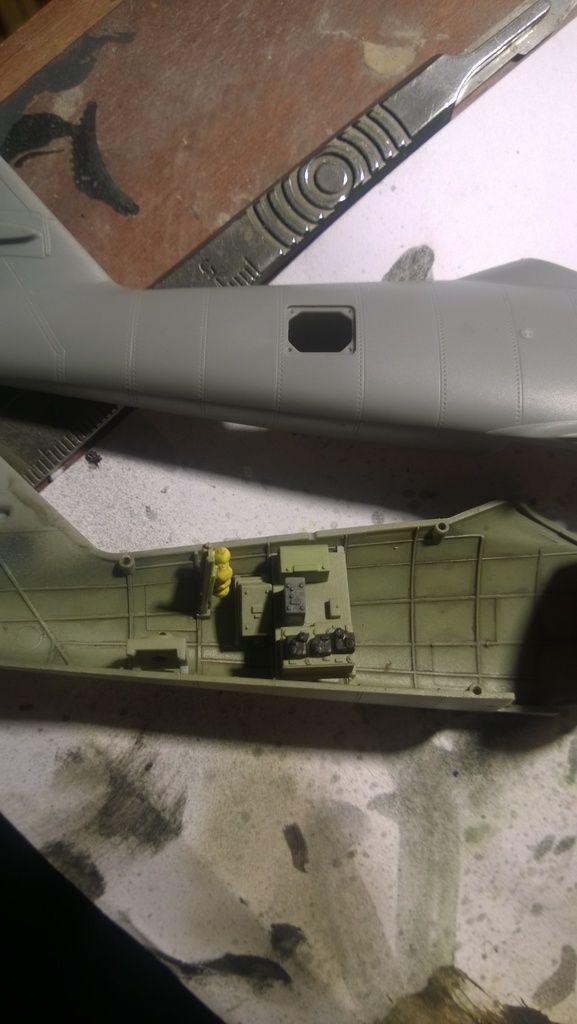
nifty weighted wheel well
unprimed sub assemblies
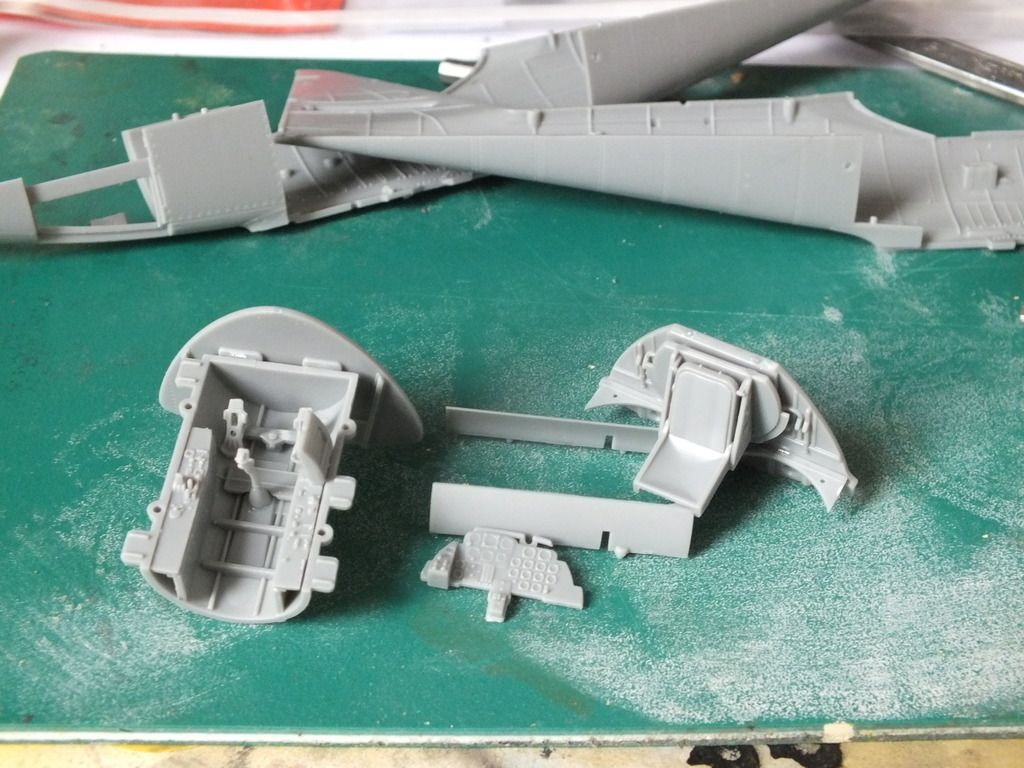
and dry fitted together
more soon, ( when i fix my airbrush :@ )
Support Our Troops! Hit the Yes button If you find reviews or features helpful.

#424
Queensland, Australia
Joined: April 23, 2015
KitMaker: 4,648 posts
AeroScale: 1,938 posts
Posted: Saturday, June 11, 2016 - 05:11 PM UTC
Hi James,
Glad to see you back in the saddle! I like that the nose comes pre-weighted! That has to be one of the most brilliant changes offered in new kits.
Gaz
"Artillery adds dignity, to what would otherwise be an ugly brawl."
Frederick The Great
AussieReg
 Associate Editor
#007
Victoria, Australia
Joined: June 09, 2009
KitMaker: 8,156 posts
AeroScale: 3,756 posts
Posted: Saturday, June 11, 2016 - 05:34 PM UTC
Gotta love a Schwalbe! Looking forward to following your progress on this build James, I have several of the Hobby Boss kits stashed away.
Cheers, D
ON the bench
Revell 1/24 '53 Corvette (building as '54)
Revell 1/24 BMW 507 Coupe and Cabrio
Italeri 1/48 Me262 B-1a/U1 Nightfighter
Monogram 1/24 '57 Chevy Nomad
Dragon 1/350 USS Frank Knox DD-742
England - South West, United Kingdom
Joined: January 06, 2007
KitMaker: 3,661 posts
AeroScale: 369 posts
Posted: Tuesday, June 14, 2016 - 04:50 PM UTC
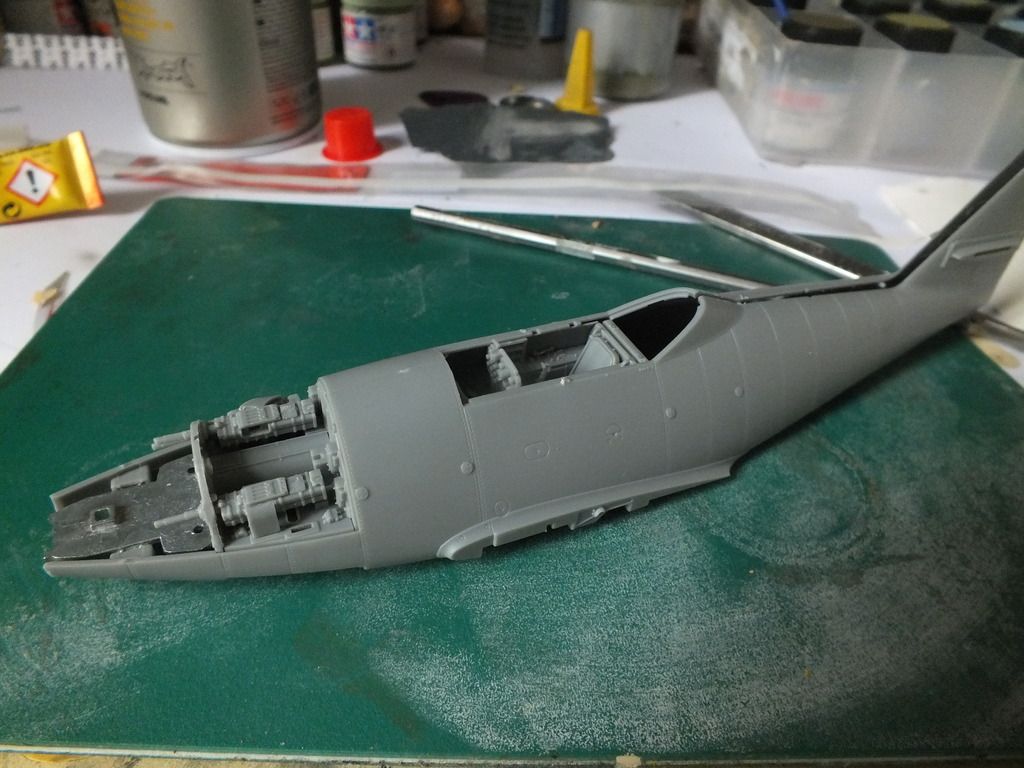
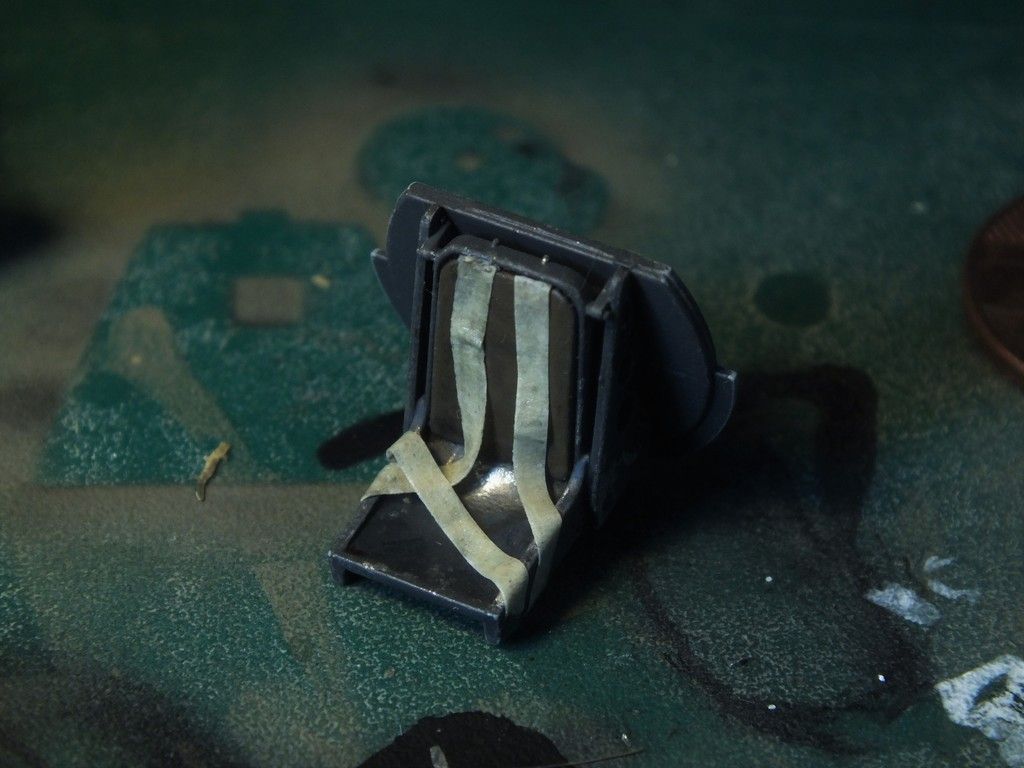
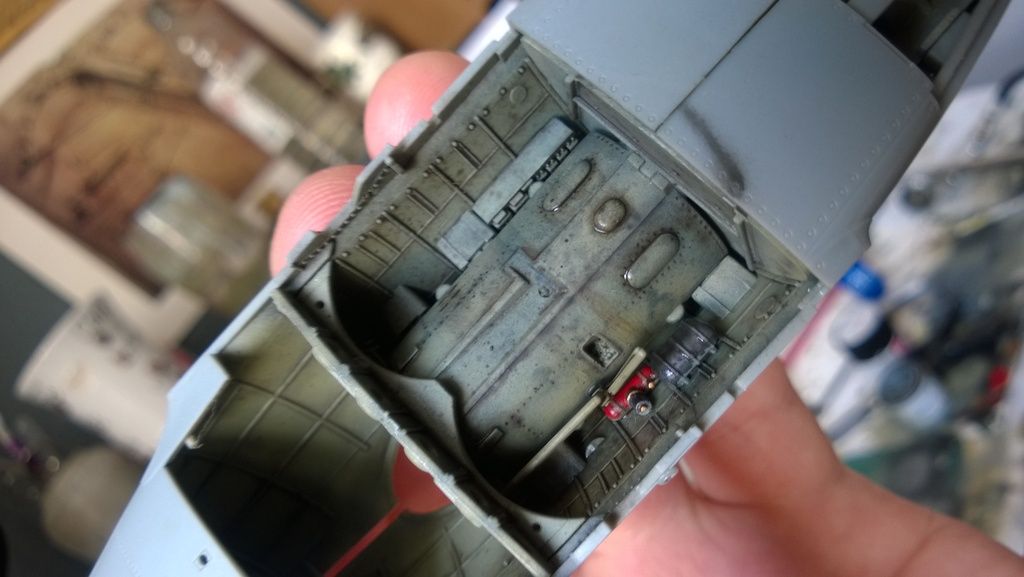
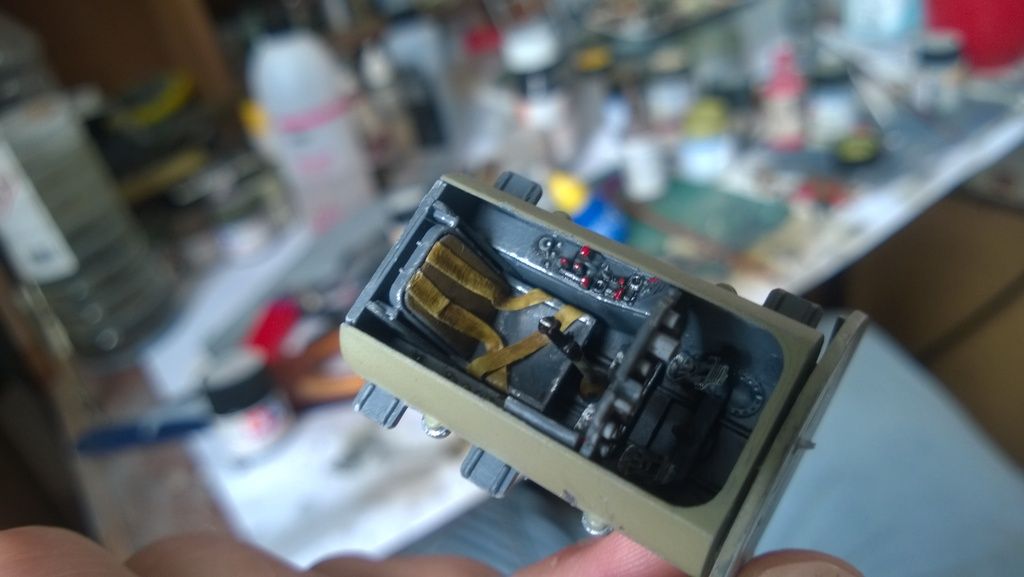
really nicely detailed kit so far. Cockpit is vallejo dark seagreen with a few washes and details picked out with vallejo tamiya and lifecolour, chips are humbrol metalcote polished aluminium
dials are finished with tamiya clear and seatbelts are tape and are yet to be painted.

Support Our Troops! Hit the Yes button If you find reviews or features helpful.
#424
Queensland, Australia
Joined: April 23, 2015
KitMaker: 4,648 posts
AeroScale: 1,938 posts
Posted: Wednesday, June 15, 2016 - 02:48 AM UTC
James,
You make a fine looking cockpit!
Gaz
"Artillery adds dignity, to what would otherwise be an ugly brawl."
Frederick The Great
England - South West, United Kingdom
Joined: January 06, 2007
KitMaker: 3,661 posts
AeroScale: 369 posts
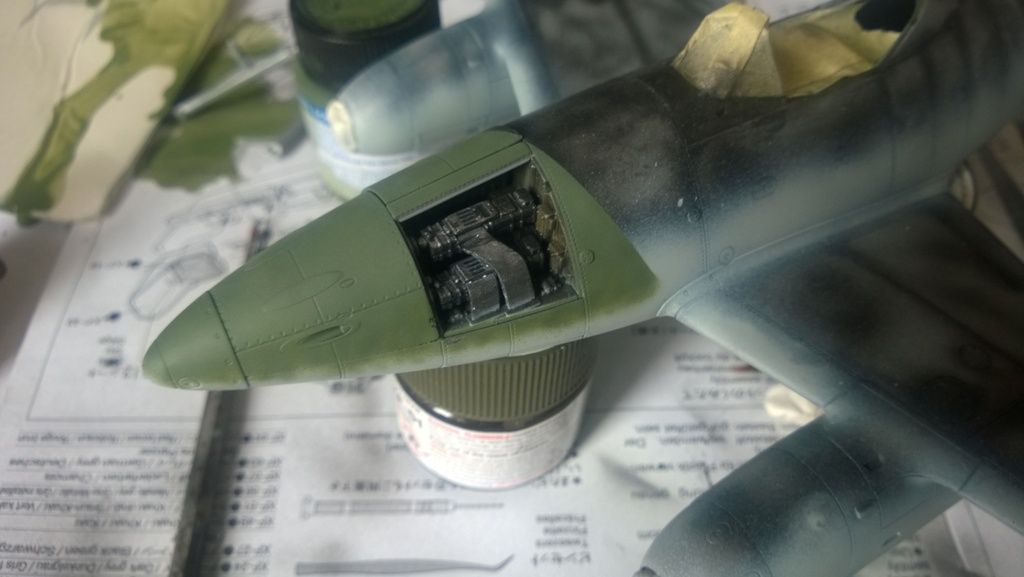
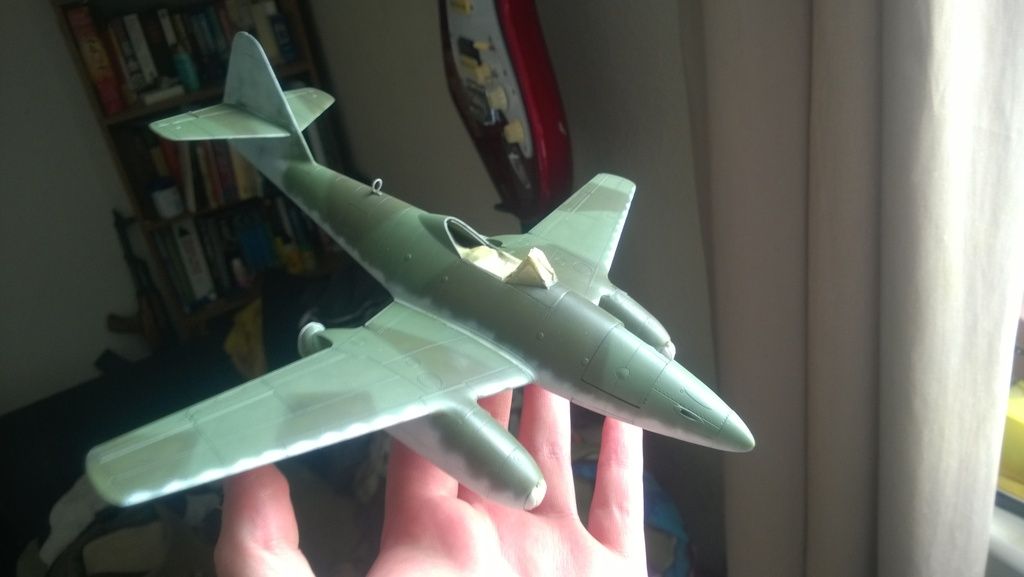
Posted: Saturday, June 18, 2016 - 01:49 PM UTC
hey guys, been taking my time with this one and planning ahead, in my fw190 i completely forgot to pay any attention to the wheel well, so i compensated with this one,
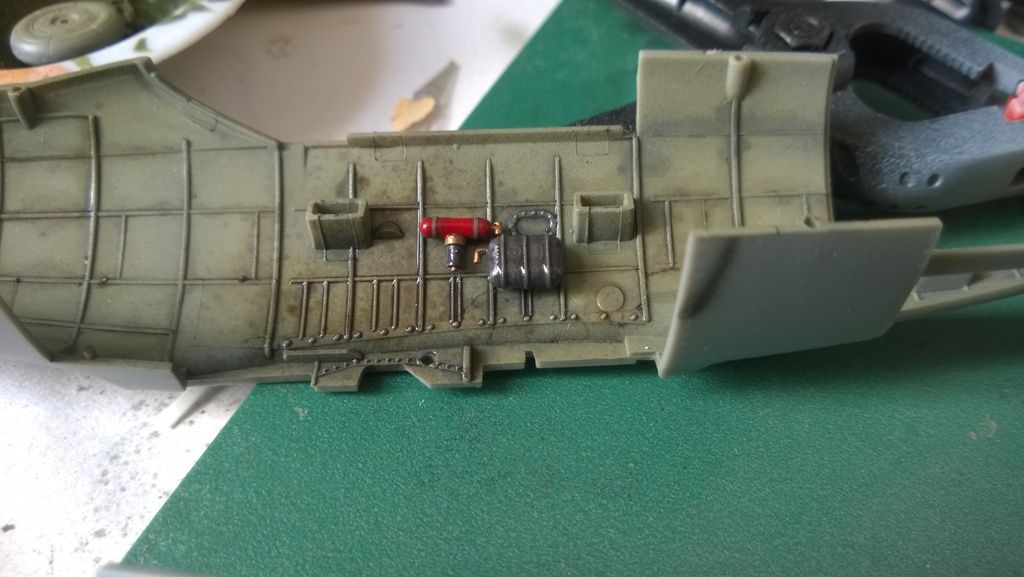
cockpit is done and im happy with it
the camera is pretty pointless considering how much you can actually see..
its weathered up (not seen here)
not overly happy with the gun bay, alclad dull aluminium, and a few metalcote colours, the trouble is when applying a wash all the small pigment particles seemed to get picked up and it ruined the effect
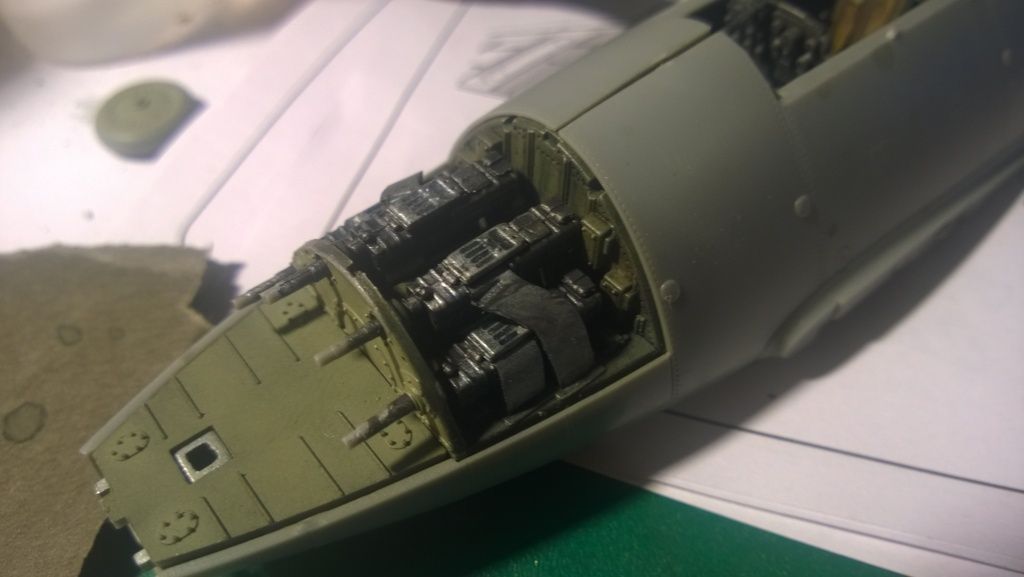
i have decided not to prime this one as the detail is so fine, so tamiya flat black as a key and a preshade, i have attempted a more mottled style of preshade for this one. lets see how it goes
thanks all!
James
Support Our Troops! Hit the Yes button If you find reviews or features helpful.
Oregon, United States
Joined: February 07, 2004
KitMaker: 869 posts
AeroScale: 862 posts
Posted: Saturday, June 18, 2016 - 10:53 PM UTC
Fine job on this model so far!
I know its way too late now to change anything but most Me 262's were built without interior painting, aside from the cockpit most of the airframe interior on them was left in BMF. The operational life span of most Me 262's were just a few hours and there was little need to paint the interiors to prevent corrosion from starting, plus paints were becoming more and more difficult to produce because of the war situation in the last few months of the conflict. In the last weeks of the war some complete Me 262's even left the factory without camouflage paint on them at all.
Matrixone
England - South West, United Kingdom
Joined: January 06, 2007
KitMaker: 3,661 posts
AeroScale: 369 posts
Posted: Saturday, June 18, 2016 - 11:25 PM UTC
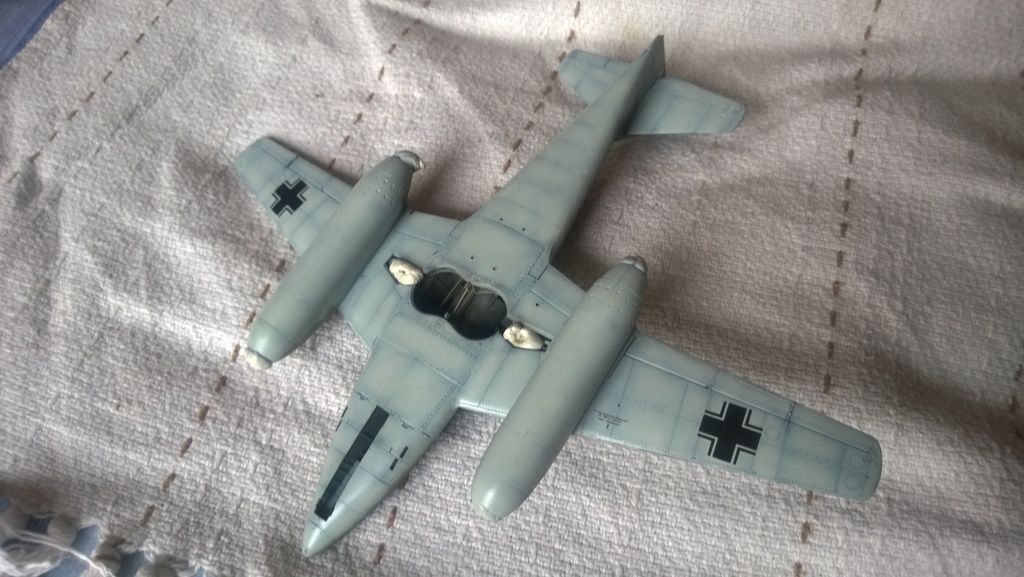
Les, thankyou for the input there, I just went by the instructions which called out for the grey, I have really enjoyed this build so far and will probably build another one so i will remember that for the future,
I would like to paint the exterior with braunviolet and hellgrun over the light blue, the scheme on the instructions calls out for hellgrun and an unspecified dark green, would that be ok?
all the best
James
Support Our Troops! Hit the Yes button If you find reviews or features helpful.
Oregon, United States
Joined: February 07, 2004
KitMaker: 869 posts
AeroScale: 862 posts
Posted: Sunday, June 19, 2016 - 02:48 AM UTC
James,
Kit painting guides sometimes have errors in their color call outs especially for late war Luftwaffe machines like the Me 262.
The standard colors prescribed for Me 262's were RLM 76 pale blue-gray, RLM 81 brown-violet, and RLM 82 green (a grass green color).
Below is picture of a Me 262A-2a I am building, this model is being painted in RLM 76, RLM 81, and RLM 82 paint colors, this will give you an idea of what these colors look like, however the camouflage pattern on this model is not factory standard.

Here is a photograph of the machine I am trying to model.

I have built a HobbyBoss Me 262 before and its a great kit as you are now finding out. Keep up the good work!
Matrixone
#001
California, United States
Joined: February 09, 2002
KitMaker: 1,726 posts
AeroScale: 89 posts
Posted: Sunday, June 19, 2016 - 05:47 AM UTC
James,
Glad to see you are back building models! Doesn't look like you've missed a beat. This is looking to be a great build!
I may have to get one of these Hobbyboss 262's
Cheers,
C.
England - South West, United Kingdom
Joined: January 06, 2007
KitMaker: 3,661 posts
AeroScale: 369 posts
Posted: Wednesday, June 22, 2016 - 02:17 AM UTC
thanks Charles, good to be back!
Les, thankyou, very helpful, lead me to the next stages of the build!
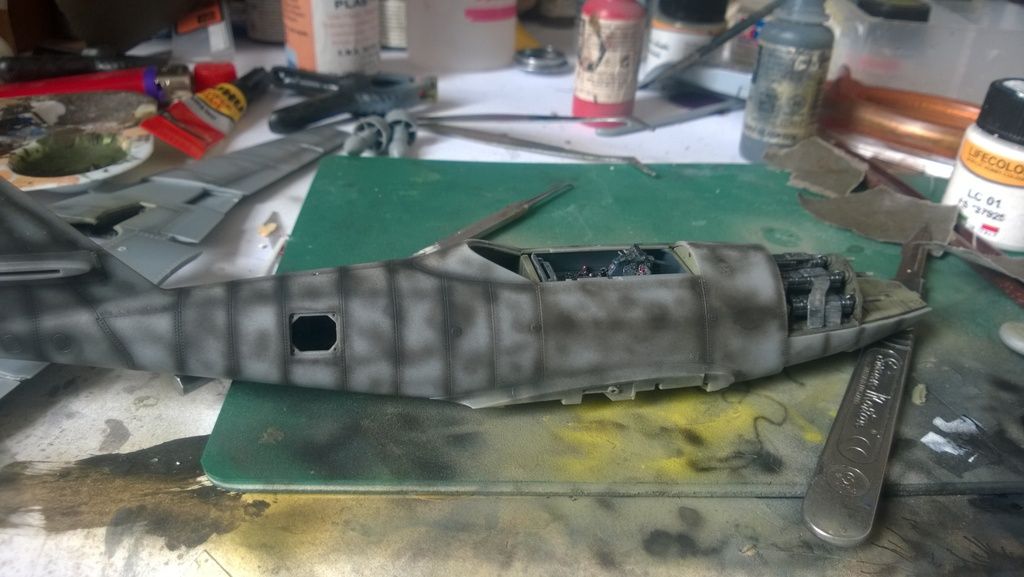
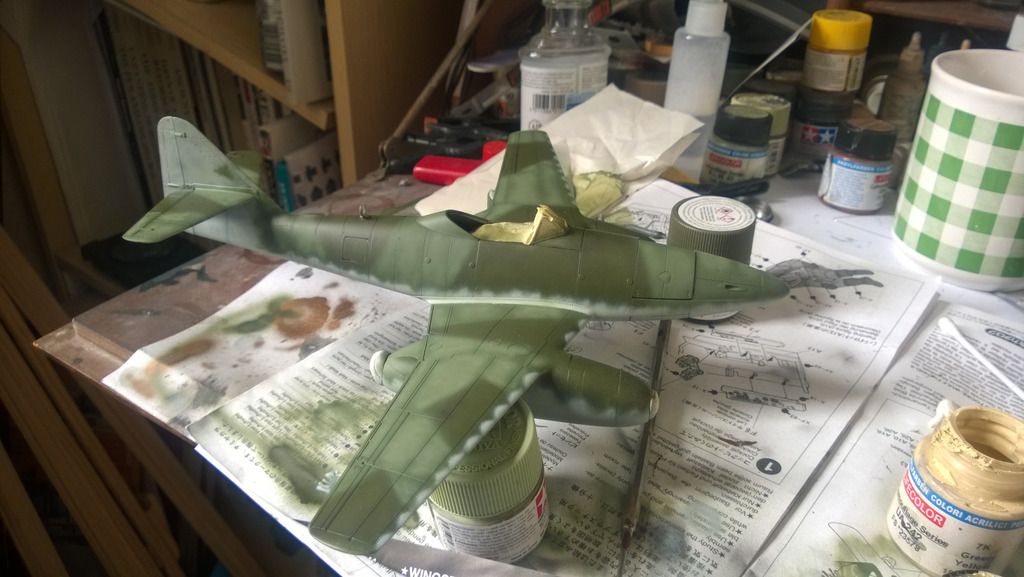
progress!! bad photos, sorry!!
the green bits are seams that were filled
light green
and the brown violet, freehand
more soon!
Support Our Troops! Hit the Yes button If you find reviews or features helpful.
Oregon, United States
Joined: February 07, 2004
KitMaker: 869 posts
AeroScale: 862 posts
Posted: Wednesday, June 22, 2016 - 02:25 AM UTC
Very nice airbrush work!
Whenever possible I airbrush free handed, masking takes too long, after spending all the time masking something off it usually takes less than a minute of actual painting the object.
Matrixone
England - South West, United Kingdom
Joined: January 06, 2007
KitMaker: 3,661 posts
AeroScale: 369 posts
Posted: Wednesday, June 22, 2016 - 03:11 AM UTC
I guess the trouble in having at the moment is straight lines. But that will come with time ! Thankyou les. Kind words from someone with the airbrush skills you have !
Support Our Troops! Hit the Yes button If you find reviews or features helpful.
#424
Queensland, Australia
Joined: April 23, 2015
KitMaker: 4,648 posts
AeroScale: 1,938 posts
Posted: Wednesday, June 22, 2016 - 05:58 AM UTC
James,
Your airbrush work is really good! I like the way your model is progressing.
Gaz
"Artillery adds dignity, to what would otherwise be an ugly brawl."
Frederick The Great
AussieReg
Associate Editor #007
Victoria, Australia
Joined: June 09, 2009
KitMaker: 8,156 posts
AeroScale: 3,756 posts
Posted: Wednesday, June 22, 2016 - 08:28 AM UTC
Looking really good James, coming together beautifully. A tip for quickly masking for sharp edged straight lines on larger areas is to use post-it notes.
Cheers, D
ON the bench
Revell 1/24 '53 Corvette (building as '54)
Revell 1/24 BMW 507 Coupe and Cabrio
Italeri 1/48 Me262 B-1a/U1 Nightfighter
Monogram 1/24 '57 Chevy Nomad
Dragon 1/350 USS Frank Knox DD-742
England - South West, United Kingdom
Joined: January 06, 2007
KitMaker: 3,661 posts
AeroScale: 369 posts
Posted: Thursday, June 23, 2016 - 02:10 PM UTC
hey guys!
been having fun and frustrations with airbrushung, inconsistent results, sometimes the paint goes in beautifully sometimes its a batlle. ahh well ill get used to it over time. anyhoo, progress
i have tidied up the transitions
and started shading.
the tail keeps fighting with me so im going to slowly re do it as best as i can
all the best
James
Support Our Troops! Hit the Yes button If you find reviews or features helpful.
#424
Queensland, Australia
Joined: April 23, 2015
KitMaker: 4,648 posts
AeroScale: 1,938 posts
Posted: Friday, June 24, 2016 - 05:38 AM UTC
James,
I've only recently learned how much effort we can save ourselves by making attaching the tailplanes one of the final steps in construction. With the tail planes off, adding theatre bands, and any decals to the vertical tail is so much easier.
Les, aka Matrixone taught me that one.
Gaz
"Artillery adds dignity, to what would otherwise be an ugly brawl."
Frederick The Great
JPTRR
Managing Editor #051
Tennessee, United States
Joined: December 21, 2002
KitMaker: 7,772 posts
AeroScale: 3,175 posts
Posted: Friday, June 24, 2016 - 08:18 AM UTC
James,
Impressive work!
Are these detailed interiors common to Hobby Boss models????

If they demand your loyalty, give them integrity; if they demand integrity, give them your loyalty.--Col John Boyd, USAF
Any plan where you lose your hat is a bad plan.
England - South West, United Kingdom
Joined: January 06, 2007
KitMaker: 3,661 posts
AeroScale: 369 posts
Posted: Friday, June 24, 2016 - 10:29 PM UTC
Gaz, that's pretty solid advice, I will use that for the next build, Frederick, I'm not sure, I used to do a lot of armour and the hobbyboss kits on that side were very detailed, this is my first hobbyboss a/c kit so I cant really comment,
Thanks for stopping by, and it really does feel good to be back building again.
James
Edit so as not to double post.
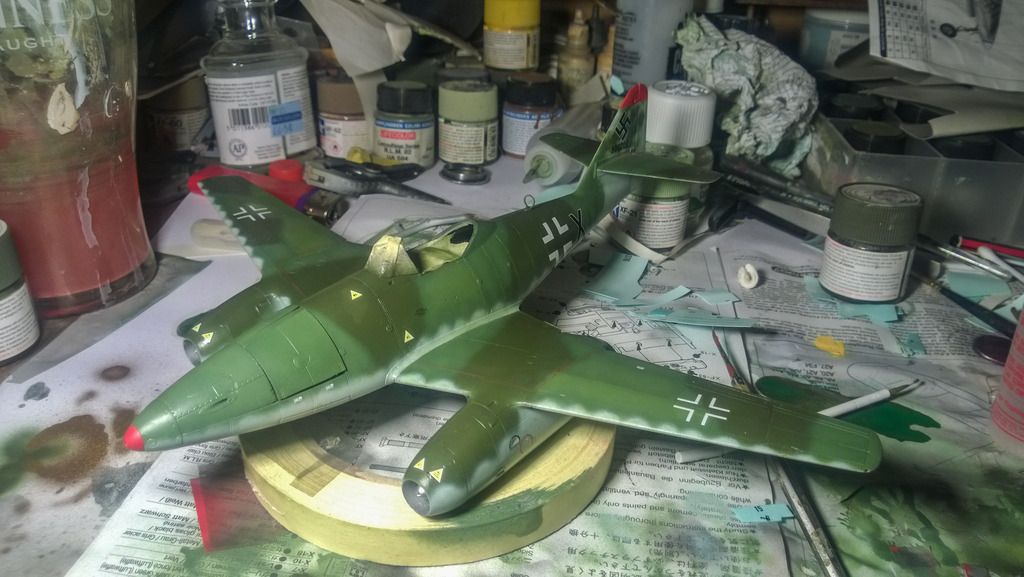
Got to the decals stage!
Support Our Troops! Hit the Yes button If you find reviews or features helpful.
Oregon, United States
Joined: February 07, 2004
KitMaker: 869 posts
AeroScale: 862 posts
Posted: Saturday, June 25, 2016 - 09:06 PM UTC
I will say it once again, very nice work with the airbrush! Your Me 262 is turning out very nice.
Matrixone
England - South West, United Kingdom
Joined: January 06, 2007
KitMaker: 3,661 posts
AeroScale: 369 posts
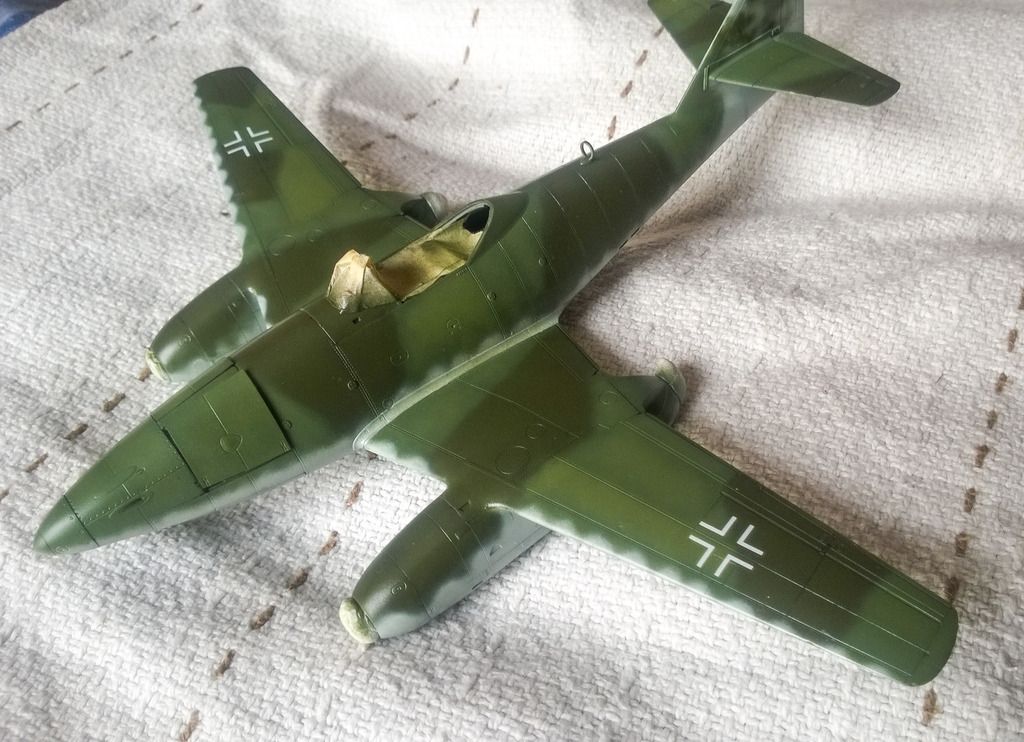
Posted: Sunday, June 26, 2016 - 04:53 PM UTC
Thankyou les, although I'm a long way off the standard I want to be ! Hehe
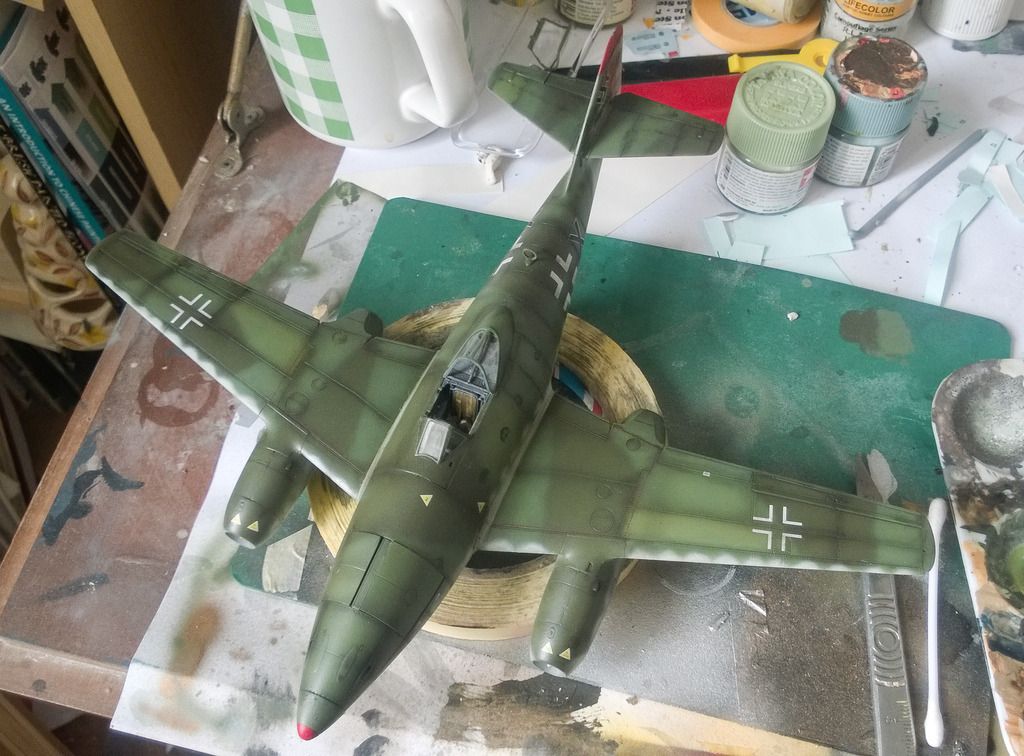
Decals and clearcoat are on. Next up, weathering and the little bits like canopy and wheels !
Support Our Troops! Hit the Yes button If you find reviews or features helpful.
England - South West, United Kingdom
Joined: January 06, 2007
KitMaker: 3,661 posts
AeroScale: 369 posts
Posted: Monday, June 27, 2016 - 04:41 PM UTC
Made a start on the weathering!
Support Our Troops! Hit the Yes button If you find reviews or features helpful.
AussieReg
Associate Editor #007
Victoria, Australia
Joined: June 09, 2009
KitMaker: 8,156 posts
AeroScale: 3,756 posts
Posted: Tuesday, June 28, 2016 - 03:19 AM UTC
Looking good James, coming together very well indeed!
Cheers, D
ON the bench
Revell 1/24 '53 Corvette (building as '54)
Revell 1/24 BMW 507 Coupe and Cabrio
Italeri 1/48 Me262 B-1a/U1 Nightfighter
Monogram 1/24 '57 Chevy Nomad
Dragon 1/350 USS Frank Knox DD-742
Slovakia
Joined: October 15, 2010
KitMaker: 825 posts
AeroScale: 476 posts
Posted: Wednesday, June 29, 2016 - 04:54 PM UTC
I like especially how You managed to differentiate the panel lines and the transfer on the leading edges of the wings. You realy must have a very steady hand with the airbrush !
Lisboa, Portugal
Joined: August 27, 2010
KitMaker: 679 posts
AeroScale: 669 posts
Posted: Wednesday, June 29, 2016 - 05:23 PM UTC
James,
Taking the risk of being redundant, yours is a fantastic airbrush work!
Cheers
Pedro


