England - North, United Kingdom
Joined: October 04, 2002
KitMaker: 1,495 posts
AeroScale: 643 posts
Posted: Monday, February 09, 2004 - 09:01 AM UTC
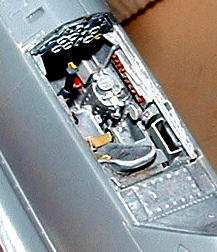
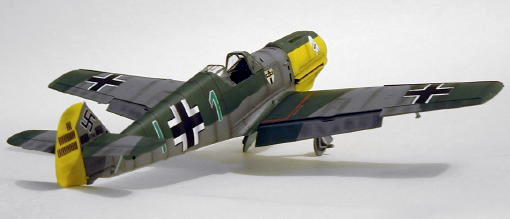
Here's some in progress pics of Tamiya 1/48 ME109E-3. First the cockpit detailed with Aries resin+etched set.
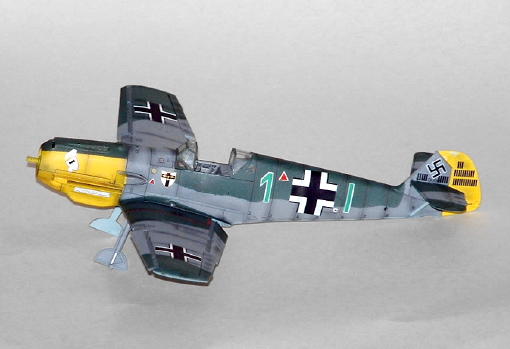
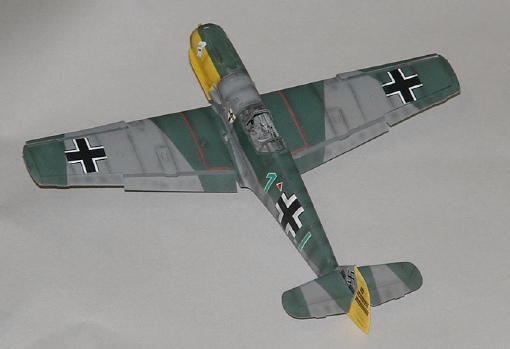
The aircraft before the panel lines are weathered
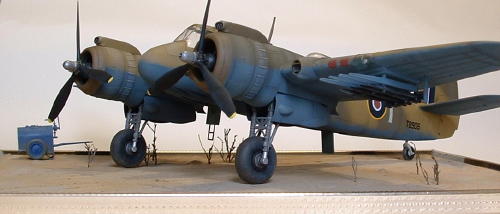
And finally after the panel lines are done
All comments and/or suggestions welcome
Merlin
 Senior Editor
#017
United Kingdom
Joined: June 11, 2003
KitMaker: 17,582 posts
AeroScale: 12,795 posts
Posted: Monday, February 09, 2004 - 11:37 AM UTC
Hi Martin
Nice job! She's coming on beautifuly - a really spectacular scheme.

How did you weather the panel lines? A similar way to your Corsair?
One small point I'd make concerns the undercarriage legs; Bf 109s normally had covers protecting the oleos, unless they were being serviced.
All the best
Rowan

BEWARE OF THE FEW...
As I grow older, I regret to say that a detestable habit of thinking seems to be getting a hold of me. - H. Rider Haggard
Metro Manila, Philippines
Joined: February 20, 2003
KitMaker: 5,762 posts
AeroScale: 543 posts
Posted: Monday, February 09, 2004 - 12:48 PM UTC
Not bad not bad! I really love the interior!

--==Shonen Red==--
-=Filipino Modeler=-
England - North, United Kingdom
Joined: October 04, 2002
KitMaker: 1,495 posts
AeroScale: 643 posts
Posted: Monday, February 09, 2004 - 04:44 PM UTC
Quoted Text
How did you weather the panel lines? A similar way to your Corsair?
For this one I used a propelling pencil to draw in the lines and powder from pencil lead applied with a brush to darken around them. Thanks for the tip about the oleos.
Quoted Text
Not bad not bad! I really love the interior!
Thanks, the aries detail set does add to the cockpit although a lot of the bits can't actually be seen once assembled in place. I used the kit instrument panel as the etched one didn't seem to add to the kit. The set needed a bit of slight surgery to fit.
Pennsylvania, United States
Joined: December 09, 2003
KitMaker: 880 posts
AeroScale: 654 posts
Posted: Tuesday, February 10, 2004 - 02:29 AM UTC
Love the detail in the cockpit, this is where a lot of people look when viewing your model, I like the yellow under the cowl and on the tail, it adds a nice touch of color, good job, Wingman out.
WATCH OUT THE WOLFPACK IS COMING!
WOLF#8
Holdfast
President #056
England - South West, United Kingdom
Joined: September 30, 2002
KitMaker: 8,581 posts
AeroScale: 4,913 posts
Posted: Tuesday, February 10, 2004 - 08:28 AM UTC
:-) Yes Martin, coming on a treat. Interesting colour scheme, i'm interested in what RLM colours it is? looking forward to the completion of this bird, probably just in time for my Spit to shoot it down


Mal

MAL the MASK
BULLDOG # 6 (President)
BEWARE OF THE FEW
Sappers: First in, last out. (UBIQUE)
It's not the same, better, but not the same.
England - North, United Kingdom
Joined: October 04, 2002
KitMaker: 1,495 posts
AeroScale: 643 posts
Posted: Tuesday, February 10, 2004 - 08:39 AM UTC
Quoted Text
I'm interested in what RLM colours it is?
Hi Mal, the colours used were Humbrol 30 and 65 for the green and underside blue. I tried to mix a grey to match a colour profile I found of this aircraft but I think I didn't get it right.
Quoted Text
probably just in time for my Spit to shoot it down
Heh heh, in your dreams, I know you like to say "You can't have too many spitfires" but if this ever meets one of yours there would be one less spitfire around :-) #:-) Why not build yours in a crash site dio to show the result?:-) #:-)
Illinois, United States
Joined: January 18, 2003
KitMaker: 547 posts
AeroScale: 0 posts
Posted: Tuesday, February 10, 2004 - 09:06 AM UTC
brandydoguk,
I'm just curious as to when you painted the yellow on this 109. I always have trouble getting a good coat of yellow over a darker color. So how did you go about painting this scheme?
Keep up the great work,
Sean
New Jersey, United States
Joined: May 09, 2003
KitMaker: 40 posts
AeroScale: 0 posts
Posted: Tuesday, February 10, 2004 - 01:24 PM UTC
wow great job blows my me109 out of the sky
Texas, United States
Joined: August 03, 2003
KitMaker: 34 posts
AeroScale: 22 posts
Posted: Tuesday, February 10, 2004 - 02:10 PM UTC
You need to do a full article on this bird. Great job!!
England - North, United Kingdom
Joined: October 04, 2002
KitMaker: 1,495 posts
AeroScale: 643 posts
Posted: Tuesday, February 10, 2004 - 04:50 PM UTC
Quoted Text
brandydoguk,
I'm just curious as to when you painted the yellow on this 109. I always have trouble getting a good coat of yellow over a darker color. So how did you go about painting this scheme?
Hah, I have exactly the same trouble with yellow [and red!] For this one I onlt have Tamiya yellow and had tried brush painting the cowling and it came out a complete mess so I stripped off the paint and started again. I primed the parts with white auto primer, then used the airbrush for the yellow. Then masked off the yellow and sprayed the green. I think the white primer was the key to getting a good colour.
Quoted Text
You need to do a full article on this bird.
Thanks eagledoc2000, but I don't think it is up to the standard of the kits that appear in articles.
I'm planning on placing this one in a dio with a group of pilots, I will post pics of the finished dio.
England - North West, United Kingdom
Joined: November 13, 2003
KitMaker: 2,240 posts
AeroScale: 743 posts
Posted: Tuesday, February 10, 2004 - 10:13 PM UTC
Quoted Text
I'm interested in what RLM colours it is?
I believe the grey is RLM 75 Grey-violet, The green RLM 70 Dark green or RLM 83 Dark green and undersides RLM 76 Light blue (Greyish).
I love it to death. Can't wait to see the final result.
Also the stages illustrated are excellent reference for anyone doing the "just-enough" weathering technique.
Cheers
Peter
Cheers
Peter
0:-)
:-)

Wolf Number 9.
A Wing Waggle to modellers everywhere.
Madness is the normal condition, interupted only by spells of sanity.
England - North, United Kingdom
Joined: October 04, 2002
KitMaker: 1,495 posts
AeroScale: 643 posts
Posted: Tuesday, February 10, 2004 - 10:52 PM UTC
Quoted Text
the stages illustrated are excellent reference for anyone doing the "just-enough" weathering technique.
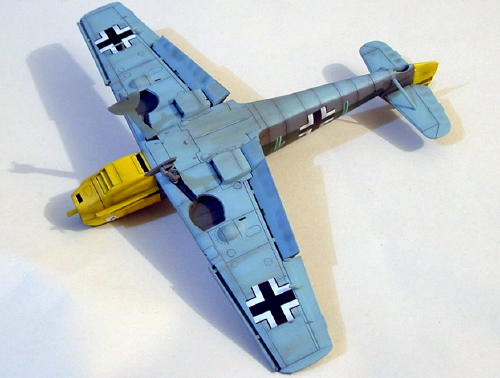
Thanks, I'll add this one in case anyone wants to see the undersides. I'm going to add a bit more weathering to the fuselage centre section to depict the muck thrown up by the propblast when using grass airfields.
England - North West, United Kingdom
Joined: November 13, 2003
KitMaker: 2,240 posts
AeroScale: 743 posts
Posted: Tuesday, February 10, 2004 - 11:10 PM UTC
Wolf Number 9.
A Wing Waggle to modellers everywhere.
Madness is the normal condition, interupted only by spells of sanity.
England - North, United Kingdom
Joined: October 04, 2002
KitMaker: 1,495 posts
AeroScale: 643 posts
Posted: Tuesday, February 10, 2004 - 11:24 PM UTC
Quoted Text
Looking at the equally superb underside, I think the RLM colour is the earlier 65 Hellblau rather than RLM 76....?
I used humbrol 65, and checking on your paint chart yes it would be RLM65.
Texas, United States
Joined: November 23, 2002
KitMaker: 512 posts
AeroScale: 104 posts
Posted: Tuesday, February 10, 2004 - 11:38 PM UTC
well I'd put a drooling lil face in here but they dont have one so I'll have to say this
ABSOLUTELY STUNNING!!!!!!!
would love to see a detaild write up on the build
Chris
England - North, United Kingdom
Joined: October 04, 2002
KitMaker: 1,495 posts
AeroScale: 643 posts
Posted: Wednesday, February 11, 2004 - 02:24 AM UTC
Quoted Text
ABSOLUTELY STUNNING!!!!!!!.......would love to see a detailed write up on the build
Thanks for the compliment. The kit is a joy to build, hardly any filler necessary. The weathering also is simplicity itself and does look effective [if I can hold myself in check and not overdo it :-) ] On my next build I might do a little step-by-step on how I weather panel lines to show just how easy it is.
Holdfast
President #056
England - South West, United Kingdom
Joined: September 30, 2002
KitMaker: 8,581 posts
AeroScale: 4,913 posts
Posted: Wednesday, February 11, 2004 - 08:27 AM UTC
:-) Martin I'm sure Bryan would love to get an article from you. I have put together a couple of simple templates, that help me when I'm doing my articles and Bryan says they're OK for him. They also help me check that the pics are correct for the text. If you like I could send you a copy of my most resent one, not yet up, for you to have a look at.
You can't keep putting up these pics and not writing an article on how you've done your thing
Mal
MAL the MASK
BULLDOG # 6 (President)
BEWARE OF THE FEW
Sappers: First in, last out. (UBIQUE)
It's not the same, better, but not the same.
England - North, United Kingdom
Joined: October 04, 2002
KitMaker: 1,495 posts
AeroScale: 643 posts
Posted: Wednesday, February 11, 2004 - 09:22 AM UTC
Quoted Text
If you like I could send you a copy of my most resent one, not yet up, for you to have a look at.
Thanks Mal, I'll PM you my e-mail.
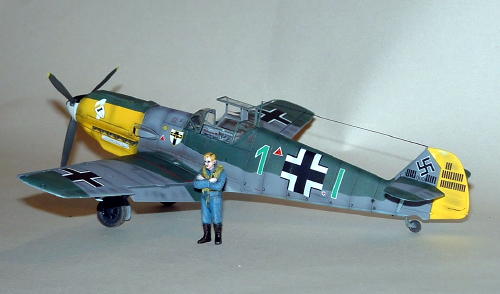
A quick pic of the finished plane with one of the figures to go in a dio.
Posted: Saturday, February 14, 2004 - 02:51 PM UTC
Awsome, I've always loved 109 E. Is that a Battle of Britian scheme.
where did you get the markings.
Posted: Saturday, February 14, 2004 - 02:52 PM UTC
Awsome, I've always loved 109 E. Is that a Battle of Britian scheme.
where did you get the markings.
England - North, United Kingdom
Joined: October 04, 2002
KitMaker: 1,495 posts
AeroScale: 643 posts
Posted: Saturday, February 14, 2004 - 06:15 PM UTC
Quoted Text
Awsome, I've always loved 109 E. Is that a Battle of Britian scheme.
where did you get the markings.
Hi Cleff, yes it is a Battle of Britain scheme. The aircraft was flown by Hptm Wilhelm Balthasar of III/JG3. The decals are from Super Scale decal sheet number 48-703. I chose them as I like a colourful scheme on 109s.
Rheinland-Pfalz, Germany
Joined: April 14, 2004
KitMaker: 66 posts
AeroScale: 0 posts
Posted: Thursday, May 20, 2004 - 06:22 AM UTC
That 109 looks wonderful, I love the weathering and the panel lines
"Be Strong Sayeth my heart, for I am a soldier, and I have seen worse sights then these."
-Odysseus, The Iliad