Florida, United States
Joined: August 23, 2015
KitMaker: 170 posts
AeroScale: 109 posts
Posted: Thursday, July 07, 2016 - 12:55 AM UTC
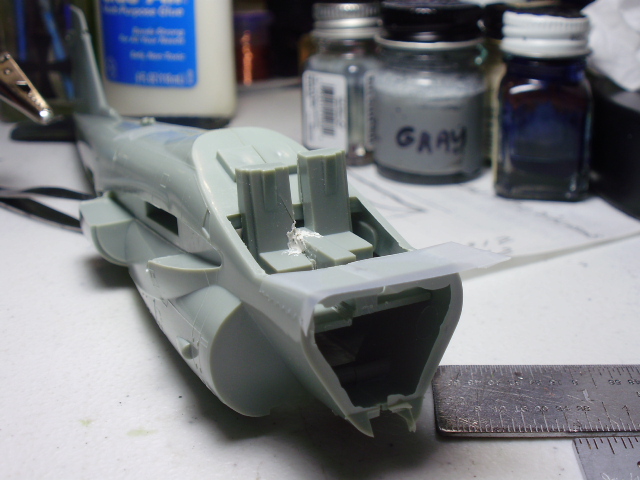
This is the last to start for a while. I have plenty of "irons in the fire", maybe too many. The old Hasegawa is the kit for this subject. It is definitely old and in need of some TLC to make it look presentable. The main area of concern is the cockpit. It's rude, crude and offensive, but doable. I started by cutting the seats apart. Hasegawa molded at the same height, the B/Ns seat should be lower than the pilots. So I cut them apart, deepened the notch in the B/Ns seat and trimmed the lug in the right fuselage to drop the B/Ns seat by the 1mm I ofset the seats. I plan on making pull handles for the ejection seat tops and adding a center console to go between the pilot and B/Ns seat backs. I am also going to do rudder pedals, stick and control console for the B/N.---John
 Intruder 1
 by
jvandeu53, on Flickr
 Intruder 2
 by
jvandeu53, on Flickr
Florida, United States
Joined: August 23, 2015
KitMaker: 170 posts
AeroScale: 109 posts
Posted: Thursday, July 07, 2016 - 01:02 AM UTC
Here's the start, not much but it looks a bit more realistic than it was on the sprues.---John
 Intruder 5
 by
jvandeu53, on Flickr
Florida, United States
Joined: August 23, 2015
KitMaker: 170 posts
AeroScale: 109 posts
Posted: Thursday, July 07, 2016 - 02:34 AM UTC
I did a test fit of the partial cockpit with corrections into the fuselage halves and taped it up. It seems to fit good and looks level. Now to sand the nutty putty between the seats and fill the gouge in the B/Ns seat then I can start to scratch build some interior details.---John
 OLYMPUS DIGITAL CAMERA
 by
jvandeu53, on Flickr
Florida, United States
Joined: August 23, 2015
KitMaker: 170 posts
AeroScale: 109 posts
Posted: Friday, July 08, 2016 - 07:32 AM UTC
Started some detailing. I have the face curtain pulls, side consoles, B/N console, and IP on and decaled. Next will be the pilot's stick, B/N joy stick, and bomb sight.---John
 Intruder 7
 by
jvandeu53, on Flickr

#424
Queensland, Australia
Joined: April 23, 2015
KitMaker: 4,648 posts
AeroScale: 1,938 posts
Posted: Friday, July 08, 2016 - 10:06 AM UTC
Hey John,
Nice job on that cockpit. Used to watch a lot A-6's back in the 80's. Looking forward ro see how yours turns out.
Cheers,
Gaz
"Artillery adds dignity, to what would otherwise be an ugly brawl."
Frederick The Great
Florida, United States
Joined: August 23, 2015
KitMaker: 170 posts
AeroScale: 109 posts
Posted: Saturday, July 09, 2016 - 02:21 AM UTC
Thanks, the only thing I am not happy with is the seats, I am still thinking I should have at the least built more accurate looking headrests. The face curtain pulls alone just don't help all that much. I have the pilots stick, B/N joystick, circuit breakers vertically between the seat backs and B/Ns console done and added some dials and knobs to make them look busy. All I need to do before buttoning it up is make a bomb sight for the IP.---John
 Intruder 9
 by
jvandeu53, on Flickr
Florida, United States
Joined: August 23, 2015
KitMaker: 170 posts
AeroScale: 109 posts
Posted: Saturday, July 09, 2016 - 07:01 AM UTC
Bomb sight on, I also added khaki green fabric area to ejection seat tops to "enhance" it a bit. Now to add the canopy, I want to protect the fragile face curtain pull handles.---John
 OLYMPUS DIGITAL CAMERA
 by
jvandeu53, on Flickr
Florida, United States
Joined: August 23, 2015
KitMaker: 170 posts
AeroScale: 109 posts
Posted: Monday, July 11, 2016 - 12:37 AM UTC
The canopy is on and I have filled the offending areas that are really visible. It's starting to look up, I have a 1/72 Fujimi A-6A coming in a few days, may do a side by side comparison.---John
 OLYMPUS DIGITAL CAMERA
 by
jvandeu53, on Flickr
 Intruder 14
 by
jvandeu53, on Flickr
#439
Washington, United States
Joined: November 05, 2005
KitMaker: 4,950 posts
AeroScale: 3,192 posts
Posted: Monday, July 11, 2016 - 01:33 AM UTC
Looking good. I've got one of these in the stash. Love to see how the canopy works out.

Hanger Queens in Waiting:
Monogram 1/72 F8F-1
Corsair the Sky Pirate - 1/72 Ace A-7D
Century Series - Airfix 1/72 F-105G
Anti Shipping - Academy 1/72 PBJ-1D
Academy 1/72 F-84E
Florida, United States
Joined: August 23, 2015
KitMaker: 170 posts
AeroScale: 109 posts
Posted: Tuesday, July 12, 2016 - 10:02 PM UTC
The canopy isn't one of the better qualities of this kit. It's very poorly done and why 2 pieces makes no sense. It makes it hard to sand and the attachment points are on the mating seams and almost impossible to sand without scratching the canopy. Anyways I have the wings, intakes and exhausts on. Not sure of the dihedral of the wings, looks more anhedral, but at this point "it is what it is".---John
 Intruder 15
 by
jvandeu53, on Flickr
#424
Queensland, Australia
Joined: April 23, 2015
KitMaker: 4,648 posts
AeroScale: 1,938 posts
Posted: Tuesday, July 12, 2016 - 11:01 PM UTC
Jon,
Glad tonsee it coming together. I'm glad to see it coming together. Were the forward wing flaps separate pieces, or molded with the wing?
Gaz
"Artillery adds dignity, to what would otherwise be an ugly brawl."
Frederick The Great
Florida, United States
Joined: August 23, 2015
KitMaker: 170 posts
AeroScale: 109 posts
Posted: Tuesday, July 12, 2016 - 11:55 PM UTC
Gaz, the leading edge slats were not separate. All flying surfaces are one piece and non positionable. I just received the 1/72 Fujimi A-6A in the mail today and it DOES have positionable slats.---John
Florida, United States
Joined: August 23, 2015
KitMaker: 170 posts
AeroScale: 109 posts
Posted: Friday, July 15, 2016 - 06:06 AM UTC
The intakes, burner cans and horizontal stabilizers are installed. I am going to use unit markings from my Fujimi kit for an A-6A of U. S. Marines,VMA-533 Hawks in Vietnam 1966. The only Hasegawa kit decals I will use are the basic stars and bars and the common maintenance markings.---John
 Intruder 17
 by
jvandeu53, on Flickr
#424
Queensland, Australia
Joined: April 23, 2015
KitMaker: 4,648 posts
AeroScale: 1,938 posts
Posted: Friday, July 15, 2016 - 10:12 AM UTC
Amazingly these birds were in USMC service from Nam' until after my first posting in the Marines to El Toro in 1984.
It was great to watch them doing touch-and-goes as well as turning and banking around the air base.
One detail that struck me was that when the forward flaps were extended, the red primer underneath contrasted greatly with the dull gray paint on the exterior. It looked like the color of blood until you were up close.
Looks you got some serios putty to remove, John.
Best Wishes,
Gaz
"Artillery adds dignity, to what would otherwise be an ugly brawl."
Frederick The Great
Florida, United States
Joined: August 23, 2015
KitMaker: 170 posts
AeroScale: 109 posts
Posted: Friday, July 15, 2016 - 08:07 PM UTC
Gary,I have added even more putty since. I wasn't happy with the wing dihedral so I "adjusted" it and got at least 1/2 of it out and looking more normal. The wing tips were almost touching the table when I set it on the work bench, FAR TOO MUCH. So I gingerly yanked on them with steady pressure and worked them up a bit. A few seams opened so more filling. The results give it a much better sit.---John
 Intruder 19
 by
jvandeu53, on Flickr
 Intruder 18
 by
jvandeu53, on Flickr
Florida, United States
Joined: August 23, 2015
KitMaker: 170 posts
AeroScale: 109 posts
Posted: Monday, July 18, 2016 - 10:00 AM UTC
Here's a picture of the plane I am modeling, VMA-533 Marines
A-6A in Chu Lai Vietnam 1966. The decals are from my Fujimi kit.---John
 533_takafumihiroe_1
 by
jvandeu53, on Flickr
#424
Queensland, Australia
Joined: April 23, 2015
KitMaker: 4,648 posts
AeroScale: 1,938 posts
Posted: Monday, July 18, 2016 - 01:39 PM UTC
John,
That's a cool pic....coming in for a landing, flaps and gear down with air brakes extended. Too bad that by the time the 80's rolled in that they'd lost their personalities in dull grey radar reflective paint.
Gaz
"Artillery adds dignity, to what would otherwise be an ugly brawl."
Frederick The Great
#372
United Kingdom
Joined: March 10, 2010
KitMaker: 2,568 posts
AeroScale: 1,619 posts
Posted: Saturday, July 23, 2016 - 10:20 PM UTC
Good work so far.
I'm always on the lookout for a good Vietnam era A-6 but most tend to be later TRAM's.
On the bench: 1/72 Mosquito, Lightning F.6, DH.2,
AMT Vulcan Shuttle Surak.
Cyber-Hobby 1:35 Sherman Firefly IC - still stalled.
Florida, United States
Joined: August 23, 2015
KitMaker: 170 posts
AeroScale: 109 posts
Posted: Monday, August 01, 2016 - 07:08 AM UTC
I have the MERs on the wings and have scratch built ECM antennas for the pylons. I used the ones that are in my 1/72 Fujimi A-6A kit as a model to replicate these, using stretched sprue and scrap plastic from an old unused missile launcher.---John
 OLYMPUS DIGITAL CAMERA
 by
jvandeu53, on Flickr
#424
Queensland, Australia
Joined: April 23, 2015
KitMaker: 4,648 posts
AeroScale: 1,938 posts
Posted: Monday, August 01, 2016 - 10:53 AM UTC
John,
Nice job on the scratch-build!
Gaz
"Artillery adds dignity, to what would otherwise be an ugly brawl."
Frederick The Great
JPTRR
 Managing Editor
#051
Tennessee, United States
Joined: December 21, 2002
KitMaker: 7,772 posts
AeroScale: 3,175 posts
Posted: Monday, August 01, 2016 - 11:11 AM UTC
Nice work tackling the old girl. She's looking good.
If they demand your loyalty, give them integrity; if they demand integrity, give them your loyalty.--Col John Boyd, USAF
Any plan where you lose your hat is a bad plan.


