_GOTOBOTTOM
Early Aviation
Discuss World War I and the early years of aviation thru 1934.
Eduard Nieuport Ni-11 bare build
betheyn
Staff MemberSenior Editor
AEROSCALE
#019
_VISITCOMMUNITY
England - South East, United Kingdom
Joined: October 14, 2004
KitMaker: 4,560 posts
AeroScale: 2,225 posts
Posted: Saturday, July 16, 2016 - 01:05 AM UTC
Having received Eduard's 1/48th Weekend Edition Nieuport Ni-11, I thought this would be a good kit to build bare (no, not with out clothes on you mucky thinking lot, but with out paint, just glue ).
Kit no - 8422
Price - £12.80

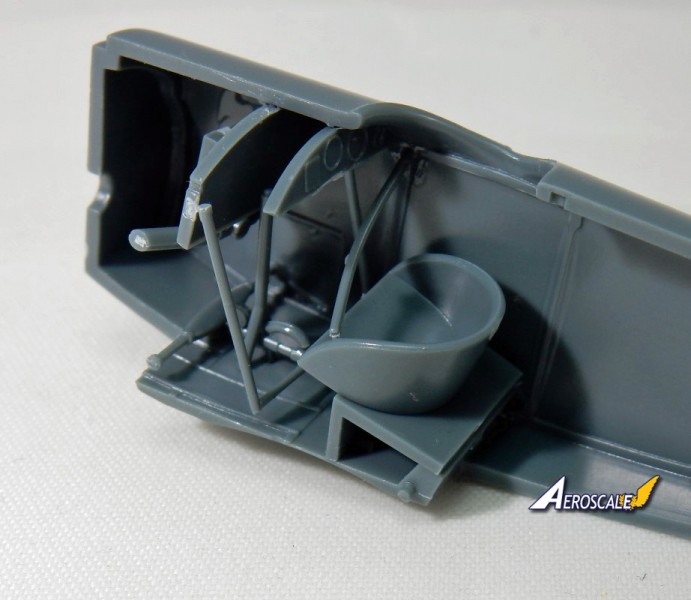
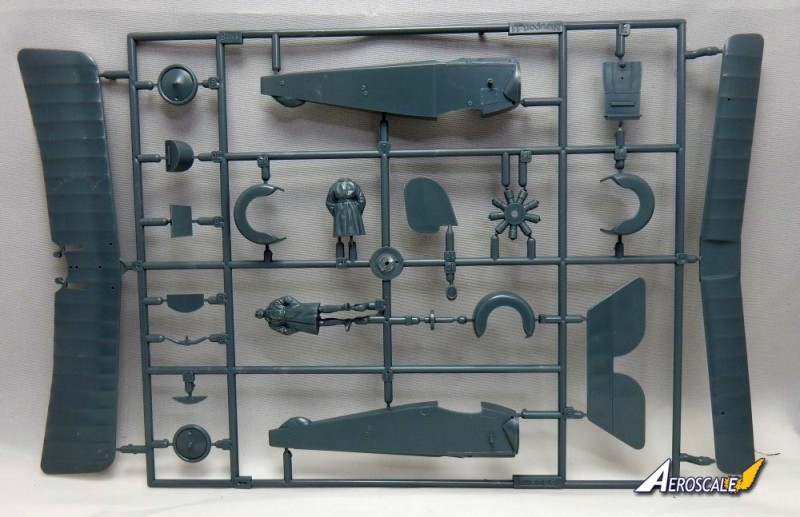
Inside the box is two sprues, one clear sprue with a windscreen attached, a decal sheet and a colour instruction manual.


Two decal options are supplied,
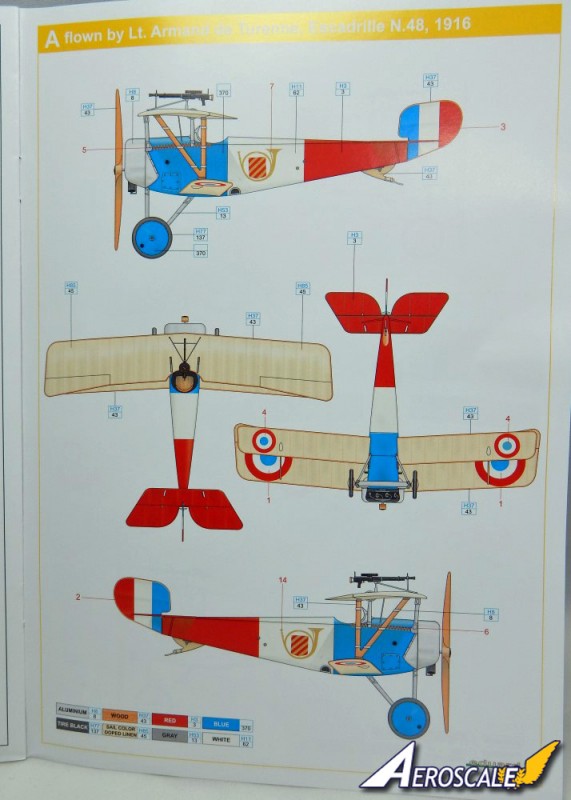
A Nieuport Ni-11 flown by Lt. Armand de Turenne, Escadrille N.48, 1916.
Blue, white and red fuselage with sail colour wings.

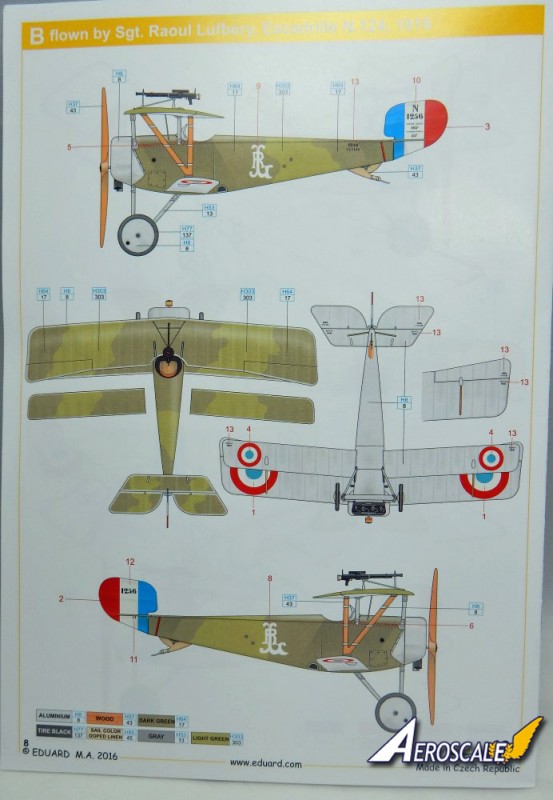
B Nieuport Ni-11 flown by Sgt Raoul Lufbery, Escadrille N.124, 1916.
two tone green camouflage with aluminium undersides.


Andy

betheyn
Staff MemberSenior Editor
AEROSCALE
#019
_VISITCOMMUNITY
England - South East, United Kingdom
Joined: October 14, 2004
KitMaker: 4,560 posts
AeroScale: 2,225 posts
Posted: Saturday, July 16, 2016 - 03:17 AM UTC
Well first up is the cockpit, and this fits together with no problems. Although there is quite a few parts to go in, Eduard have supplied a couple of drawings of the position of all the parts from a side view once installed.
Detail is fairly good but the seat doesn't come with a harness.
The instrument panel has four decals for the dials, if you don't fancy painting them.

Next up is closing up the fuselage and installing the engine face.
Andy
betheyn
Staff MemberSenior Editor
AEROSCALE
#019
_VISITCOMMUNITY
England - South East, United Kingdom
Joined: October 14, 2004
KitMaker: 4,560 posts
AeroScale: 2,225 posts
Posted: Saturday, July 16, 2016 - 05:03 AM UTC
Fuselage closed up, and very little work will be needed for the seams, the fit is very good.
The engine face is made up of three parts. The prop shaft, the main cylinders and the ignition wires(?). The ignition wires glue onto the front of the cylinders and have to be lined up so the wires sit on top of the cylinders, the prop shaft just slots into the back, before fitting the whole thing to the fuselage.
This is all very easy, too easy one might say .

Right that's it for tonight. Tomorrow will be fitting the wings, this is the part most of my biplanes go wrong (gulp) .
Andy
Merlin
Staff MemberSenior Editor
AEROSCALE
#017
_VISITCOMMUNITY
United Kingdom
Joined: June 11, 2003
KitMaker: 17,582 posts
AeroScale: 12,795 posts
Posted: Saturday, July 16, 2016 - 02:34 PM UTC
Nice one Andy

It's interesting and helpful to see the kit going together "au naturel". I nearly did it with the Super Etendard, but in the end I couldn't help myself and reached for the filler and paint...

All the best

Rowan
phantom_phanatic309
#372
_VISITCOMMUNITY
United Kingdom
Joined: March 10, 2010
KitMaker: 2,568 posts
AeroScale: 1,619 posts
Posted: Saturday, July 16, 2016 - 03:08 PM UTC
Looking good.
I really should have a go at doing something similar. Thought about with an old Matchbox multi-colour kit. After all, they often claimed to be moulded in authentic colours and no painting was necessary

The Ni-11 looks to be a good kit too. Might have to get one. Great to see a pilot included with it.
betheyn
Staff MemberSenior Editor
AEROSCALE
#019
_VISITCOMMUNITY
England - South East, United Kingdom
Joined: October 14, 2004
KitMaker: 4,560 posts
AeroScale: 2,225 posts
Posted: Saturday, July 16, 2016 - 03:44 PM UTC
Thanks for the replies guys.
Building the weekend kits as bare builds does give us a chance to see how well they go together, and its nice to just build without having to worry about paint and filler.
I remember well the old Matchbox multi coloured kits not needing to be painted, even as a kid I still painted them, as glossy plastic just didn't look right .
Andy
betheyn
Staff MemberSenior Editor
AEROSCALE
#019
_VISITCOMMUNITY
England - South East, United Kingdom
Joined: October 14, 2004
KitMaker: 4,560 posts
AeroScale: 2,225 posts
Posted: Saturday, July 16, 2016 - 03:48 PM UTC
Was going to attach the wings but went straight to the tail instead.
Goes on well but you need to attach 6 control horns to the top and bottom of the horizontal stabilisers and two more to the rudder. These are pretty small and as per normal with small parts, two went missing straight away.
These would be quite easy to scratch build if you do lose them, but as this isn't going to be seen again anywhere I just left them off from the underside.

Andy
betheyn
Staff MemberSenior Editor
AEROSCALE
#019
_VISITCOMMUNITY
England - South East, United Kingdom
Joined: October 14, 2004
KitMaker: 4,560 posts
AeroScale: 2,225 posts
Posted: Saturday, July 16, 2016 - 04:45 PM UTC
DOH, got carried away and finished it, all told took about 2 hours to be built.
Well the wings go together without any problems what so ever, they line up with the struts very easily.
The wheel assembly is a little delicate but leaving it to set whilst working on the gun helps it.
The front cowling covers up the top half of the engine face, but enough detail is left to see, so painting it well isn't a futile exercise.
The gun assembly fits onto the top wing and is only used for marking option "B". A touch of filler will be needed to cover the locating holes.
Anyway finished pics, thanks for watching.


Andy
Next up will be a 1/72nd W.W.2 prop.
phantom_phanatic309
#372
_VISITCOMMUNITY
United Kingdom
Joined: March 10, 2010
KitMaker: 2,568 posts
AeroScale: 1,619 posts
Posted: Sunday, July 17, 2016 - 02:40 AM UTC
Looks great.
I'm amazed at how quickly it went together. Just shows how much time goes into filling, sanding and painting! Will you be applying the decals?

You know this would make a good campaign idea.
betheyn
Staff MemberSenior Editor
AEROSCALE
#019
_VISITCOMMUNITY
England - South East, United Kingdom
Joined: October 14, 2004
KitMaker: 4,560 posts
AeroScale: 2,225 posts
Posted: Sunday, July 17, 2016 - 12:14 PM UTC

Quoted Text

Looks great.
I'm amazed at how quickly it went together. Just shows how much time goes into filling, sanding and painting! Will you be applying the decals?

You know this would make a good campaign idea.


Thanks Stephen.
Its amazing how quick a good fitting kit will go together, mind you the parts count wasn't massive.
The decals will be saved for any future projects that might need them.
It would be an interesting campaign, but I don't know how many members would want too build a kit "bare".
Andy
JackFlash
_VISITCOMMUNITY
Colorado, United States
Joined: January 25, 2004
KitMaker: 11,669 posts
AeroScale: 11,011 posts
Posted: Sunday, July 17, 2016 - 11:33 PM UTC
Greetings all.

I remember the magazine Military Modellers Illustrated(?) It was a periodical around in the very early 90s. This the way they did all of their reviews. Bare plastic but it was in black and white print. I think that was the main downfall. As such it did not last more than a couple of years. One correction if you please Andy. The cross member you have angling down into the seat should span the cockpit upper longeron to upper longeron.

betheyn
Staff MemberSenior Editor
AEROSCALE
#019
_VISITCOMMUNITY
England - South East, United Kingdom
Joined: October 14, 2004
KitMaker: 4,560 posts
AeroScale: 2,225 posts
Posted: Sunday, July 17, 2016 - 11:56 PM UTC
Hi Stephen,
I have just checked my kit, by looking through the small hole, and the cross member is in the correct place, it must have fell down for the pic, but well spotted, because I didn't notice it .
There is something liberating building a kit like this, and its nice just too see how they go together.
Andy
 _GOTOTOP