

I have nearly completed my first airplane kit . I understand that to make the aerial line I need to stretch some sprue over a candle . But some models I see pictures of have a straight line aerial others have what is best described as a T shape with a piece attached half way down the back of the fuselage as well ?
The other thing I do not understand is some models have what looks like several small beads attached to the stretched part of sprue . What are they and where can I buy some ? Thank you very much.
Start Here (for Beginners)
This forum is for younger modelers or people just starting out in the hobby.
This forum is for younger modelers or people just starting out in the hobby.
Hosted by Jim Starkweather
aerial question 1/72 Tamiya messerschmitt

caireparavel

Joined: August 19, 2012
KitMaker: 41 posts
AeroScale: 5 posts
Posted: Tuesday, July 26, 2016 - 09:49 AM UTC

gaborka

Joined: October 09, 2005
KitMaker: 626 posts
AeroScale: 264 posts

Posted: Tuesday, July 26, 2016 - 12:28 PM UTC
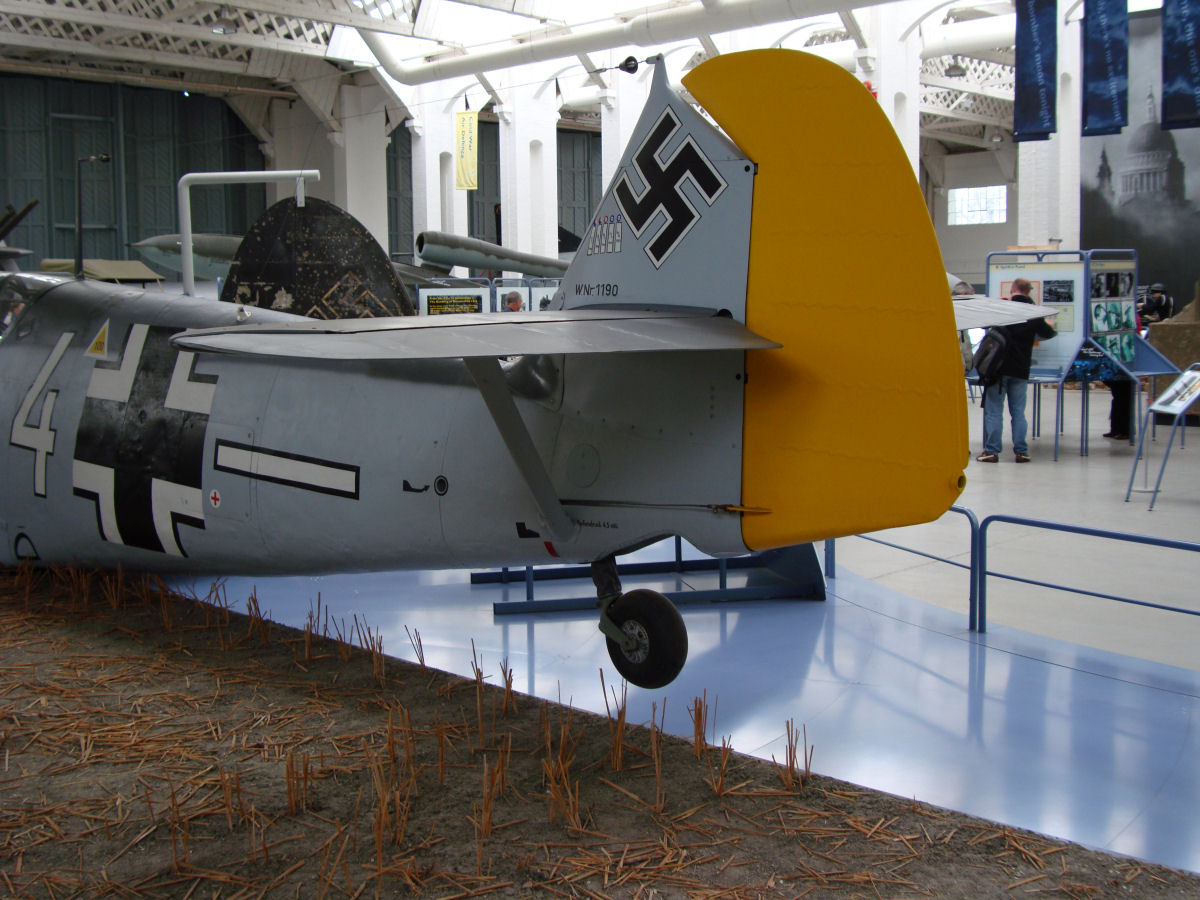
How the aerial looks depends on the actual configuration of the antennae and radio system of the real plane, so best you look for photos of the real subject because there may be differences even between sub-series of the same version.
The beads on the wire are insulating porcelains, you can replicate them by putting a little blob of white glue to the right spot and painting them white after they have dried. (I haven't seem these sold as aftermarket but this way you need not buy them anyway).

The beads on the wire are insulating porcelains, you can replicate them by putting a little blob of white glue to the right spot and painting them white after they have dried. (I haven't seem these sold as aftermarket but this way you need not buy them anyway).


GazzaS

#424

Joined: April 23, 2015
KitMaker: 4,648 posts
AeroScale: 1,938 posts

Posted: Tuesday, July 26, 2016 - 12:36 PM UTC
Martin,
Here is a detail picture for the 109 aerial of the A/C at duxford. Photos for discussion only.
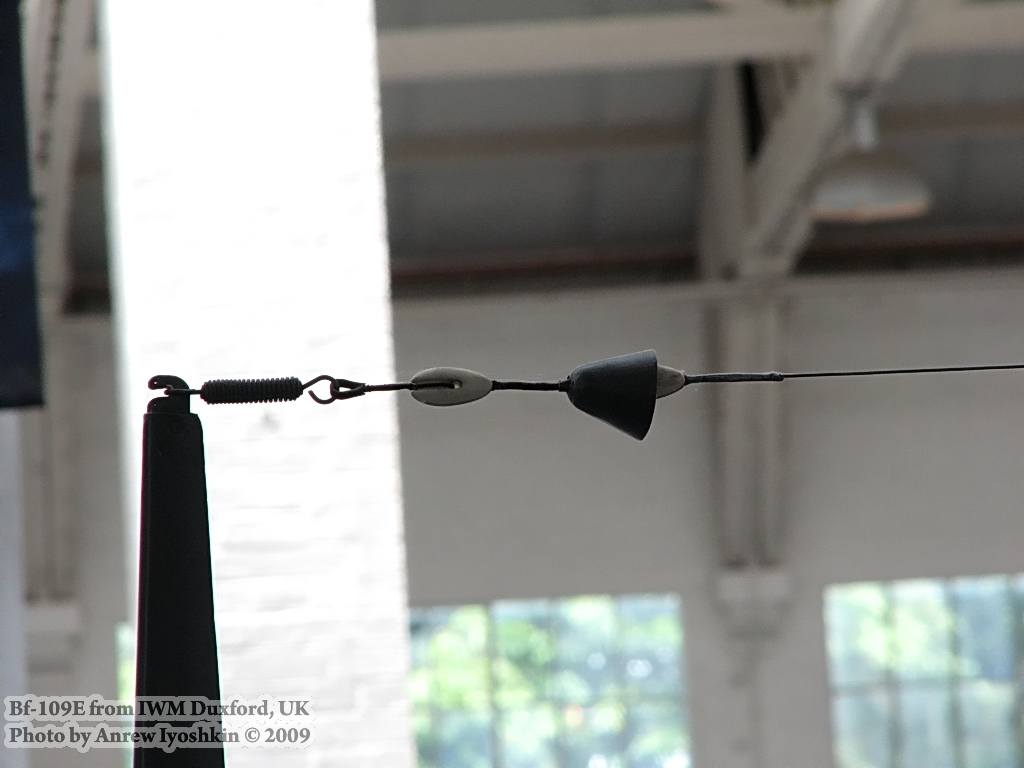
Here is the other end:
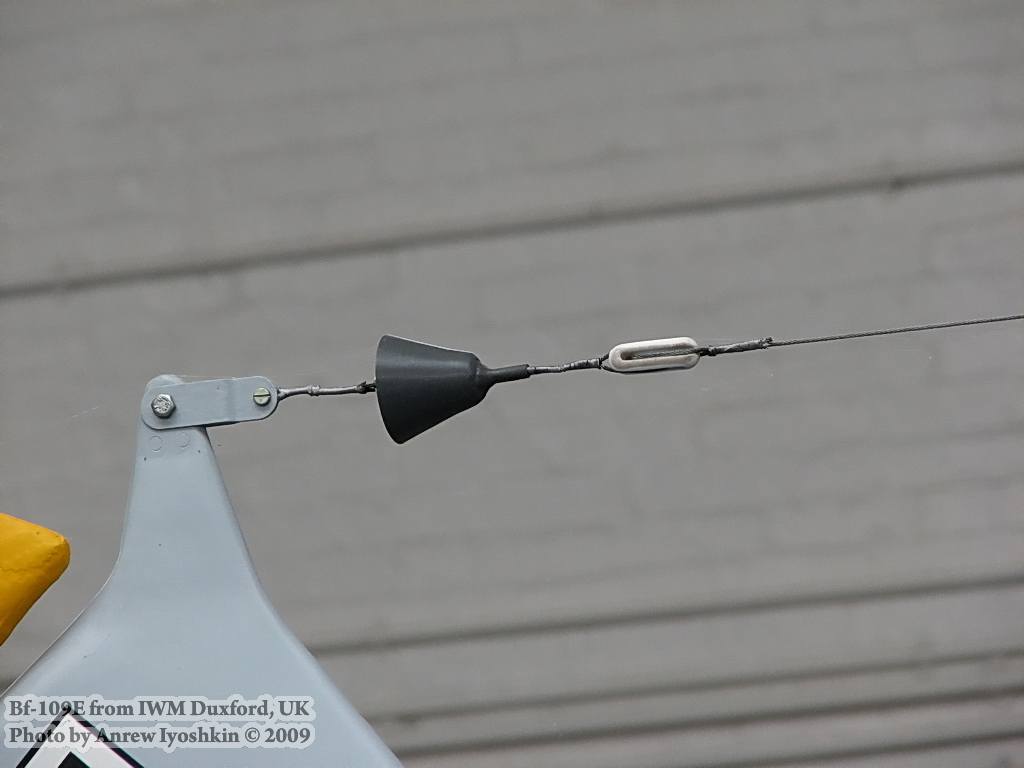
And you can see in this one that there is a white connector midway between the cockpit and tail where the wire goes down to. I've never seen this little connector before I found this photo. Maybe it's a ground. I dunno. I don't know if it is there on later models or not. Never seen it on a plastic kit, that is for certain.
I've never seen any beads for the end connectors and springs. I think most guys use some PVA glue or CA to make it look like them.
At 1/48 scale many ppl leave off the aerial entirely. I praise you going for it in 1/72. I use EZ line instead of stretched sprue.
Best Wishes,
Gaz
Here is a detail picture for the 109 aerial of the A/C at duxford. Photos for discussion only.
Here is the other end:
And you can see in this one that there is a white connector midway between the cockpit and tail where the wire goes down to. I've never seen this little connector before I found this photo. Maybe it's a ground. I dunno. I don't know if it is there on later models or not. Never seen it on a plastic kit, that is for certain.
I've never seen any beads for the end connectors and springs. I think most guys use some PVA glue or CA to make it look like them.
At 1/48 scale many ppl leave off the aerial entirely. I praise you going for it in 1/72. I use EZ line instead of stretched sprue.
Best Wishes,
Gaz

Emeritus

Joined: March 30, 2004
KitMaker: 2,845 posts
AeroScale: 1,564 posts

Posted: Tuesday, July 26, 2016 - 05:46 PM UTC
Quoted Text
Martin,
And you can see in this one that there is a white connector midway between the cockpit and tail where the wire goes down to. I've never seen this little connector before I found this photo. Maybe it's a ground. I dunno. I don't know if it is there on later models or not. Never seen it on a plastic kit, that is for certain.
The connector on the fuselage between the cockpit and tail is the hole with an insulator through which the antenna runs to the radio. (here's a cut-away drawing) On earlier variants this was around half way between cockpit and tail, and starting at G-5 it was moved back to near the tail.
Quoted Text
I've never seen any beads for the end connectors and springs. I think most guys use some PVA glue or CA to make it look like them.
At 1/48 scale many ppl leave off the aerial entirely. I praise you going for it in 1/72. I use EZ line instead of stretched sprue.
Fiddly? Yes. But definitely doable in 1:48.
 Though I have to admit I used PVA to make the insulator beads.


GazzaS
#424
Joined: April 23, 2015
KitMaker: 4,648 posts
AeroScale: 1,938 posts
Posted: Tuesday, July 26, 2016 - 11:17 PM UTC
That's a fine looking 109, Eetu!
Gaz
Gaz
Emeritus
Joined: March 30, 2004
KitMaker: 2,845 posts
AeroScale: 1,564 posts
Posted: Wednesday, July 27, 2016 - 12:42 AM UTC
Quoted Text
That's a fine looking 109, Eetu!
Gaz
Thanks!
There's a bunch more in the 109 campaign thread here (halfway down that page), if you're interested.

caireparavel
Joined: August 19, 2012
KitMaker: 41 posts
AeroScale: 5 posts
Posted: Wednesday, July 27, 2016 - 08:12 AM UTC
Thank you Gabor much appreciated. white glue bobs ! who would have thought !
caireparavel
Joined: August 19, 2012
KitMaker: 41 posts
AeroScale: 5 posts
Posted: Wednesday, July 27, 2016 - 08:16 AM UTC
Eetu, wow ! is all I can say about that incredible !
where did you get the tiny spring from ? The blotch cammo looks amazing I haven't painted mine yet. Still trying to figure out how to do the cammo did you use a brush or an airbrush ? on the side of the fuselage Thanks
where did you get the tiny spring from ? The blotch cammo looks amazing I haven't painted mine yet. Still trying to figure out how to do the cammo did you use a brush or an airbrush ? on the side of the fuselage Thanks

Jessie_C


Joined: September 03, 2009
KitMaker: 6,965 posts
AeroScale: 6,247 posts

Posted: Wednesday, July 27, 2016 - 07:30 PM UTC
Quoted Text
where did you get the tiny spring from ?
Making tiny springs is fairly easy. You need some fine fuse wire, and a piece of piano wire. Wind the fuse wire around the piano wire nice and tightly, then just slide it off the end, trim to length et voilà! One spring, made to measure

The gauge of your piano wire determines the size of the spring coils.
Luftwaffe blotches are best replicated with an airbrush, because of course they were sprayed on in 1/1 scale. You can try using a brush or a piece of makeup sponge and see what results you get using a scrap model.
Emeritus
Joined: March 30, 2004
KitMaker: 2,845 posts
AeroScale: 1,564 posts
Posted: Wednesday, July 27, 2016 - 08:30 PM UTC
Quoted Text
Quoted Textwhere did you get the tiny spring from ?
Making tiny springs is fairly easy. You need some fine fuse wire, and a piece of piano wire. Wind the fuse wire around the piano wire nice and tightly, then just slide it off the end, trim to length et voilà! One spring, made to measure
The gauge of your piano wire determines the size of the spring coils.
Luftwaffe blotches are best replicated with an airbrush, because of course they were sprayed on in 1/1 scale. You can try using a brush or a piece of makeup sponge and see what results you get using a scrap model.
That was exactly how I made the spring: thin wire wound around a drill bit, with two wire loops to make the end loops/hooks for attaching to the antenna mast and aerial wire.
The mottled camo is indeed airbrushed on my model.
 |

WEB HOSTING BY


Copyright ©2021 AeroScale and Kitmaker Network, a subsidiary of Silver Star Enterprises
All Rights Reserved. Please read our Conditions of Use and Privacy Policy.
All Rights Reserved. Please read our Conditions of Use and Privacy Policy.