_GOTOBOTTOM
World War II
Discuss WWII and the era directly before and after the war from 1935-1949.
Hosted by Rowan Baylis
Otaki P51 build
julionav
_VISITCOMMUNITY
Florida, United States
Joined: September 01, 2016
KitMaker: 75 posts
AeroScale: 69 posts
Posted: Wednesday, October 05, 2016 - 11:37 PM UTC
My first attempt at detailing and more detail oriented treatments.


This is my very primitive attempt based on many techniques I see here from more experienced modelers.


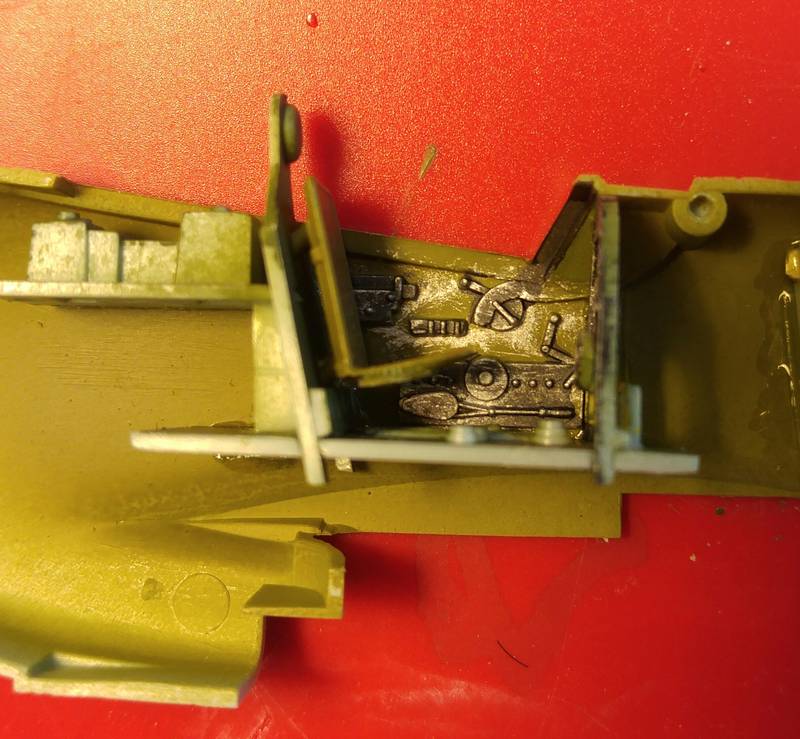
Dry brush technique. I used interior green with black and dry brush silver to highlight detail.


The engine is painted using a mixture of enamel flt black and steel mixture then highlighted with steel dry brush. I kind of like how it turned out.

I like the minimal detail of this kit. I know its an old kit but it is a great way to introduce a novice to more detail type builds.

Please share critiques. I am here to learn.

You will notice that there is no 'joy stick' it broke when I was taking off the sprue and flew to who knows where, so I just took a deep breath and plowed ahead with out it.
Jessie_C
_VISITCOMMUNITY
British Columbia, Canada
Joined: September 03, 2009
KitMaker: 6,965 posts
AeroScale: 6,247 posts
Posted: Thursday, October 06, 2016 - 12:29 AM UTC
It's easy enough to make a replacement joystick. You need a bit of copper wire and a tiny drill bit. Find the broken bits of the joystick and trip off the grip, and the fabric boot at the bottom. Very carefully drill holes into each of them, and then snip the wire to the right length. Superglue it all together and you've got yourself an unbreakable joystick
julionav
_VISITCOMMUNITY
Florida, United States
Joined: September 01, 2016
KitMaker: 75 posts
AeroScale: 69 posts
Posted: Thursday, October 06, 2016 - 12:59 AM UTC

Quoted Text

It's easy enough to make a replacement joystick. You need a bit of copper wire and a tiny drill bit. Find the broken bits of the joystick and trip off the grip, and the fabric boot at the bottom. Very carefully drill holes into each of them, and then snip the wire to the right length. Superglue it all together and you've got yourself an unbreakable joystick


My problem is that all pieces flew out into outer space, or inner space, not quite certain, but I have another 1/48 scale p-51 I might be able to cannibalize?? maybe I can reproduce it??
Scrodes
_VISITCOMMUNITY
Ontario, Canada
Joined: July 22, 2012
KitMaker: 771 posts
AeroScale: 763 posts
Posted: Thursday, October 06, 2016 - 01:23 AM UTC

Quoted Text


My problem is that all pieces flew out into outer space, or inner space, not quite certain, but I have another 1/48 scale p-51 I might be able to cannibalize?? maybe I can reproduce it??


No, save it, but copy the other control stick for size and shape.

You need to remove more paint from your brush before dry-brushing. You shouldn't really be able to see strokes. I also recommend using any colour other than silver. Silver (or other metalics) are just too harsh and you get a very unnatural contrast. Use a lightened colour of the base - i.e. for black use a gray, for the green, a gray would also work, or you could lighten the green with a few drops of yellow.

The contrast with a drybrush should be very subtle.
julionav
_VISITCOMMUNITY
Florida, United States
Joined: September 01, 2016
KitMaker: 75 posts
AeroScale: 69 posts
Posted: Thursday, October 06, 2016 - 01:55 AM UTC

Quoted Text


Quoted Text


My problem is that all pieces flew out into outer space, or inner space, not quite certain, but I have another 1/48 scale p-51 I might be able to cannibalize?? maybe I can reproduce it??


No, save it, but copy the other control stick for size and shape.

You need to remove more paint from your brush before dry-brushing. You shouldn't really be able to see strokes. I also recommend using any colour other than silver. Silver (or other metalics) are just too harsh and you get a very unnatural contrast. Use a lightened colour of the base - i.e. for black use a gray, for the green, a gray would also work, or you could lighten the green with a few drops of yellow.

The contrast with a drybrush should be very subtle.


Got it, both suggestions are greatly appreciated. I see what you mean. I do need more practice with the dry brush.

I have a Squadron F4U cockpit I want to get as close to perfect as I can. This is practice towards that. All advice is greatly appreciated.
Jessie_C
_VISITCOMMUNITY
British Columbia, Canada
Joined: September 03, 2009
KitMaker: 6,965 posts
AeroScale: 6,247 posts
Posted: Thursday, October 06, 2016 - 09:01 PM UTC

Quoted Text

My problem is that all pieces flew out into outer space, or inner space, not quite certain, but I have another 1/48 scale p-51 I might be able to cannibalize?? maybe I can reproduce it??


Okay, that's not insurmountable. Use the other kit's joystick as a pattern. Cut your wire a little longer than the pattern so you have something to glue into the floor, use a little epoxy putty to make the canvas boot at the bottom, and wrap the top with a sliver of masking tape to make the grip. Once it's painted up and in place nobody will notice the difference.
Joel_W
Staff MemberAssociate Editor
AUTOMODELER
_VISITCOMMUNITY
New York, United States
Joined: December 04, 2010
KitMaker: 11,666 posts
AeroScale: 7,410 posts
Posted: Thursday, October 06, 2016 - 11:16 PM UTC
Julio,
For dry brushing interiors all I use is a few shades of medium gray. Really wipe off the tip of the brush so that it takes a few test strokes to leave the slightest residue of paint. When dry brushing use very light broke strokes. Like I said it will take a few strokes to leave a little paint, and that's exactly what you want.

Looking at the crude instruments on the Otaki IP, with the heavy dry brushing, they look more like electrical switches. Repaint the faces white, then paint the needle Black. Dry brush the bezel the best you can.

Also paint the boxes behind the pilot's armor plate flat black, then dry bush with light Gray.

I remember building this kit more then 40 years ago. Back then the Otaki kits were cutting edge

Joel
julionav
_VISITCOMMUNITY
Florida, United States
Joined: September 01, 2016
KitMaker: 75 posts
AeroScale: 69 posts
Posted: Friday, October 07, 2016 - 03:30 PM UTC

Quoted Text


Quoted Text

My problem is that all pieces flew out into outer space, or inner space, not quite certain, but I have another 1/48 scale p-51 I might be able to cannibalize?? maybe I can reproduce it??


Okay, that's not insurmountable. Use the other kit's joystick as a pattern. Cut your wire a little longer than the pattern so you have something to glue into the floor, use a little epoxy putty to make the canvas boot at the bottom, and wrap the top with a sliver of masking tape to make the grip. Once it's painted up and in place nobody will notice the difference.


That is doable! I will try that for certain. Great idea thanks J
julionav
_VISITCOMMUNITY
Florida, United States
Joined: September 01, 2016
KitMaker: 75 posts
AeroScale: 69 posts
Posted: Friday, October 07, 2016 - 03:36 PM UTC

Quoted Text

Julio,
For dry brushing interiors all I use is a few shades of medium gray. Really wipe off the tip of the brush so that it takes a few test strokes to leave the slightest residue of paint. When dry brushing use very light broke strokes. Like I said it will take a few strokes to leave a little paint, and that's exactly what you want.

Looking at the crude instruments on the Otaki IP, with the heavy dry brushing, they look more like electrical switches. Repaint the faces white, then paint the needle Black. Dry brush the bezel the best you can.

Also paint the boxes behind the pilot's armor plate flat black, then dry bush with light Gray.

I remember building this kit more then 40 years ago. Back then the Otaki kits were cutting edge

Joel


I've already closed the fuselage on this guy but I just got the Tamiya 1/48 F4U Birdcage and the true scale cockpit and wheels. I will certainly do this Joel on that build. And I will seek more advice.

I am going to attempt the joystick solution that Jessica suggested since I can still drop it in from above.

Thanks so much!
 _GOTOTOP